An Embroidered Tote for Janome
As many of my loyal readers know, I sew on a Janome. I have been incredibly fortunate to be a part of their artists and teachers loan program for an embarrassingly, blissfully long time. THANK YOU, JANOME AMERICA (and yes, I’m shouting!) As part of this program, I gladly and happily make things which they can use, whether it is a banner for their booth (and also used in their adverts!), a project used online, asking to teach in Janome classrooms at big shows, you name it. This season, I have been using a (gasp, gulp!) top of the line 15000 embroidery and quilting machine. Links for a free tutorial on this caddy are at the end of this post.
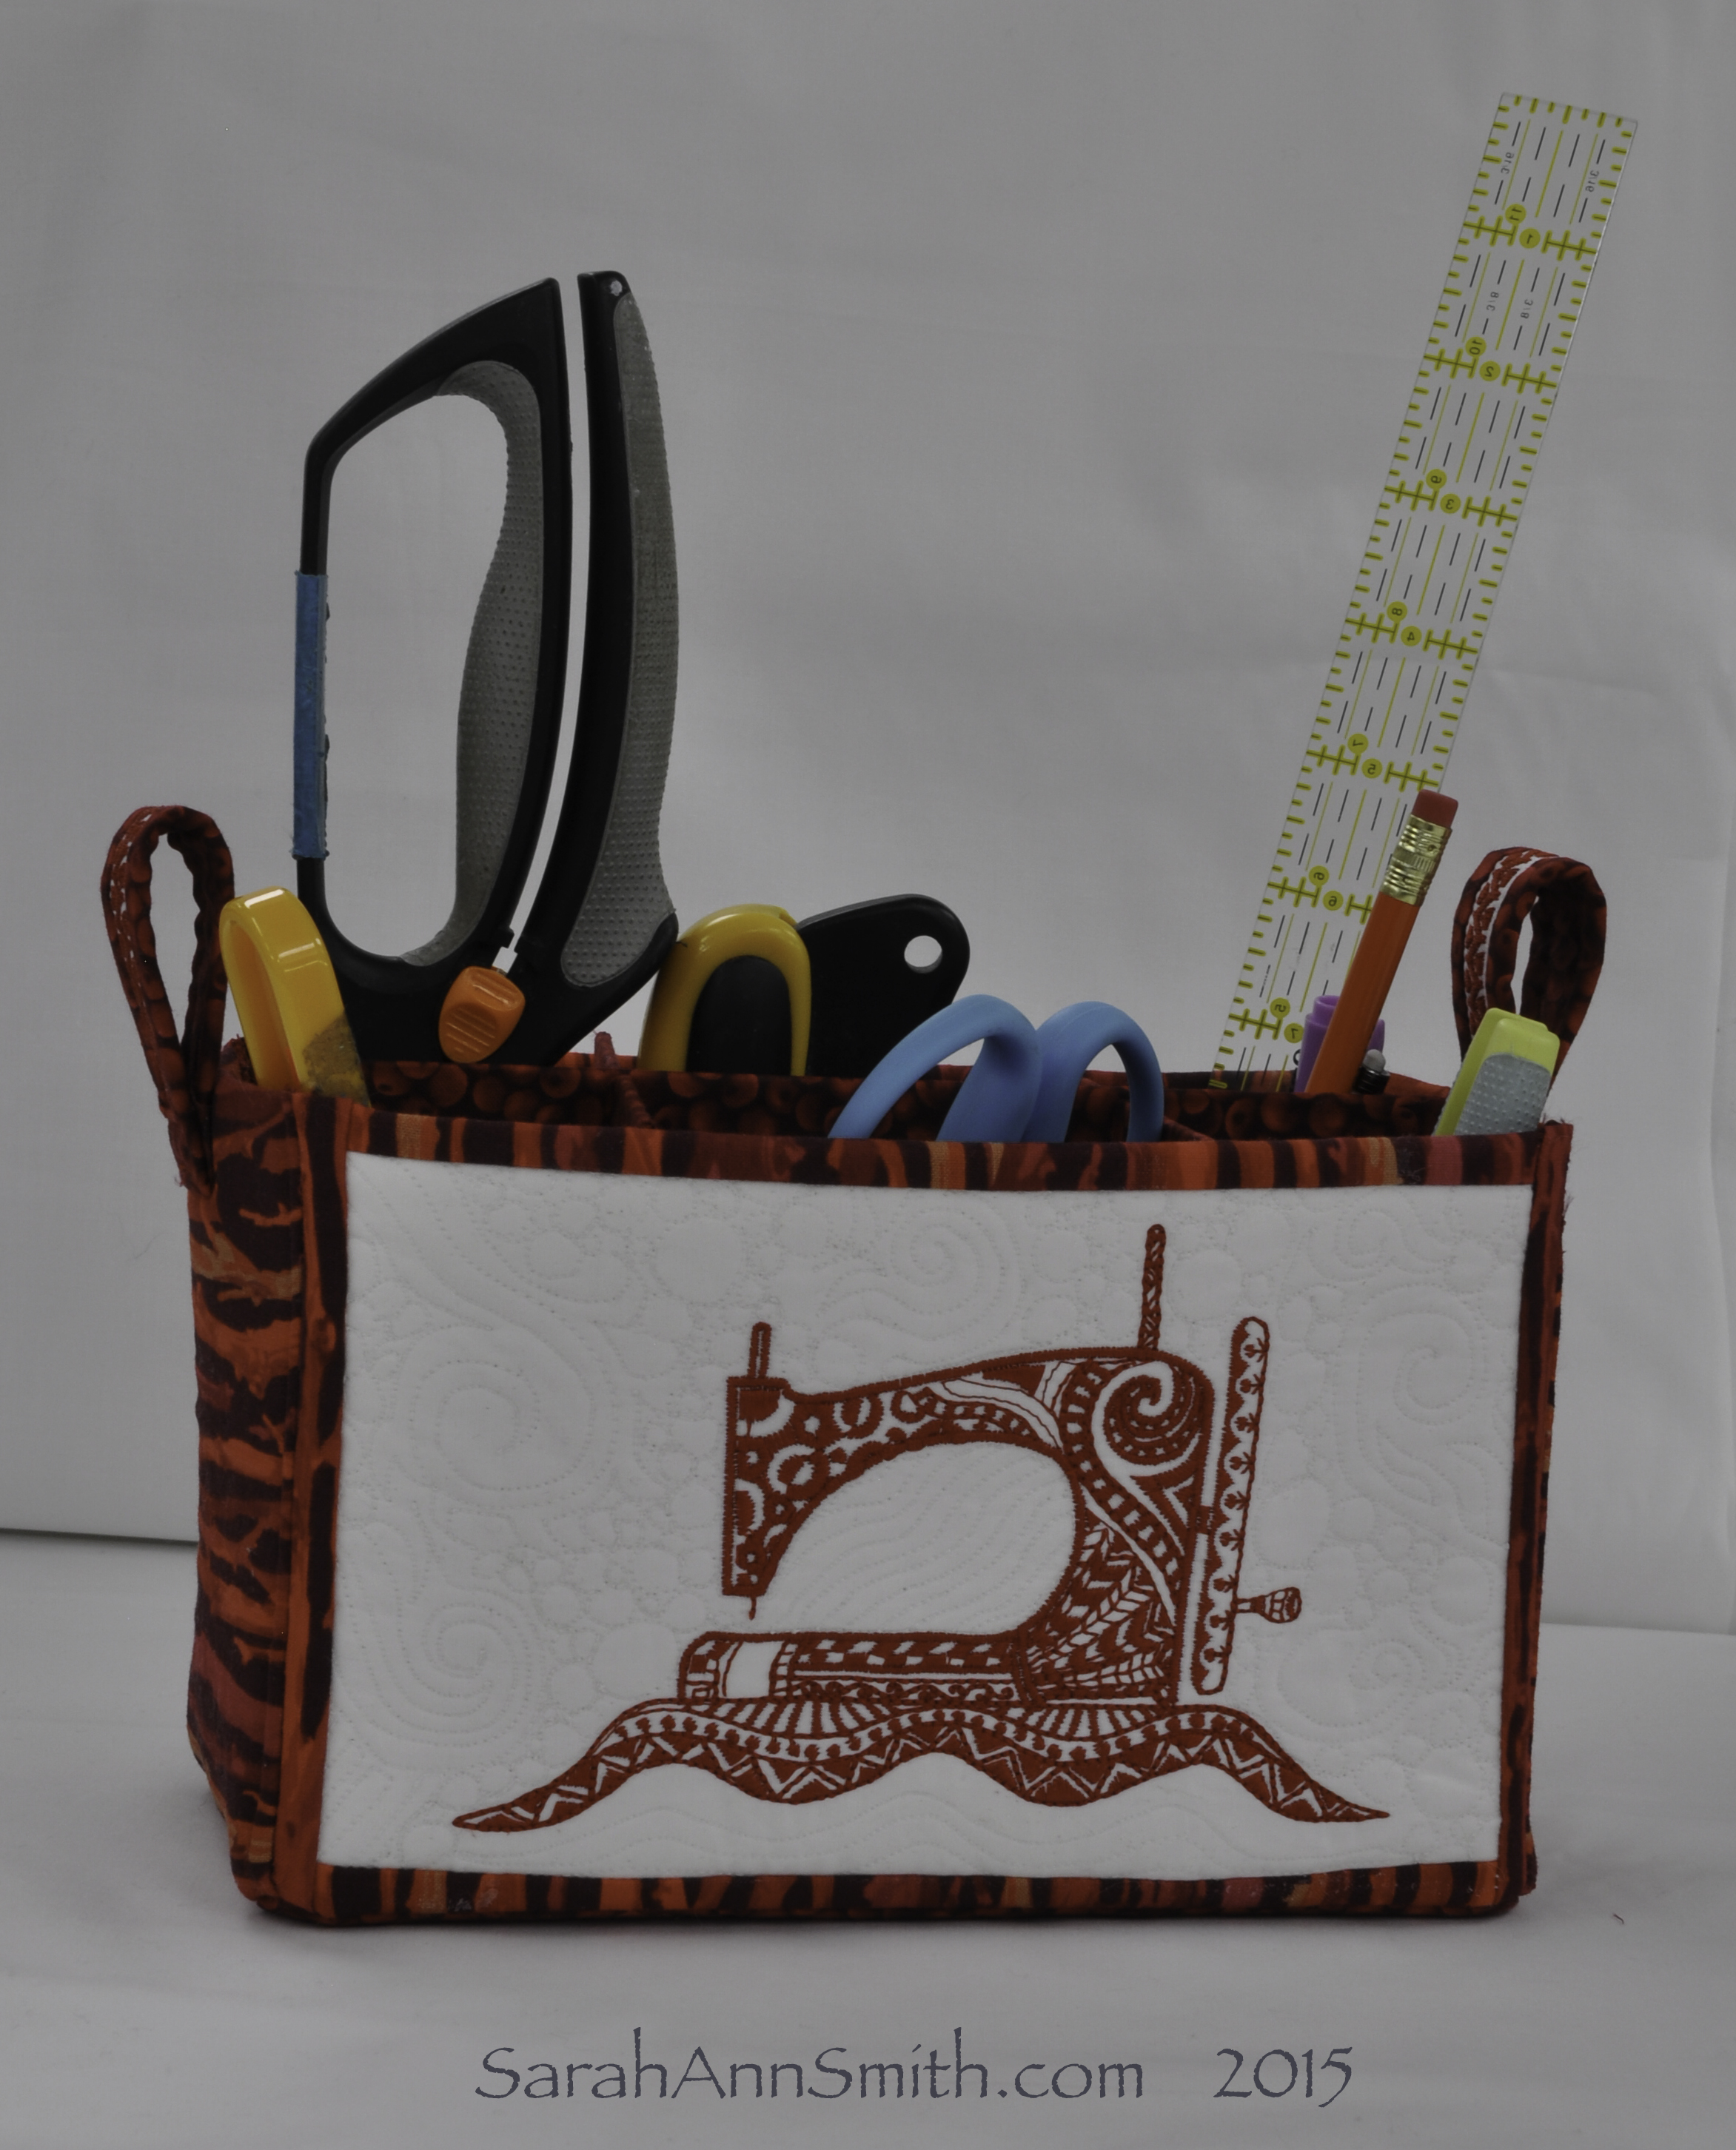
Embroidered Caddy for Janome America. The sewing machine is a built-in design on the top of the line Janome 15000. Right Click to see larger. Thanks to Jean S. I know now this design was created by Jill Buckley, who has fun stuff on her blog here. Nice to meet you Jill!
Embroidery you say? Well, I never would have thought that *I* would fall in love with machine embroidery–the pre-programmed kind, but I have. I’ve got a project for fall that will be awesome using one of Lonni Rossi’s designs built into the machine. But for spring, I have made that lovely little tote! It is 4×8 inches (footprint), 5 inches tall. I used two embroidery designs that are included on the machine along with the initials that are one of several included alphabets (see photo below for the other side).
One of the things that most surprised me is how easy the interface is with the software. I’m not very patient with that sort of computer-ish stuff (and after all, these machines are really computers that sew). This was SO EASY to size, position, all of it. Even *I* could do it using the manual–no classes needed! And utterly cool: there is an iPad app that allows you to do stuff elsewhere in the house. With the iPad and your 15000 sharing your wifi network, you can view the progress of the stitch-out so you know if you need to go to your sewing machine and change thread colors or insert a full bobbin. Totally cool!
FREE TUTORIAL!
Best of all, this project has just been featured on Janome’s blog where you can find a link to free instructions! Today you can see my project here as a featured project. Scroll down their blog to April 1 for a blogpost on it. Or go straight to the project, here. At the bottom of that post is a link to download a PDF of my full instructions.
Here’s a view of the other side and the end:
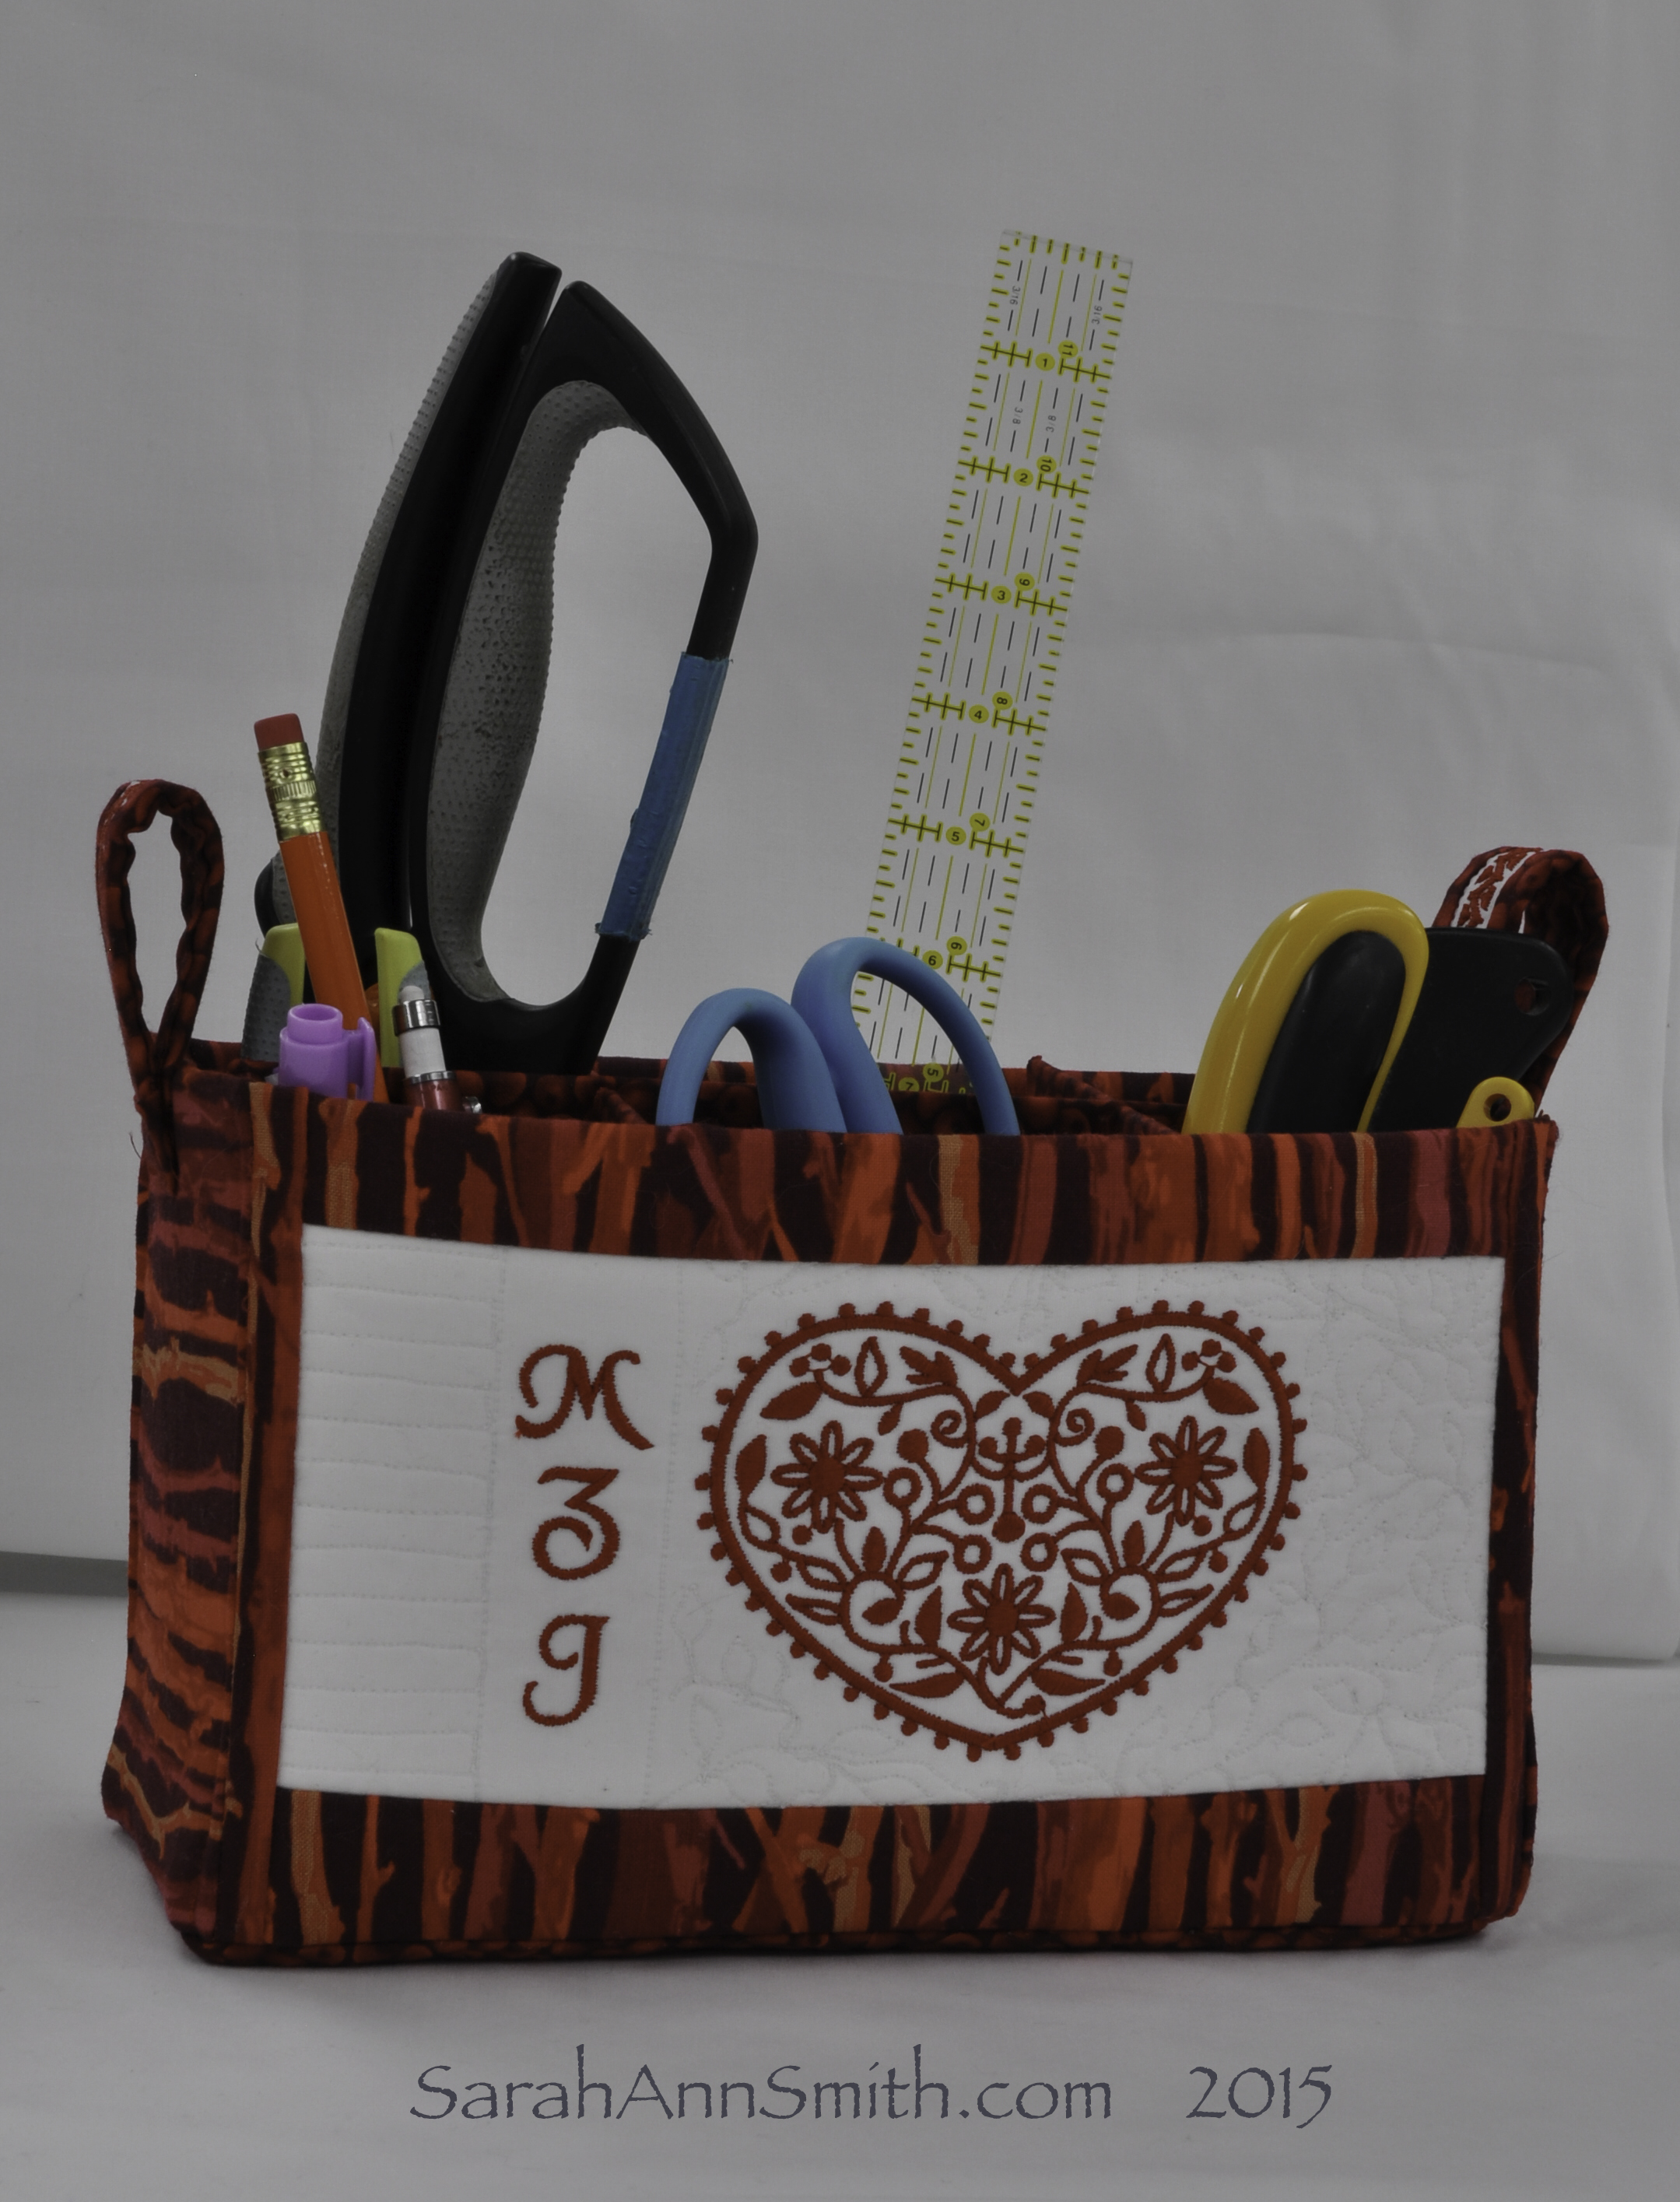
Side two: the Heart is also an included design, the font is called “Galant” and is also included on the machine. It was surprisingly easy to create the design on the machine. And if you happen to be my BFF living on SJI with the initials MZJ, yep–this is a sneak peek at part of your birthday present! Red is the theme this year…..Right click to see larger.
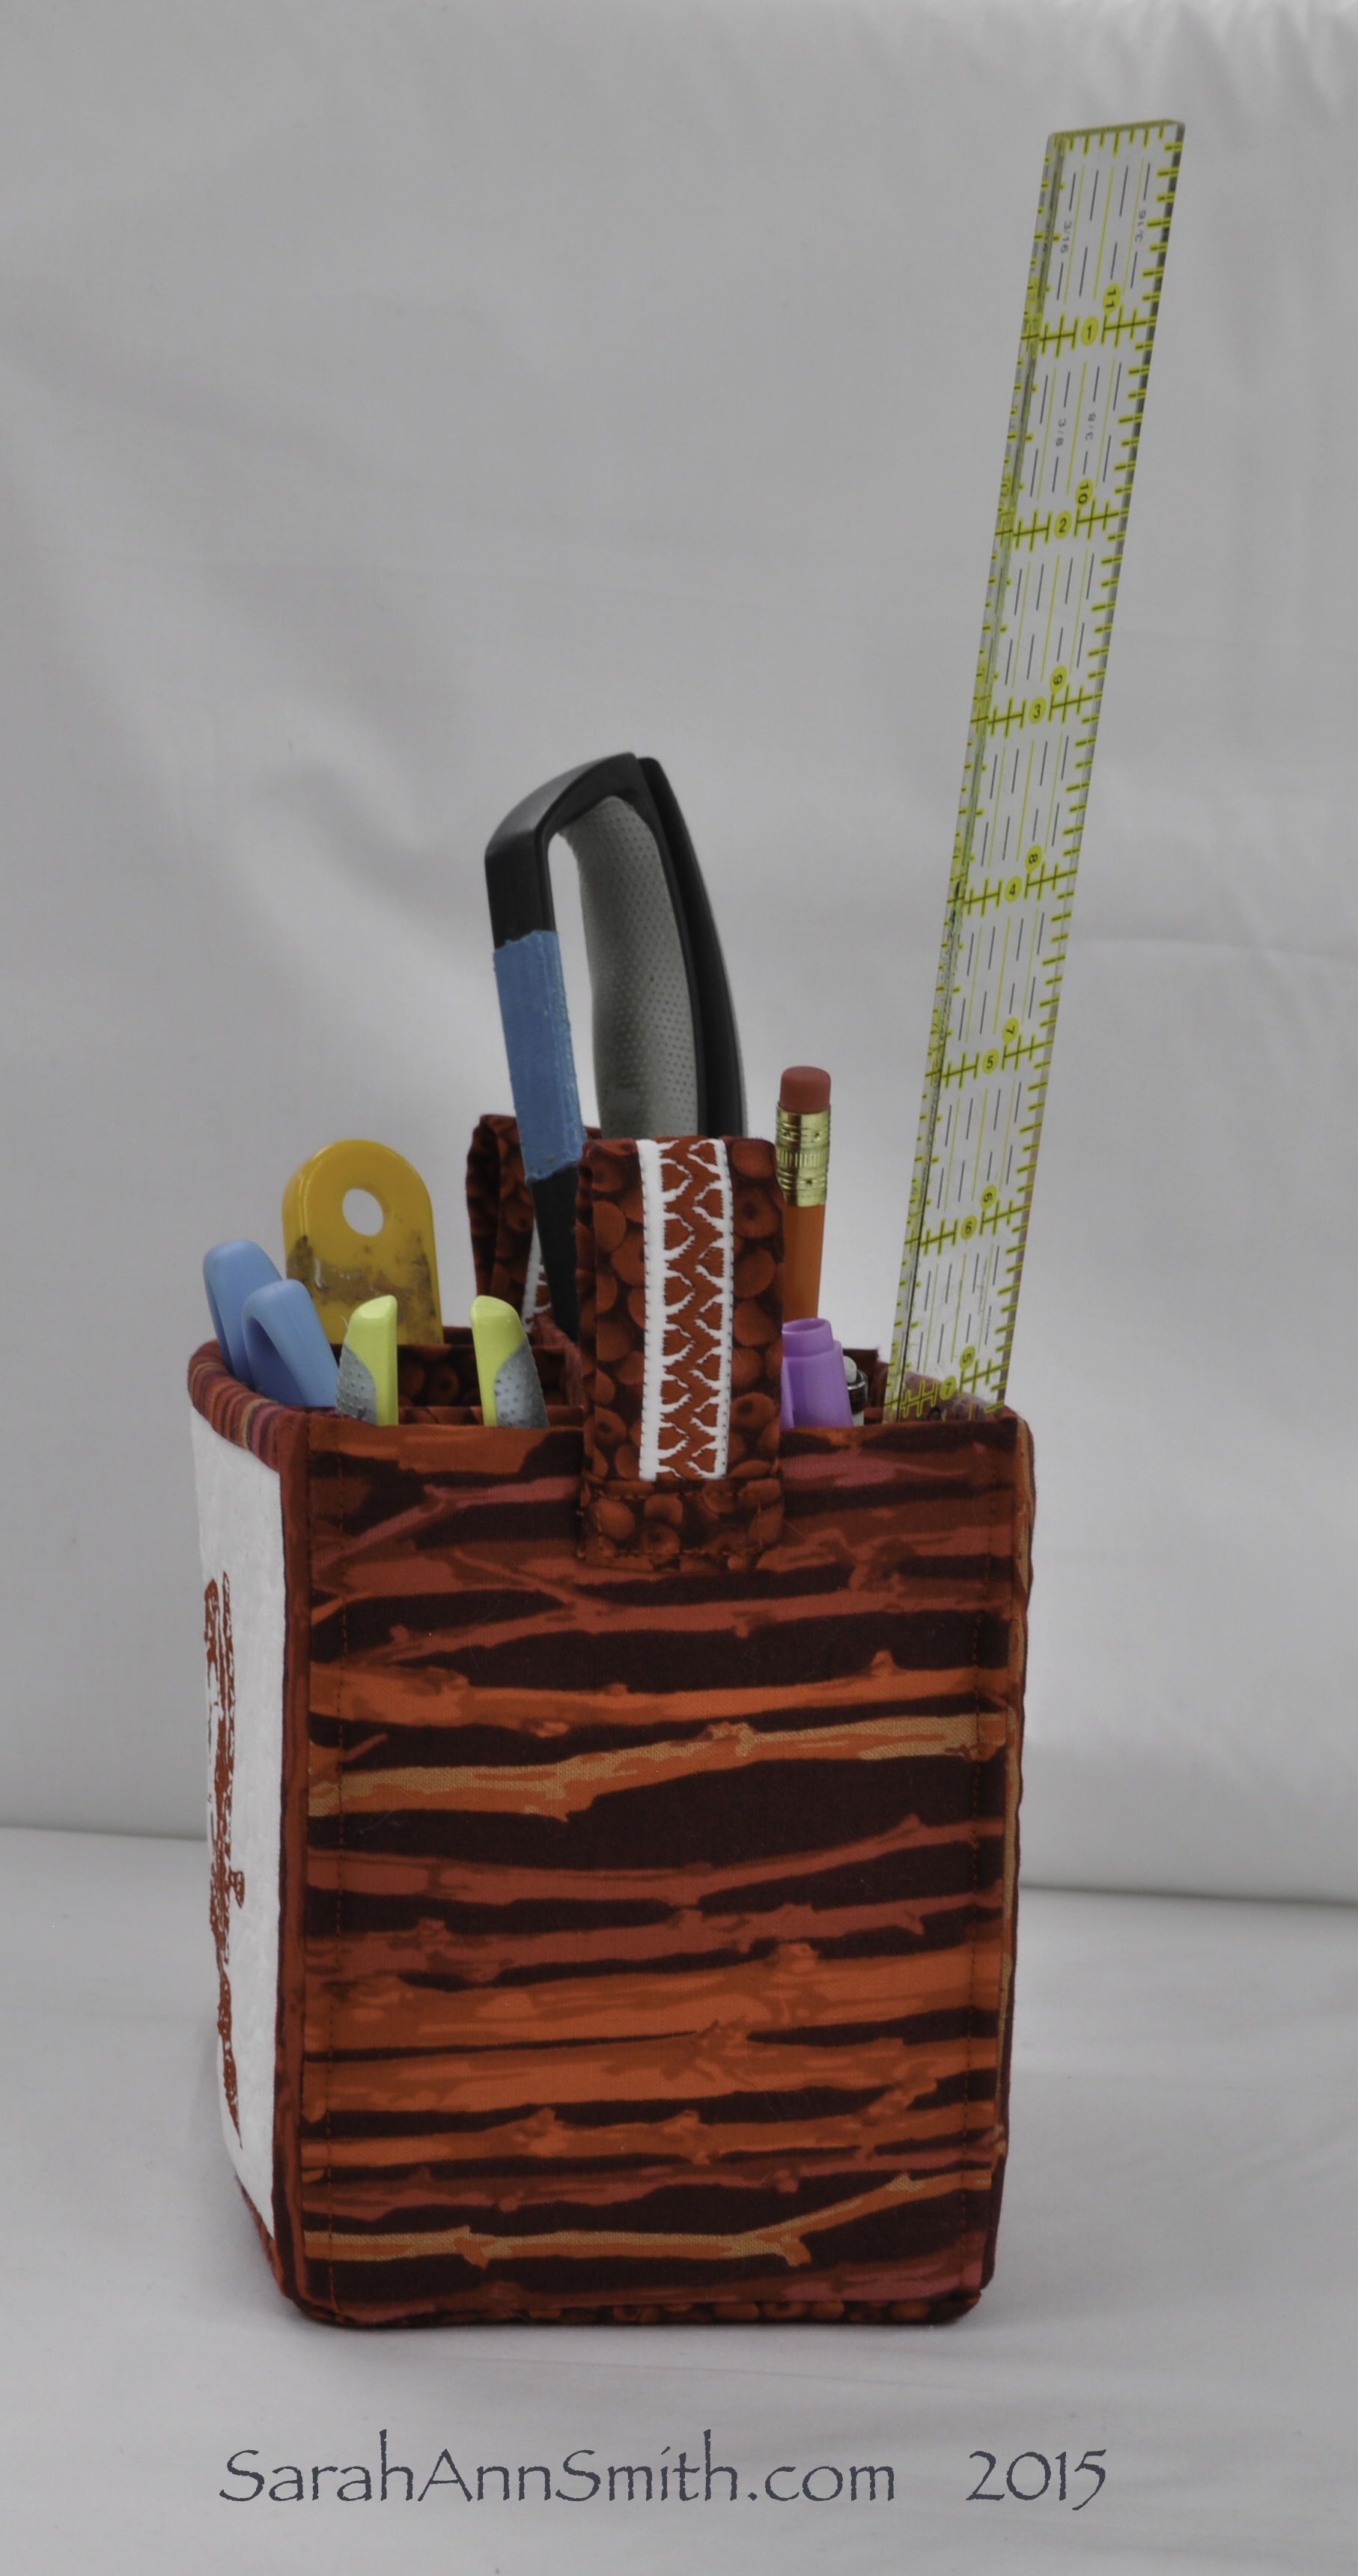
End view of the caddy. I used one of the built-in decorative stitches on the handle.
Thank you again, Janome, for years of support. Your fabulous machines make it possible for me to do what I do!
April 3rd, 2015 at 12:23 pm
The sewing machine design was created by Jill Buckley (Quilt Rat blog) for Janome.
April 3rd, 2015 at 12:28 pm
Thank you for adding that Jean! I didn’t know…I will go check out her blog.
April 3rd, 2015 at 3:28 pm
Hi Sarah, sorry to go to an almost unrelated question…but I have been looking for stick-like fabric for ages. Do you have any details for the main fabric you used?
Thanks,
Sandy in the UK
April 7th, 2015 at 4:55 pm
I got a Janome 15000 about a month ago. I haven’t done anything on it yet because, well, life happens! We went to the Caymans. I had my gall bladder yanked out, and on and on and on.
I know nothing about embroidery machines but the dealer did come out recently and go over the machine with hubby and I. It seems to be quite user friendly. Things seem to be calming down a bit and I’m anxious to start creating something!
Have an excellent day,
D~~~~
April 19th, 2015 at 8:20 am
Martha Ginn suggested that I talk to you about my new Janome 8900 machine. I have had a little bit of trouble with my machine, but there is also a lot I like about it. My problem…I took a miniature quilt class last weekend, and was told to use the 1/4 inch stitch with the single hole stitch plate. I had already had trouble with the “pre-set” 1/4 inch stitch not coming from the factory with a true quarter inch stitch, and had it accurately reset. When I went to use the single hole plate with the 1/4 inch “button”, the needle does not go through the hole. Why would Janome design a machine that you cannot use the preset 1/4 inch stitch with the single hole plate? Am I missing something? Every quilter uses the 1/4 inch stitch and wishes for a single hole plate. I am so dissatisfied with this design that I’m thinking of changing brands. Can you set me straight?
May 2nd, 2015 at 9:10 am
Jacquie, I have been on the road for weeks and was having trouble getting an email sent out to you directly, so not sure if you received it. I understand your frustration, but want to explain why this happens on ALL brands.
To get a perfect 1/4″ seam, you need to account for the thickness of the thread and the thickness of the cloth, since some of the cloth is “used up” in the turn (when pressing). If you stitch two squares of 2 inch lightweight cotton lawn, cotton batik, and cotton flannel with the same setting (a default 1/4″ for example), then press the seam to the side as one would for piecing a quilt, the cotton lawn will be the widest, the flannel the narrowest. That is because the flannel is thick and it takes up more of the flannel to fold back on itself. To get a seam allowance that would yield a section that measure a perfect 3 1/2 inch across after that seam is pieced, you’d have to use a larger seam allowance with the lightweight cotton lawn and a narrower seam allowance with the flannel.
Then there is the straight stitch plate and quarter inch seams. With our fancy new machines that stitch wide stitches, on the Janomes up to 9mm apart (that’s nearly a half inch across), the feed dogs must be farther apart to permit the needle to swing that wide on the decorative stitches. That means when it comes to pieceing you have two choices:
1. Leave the needle in the center with the straight stitch plate on, but then have the pieces feed ONLY with the left-side feed dog (because the quarter inch seam allowance won’t extend fully onto the right hand feed dogs)
or
2. Use the quarter inch foot, move the needle to your own personal perfect quarter inch (based on the thickness of your fabric and thread), and have the pieces feed over BOTH feed dogs so that it feeds straight and even.
Basically, you can’t have it both ways IF you have a machine, such as the 8900, that also makes wide decorative stitches. If you want a perfect straight stitch, to be blunt, the old Singer Featherweight 221 has always had the best straight stitch ever. That is because that is the ONLY thing that machine does–any straight-stitch-only machine will be the same. Why? Because the needle bar never moves. It goes up and down only.
That means you can either get used to the Janome 8900’s (and any other fancy machine’s) requirements for getting a perfect-for-you quarter inch, OR have a second machine for simple piecing. Frankly, I adore my 1934 Featherweight. I don’t actually use it much, since I almost never piece. And when I DO piece, I use my wonderful Janome because I understand what it is I need to do to make an accurate seam.
I hope explaining this helps–there is nothing wrong with your machine! It just needs for you to learn how to adjust the settings so that they yield the perfect result for you.
Hope this helps!