email Youtube

Home
Galleries
Blog
Workshops & Calendar
Store
Resources
About
Contact

Design! A Lively Guide to Design Basics for Artists and Craftspeople

February 24th, 2007

For today’s post, I thought I’d review Design! A Lively Guide to Design Basics for Artists and Craftspeople by Steven Aimone (If you click on the title, it will take you to the listing for the hardback at Amazon; I notice that it is due out in April in paperback, but the cost difference –$4– is so little, go for the hardback!).

The thing I like most about this book is that Aimone goes beyond traditional art media (oils, acrylics, watercolors and sculpture) to look at design EVERYwhere: the endpapers have a photo of a stovetop! Items used to illustrate various design principles include: paintings, sculpture, masks, jewelry, hair, olive oil can, chairs and flowers, baskets, mud huts, quilts, advertisements, toiletries, architecture, the Apple iMac, photographs (including one of a decorated camel), even food!

I can’t decide if this is supposed to be a textbook or a coffee table book: the production values are so good that it is eye-candy as well as informative. I have long said good sewing is good sewing, whether you are making a garment, a quilt, or household items. Similarly, good design is just that: good design. It doesn’t matter if it is a painting, a quilt, a landscape, an interior, a building. The basic principles of design apply across all media.

The book covers:

  • Introduction
  • 1. The Purposes of Design
  • 2. The Design Process
  • 3. Visual Elements
  • 4. The Design Space
  • 5. Repetition of Motif
  • 6. Rhythm
  • 7. Symmetrical Arrangements
  • 8. Asymmetrical Arrangements
  • 9. Focal Emphasis
  • 10. Underlying Shapes
  • 11. Critique
  • Glossary of Design Terms
  • Artist Index
  • Index

Many quilters are intimidated by terminology from the art world, but (pet peeve / soapbox moment coming) it is just words! Just as we learned what Log Cabin, fat quarter, scant quarter inch and Baltimore Album mean, we can learn color vocabulary: complementary, analogous, tint/shade/tone, and we can learn art vocabulary: focal point, rhythm, harmony, line and more. It’s just words, we’re all smart, so we can learn to use the art terminology and better understand our own art form.

I loved Aimone’s straightforward description in the introduction: Simply put, design is the arrangement of visual elements in a space. (p. 10) And the illustrations for that page are a quilt and an oil painting by Piet Mondrian!

Unlike many traditional design books, Aimone also talks about texture: actual and imaginary, as pattern, as weight and emphasis, and as subject. Pages 54-55 are part of that discussion:

If you’re interested in learning more about why some designs work, some don’t, how to create better compositions, and how to troubleshoot your own pieces, this is a fantastic book that really gets you to thinking beyond the quilt world. And, it gives you exercises to try to help implement what you’ve just learned.

Highly recommended!

Publishing information:

Aimone, Steven. Design! A Lively Guide to Design Basics for Artists and Craftspeople. 2004 Lark Books, New York. ISBN 1-57990-349-5 (hard cover).

Reverse Auction for Cancer Research

February 21st, 2007

Fiberart For A Cause, fundraising for the American Cancer Society, is back
in action with the 2007 Invitational Reverse Auction.

http://www.virginiaspiegel.com/NewFiles/ACS/ReverseAuction2007.html

Featuring fiber art donated by Jane Davila, Jamie Fingal, Mary Beth Frezon,
Lynn Krawczyk, Heidi Miracle-McMahill, Carol Moore, Scott Murkin,
Cynthia St. Charles, Sarah Ann Smith and Elin Waterston, the Reverse Auction
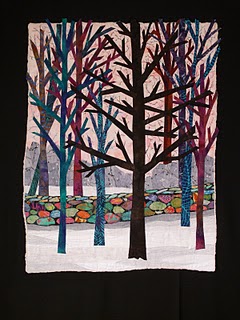
runs March 12-16. The quilt above is my donation to the cause. Surf in to the link above to see all the fabulous pieces!

Artwork begins at a fixed price and is reduced by a fixed percentage each
day. Wait too long and the artwork you want will be gone. 100% of the
proceeds are donated to the American Cancer Society.

Blatant bragging…

February 19th, 2007

Mom alert: blatant bragging about number one son, Joshua!

Saturday was the first wrestling meet of the year. Last year, Joshua’s first year wrestling, was a bit rocky, but ended on a good note. Middle school kids in grades 6 to 8 wrestle each other based on weight class. This year started off with a resounding BANG on Saturday:

*Three matches.
*Three pins (that’s the best..an instant win when you pin your opponents shoulders to the mat for a length of time)
*Three pins all in the first round (of three) of the match.
*Total points scored against Joshua in all three matches: Zero!

Way to go sport!

What to do with those scraps, the little ones!

February 17th, 2007

On one of my e-lists, someone asked (hi Janice in WNY!) how to deal with small scraps. Well, I’ve got a good one that works well for me. Do you do fusible applique? If so, this is what I do–this of this as a mini-tutorial. If not, omit the adding fusible part. First, I fuse up the scraps.

FUSING:
Set out a “chunk” or length of fusible web on your ironing surface. I prefer Misty Fuse or Wonder Under, with the “business” (fusible) side facing UP. (If using Misty Fuse you’ll need to lay down parchment paper or a non-stick applique press sheet first, then put the Misty Fuse on top.)

Lay your scraps out wrong side down on the fusible, fitting the odd shapes together like a jigsaw puzzle.

Lay a non-stick applique press sheet or parchment paper (Reynolds brand seems to work best—the “organic” / “green” varieties don’t seem to have as much release coating on them and can stick) on top.

Iron.

Carefully pull the scraps apart.

Or, if I want to create “yardage” I’ll cut a few lengths off fabric in the stash cupboard and fuse them up

NOW…SORT AND STACK

Get a stack of small boxes. I use Clementines boxes (mandarin oranges of a sort), but shoe boxes, boot boxes, Amazon boxes or even nice Rubbermaid would work. Sort the scraps by color family. Here’s some of the contents of the “warms” box:

I keep my stack of Clementine boxes in Eli’s walker-wagon from when he was a toddler (please tip head sideways…photo shows vertical in iPhoto, but loads sideways…sorry!). Since the Clementine boxes have these little “pokey up” posts on the corners, I can stack them criss cross in a neat (well…sorta) tower by my work table.

Currently I have:

Earth-black-white (this includes everything from snow to sand to rock to dirt to black)
Greens
Blues and purples
Yellows, oranges and reds
“Fancy stuff” (this includes sheers, silks, sparkly nonsense, tulle, etc)

When I want to put together a postcard, or am working on a project with fusible, then I have a stash with a wide array of colors. Sometimes I even cut a chunk of fabric (instead of using just scraps) maybe 9×12 or 7×14, and fuse that up and add it to the boxes. Here’s a small project in its early stages. I’ve set out the boxes in an arc around my groady cut-n-press (it was SO decrepit I fused some ironing board cloth to the top!):

Cheers, Sarah

Bacon, Cheddar and Scallion Scones

February 15th, 2007

Hi! I got a request for the recipe from Diane Keagy (your comment came through as “no reply” Diane, so couldn’t write you directly to let you know this was coming), so I thought I’d give you what I did, and then what I’d do differently next time. My recipe is a variation on a recipe in the King Arthur Flour 200th Anniversary Cookbook. I LOVE the catalog and the cookbook, too, because they explain the “how” and “why” so you can make your own variations.

2 cups unbleached white flour
1 cup whole wheat flour
1 Tablespoon baking powder
1/2 teaspoon baking soda
1 teaspoon salt
3 Tablespoons sugar
6 Tablespoons butter at room temp.
1 cup buttermilk (except I didn’t have any so I made this mix as a substitution:
-about 3/4 c. milk
-1 Tbsp. vinegar
–combine and allow to sit 5 min, add
-1 egg and
-enough sour cream to make 1 cup liquid)
about 4-5 ounces sharp cheddar, grated
1/2 tsp. dry / prepared mustard (the powder, not the spreadable kind)
5 slices bacon, cooked crisp and chopped / crumbled
1 scallion (spring onions) snipped into bits

Preheat oven to 450 degrees. Sprinkle a dusting of flour on a baking sheet.

–Blend dry ingredients in a bowl.
–Cut butter into smaller bits, drop into bowl and toss with the dry ingredients.
–Use fingers to quickly rub in the butter.
–Add bacon, scallion (I use scissors and just slice mine over the bowl) and most of the cheese to the dry ingredients and toss/mix.
–Make a well in the center of the dry ingredients and pour in the liquids.
–Mix quickly with a fork or bowl scraper.
–Dust counter with flour; turn out dough onto flour and knead about 10 times, until it holds together.
–Form dough into a round about 1 inch thick. Cut into 8 wedges.
–Transfer wedges to flour-dusted baking sheet.
–sprinkle remaining cheese on top
–bake 10-15 minutes, until golden brown

OK… the recipe called for fresh buttermilk, which didn’t have. So I used their “wet ingredients” substitutions instead. But instead of using a cup of milk plus 1 Tbsp. vinegar (to “clabber” or curdle it), I also wanted to add the egg to make the scones nice and rich. We also had some leftover sour cream. If you use all sour cream or yogurt, though, the resulting mix is very dry! I think next time I’ll try 1/2 cup milk, 1 egg, a scant Tbsp. of vinegar, and enough yogurt or sour cream to add some tang.

Also, I think next time I’ll use only 1/2 cup whole wheat, and 2 1/2 cups white. I LOVE whole wheat breads: nice and hearty! But years ago we used to shop at a wonderful “organic” / wholesome grocery store called Fresh Fields. I tried everything in the dessert and baking case. I decided then that there IS a place in the world for refined sugar and flour: it is called dessert! I’ve expanded that to include light and airy dinner rolls, sourdoughs (some, some can also be wholewheat), and rich scones (I love all-white-flour scones made with dried cranberries instead of raisins and add the zest of two lemons or one orange…serve piping hot with homemade marmalade and hot tea–heaven!).

Next, quilty content! My fusible scrap jigsaw and chunks…..