email Youtube

Home
Galleries
Blog
Workshops & Calendar
Store
Resources
About
Contact

Notebook Cover Tutorial!

December 10th, 2006

Notebook Cover, 5×8 Notepads

By Sarah Ann Smith © 2006

This cover will fit “mini” legal pad sized notebooks which are approximately 5 by 8 inches.

Supplies Required:

¨ Sewing Machine

¨ ¼” Seam foot (optional)

¨ Free-motion quilting foot (optional, if project will be quilted)

¨ Rotary cutting supplies

¨ The U.S.S.— the Usual Sewing Supplies: scissors, thread, pins, marking tools, etc.

Fabric and notions needed:

Because I like to mix and match my fabrics for this project, I have given finished dimensions for your total cover. You may wish to use three fabrics, one, or many….let your imagination run wild! If you want to, you could even piece blocks, strips or squares of fabric to make a decorative front panel.

¨ Batting: optional, only if quilting. 6 ½ x 17 inches.

¨ Sewing and quilting threads.

¨ Embellishments (optional): embroidery floss, beads, paint, sequins, you name it!

¨ 5×8 piece of posterboard, cereal boxes or something stiff to give body to the inside front cover

Measurements:

The image above is clickable to make it larger (and more easily read….blogger wouldn’t upload the graphics from the word document). If you have trouble seeing what’s on here and want the pattern, just e-mail me and please include your e-mail address in the text of the message—the new blogger stuff is making replying to posts almost impossible. I’ll send you the pattern in an attached word document file by e-mail.

Assemble your outside cover. As you can see from the three examples given, you can:

¨ piece mini-blocks set on point (the loon block from my Loon-y About Maine pattern),


¨ appliqué (the free-motion embroidered nautilus which was done on painted fabric, set on point onto frayed-edge accent square, set onto the center panel

¨ embroider a piece of art cloth with variegated embroidery floss and add beads (Deborah’s cover)

¨

and a zillion more ideas.

Keep in mind the 17 inch area which will be your cover when piecing or decorating your cover so that you don’t end up with a special part inadvertently rolling to the inside or over the top (unless, of course, that is where you want the special bit to be!).

Press ½” of each end to the wrong side and stitch.

IF Quilting: layer your 6 ½ x 17 inch piece of batting under the front and back outside portion. You do not need to have a backing fabric unless you want one, because this area will eventually be inside the book cover. However, if you don’t use a backing fabric (I didn’t) you may end up with a bit more lint inside your bobbin area which will need cleaning.

Quilt as desired…in my case, that always means a lot of quilting !

Or not…Deborah’s notebook cover is wonderful, and has only a little bit of batting inside the front cover to stabilize and pad the embroidery.

Fold the cover right sides together as follows. You may wish to wrap the cover around your notebook (right side out) and determine exactly where you want the three fold points to be: front bottom, top / spine, and back bottom folds.

Sew your side seams. Start with a ¼” seam allowance. Turn right side out and test the fit of the notebook cover. If this is too roomy, make the seam allowances wider and, if necessary, trim.

Turn right side out and press edges for a crisp finish. Use a blunt knitting needle or point turner to tease out the corner points.

Slide a piece of something stiff inside the front cover to make it easy to flip open and not-floppy. I used two pieces of cereal box carton, but posterboard or the back of a used-up notepad work well.

Slide your notebook into the back cover and use with pleasure! Celebrate with just a smidgen of chocolate!

This pattern will become part of a for-sale pattern sometime next year (I hope), so it will remain up on the blog until Epiphany, January 6th, at which point it will vanish. You are free to download a copy for your personal use at any time it is on the blog. Thanks for respecting my copyright and feeble attempts to earn a bit of a living from quilting…what a wonderful thing to be able to do!


Hello!

December 9th, 2006

Well bummers! Today is my local guild chapter meeting, and the fun holiday potluck too and instead I’m home getting over a bout of the stomach flu. Eli came down sick at 5 a.m. Wednesday. He stayed home all day and the next. The next night, Thursday, at 11:30 or so, Joshua came down sick. I got up with him every hour or so until about 3 a.m…. he kept getting sick but by then I was too and couldn’t make it downstairs. So I basically spent from 10 pm Thursday until 9 am Saturday in bed. YUCK. Bed is boring.

I’ll be back soon, and hope to have that tutorial on making a notebook cover. I just have to feel like sitting up long enough to write it!

Oh…and I switched the blog over to the “new” allegedly improved Blogger version. Well, now, I can’t reply to folks whom I have been able to answer previously like Sioux and Elle. When I replied to their e-mails, it would go to them directly. Now, it goes to “no reply at Blogger.” Sigh. So I’m not being anti-social folks, I just don’t have you in my personal address book, and now Blogger won’t let me answer you.

Maybe in late spring I’m going to re-vamp my website a bit, and will migrate the blog to my website. THEN, I won’t allow anonymous comments and I should be able to be courteous and respond to all of you. Back soon (I hope!).

Our first gingerbread house

December 6th, 2006

Well we had fun and work over the weekend, and at last things have let up a little (I’ve been making Christmas gifties) and I can post about our first EVER Gingerbread House …. that’s maybe not so surprising for Eli (8) and JOshua (13), but I’m nearly 50 and it’s my first, too!

What I learned is that it takes a LOT of time, and not as much candy (phew!) as I thought. On Saturday we made the gingerbread from a recipe in Joy of Cooking Christmas Cookies (hotlink is to the book on Amazon), and decided to make life easy and use their pattern for my first house instead of making up a design from scratch (what a concept!).

I loved the way the batter looked so glossy and swirly when I mixed the molasses into the mixture:

Then, the batter had to “rest” in a cool spot (our garage) for 2+ hours. It ended up being more like 6, which was fine according to the recipe. Rolling it out and cutting the pieces took a lot longer than I expected…about an hour!

It definitely helped to roll it out, as suggested, on parchment paper that you can cut and just slide the piece onto the cookie sheet….that batter gets really sticky, even the “construction” grade (versus cookie / eating mixture, which has less flour).

I used (of course I did…I’m a quilter!) my 9 1/2 inch squzre Creative Grids Rotary cutting ruler to measure out the pieces! I just dusted a little flour on top of the gingerbread before placing the ruler, scored the lines to match the pattern, and then sliced away.

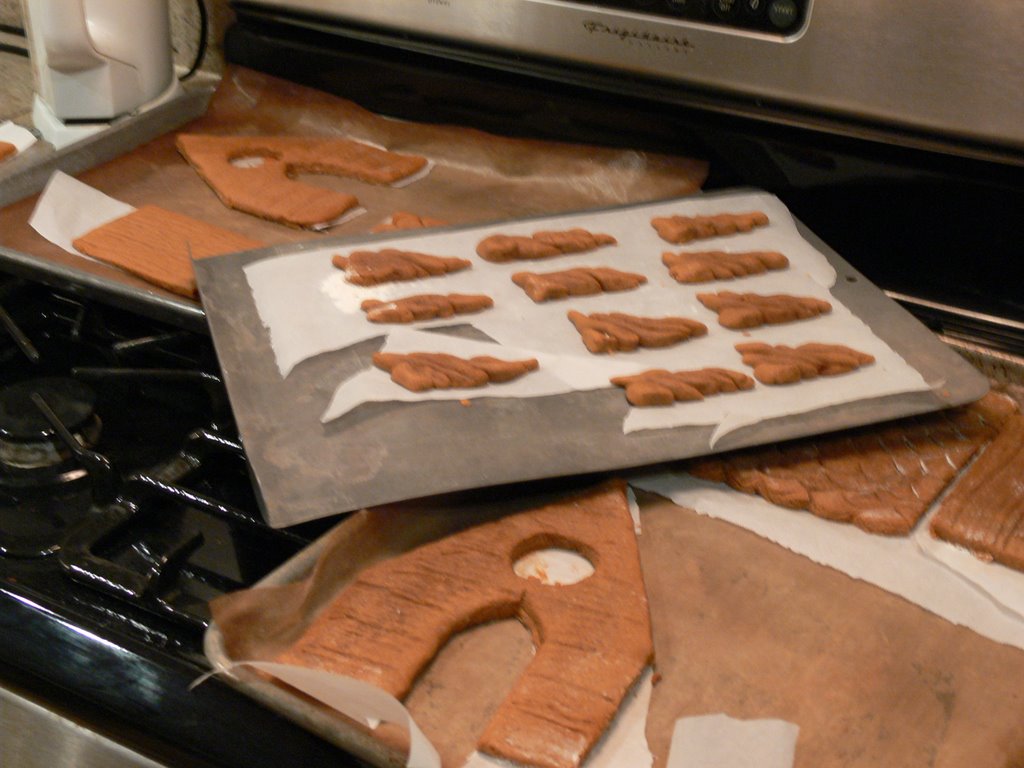
Here are the pieces having just come out of the oven:

I tried to make trees and an outhouse out of the leftovers. So-so for an effort. Then on Sunday (the next day) we had to “glue” the house together with frosting and wait at least an hour for it to “set up” and be solid. THEN we finally got to decorate.

At the grocery, when I returned several bags of not-needed candies, the manager had a great idea which I wished I had known: cut your pieces the size of a pint container and “glue” them with frosting to the container…helps support the gingerbread from the inside. Even making a cardboard “house” frame first, and taping it together, would really have made things a lot easier. Save that idea for next year. Anyway, I ended up making two trees, and got too tired and just pitched the outhouse parts.

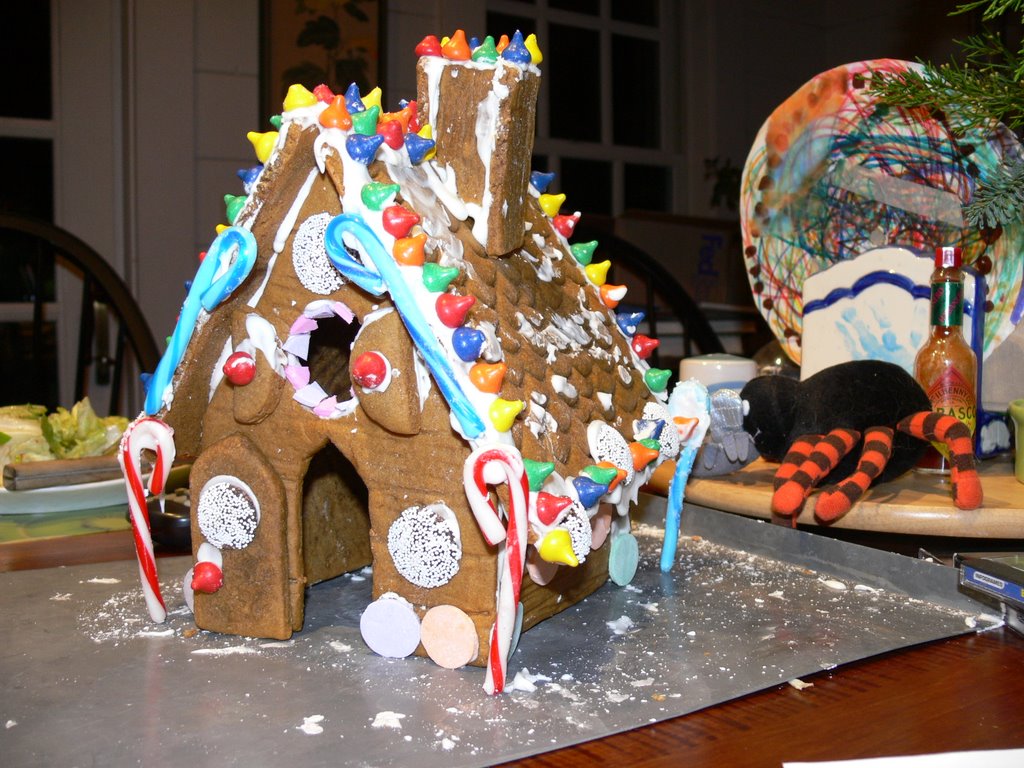
I made the house with front and back doors (or two front doors, if you prefer) so that each of the boys had their own end to do, but Joshua decided to be a teen and “IM” with friends and play Runescape instead. Bummers. He didn’t even eat the candies! Eli, however, joined in and had the great ideas to use the candycanes on the ends of the eaves over the doorways.

Now…what do I put on the cookie sheet so it looks nicer?

Another lesson learned…using cheap-o store brand sandwich baggies as a frosting tube (clipping a tiny bit of a corner off) instead of a proper pastry tube is a recipe for a mess…the bag split any number of ways, including in the middle of the bag. So our “piped” edges and drips are more like messy blobs. Oh well….we’ll call it wet snow which is clumpy!

And….wonder why you can’t just glue it up using hot glue instead of frosting….the house isn’t going to get eaten (the dough recipe has double the flour to make it sturdy), so why not???? Anyone have any ideas?

Oh, and I really like the candy-coated “Kissables” (think chocolate chips meet M&Ms) which I used all along the roof, and the Necco dots on the foundation of the house.

PS–that black and orange thing on the lazy susan is an adorable Halloween spider from the boys’ devoted Aunt Joyce!

A trip to Bethlehem

December 3rd, 2006

The Chestnut Street Baptist Church, which is right on the village green, is the one I used in my quilt “Autumn on the Village Green.” They are now in the 8th year (I think) of having a “Walk Through Bethlehem” on the “Christmas by the Sea” weekend which is organized by the Camden, Lincolnville and Rockport Chamber of Commerce. Apparently folks even travel here for this weekend, which features the tree lighting, Santa arriving by ship, a parade, caroling, late evening shopping at least on Friday, sales before the season kicks of for real, and generally being lucky to live in such a beautiful town.

The “walk” begins when you are welcomed to the church and join in the caroling. You are given a card which identifies you as being with one of the twelve tribes of Israel. In turn, you are called to begin your walk. The first stop is with Isaiah, who tells of the coming of Jesus. The walls of the hallways of the buildings around the church are covered with painted cloth (or something) so that the walls look like stone, with doorways and garden walls. When you enter a room, the character is in a scene, with cloths and costumes suitable to the period. A “Roman centurion” guides you along your journey.

The second stop is the annunciation, when Gabriel tells Mary to “fear not, for you are with child”, while the third is when Mary visits Elizabeth. You get to stop at an inn (suitable held in the church’s big kitchen!) before you get to visit the marketplace. That is when I couldn’t resist and got out my camera…WOW! Look at this…you walk in and there are the weavers

The foodsellers

and some of the food … luscious pomegranate:

The woolspinners and weavers

and the plant-sellers

and the tinkers:

There is a storyteller, who will tell you the story of David and Goliath, and a fabric store (with some of Dianne Hire’s stash to decorate…she and her hubby drive down from Northport to attend this church…about a 20 minute drive)

and even a manger with live goats, calf and donkey!

Life is Good

December 1st, 2006

This was going to be about one thing, then another good thing happened, then another, and then yet another! Yes, life is good, and there are good people in the world.

Last week, I received an e-mail from one of my machine quilting students. She had done some machine quilting before the class, but wanted to learn more. Well, I’d say she’s well on her way now! Sally Robbins, of North Haven (an island off the coast in Penobscot Bay), Maine, sent me this jpeg showing a 31×43 wholecloth quilt:

Sally wrote: “I have been wanting to do something like this for sometime. I used a design in Pepper Cory’s book on quilt marking, that being the center diamond, and several methods for getting the design onto the top.” I think she did an incredibly good job and am so happy for her. I see lots of quilts in her future! Thanks to Sally for sharing, congrats for tackling such a project, and I’m so glad if my class helped her get to where she is!

Then, yesterday as I was cleaning up after working on “the chair,” Eli announced “the plant man is here.” Plant man? Well, it was the flower delivery guy… Sister Gervaise, Beth O’Hara and the Development Office at San Domenico sent me flowers in thanks for the Nativity quilt!!!! You can read about this quilt, which I made for my school here. Better yet, click here for the June Archives, and scroll down to the bottom to June 1, then skip your way through the month and the various posts on the nativity quilt.

Tonight, in just under 2 hours as a matter of fact, will be the 101st consecutive perfomance Christmas Tableaux. In “scenes” and song and bell choir and spoken word, the performance tells the story of the Nativity. I get goosebumps thinking about a play being performed like this for more than a century without interruption. I am blessed to have been able to go to school at San Domenico (grades 7-12), most of all because of the love and caring from the sisters and staff. And I’m so happy I was able to make and give them the Nativity quilt in thanks for all they have given to me and continue to give to students and families alike.

After getting home in the pitch dark and rain and ick tonight after Joshua’s guitar lesson at 5:30, we found the mail. And in the mail I found this wonderful postcard made by Jacquie “the QuiltMuse” Scuitto with the note “In recognition of your fantastic quilting progress this year. Keep up the great work” I am blessed to have such wonderful, giving friends (in this case someone I met over the internet and had the joy of meeting this June when she came to Maine…blog post here).

After making a quick spaghetti dinner, we went into town (in the rain and cold and ick) for the Christmas tree lighting (Boo hiss–they were to light the tree at 7. We got there at 6:47, and it was already lit…early…guess it was too nasty out to wait?). Then we walked over to the Chestnut Street Baptist Church where they have this awesome “walk through Bethlehem.” You enter the church for singing, then in turns (as a member of one of the tribes of Israel) get to walk through the large building spaces they have which they have dressed up for the holidays into various scenes, starting with the prophet Isaiah doing a reading /telling his story, on through the birth of the baby Jesus. One part of it was SO cool I took about 10 photos–here’s one–, which I’ll share tomorrow. Hmm…maybe I’ll go back again tomorrow night just to sit in the church and sing the songs (we got about half of one carol before it was our turn to “walk through the city” and I could do with some more hymns).