email Youtube

Home
Galleries
Blog
Workshops & Calendar
Store
Resources
About
Contact

Archive for the ‘Garments’ Category

The last bits of fleece make an easy peasy hat!
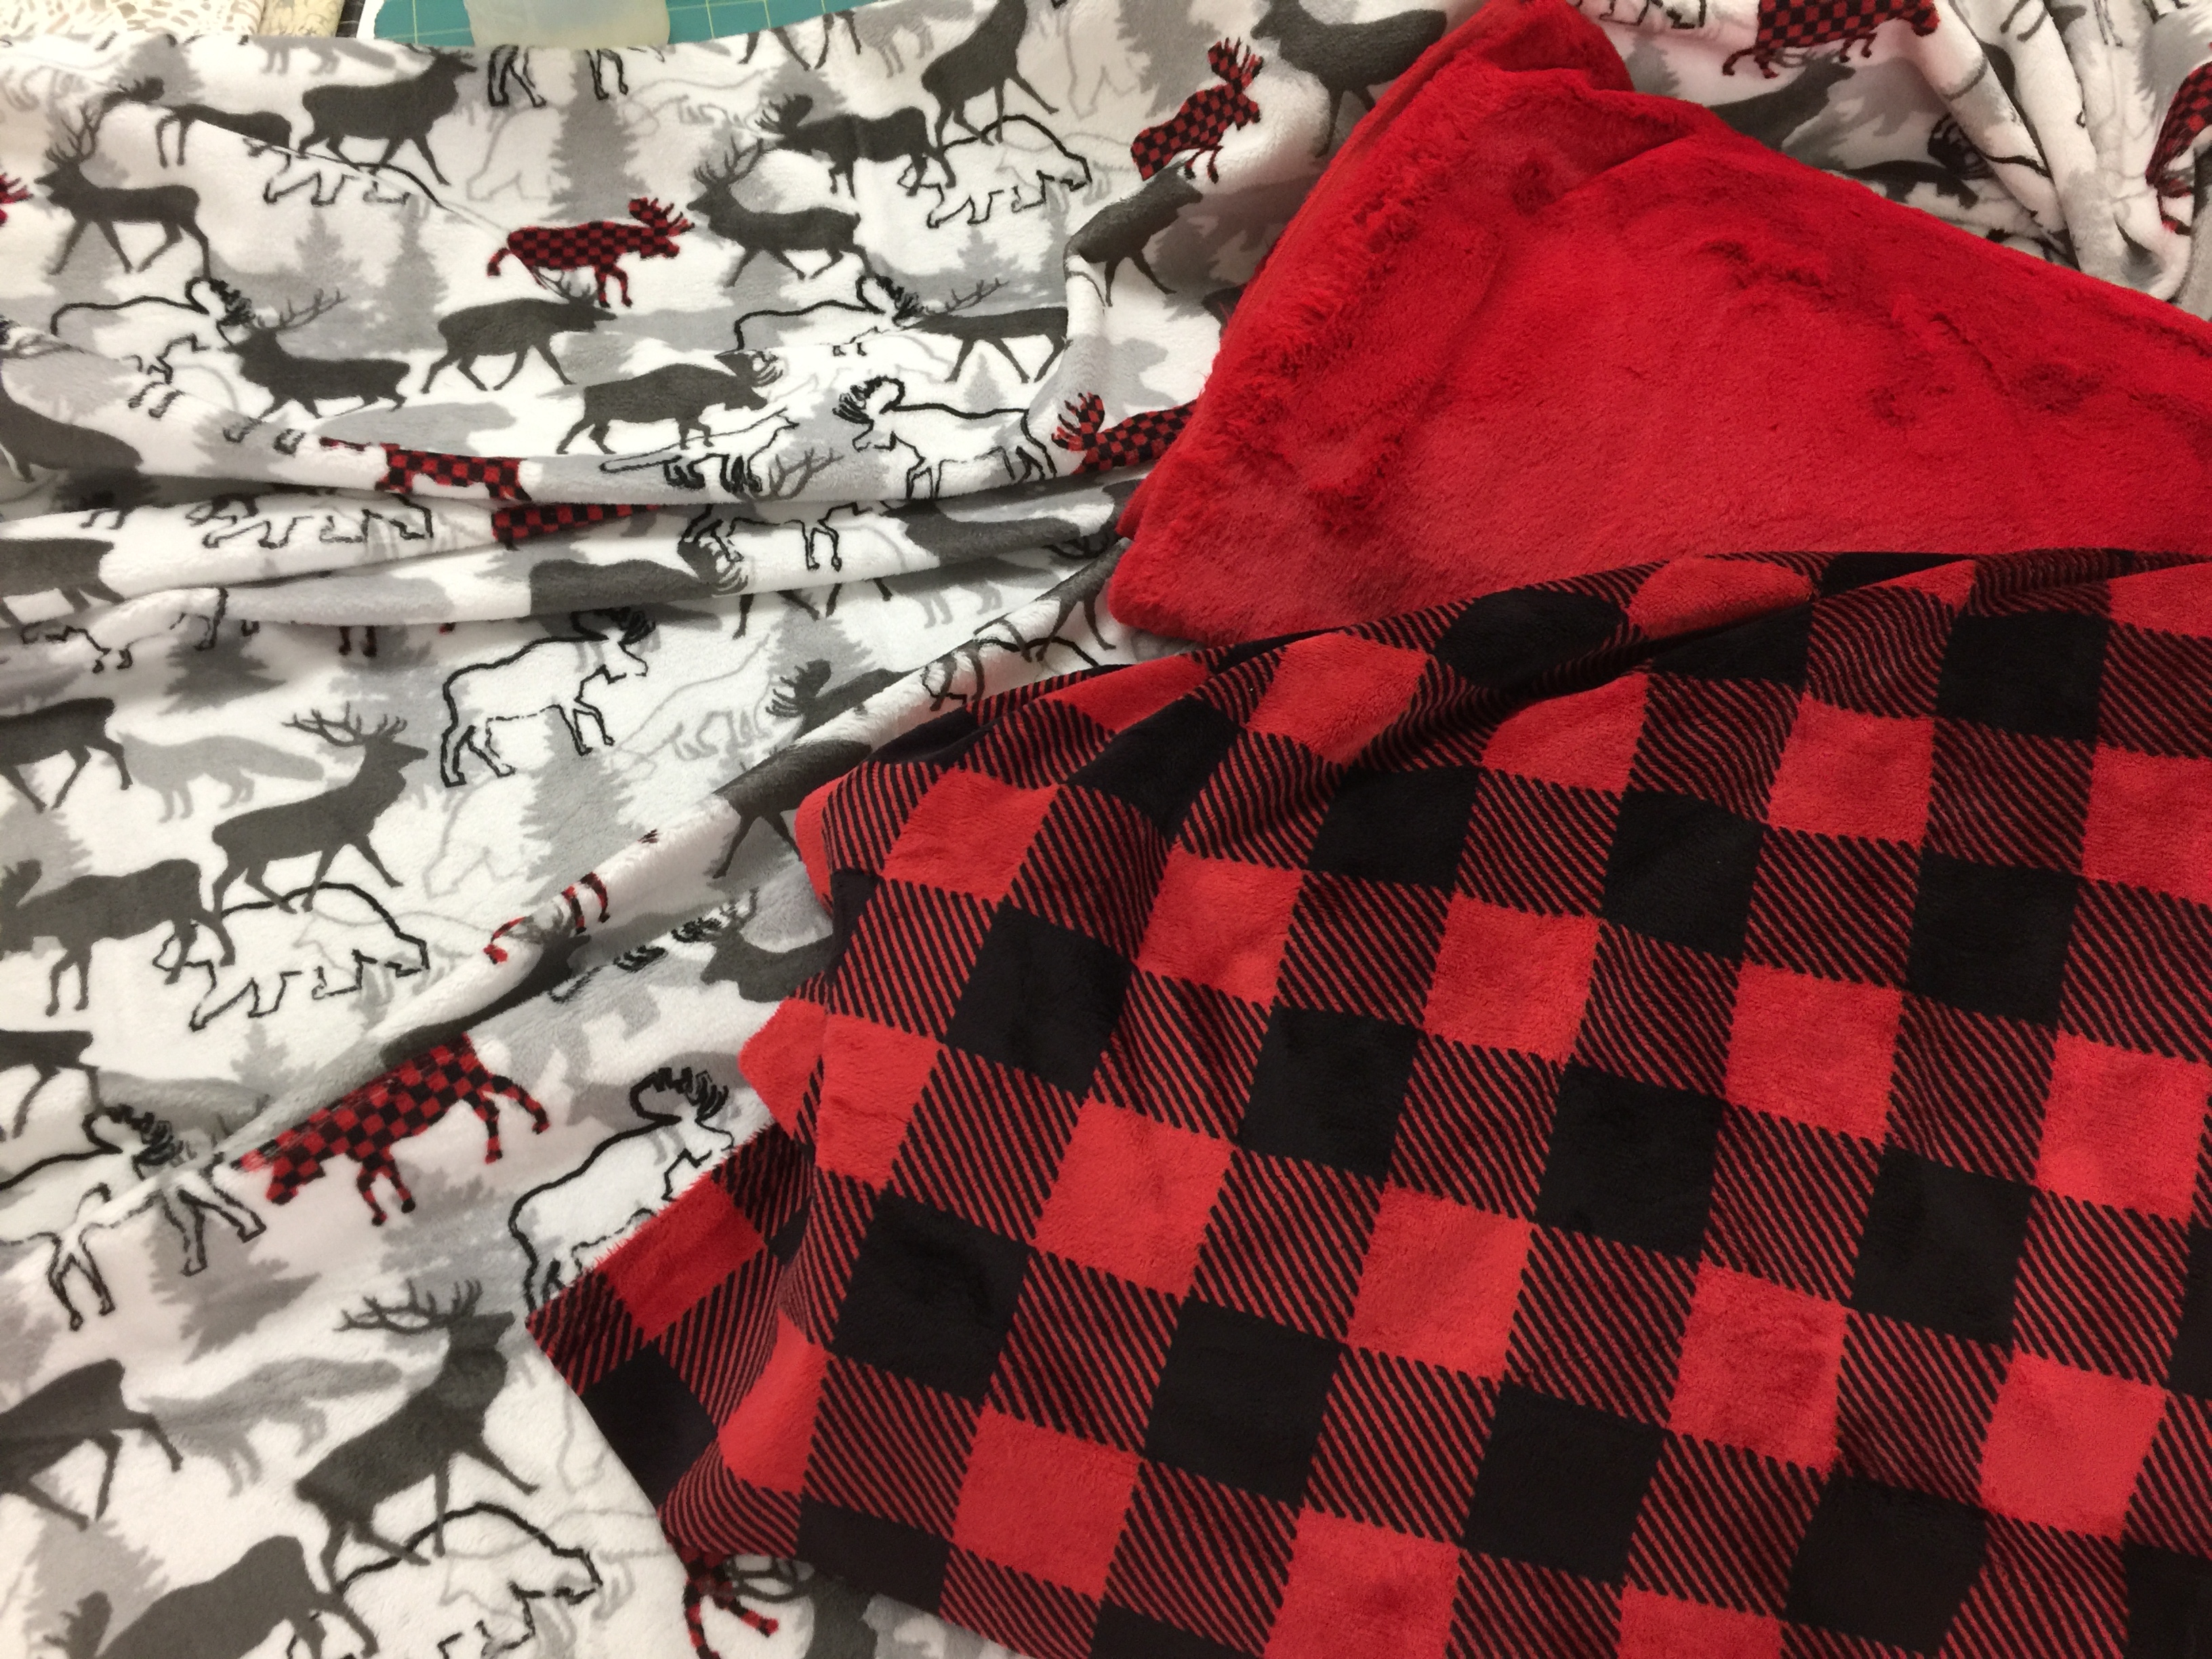
Thursday, November 1st, 2018

So I decided to use up the very last bits of my buffalo check fleece.  I began with 4 3/4 yards of the 58-60″ wide cloth.  The second photo shows the last bits!   These hats are SO FAST to make…including figuring out the best sewing sequence it took less than an hour for the first one.  If you wanted to make a half dozen, you could do that in an afternoon–quick and easy winter gifts!

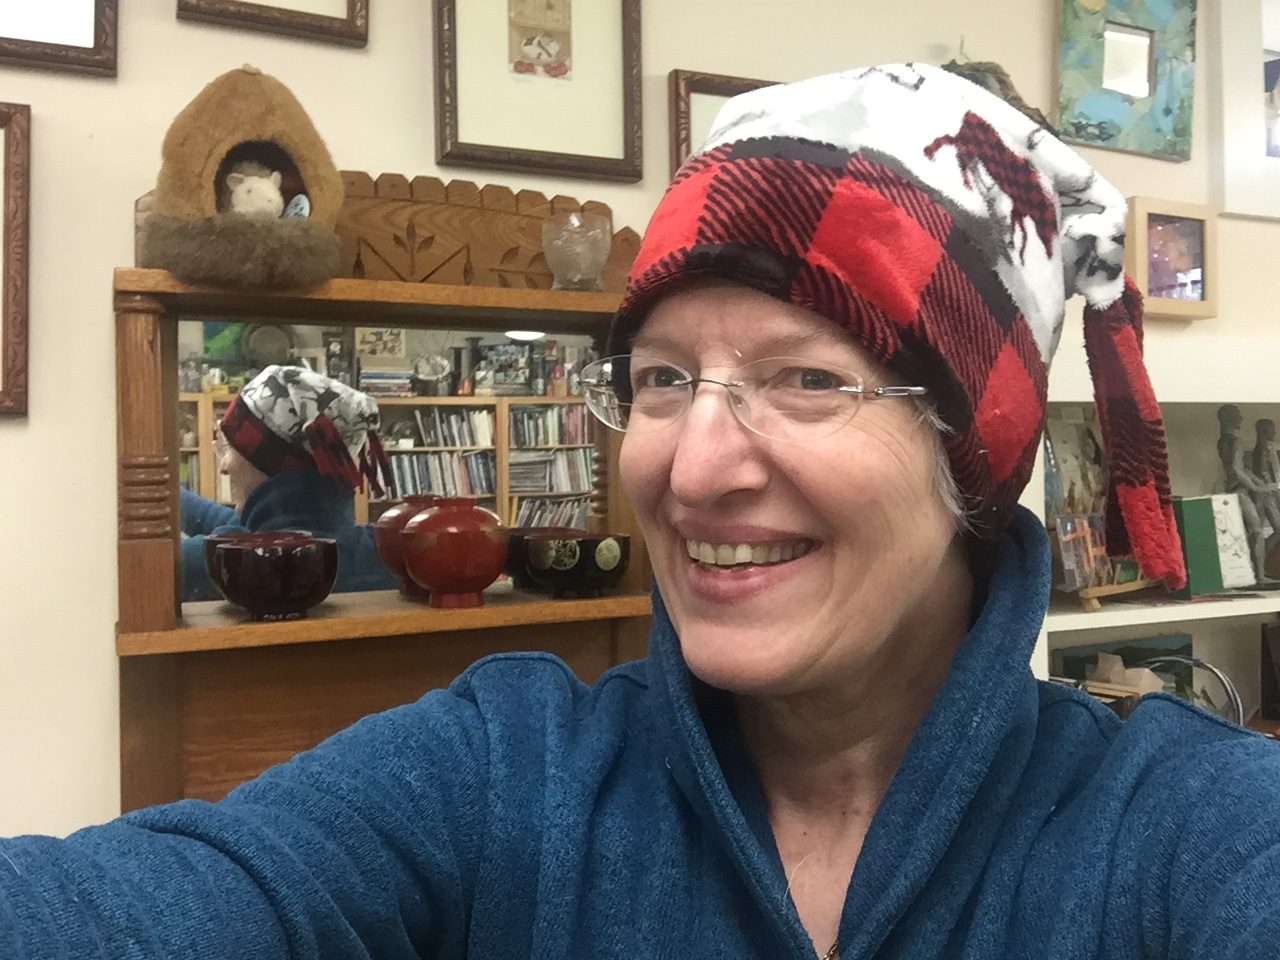
How many selfies do you need to take to eliminate many chins or no chin? LOL! I love my soft hat!

This is all that is left of 4.75 YARDS of fabric….that is 10,260 square inches. Under 200 left! I even made some tassles/trim out of the selvages!

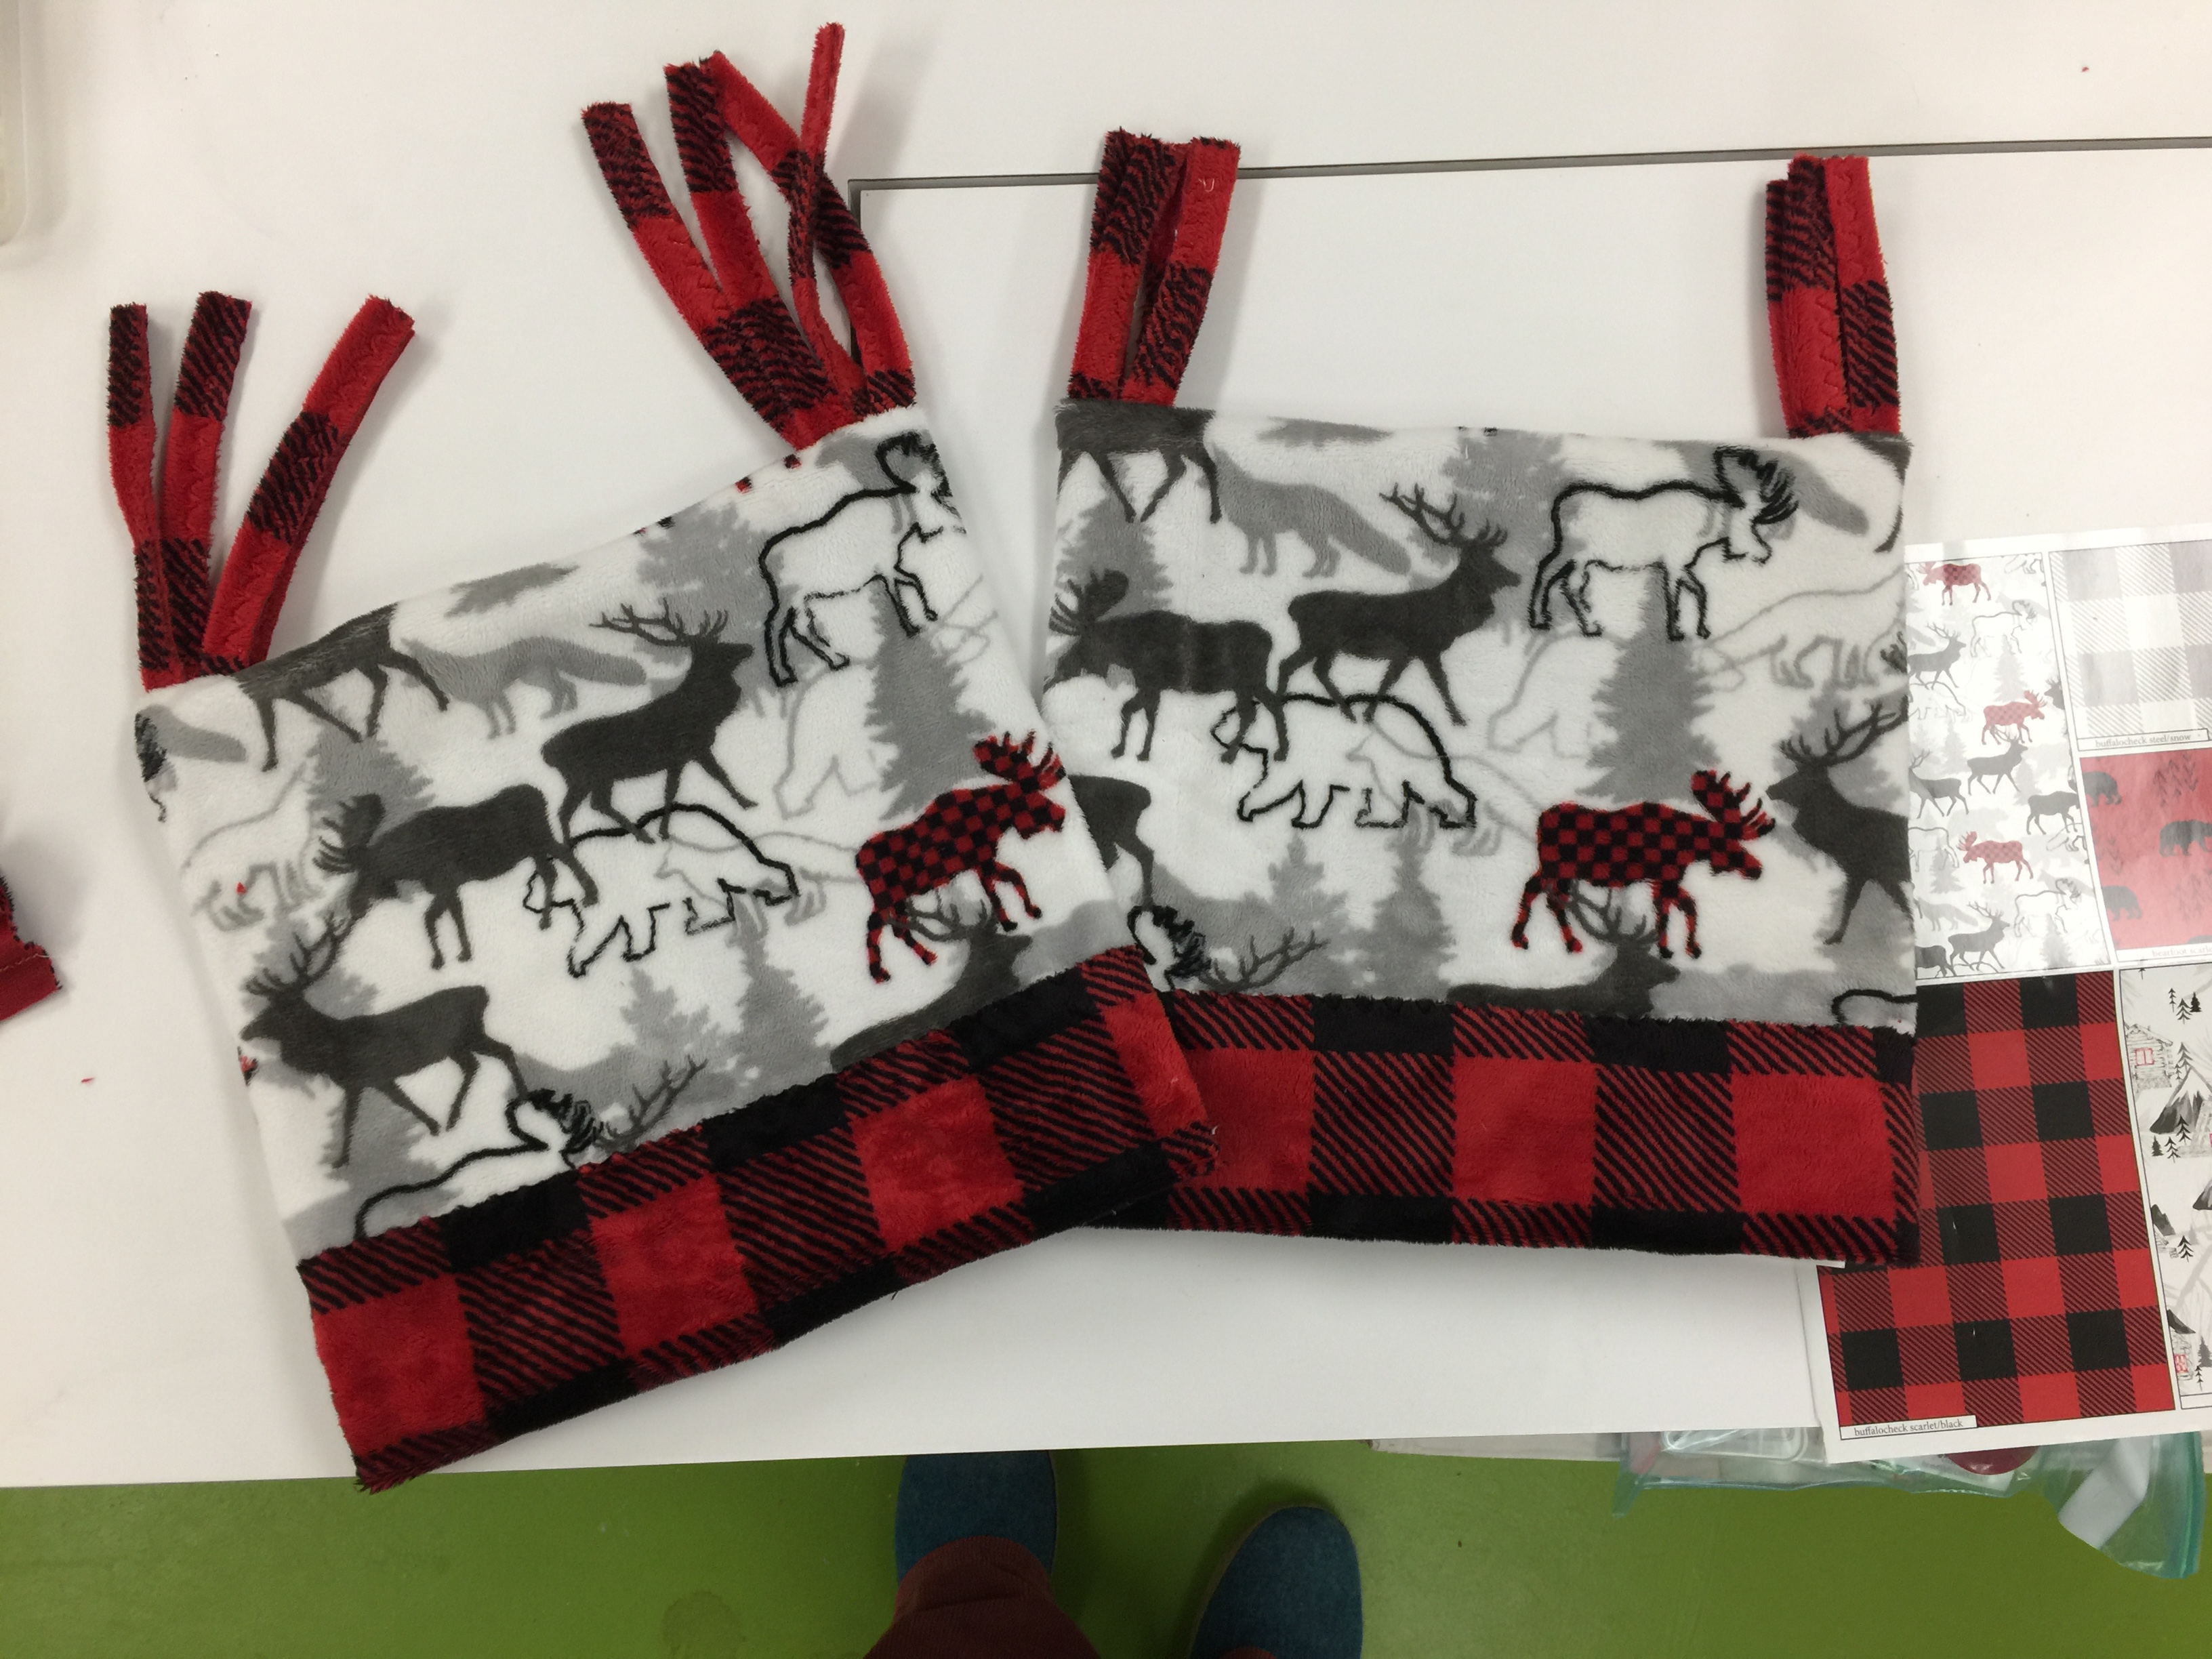
This hat will be a free pattern soon–not sure yet if it will be here or at Shannon’s site, but you can make one of these in well under an hour from scraps.  Truly, I used maybe 10×25 for the white part, 5 x 25 for the bottom, and a bit more for the tassles/dangly bits.   I just sewed two tubes to fit my head, one of the white print, one of the buffalo plaid.  The white print is here at Fabric.com.

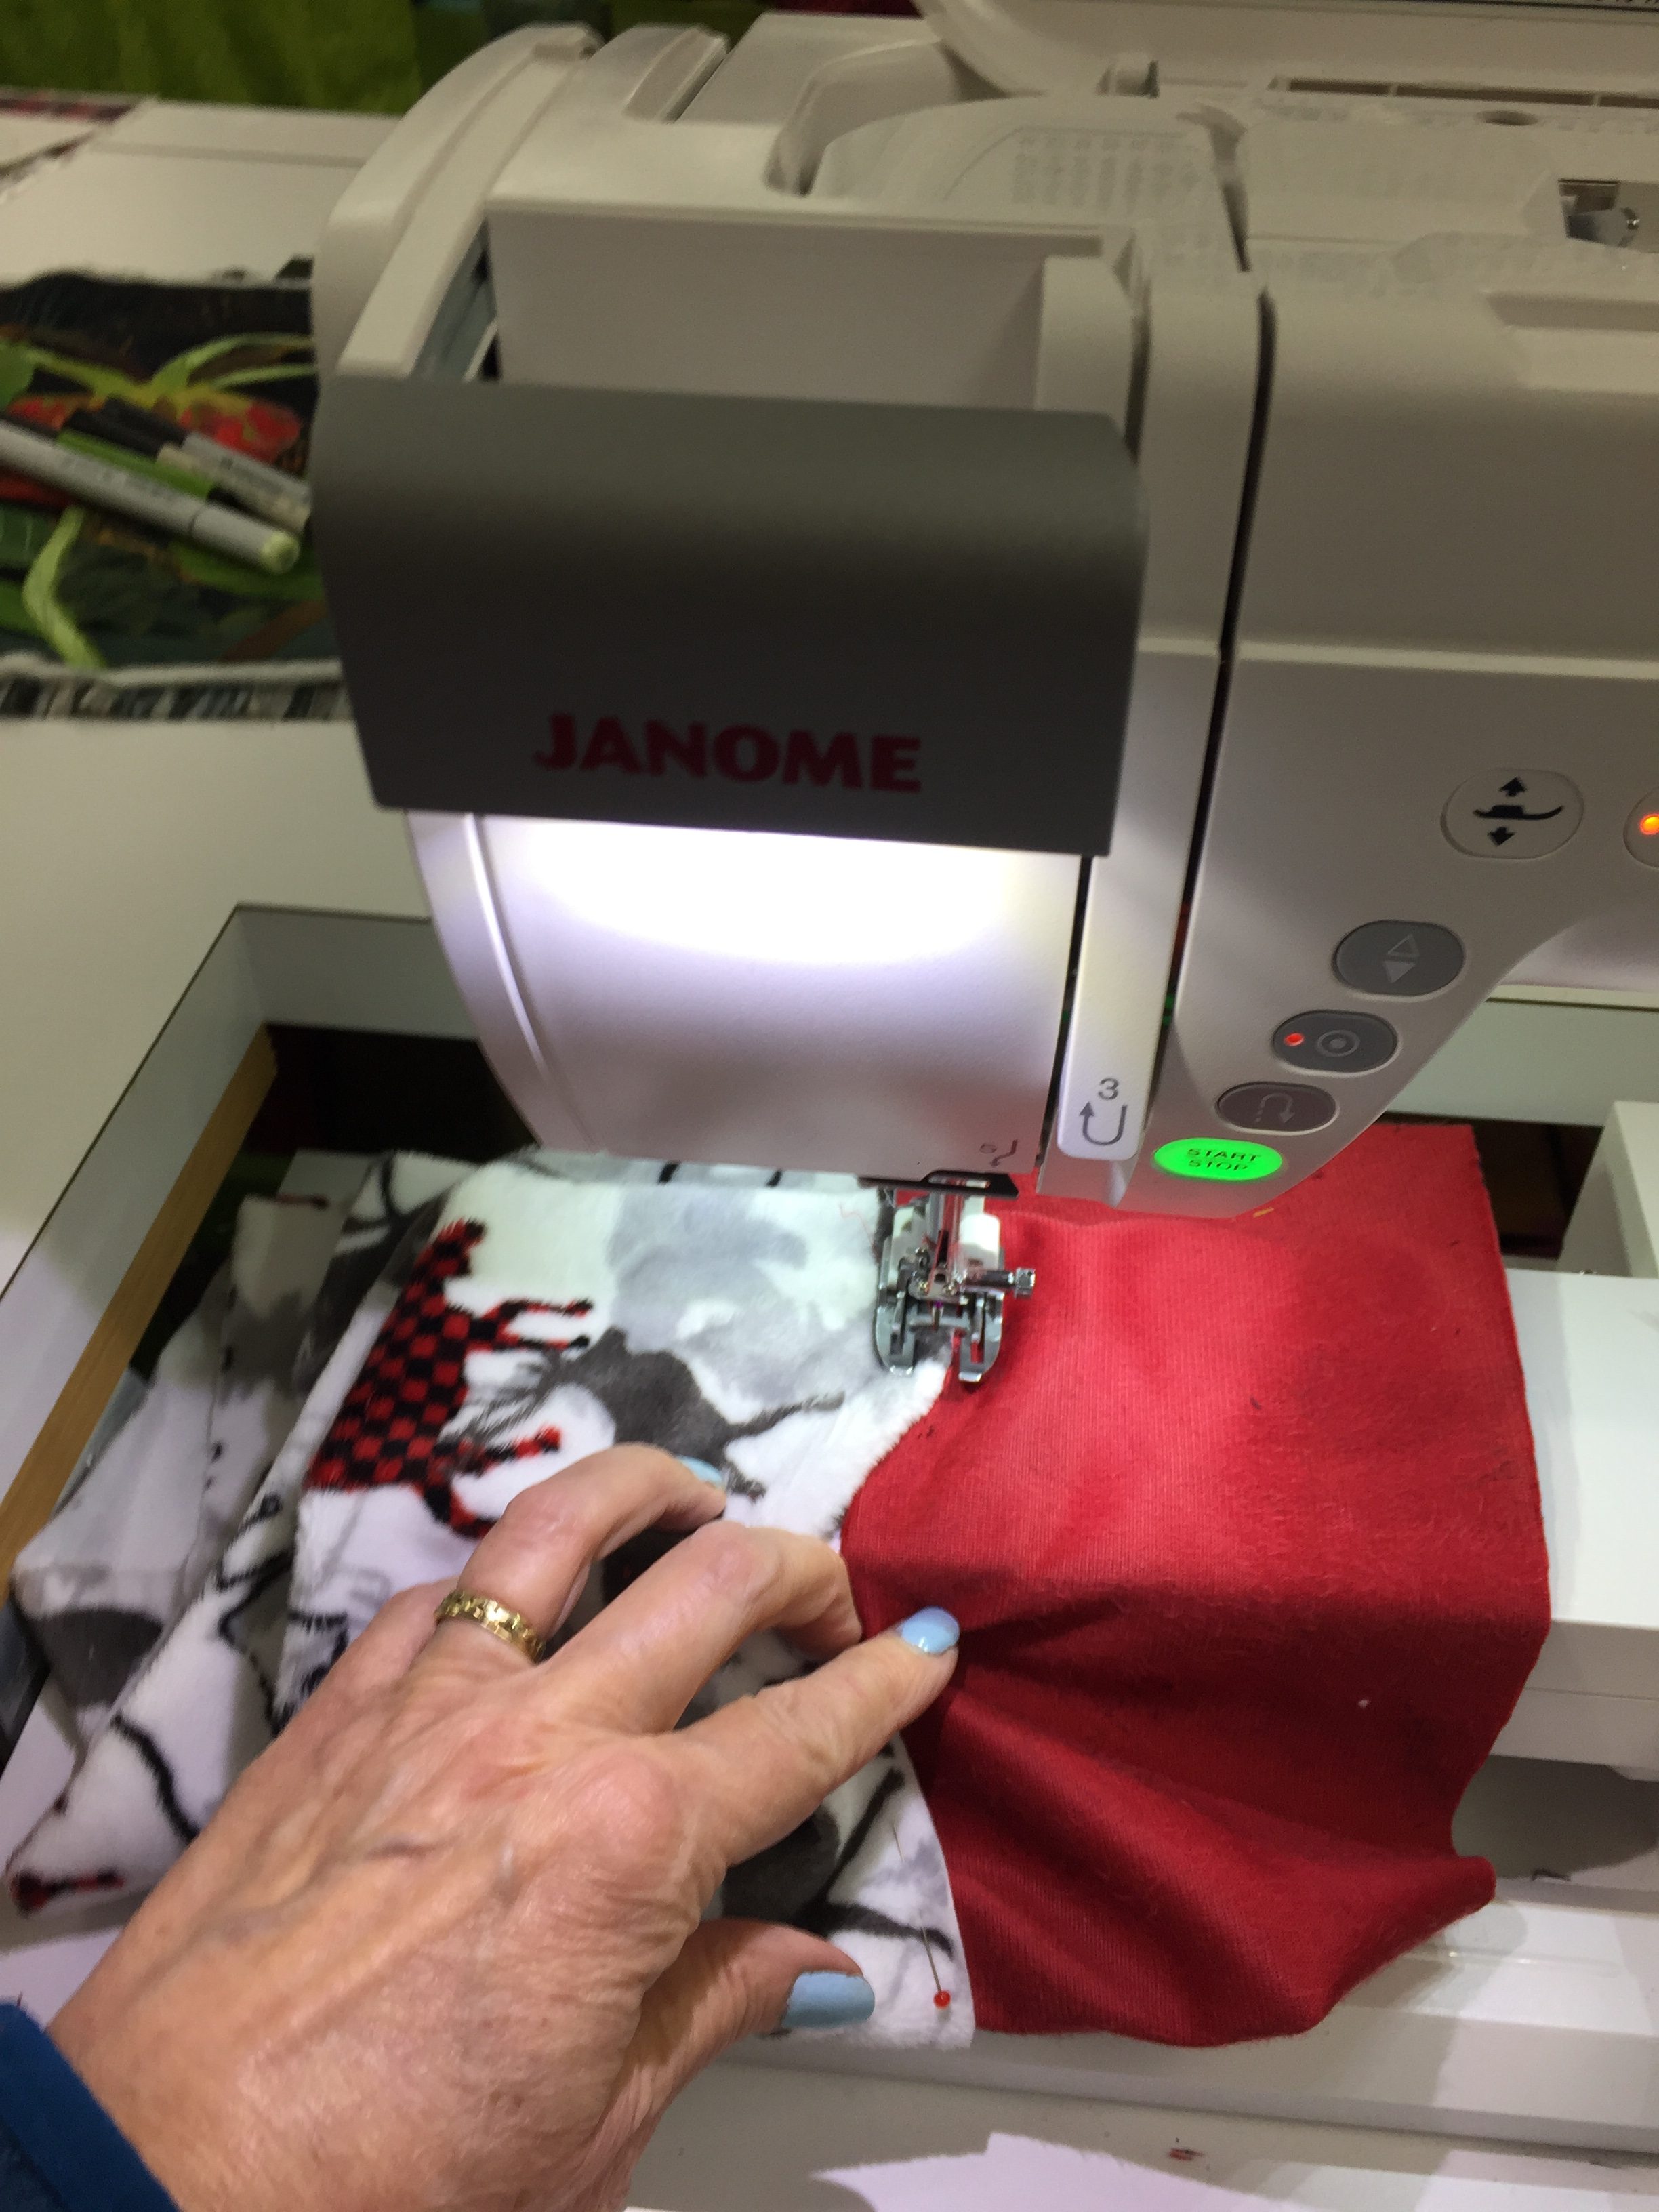
Because the fleece is thick, and because I wanted the soft part next to my forehead, I didn’t use a typical garment seam. Instead, I overlapped the two fabrics, wrong sides together, and sewed them with a serpentine stitch. I did this twice, on either side, so I would catch both edges of the overlap. My finger is pulling the two pieces apart so you can see the overlap.

I then turned the plaid to the outside and brought it up above the seam that joins the top of the hat to the “cuff.”  I pinned the fabric at both edges so that I kept the amount of black that shows at the bottom even all the way around.  As I mentioned in my earlier posts about the throw and the jacket, the inside of Cuddle is slippery, so pin well. Because the fabric does not ravel, I didn’t need to turn under the upper edge of the plaid cuff.  I used the serpentine stitch to it down.

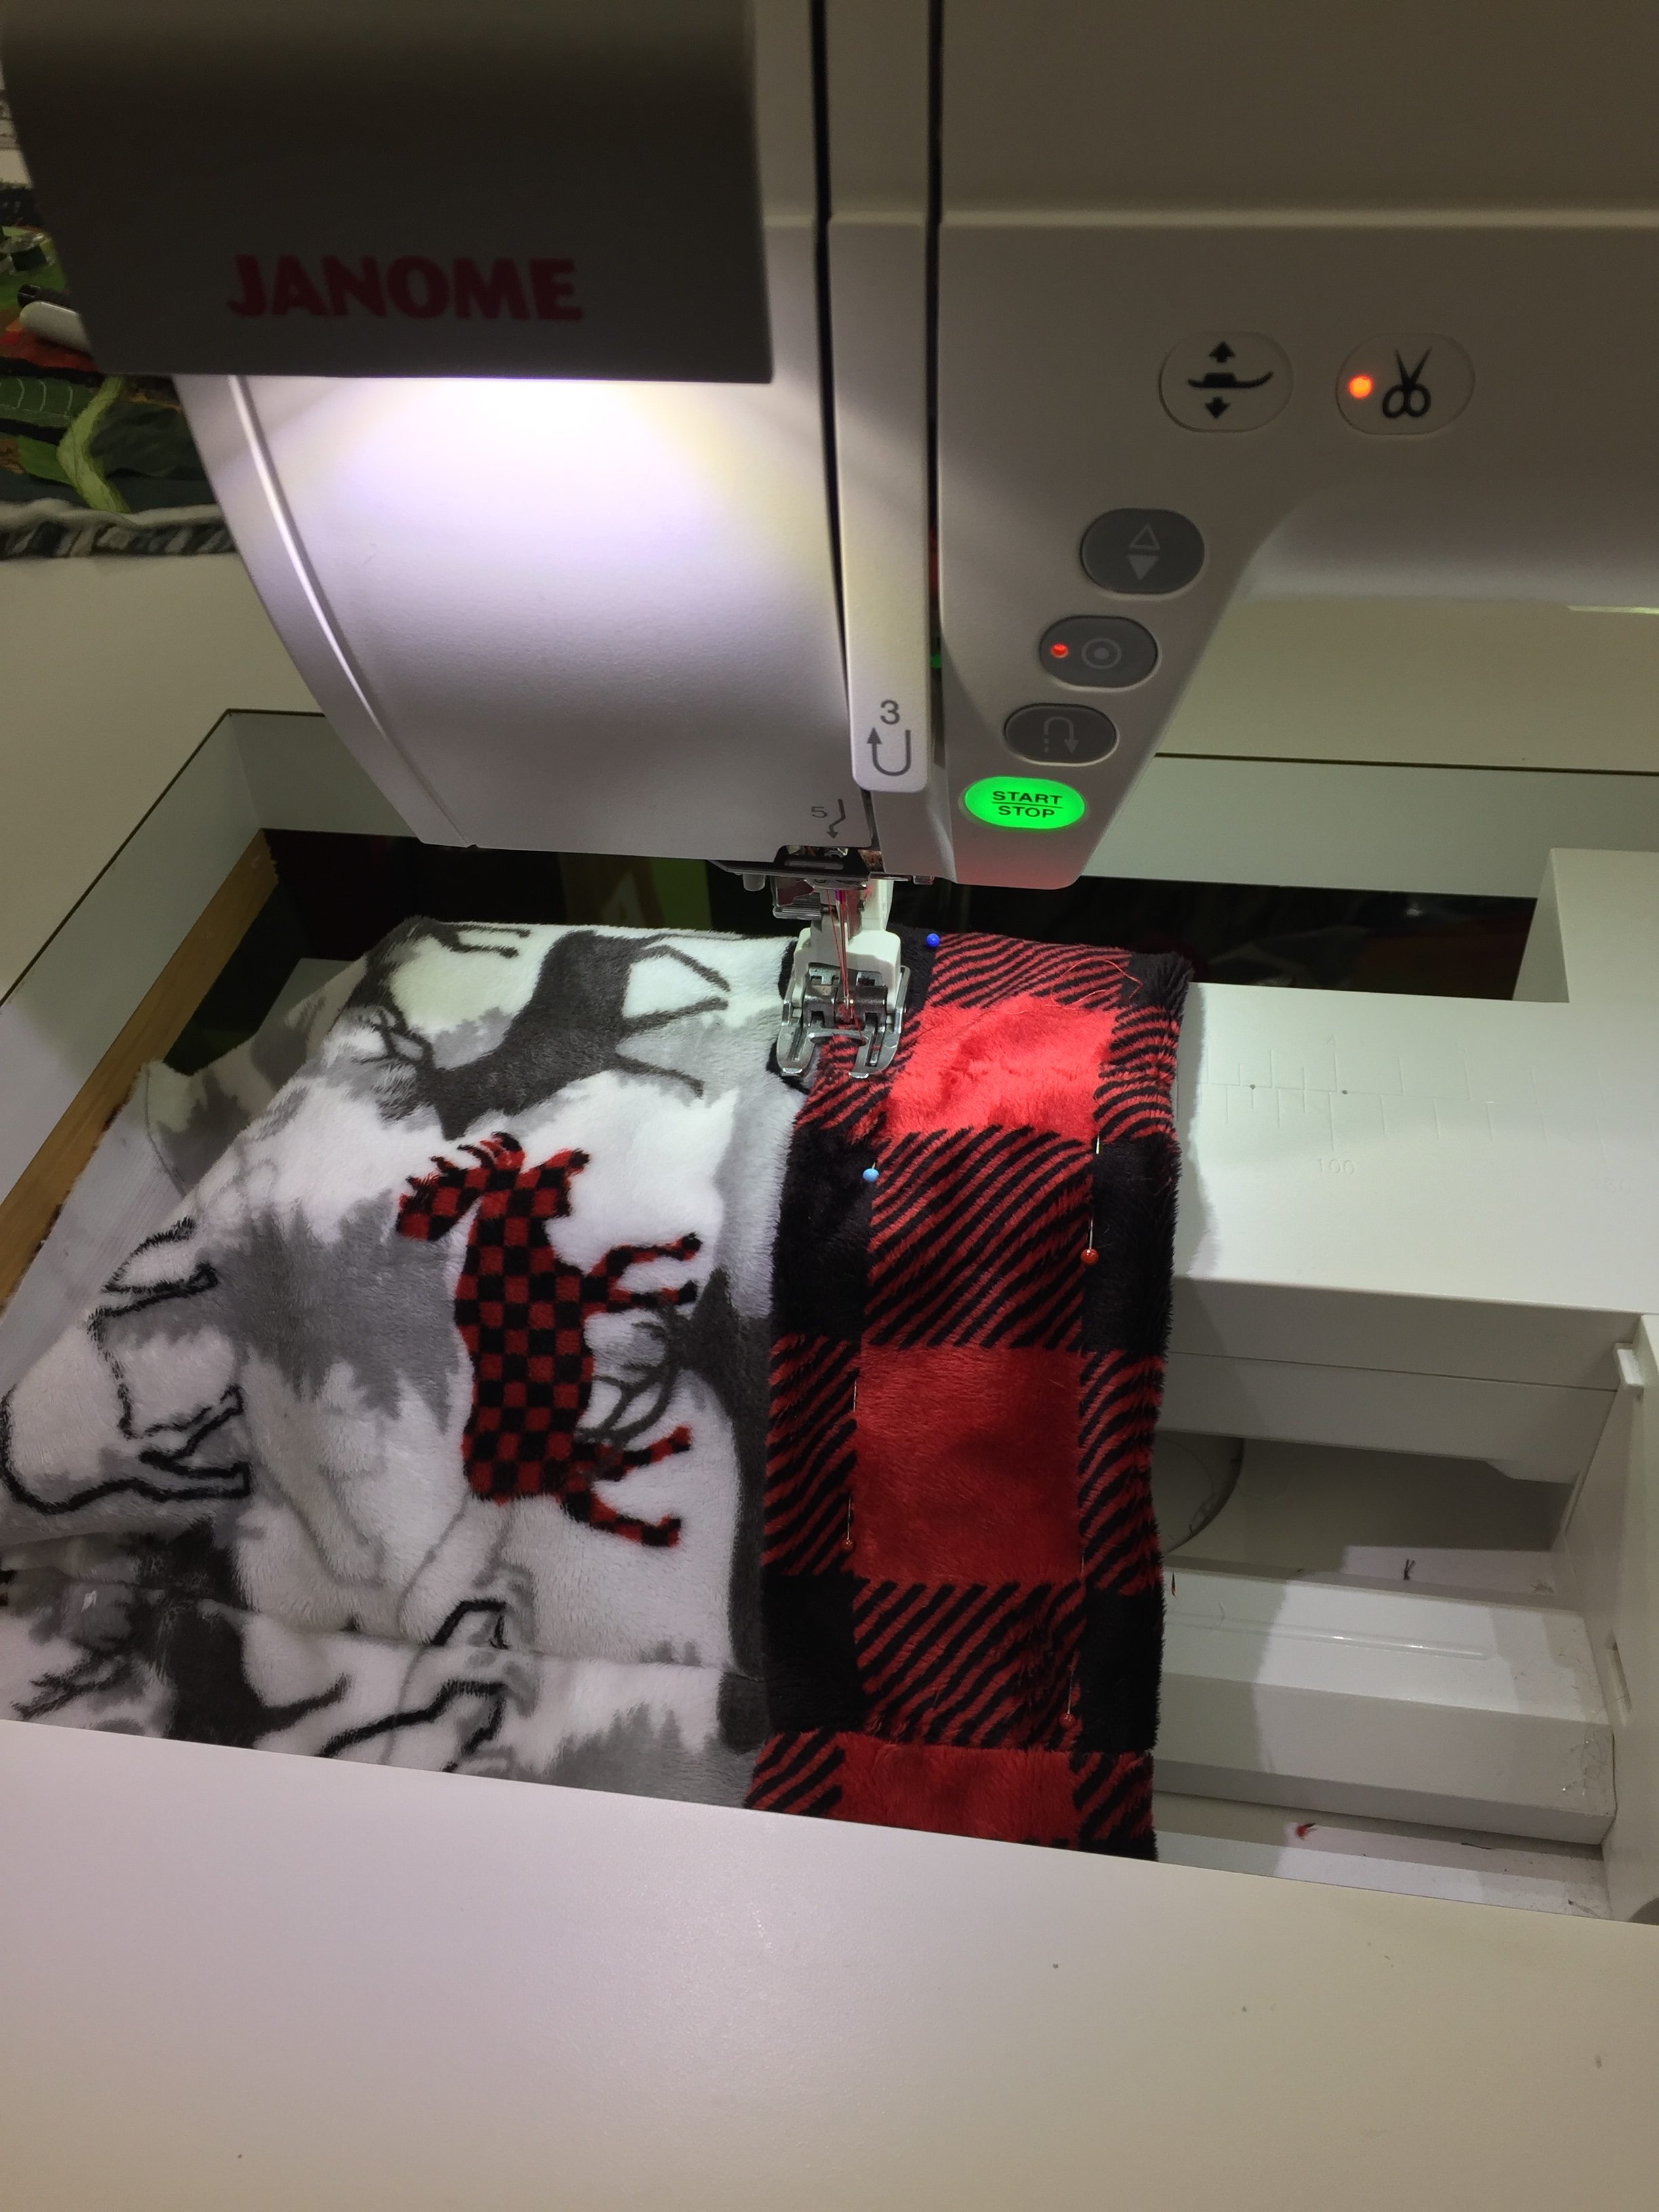
Finally, I made some dangly bits using the trimmed off selvages (they were about 1″ wide plus lengthwise grain of course):  fold in half wrong sides together and use serpentine stitch.  Cut to length, insert two, each folded in half, at either end of the seam at the top of the hat, and sew the final seam.  Because of the bulk from the dangly bits, I found it far easier to sew from the center to the ends, lock off the stitch and repeat for the other side.

Two hats…I mean I used up EVERY LAST BIT of scraps! One hat for me, one to send to Shannon for them to use as they wish!  Talk about a quick and easy Christmas gift!


THANK YOU Shannon Fabrics for this wonderful fabric and an October full of fun, fast and easy fleece projects.   I look forward to making more…I’ve got some Christmas gifts already made which I can’t share due to friends looking at my blog, and another big length of fleece to use on a snuggle quilt for winter!

Fleece Buffalo Jacket/coat!

Tuesday, October 30th, 2018

Hi everyone…preparations for teaching at International Quilt Festival Houston are nearly done, so I can return to somewhat regularly sporadic blogging!   In addition to that snuggly lap robe/blanket in Cuddle fabric, I also recently made a hooded jacket using two layers of fleece and a Simplicity pattern.

Cuddle-y two-layer fleece jacket–I may not want to take this off this winter!

As I’ve; mentioned in earlier posts, I totally fell in love with Shannon Cuddle fabric at the Janome Education Summit this past May. Here’s a link to the buffalo check (temporarily out of stock as of October 30) Shannon scarlet and black Cuddle.

Here’s the pattern I used, Simplicity D0761. I purchased 2 3/4 yards of both the ivory cuddle and the buffalo check. I would recommend an extra quarter yard of the check if you plan to match the plaid as I did at sides and sleeves.  The pattern is cool because the hood is cut with the fronts as one big piece.  The only fiddly part in the entire thing was the shoulder-back neck-shoulder seam, and even that worked a charm with careful pinning.   A confident beginner could probably tackle this.  

The pattern is designed for a two-sided fleece such as the sherpa/suede.  Instead, I made two jackets.  I cut the outer jacket perhaps 1/8″ larger than the pattern and sewed it with a 1/2″ seam allowance, not the standard 5/8″.  I sewed the ivory inner jacket at accurate size and with a generous 5/8″ seam allowance.  This allowed the fluffy Cuddle to fit inside.   HOWEVER, the back side of the Cuddle is slippery.  If I were to make this again, I think I would cut my fabric pieces slightly oversized, sew them together as if quilting (wrong sides together) along the black stripe, THEN trim to final size and sew it as if it were ONE fabric.  Currently, even though I tacked the coat at the neckline, it has a propensity to wiggle and sometimes bubble at the hem.

Hood down and open. 

The pattern doesn’t have a closure, but I have some black toggles on faux-leather and may use one.

And a side view showing the hood.

Thanks as always to Janome America…sewing this on my Janome 9400 was a DREAM.  I used the acufeed foot for pretty much everything and the serpentine or lightning stitches.  I used the lightning (a type of zigzag) for seams at 10 width and 3.0 length, which accommodates any stretching.  I used the serpentine on all the turned-over white bits.  Since the Cuddle does NOT RAVEL at ALL, you don’t need to turn under the edges so the serpentine was perfect and it hides in the pile of the fabric.

I’ll repeat the tip I gave before on the blanket:  minky type fabrics are known for shedding fluff.  To minimize the mess, cut from the back side (with a scalpel type cutter if you have one–I don’t so I just used scissors; I also cut from the front to stay on the lines!).  Carefully put everything including the scraps into a plastic bag, carry it to your dryer, and set it on air dry for maybe 5 minutes.  The fluff ends up in the lint filter, so remember to empty it out and perhaps use a damp cloth to wipe out any stray bits.  This reduces the shedding by about 90 percent!


Looks what came in the mail from Shannon Fabrics! Soft and pettable!

Thursday, September 27th, 2018

Luxe print cuddle and velvet cuddle (the solid red) from ShannonFabrics.com

Oh I can’t WAIT to start sewing this.  At the Janome Education Summit in May we had a program from Shannon Fabrics using their double gauze and Cuddle (minkee).   I saw these three fabrics in swatches and NOW I have some!  They are part of the Fall line, and I can’t wait!  SQUEE…just checked and these are now available at Fabric.com–go here.

The white with buffalo-plaid moose will be backed/edged with the big buffalo-check (each square is about 2 inches) for a ginormous throw, almost twin sized (I think it will be about 54×66 inches when done.  The red will line the buffalo check for a new winter coat or wrap to snuggle in.  This stuff is SO SOFT!

Learned a fantabulous trick from the ladies at Shannon Fabrics at the Education Summit:  when cutting Cuddle and other hairy fabrics (like minkee and similar), cut the pieces, then carefully roll them up and put them in the drier on air/no heat for a while.  About 80 percent of those stray hairs will gather in the lint filter (remember to EMPTY IT), leading to a billion times less clean-up in the studio.

Stay tuned–I should have the throw done by early next week.  The coat will take longer!  THANK YOU Janome America for that fabulous summit and Shannon Fabrics for these snuggly fabrics.  For all of you, I had already ordered some blue for a different throw, and some other fabric for Christmas gifts which obviously I can’t tell you about—yet!

Dinner Cruise to Statue of Liberty, Janome Education Summit Post #8

Sunday, July 15th, 2018

OH MY….let’s just say every single person on the boat was snapping pics like mad!

Though this was the evening before the last session, it needs to go last as a spectacular wrap-up to a fun and informative week at the first ever Janome Educational Summit.  We had Artisans and Makers from the US and Canada, members of Janome America and Janome Canada staff, so many generous and inspiring sponsors, worked on the Janome 15000, 9400, Serger, Cover-stitch machines, did piecing, quilting, Acu-design work, worked on garments, fleece, double gauze, knits, learned about industry trends and upcoming machines and campaigns, and most of all had a blast getting to know each other.  It is amazing how quickly a community of like minded souls can meld into a group that sticks together even after you go home.

At the last minute, just the Friday before the summit (we arrived Monday afternoon), Shin Yamamoto the President of Janome America, decided they needed to lay on something special for our last evening.   OH MY did they ever!   A dinner cruise on the Hudson from NJ down to the Statue of Liberty and back.  The rain of the earlier week had vanished, the temperature was perfect, the humidity low.   Traffic en  from Park Ridge to up by the Hudson and back was something else again for this Maine Mom (more cars in the 90 minutes it took to get there, there were more cars on that route than I think in the entire state of Maine), but what a treat.

At the dock waiting to depart

Sailing under the bridges…arches that I recognized from photos of NYC and some of the Janome crowd, including my main contact Erin S.

After dinner up on deck, the Janome crowd enjoying the perfect weather…gosh what a FUN group.  The collective skill level in that room was beyond amazing!

Miriam and Karen….what a fantastic photo!

Me and Meredith–can you tell we were having fun?

Terry, Sam, Meredith and the sunset, Liz, Miriam and Karen behind the pole

MORE sunset, Statue of Liberty at far left

Lady Liberty, as the Star Spangled Banner and God Bless America / Land That I Love (cue Kate Smith!) played. Utter. Complete. Perfection!

After the Statue of Liberty we turned around to head back to the dock, as night fell and the lights came up. Magical!

I’m so not a city girl, but if you’re gonna do city, this is pretty spectacular.  Look at those reflections in the water!

The NJ side of the Hudson as we headed back…loved the light falling light water down the side of that skyscraper.

The end of the trip. WOW.  THANK YOU JANOME AMERICA, and you betcha I’m shouting!

Thank you Shin Yamamoto and David Manierka for being such good advocates for Janome, Janome users, and all the folks at Janome, and for such a phenomenal week. It was such a treat to be able to meet in person folks from shipping to marketing to headquarters whose names I have known these past fifteen years. THANK YOU Regena Carvelaro for putting together a Summit that has to rival the best of these events anywhere, any time.   Thank you Erin Schlosser, for being a great contact, for supporting the makers and artisans that work with Janome, for all you did to make this event such a success.  And thank you to the sponsors/presenters, Educators, Makers and Artisans who were the lively, inspiring heart and soul of this event.  Let’s do it again!

SaveSave

SaveSave

Knits, Sergers, Cover Stitch machines, and more at Janome Education Summit 2018 Post #7

Thursday, July 12th, 2018

Thursday was a whirlwind as we finished up at lunch time.

Me with my Summit t-shirt (we also did some iron-press decals…this was a basic shirt with an altered neckline also done at breakneck pace) with my skirt tucked underneath. Even my lime suede sneakers go with it!

In that morning we had a presentation on My Fabric Designer Software by Eileen Roche and made a knit skirt using sergers and cover-stitch machines thanks to Girl Charlee.  The amount of machines and work Janome America put into having them onsite for us all to test-drive and learn was amazing–huge kudos to Janome America for such a great Summit!  And of course major thanks to the sponsors and presenters for all the goodies and best of all the learning!

Today I am actually wearing the skirt I made (photo above)…the project was to make a pencil skirt.  I’m afraid that pencil skirts and my body and lifestyle are not a match made in heaven, so once again I was the disobedient child and made a gathered skirt.

The fabric I chose…other choices were a solid denim look and a blue floral print. Heather Peterson’s Girl Charlee site is here, with a wide range of VERY reasonably priced knits. This particular fabric is still available as of early July 2018, here, and is only $8.50 a yard! It’s a lighter t-shirt weight skirt (so not too heavy for a full skirt) and is soft and comfy.

Owner Heather Peterson showed some of the fun projects she has made and gave us tips for sewing on knits.  For those who don’t have a serger, even the most basic sewing machines have an overlock stitch that you can use to whip up these fun things on your domestic machine.  What I learned:  don’t be afraid of knits!  You can do it!

Heather holding up a comfy knit dress

And on the screen behind her, tips:

Different types of knits….I had never heard of Vegan Leather….but it looks leather-ish and it actually stretches! I don’t think leather leggings are in my future, but maybe this might work on a quilt….hmmm…….

Some of the delectable fabrics at Girl Charlee

A couple knit projects up on the front table

The ladies who DID make the pencil skirt wore them and fell in love–the entire time I was thinking “I wish I had Ashley’s (DIL) measurements” because this project was ideal for her.  When I showed very petite Ashley the pattern provided (here) she was delighted and said “OMG, a pencil skirt that would actually FIT!”  The pattern has you start with your measurements, then subtract a bit, calculate the length, and presto, nearly instant skirt.   I used the full yard of fabric to make a nearly ankle-length skirt.  I didn’t have time to be afraid…we had to work FAST, so I serged up the side seams, serged the elastic (my first time ever doing that!) to the top, then switched over to the cover-stitch machine to stitch down the elastic and hem the skirt.

The hem of my skirt. I’ve never used a cover stitch machine before–I love the look of this three-needle hem. On a domestic machine, you can simulate the look of a cover stitch machine (or setting on a serger) by using a twin needle. The bobbin thread zig-zagging on the bottom side gives stretch to the hem, which means the threads don’t break.

After the summit I did some noodling around on the internet: the one issue I had was the fabric curling at the top edge of the hem.  Terial Magic would take care of that by stiffening the edge, but there is also stuff called wash-away tape that is 1/4″ wide.  That, placed on the cut edge, would hold the hem in place AND keep it from curling (which it does between the pins).  Thanks to Heather’s workshop I’m determined to take the fabric I bought to make leggings 2-4 years ago will be MADE UP into leggings this summer!  I’m not afraid any more!

Back to Eileen Roche– her company prints your designs (similar to Spoonflower) on a wide range of base goods (cottons, knits, poly, etc).  But she also offers software that works on PCs (sorry, not on Macs which is what I have) that helps you design repeats.  I could see having a lot of fun with this!

Here’s the print fabric website: https://www.myfabricdesigns.com and here’s where you find the software: https://www.inspiredbydime.com/inspiration-software/my-fabric-designer/

Although I’ve returned to earth after the rush of the Summit, just revisiting these photos has brought back what a great week this was.  A TON of good stuff packed into 3 full days!