email Youtube

Home
Galleries
Blog
Workshops & Calendar
Store
Resources
About
Contact

Archive for the ‘Techniques’ Category

Winter Warmth

Thursday, October 11th, 2007

Machine needle-felting is a new thing for me, but I can see great potential for working this technique into art quilts, especially landscapes. Thanks to Janome-America, I have an Xpression (FM-725) needle-felter to test and try out. Thanks to being busier than the proverbial one-armed paper hanger this year, I haven’t had much time to play with it. I finally pulled it out for these three pieces. When this machine first came out, you had to replace the entire needle-head of five barbed needles; they’ve now come out with an alternate needle housing so you can replace a needle if it breaks without replacing the entire head…hoooray! The price is also modest …somewhere around $300 I think.
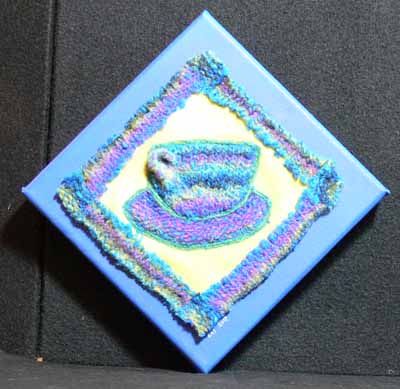
Winter Warmth 1

The two larger pieces, in blues, are made from a base of hand-dyed wool from Wild Thymes Pattern Co. and a former knit hat that I made which ended up being too itchy. I tossed the hat in the washer for two full cycles to felt it, then cut it up. (An aside: I’m not big on wool quilts or someone else’s patterns, but Barb Cribb’s patterns, wool and kits are enough to make me double back and look again… I love her stuff, so please check out the link. I’ve only met her once, at either Market or Festival years ago, so I’m not affiliated…just love the designs!)

Anyway, the piece above is mounted on an 8×8 inch canvas hung on point, while the one below is 10×10 inches. Both are the deep-profile gallery-wrap canvas. Clearly, I did not have my lighting set up properly…the one above the yellow is more washed out in the photo than in real life (see the last “mocha” for a better rendition of the yellow), and in the next one I think I actually managed to make wool (as in light-absorbing wool) glare! I didn’t think that was possible…sigh.
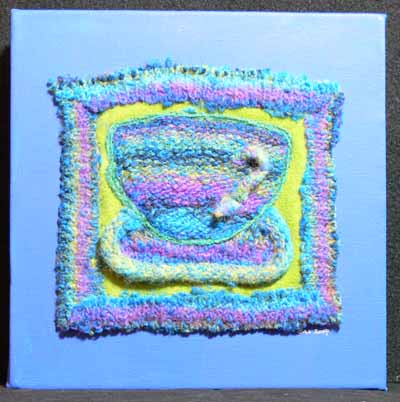
Winter Warmth 2

Here is the one I think of as Mocha, a little piece just 3 1/2″ square mounted on a deep coffee (or is it chocolate) 6×6 inch deep-profile canvas. I felted various yarns onto the wool base for this one, then added the buttons and coordinating heavy threads.
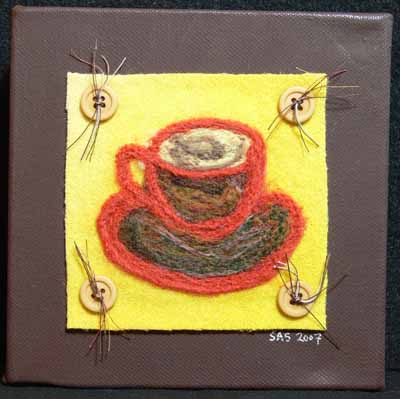
Winter Warmth 3

All the pieces are for sale; prices are $30, 40 and 50 and do not include shipping.
Zoot pieces, workshops and displaying pieces

Saturday, October 6th, 2007

Just a quick “business-y” note:

I’ll be…yippeeee!!!!!….. heading off to a workshop at ProChem in Fall River, Mass., next week. I’m taking the second week of Color Mixing for Dyers with Carol Soderlund. I head down on Monday (and hope to stop at the new Ikea near Boston en route), about a 6 hour drive if I were to go non-stop (not!). I have blogposts set to publish while I’m gone….

The next set of posts will be closeups of the pieces at Zoot Coffee House (see earlier post dated October 3rd). If anyone is interested in purchasing one, just drop me an e-mail either through a comment here or via the contact me link on my website (look up at the top menu bar for the hotlink). I’m not sure if I’ll have internet while in Fall River, so if you don’t hear from me until I get home next weekend, it means no Wi-Fi!

Finally, Dianne in Annapolis had a great question: how exactly do I mount those pieces on the canvas? Perfect for a tutorial. PLUS, I had mounted the pieces I made for the two “On the Edge” articles in Quilting Arts Magazine (about finishing the edges of quilts) and wanted to blog about display alternatives. So, when I get back, I promise to show a couple of ways to do this. I really gotta convince a publisher to let me do edge finishes and display alternatives as a book, or else self-publish! Too many ideas, never enough time. Anyway, keep popping back in for more good stuff –with pictures– starting tomorrow!

Thermofax screens and printing….

Wednesday, September 12th, 2007

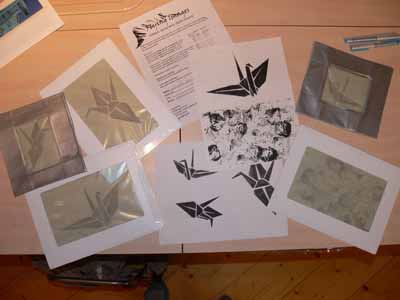
Last week I made my journal quilt, and tried a new-to-me technique: screening with Thermofax screens. My attempts to get the screens “burned” at the local tattoo place didn’t work (he had a Vista machine, not one of the 3M, so it didn’t work with my screen materials). SO, I mail ordered from Flying Images (check at the bottom of the page here, on Jane Dunnewold’s site–click on suppliers then scroll down). Talk about FAST service… I e-mailed and called on a Monday morning to see if she could do a quick job (I had been told she has one-day turnaround), e-mailed her jpegs that morning, and by suppertime the screens were made and in the mail…WOWIE!

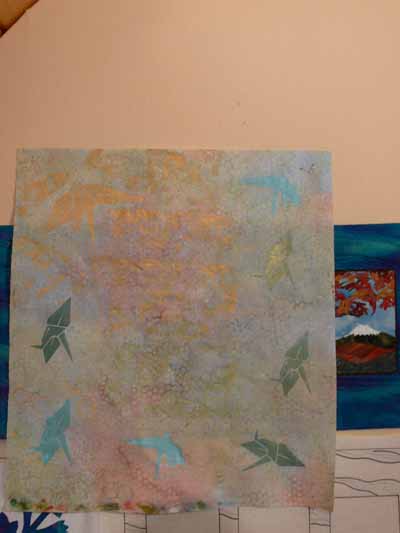
Thermofax screensIn the photo you’ll see her printouts of my images of origami-cranes and, on the bottom half of the second screen, a design I did up printing with half of a sliced white onion. Because I was sub-dividing the screens into smaller pieces, I framed them up myself…some with purchased white plastic frames, the others with cereal box and duct tape.

I used textile paints to screen onto fabric for the journal quilt. This year, instead of doing one journal 8 1/2 x 11 inches each month, we are to do one quilt 17×22 inches (the equivalent of four pieces of paper) using at least three techniques from the Creative Quilting Book (which I really am going to review, soon I hope). We can’t share the journals with you, but I can share these faxes and some playing around that I did before beginning my 2007 Journal (which went in the mail on Tuesday… two full weeks early!).

This first piece is a pastel batik. Along one edge, you can see where I daubed paints testing for the right color. Around the edges I tried out the cranes in various colors. When I blobbed the blue paint on the screen, I had rinsed my brush and it was a bit wet, leading to too-thin paint that bled under the screen; lesson learned! In the center, using low-contrast metallic green (Lumiere paint) and gold (also Lumiere) I screened the onions… oh OW am I gonna love using this one for subtle background texture:Pastel fabric screened

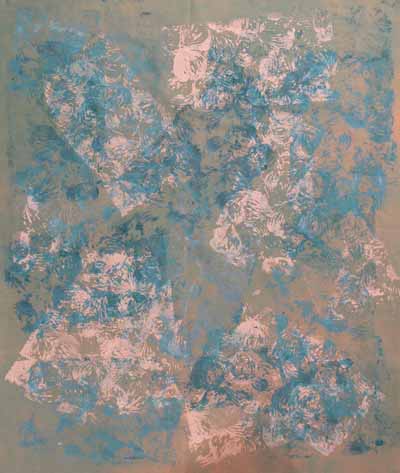
This second piece is one I gave to Kathy, since it is her (and my) favorite turqoises and teals. I began with a piece of my hand-dyed fabric…one that admittedly was a bit lacking in oomph. As in blah. So I used Jacquard Textile paint (the white), then mixed some Setacolor (a dark-ish teal) with some metallic (I think it was Pebeo / Setacolor also) along with a bit of white to get the middle-value screened onions, then more of the same but less white for the darker value. I was thinking of adding a bit of gold, but Kathy is really good at painting on fabric, so told her to take this piece and feel free to add to it and play with it:Screened fabric for Kathy

Binding with Sheer Fabrics and ribbons

Saturday, August 18th, 2007

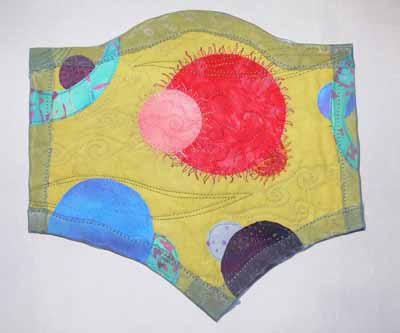
Today’s tutorial will add a bit more depth to the section of the Quilting Arts article on edge-finishes published in their August/September 2007 issue. Please order a copy here so you can have the whole article, then feel free to refer to this blogpost for more in-depth explanations! I hope someday to convince a publisher to let me do a book!!!!Sheer-finished quiltlet

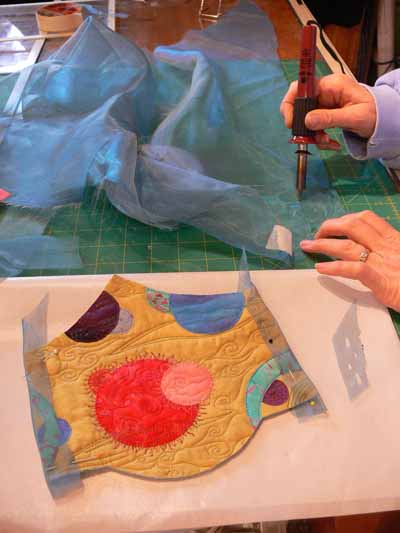
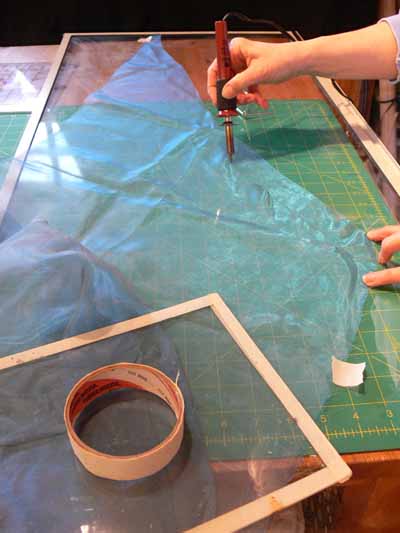
To “cut” your strips, place your synthetic sheer fabric on top of an old storm window or a piece of glass from a photo frame (tape the edges of the glass to avoid cuts). A cutting mat under the glass gives you lines to Heat-tool to cut sheers, 1follow. Secure the fabric with tape at each end.

On a corner, test your heat tool to make sure it is hot enough to cut / sear the edges.

Heat-tool to cut sheers, 2

Cut your binding at least 1½ inches wider than the desired width. For a ½” edge, cut your strip 2 ½ to 3 inches.

Hints: if you sear too close to the stitching, your sheer may pull loose. Also, you might melt your threads–eeek! Practice on a scrap and on the back side of the quilt before working on the front. Keep the heat tool somewhat vertical or you may accidentally melt the binding with the hot shaft of the tool. This polka-dot look could be really fun (what if?!) on the right quilt. Here’s what not to do:

I hope these extra photos help explain how to have fun playing with sheers as a binding! If you have any questions, just ask.

Cheers, Sarah

Facings as an edge finish

Tuesday, August 14th, 2007

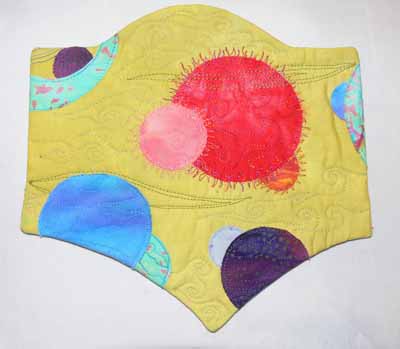
The following tutorial builds on the article published in the August/September 2007 issue of Quilting Arts Magazine. The Pillowcase (or bagged back, or escape hatch) finish for a small art quilt is simply a one-piece facing that covers the entire back of an art quilt. This method is useful if you have lots of knots or carried threads that you wish to cover, for example after extensively beading a piece. For larger quilts (or even small ones) you may not wish to cover the entire back. Instead, you can use facings. On a quilt with straight edges, like Koi, you can use a straight strip of cloth as I did here on the back / under / second side of this quilt. However, just like a dress neckline, facings work well on curved and irregular shapes. From the front, you can’t tell if this quilt is a Pillowcase backing or a faced edge:Faced quiltlet

Facings:
Borrowed from dressmaking, a facing is simply a piece of fabric that echoes the outside edges that is turned completely to the back side of a quilt. Large and small quilts with irregular edges are great candidates for facings!

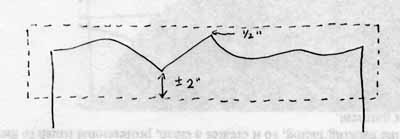
1. Cut a strip of fabric that extends ½ inch beyond the outside outermost edge and 2-plus inches towards the center of the quilt from the innermost “innie”.

Facing a weird shaped edge

2. Pin the facing to the quilt top, right sides together, on the FRONT side of the quilt.
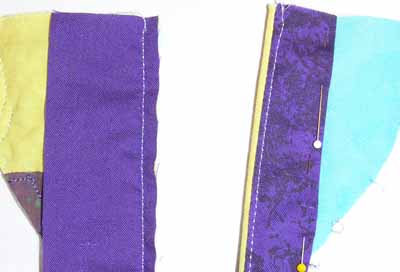
3. Sew a ¼ seam (photo below, left)

Facings–sew seam, edgestitch
4. Trim excess fabric from the seam allowance.
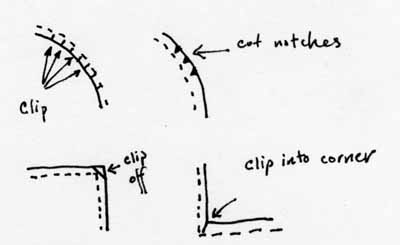
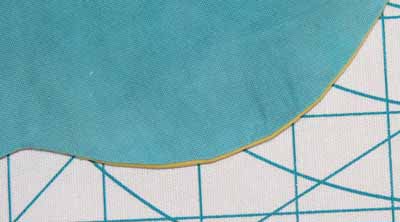
5. Clip /notch curves, clip inside corners and trim outside corners.

Facings –clip curves
6. Press the seam as stitched. Fold facing over the seam allowance and press again.

7. Edgestitch facing to seam allowance a scant 1/8” from seam line; this will encourage the seam allowance to stay put and not try to roll back to the front. (photo above right)
8. Fold facing to the back, “favoring” the edge. The little bit of yellow-green that you see in the photo below is the “favored” edge, which is a bit of the front rolled to the back.

Facings, favored edge
9. Iron the seam allowance and facings towards the center of the quilt. (See Step 9, above)

10. Turn under the edge of the facing and stitch in place. See the photo about edgestitching to see the turned, pinned edge.

11. Repeat on the other sides, turning under the short ends of the facing and stitch down to create a completely finished facing.