The blue applique vest
Since there is SO much that has happened in the past two months, I’m going to alternate between the April trip and vacation and other events. For about two years now, I have wanted to make a vest to wear while teaching applique to show the various types of machine applique and decorative stitching that I teach (two different classes), and how the samples can be used in various projects including clothing, not just quilts.
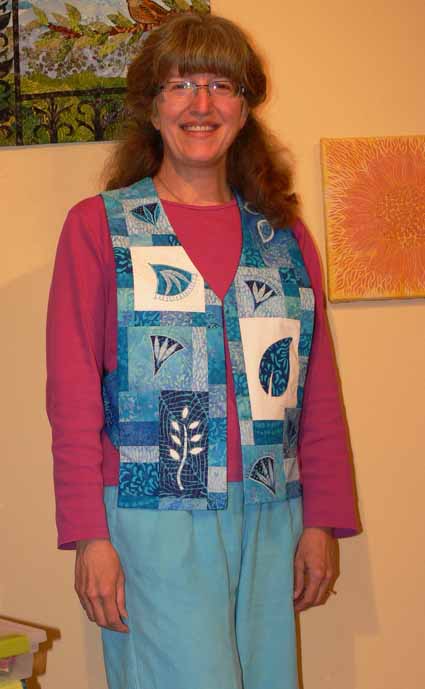
Here’s me in the just completed vest, frizzy hair, no makeup (and therefore disappearing eyes…I SO envy people with dark eyelashes!) and all:
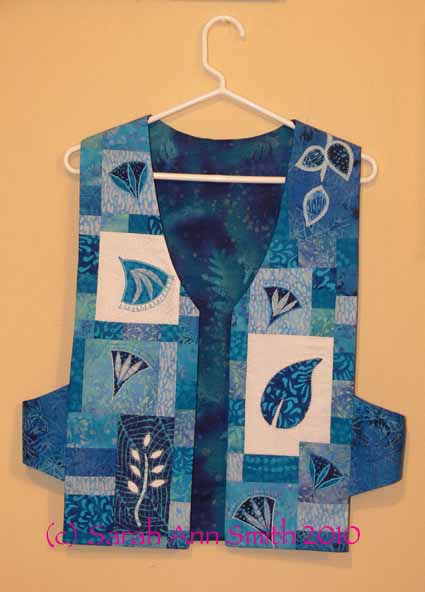
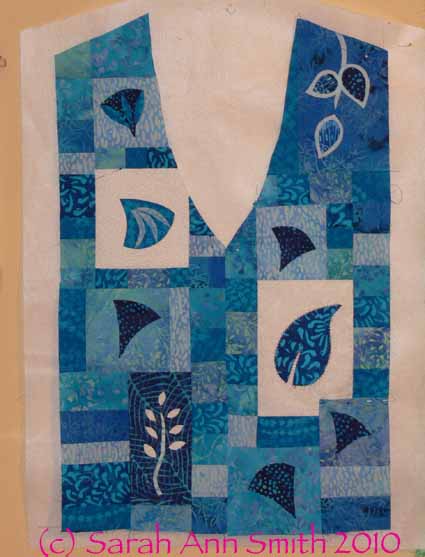
I thought pictures of the vest pinned to the design wall would make it easier to see–this is the front:
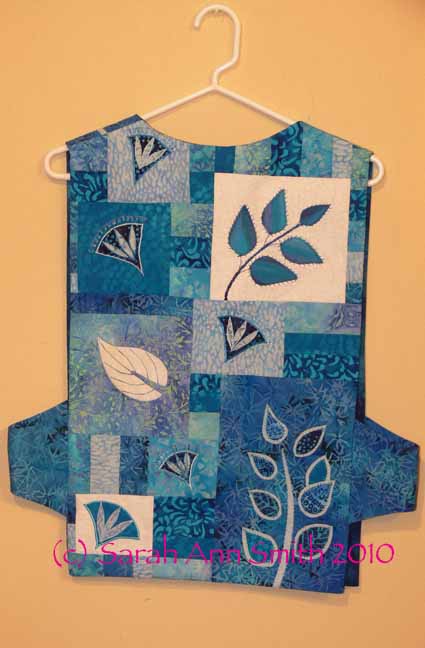
and the back:
At least 12-14 years ago, I bought Make Your Own Japanese Clothing by John Marshall (yes, THE John Marshall who teaches katazome and shibori, makes amazing silk, etc….. his website is guaranteed to keep you looking for a long time!). Amazingly, the book is STILL in print (tells you how good it is); you can find it at Amazon, here. The Japanese use 14″ wide lengths of cloth to construct their clothing without cutting into the cloth from the sides, so garments are based on rectangles, which makes for easy sewing. I developed this pattern when I made my Frayed Edges vest (seen in the second photo in this post).
In a nutshell, take your measurements or measure a vest with a fit that you like. To make the math easy, let’s say 42 inches around. Divide by 3 and by 6: 1/3 of 42 is 14. 1/6 of 42 is 7. The front of your vest needs to be, therefore, 14 inches or 1/3 of your circumference (finished…remember to add seam allowances!), the back is the same. The sides are 1/6 of the distance around you or 7 inches. It’s that simple!
When I first made the vest, I used rectangles for the sides. The bottom of the rectangle hit my hit and bent, making me look decidedly hippy and wide. So I changed the shape to arch on the bottom, with the same curve on the top. It turns out to be easy AND flattering!
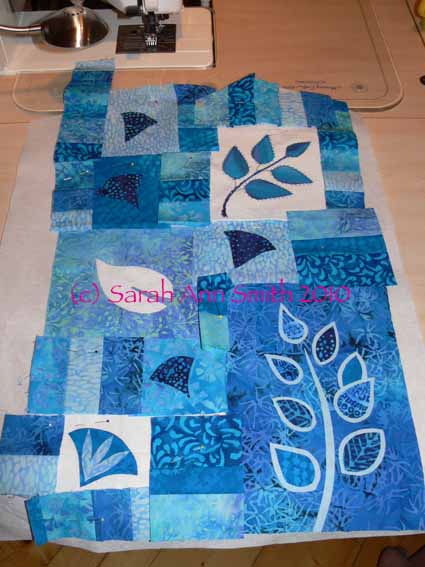
Since I had weird shapes and samples for my applique blocks, I decided to draw out the shape of the vest (used an existing vest to copy the angles for the shoulders and neckline, but modified the front “v” to be slightly curved, again, a flattering line) on RinsAway, a lightweight wash-out stabilizer which I used as a temporary base for construction and decorative stitching. I placed the applique blocks in a pleasing arrangement, then figured out what I needed to use to fill in the gaps. I selected about 6-8 prints and cut strips 1 1/2, 2 and 2 1/2 inches, then sewed them together. I cross-cut sections to create the pieced inserts….I just used a ruler to measure the size I needed, added 1/2 inch (a quarter inch seam allowance for all sides) and cut.
In the photo of the back, the cut pieces and trimmed applique samples (not yet stitched for the fused ones), are pinned to the stabilizer. In the photo of the front, below, I have pieced together the random shapes and cleaned up the edges. The pieced fronts are now spray basted to the RinsAway stabilizer in preparation for the decorative stitching.
After stitching, I removed as much of the stabilizer as I could, and sewed up the garment using the usual way of making a vest (it’s a bit of a mind-wrap…you sew the outside to the lining except at the side seams, then turn it right side out through an opening left in the lining shoulder seam—it seems impossible until you’ve done it!). Because I tend to get warm walking around the classroom all day (yes, my feet ACHE and THROB by the end of the day), I did not add batting or quilt this one.
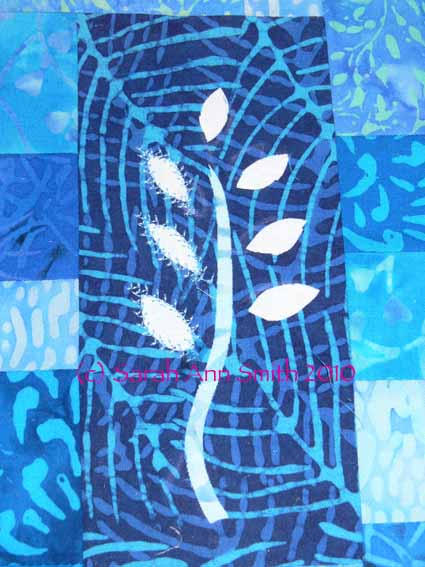
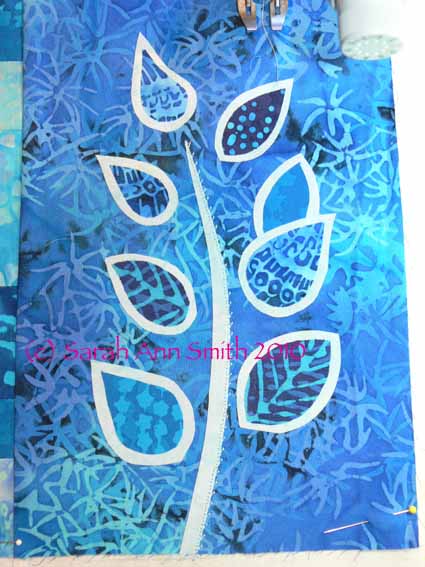
I used both turned edge and raw-edge / fused applique, with various sorts of decorative stitches. I particularly like the vine coming down over the left shoulder onto the front and the blue background / white sprigged stem (reverse fused applique) on the front. For the turned-edge pieces, I’ve discovered this new product that I love…. C&T’s washaway applique sheets (click on previous link to see the product). It has as much body as Ricky Tims’ Stable Stuff (which I still love), but it is IRON ON! You can run the sheets through your printer if you want (for example, to print off a zillion identical leaves or to produce templates for a design), cut out the shape in the C&T sheets, iron lightly to the wrong side of the applique fabric, and press the edges. You can use either a washable glue stick, starch, or just heat to turn the edges before stitching down. Way cool!
Here are some detail photos of some of the blocks–see what a difference the stitching makes between the buds on the left and the un-sewn ones on the right?:
And my two-layer leaves, which I developed for my Balinese Garden table runner (more on that in an upcoming post!):
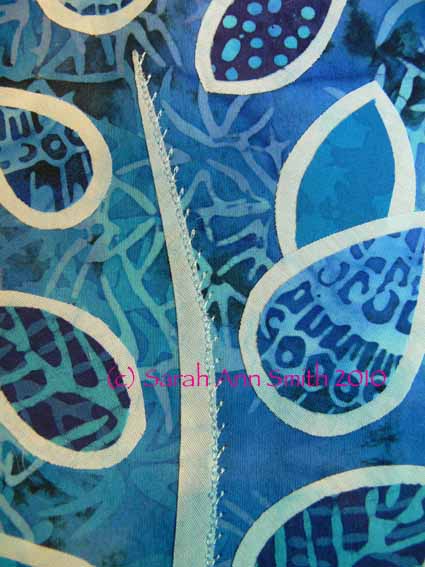
In the photo above, I’ve used a blind hem stitch, available on the most basic machines, to stitch the right side of the stem. In the next photo, you can perhaps see better. I subsesquently used a 2-sided feather stitch to outline the dark inner leaf and stitch down the lighter outline:
I came up with this 2-layer leaf because on a different project I wanted to use a busy, medium-value (not light, not dark) fabric for the background, and still use medium-value fabrics for the leaves. Set directly onto the background, there would have been almost NO contrast and the leaves would have been visually lost. By layering up the leaves like this, you get a nice contrast and outline without having to satin stitch (which while lovely is VERY time consuming, uses LOTS of thread, and may not be the look you want). Hope you like the vest!

July 17th, 2010 at 7:42 am
The vest is awesome! You are a walking sampler of your techniques!
July 17th, 2010 at 8:13 am
You have put a lot of techniques in a relatively little project and made it both practical and pretty. Setting blocks of different sizes can be challenging but I found it fun to do not only for a vest (All Reds Go Together) but also a wallhanging (Vermont Skiers) and a baby quilt for my great-grandson (Lasse’s Critters).
Straight sashing can be so boring! 😉
July 17th, 2010 at 9:25 am
It looks great, I still think it would make a fantastic wall hanging=)
July 17th, 2010 at 9:56 am
love the vest and thank you for the quilt tutorial on how to make one.
July 17th, 2010 at 10:06 am
It’s lovely Sarah! and it looks great on you!
July 17th, 2010 at 3:30 pm
Great tutorial – lots of ideas to try! Thanks!