email Youtube

Home
Galleries
Blog
Workshops & Calendar
Store
Resources
About
Contact

Author Archive

OBAMA WINS!!!!!!!

Tuesday, November 4th, 2008

Disclaimer:  political content…all of it!  Indulging for just a moment, then back to our regularly scheduled blogging ….

It is time for a change.

And the times HAVE changed.

A while back I wrote this story here, but it is time to repeat myself….  in 1975 I began college at Georgetown University in Washington, DC.  I used to fly into Dulles Airport, which is some distance from  DC, so you had to take a shuttle bus into the city (and then a cab to the university). The old downtown core still had buildings burned out from the riots and fires of 1968, the year of so many race riots and Bobby Kennedy and Martin Luther King’s assassinations.   It wasn’t long after I arrived that I realized I was — despite being in a relatively progressive city — two states south of the Mason-Dixon line (for my non-US readers, that is where the Northern and Southern states divided during our Civil War, 1861-65).

I think it was when I arrived for September…either in ’75 or ’76…the bus driver on the shuttle from Duller to DC (he was an African American) announced “now all you smokers, you gots to sit in the back o’ the bus, where I used to have to sit.”

I was dumbfounded.  I had grown up in California (and a sheltered middle-class white girl, at that).  There was very little discrimination there, and at least in the lamentably lily-white county where my family lived, few African Americans.  There were the Chinese (who were brought in to build the railroads in the mid 1800s during the Gold Rush), the Spaniards and Mexicans (Mission San Rafael was in the next town over, and the northernmost of the Spanish missions is in Sonoma, 32 miles north of our house), and of course the Anglos.  Even the Russians came to California, to Fort Ross, 62 miles north….the Mexicans and the Russians nearly met! So it was a shock for me to come face to face with someone who had grown up with the oppression of racial discrimination, and yet could joke about it (it’s that wonderful Freedom of Speech thing! and a good sense of humor on his part).

On November 4th, our nation elected Barack Obama as its next President…..   one of the joys is that his daughters don’t really yet understand that it is so remarkable for a man of  Caucasian and African parents to be moving into the White House.   A mere 44 years ago, Lyndon Baines Johnson signed into law the Civil Rights Act (if you haven’t read Johnson’s speech, it is really amazing…Wikipedia must have it), to protect the rights of ALL Americans, not just the white ones.  It was a law that was needed because discrimination was rampant….lynchings still happened, race was still a significant factor.  It is a factor still, but nowhere near what it was–and we’re doing better.  The Civil Rights Act outlawed segregation in schools, public places, and employment; it protected all races, and before passage they added women, too, from discrimination …the impact was HUGE and remains so to this day.

I am SO PROUD of what our nation has done…on November 4th, 2008, and over the past 45 years.  I am just as proud that so many people registered, voted, that this was one of the most widely anticipated elections, that so many who had never voted before were moved to become part of our right and responsibility to vote.   I heard that in one of the Carolinas, more African Americans had voted….on MONDAY, the day before official election day (via absentee or early balloting) than in the entire 2004 election…way cool!

Perhaps because I’ve lived overseas and in the third world, I appreciate a bit more easily how astonishing it is to live in a democracy and be able to vote… that the culture of democracy is so ingrained that even kids on a playground will take a vote to see what game to play at recess.

I am proud.  And I am REALLY happy!  It is time for a new era, and it has begun…..

Anyone want to join me in a rousing chorus of God Bless America?!!!!

Addendum, Weds. morning,  Nov. 5th…. they are reporting a turnout of 64 percent of the population…that is the second highest in history (usually I think elections are in the 25-50 percent range)… apparently 100 years ago, in 1908, 66 percent voted.  With the larger population, tho, the turnout is by FAR the largest number of citizens who have voted.   WAY COOL!   I hope the enthusiasm for being part of the process holds…..

Hawaiian quilting with the Backroads Quilters

Monday, November 3rd, 2008

On Saturday, October 18th, I was fortunate to be able to teach Hawaiian Quilting by Machine to the Backroads Quilters in Gardiner, Maine.  The Backroads Quilters are a wonderful, active and experienced group of quilters.  Similar to my local chapter, the Coastal Quilters, Backroads is a chapter of the Pine Tree Quilt Guild, Maine’s state-wide guild (which rocks!).

Taro, 6 inch block

I taught my paper-snowflake variation on the theme of Hawaiian quilting.  It is easier on the hands when cutting, lets you get stems and narrow bits that are equal (or nearly) in size (if you do the traditional fold the cloth into eighths the stems can range from narrow to blobby), and–if you do fusible applique and satin stitch–gives you two blocks from one fused-up square of cloth.  For this class, I did up a new 6-inch block.  Students get two choices of small blocks, turtle or taro plant, plus they can also select one of the five designs from Nourish the Body, Nourish the Soul–you can see that quilt here. Here is the taro block with two colors of satin stitching and assorted outlining stiches:

I always love to see students take my patterns then reinterpret them in their own color choices.  The small blocks are offered because it allows a student to apply the adhesive web, cut the pattern, cut out the motifs, fuse and sew a block in one class.  Other students prefer to dive right in with a full size block, but often don’t get a lot of the satin stitching done during class because the larger blocks take more time to  pre

pare and cut.  Here is a lot of eye candy!

Ann’s block being cut out:

Ann’s block, being cut

and fused and ready for checking out thread choices:

Ann’s Ulu / Breadfruit block

Nena used a contrasting lavender thread for a nice bold outline on her taro block:

Nena’s 6 inch taro block

At first, this student wanted to use orange thread, but after doing several stitchouts, decided she liked the soft look of the navy.  By using the navy thread, she “popped” the small sprigged flowers in her print fabric and still gave a subtle framing to the edges of the pattern.  I LOVE this one! (OK..I love ALL of them….)

Pineapple…the subtle navy stitching is PERFECT

Here’s how that block looks straight on, before stitching–compare with the upper left pineapple in the photo above:

Pineapple–the one with navy

Another small taro block ready to be stitched…this is reverse applique.  I like to fuse dark on top of light so the lighter fabrics keep their light, clear tones.  Her other block has a navy taro leaf on the aqua print.

Another small taro

Sometimes busy prints can be challenging in Hawaiian quilts, but this one works so well… the Wedgwood  blue  thread picks up the lighter color in the print, yet provides a solid line to separate the print from the background.  AND she managed a few PERFECTLY mitered points!

A great paisley turtle, a 6 inch block

Another pineapple block…this is the reverse applique…the bright blue is fused onto the white:

Blue-white pineapple

Often variegated thread doesn’t work so well for satin stitching unless you WANT a really striped look.  But this thread, Blendables by YLI, is a heavy cotton with longer, and more gradually blended, color changes.  I really like how it stitched out:

Taro with variegated thread

I hope you enjoyed the class as much as I did!  Thanks to the ladies of Backroads Quilters, and to Ann and Nena who invited me up to teach and made all the arrangements.

Printing with Leaves

Friday, October 31st, 2008

A while back, I blogged about preserving leaves with glycerin and freezing for later printing (as in during winter when there are no leaves on the trees), here.  I was fortunate to be able to demonstrate leaf printing at Open Studios, part of the Make It University section of the International Quilt Festival in Houston, on Wednesday evening.  I’d like to share here what I did, and include some written directions for those who were able to stop by my table and who surf in to my blog.
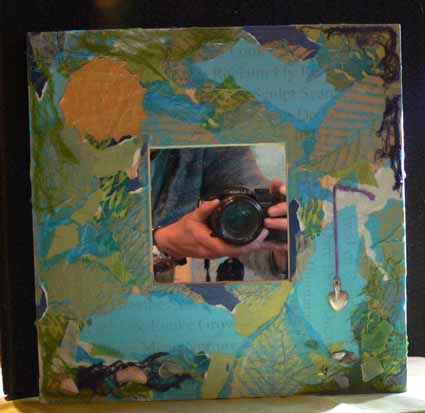
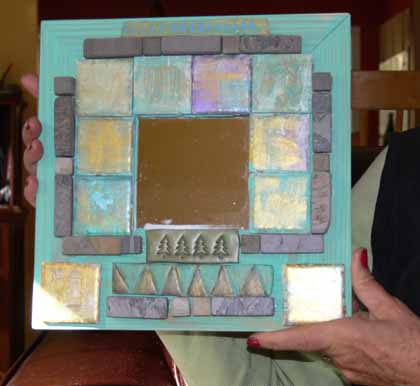
Mixed Media Mirror with leaf print tissue

Since the MIU is about mixed media, I decided I had best do something mixed media, even though that is SO not me….   When Deborah flew up to Maine and we all got together (see the post here), Hannah gave us all Ikea mirrors–the cool square ones with the wide wooden frames.  I decided I’d do a mixed media thing, since that is what Hannah loves, and do some leaf printing on paper as well as cloth.  I then used some papers from a journal kit Deborah made and gave us all one Christmas, then added a milagro Kate brought back from a trip to the southwest a couple of years ago.  Finally, I asked Kathy for some of her dyed cheesecloth–I wanted to add something that was from each of the five of us. The result is above! I LOVE IT!

Late note:  after writing this post but before taking the picture, I remembered the sea glass and shells we collected this summer with Hannah down at a beach / cove not too far from her house.  I decided to add some to the bottom of the mirror and love the addition (I used K6000 glue…the stuff that I think could hold up a roof).  I also like the reflection of my camera and hands!

Here is what the leaves look like soaking in glycerin… I use about a one part glycerin to four parts water solution, but I’m really slapdash about it… I pour the glycerin into the lasagna pan,  add enough water that I’ll fit all the leaves.  If the water feels watery and not slippery like glycerin, I add more of the latter.  Very scientific.  Ahem.  The green leaves are fresh; the brown ones were collected brown about 4 years ago…they’ve been in the freezer all this time and still work for printing!
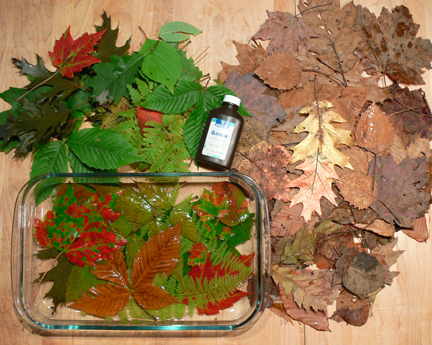
Glycerin leaves

To do your own leaf printing, first you need your supplies:

•    Textile paints
•    Fabric or paper for printing
•    Sponge roller
•    Soft rubber brayer
•    8×10 glass, edges taped or plastic page protector as a palette
•    Sponge paintbrush
•    Leaves, clean and dry
•    Paper towels, parchment or other paper
•    Plastic to cover surface
•    Lightly padded surface/worktable

The last time I dyed fabric, I used paper towels to mop up some of the mess.  They were so lovely I couldn’t toss them.  Then it occured to me to use them in my leaf printing and get a two-fer!

How-to:
•    Squeeze or pour paint onto glass
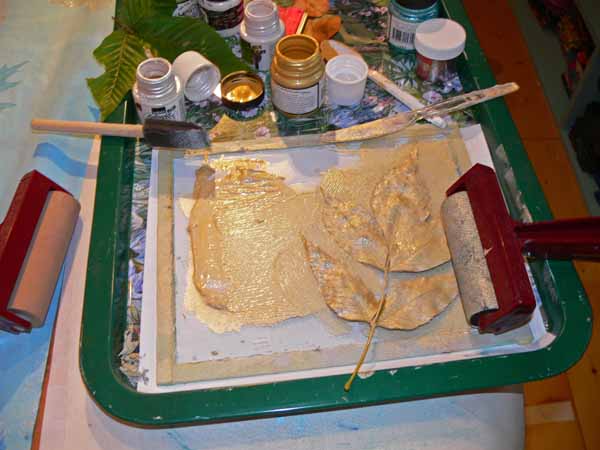
roll the paint onto the leaf

•    Roll sponge roller to create an even coating
•    Place leaf bottom-side-up on clean / dry plastic and coat with paint; use sponge roller or paintbrush (as you can see, I didn’t do that…I just squished everything onto the glass)
•    Lift leaf and place paint-side-down onto cloth or paper
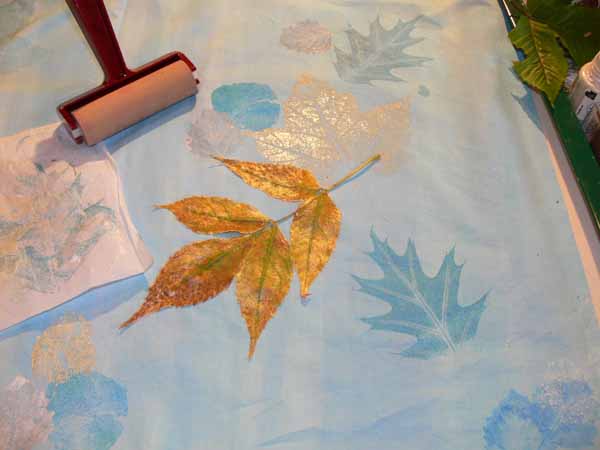
leaf on cloth

•    Cover with parchment or other paper–I used the dye-soaked paper towels!
•    Roll over leaf with soft rubber brayer (seen at left in photo above) OR press with hands
•    Remove cover sheet and carefully lift up leaf (the gold thing is the leaf with paint on it)
•    Allow paint to dry and heat-set or cure according to paint manufacturer’s instructionsThe amount of pressure applied with a roller versus your hands differs.  A brayer will produce a finer, lighter print.  If the contrast between paint and cloth/paper is too subtle, add more paint or try pressing the leaf onto the surface with your hands.

Hope you like!  Thanks to Barbara Delaney and Pokey Bolton at Quilting Arts for  the opportunity to participate in Open Studios, and to Cate Prato for inviting me to submit some ideas for the Embellishments newsletter. Click here to sign up for the free newsletter.
The Frayed Edges, October 2008

Tuesday, October 28th, 2008

The Frayed Edges met at Hannah’s house in Harpswell, Maine, this month.  We missed Deborah, but had a wonderful visit amid the autumny leaves and air.  As usual there is a flurry of e-mails the weekend before about who’s gonna fix what…. Kathy asked if I’d share the recipe for the turkey kielbasa-potato soup, tho she was planning on making a pie already.  I quickly volunteered to make the soup, which I’ve mentioned on this blog in years passed….. Hannah had sumptuous, blueberry-laden muffins and coffee, Kate brought a salad with fresh baby organic spinach (from the acreage next to her house no less…fresh picked…handy having a farm next door!), bacon, blue cheese and a raspberry-vinagrette dressing….she and I cleaned the salad bowl.  Heck, I could have eaten the bowl myself!  I’ll post the recipe (from Janet Wright on San Juan Island, who got it from the cook at the Cannery restaurant years ago, in Friday Harbor…the legacy of this recipe is long!) at the end of this post.

Kath’s mirror

Last month, Hannah gave each of us these wonderful IKEA mirrors…they are about 12 inches square, with a 4×4 mirror in the center.  I’ll share mine in the next post, on October 31…but for now you can revel in Kathyu’s wonderful mixed media piece made of painted 2×2 ceramic tiles from Home Depot, some stone tile (same place), and some Fimo clay tiles that Kathy made!  I  LOVE IT!

I shared my leaves table runner and my Batiki bird, which shipped off to Lark books on the 23rd, for inclusion in a book that will come out late next spring…hmmm…. I see I haven’t blogged about it…OK, will do that in a week or so!  Hmmm….only have in-progress pics of the table runner on the blog too…gee….you’d think I’ve been working instead of blogging LOL…OK, I’ll share that one too!  Give me a chance to take pics and write the blogpost…..

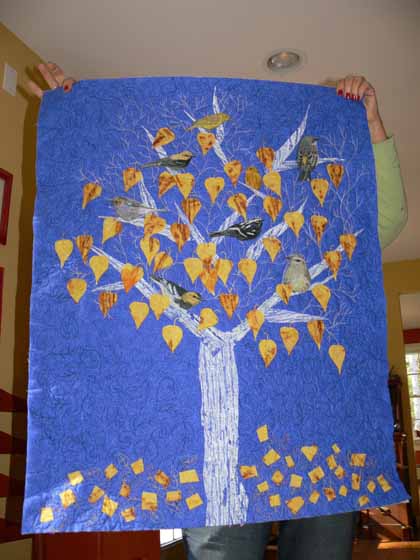
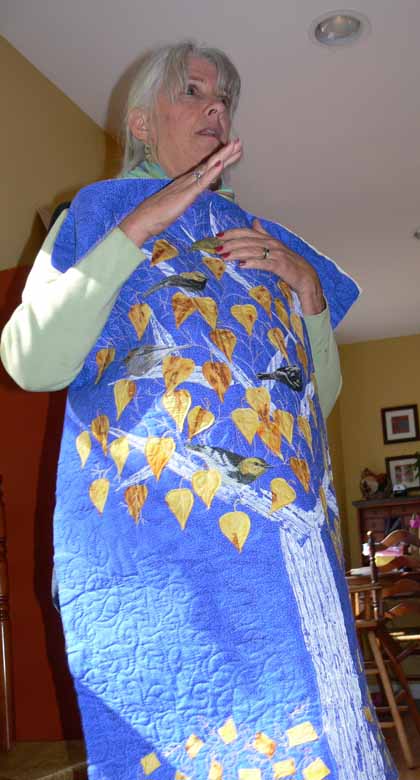
As always, Kathy shared her latest project, still in progress…. to get an idea of the size of it I’m including this photo, tho it isn’t the best:

Kathy with tree quilt

Here’s a better picture of the quilt…..

Kath’s tree quilt straight on

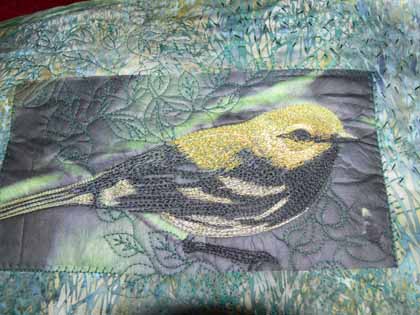
Kath is using this cool technique of printing the birds onto tissue paper, fusing them to the quilt, then stitching the daylights out of them….yields a very accurate, realistic and stunning bird.  You may have seen this picture already over on Kathy’s Studio in the Woods blog:

Kath’s bird

And here’s the crockpot soup recipe:

  •  Most of a 5 pound bag of Yukon gold (or similar) potatoes
  • 1 yellow onion, chopped
  • some butter and a dribble of oil
  • 1/2 pound turkey kielbasa (buy it in a 1 pound package, freeze the other half)
  • 8 cups chicken broth / stock (more or less)
  • 2 bay leaves (if desired)
  • pepper
  • stoneground mustard

Scrub and cube the potatoes into pieces, a small potato can be cut into four, a larger one into pieces that are about 1 1/4″-ish square-ish …just cut them up!  Place into large crockpot (turned off at the moment). My crockpot will hold a 5 pound bag minus four or five potatoes–this brings the potatoes to about 1 inch below the rim.

Slice kielbasa in half lengthwise, and again so it is in four quarters.  Cut into 1/2″ chunks.

Add butter and the dribble of oil to skillet  and saute onion until clear.

Push onion to outer edges of skillet

Add some of the kielbasa and brown.

Push that kielbasa to the side and brown more…if pan is too full, dump onion and kielbasa into crockpot.   Brown remaining kielbasa.

Pour a cup or so of the chicken broth into the pan to deglaze.  Turn off heat under skillet and pour contents into crock pot.

Add enough broth / stock to cover the potatoes…pretty much up to the very top of the crockpot.   While adding the broth, stir to mix up the onion and kielbasa througout the potatoes.

Add 2 bay leaves, pepper and whatever else you’d like to season with.

Turn on low for 12 hours; OR turn on high for 1 hour, then to low for 6 hours (or low for 6 hours, then high until the potatoes are tender).  When I make this for the Frayed Edges, I make it after dinner the night before and let it cook all night.  It is obviously not on while in the car, then I plug it back in at our destination for the day.

Just before serving add a large dollop of stoneground mustard, to taste, and mix.  I love the tangy goodness (this is the secret ingredient that makes this soup glorious)… I know it is odd… you don’t actually taste mustard, just flavor!

I’m SO GLAD they like this soup, as my family pretty much doesn’t, and an entire crockpot full is too much even for me (it’s about a week’s worth of meals!).

Moo Cards

Sunday, October 26th, 2008

Oh what FUN!  I’ve been hearing about these Moo Cards for a while now on the QuiltArt list.  When I got the opportunity to participate in the Open Studios (blogpost here), I decided it was time for something a bit fancier than business cards made on my printer at home.

If you stop by my table at Open Studios on Wednesday, October 29th, I’ll have them there for the taking!  Also when I demo in the Misty Fuse booth on Thursday and Saturday mornings, somewhere around 11 or 11:30 ish……. See you there I hope!

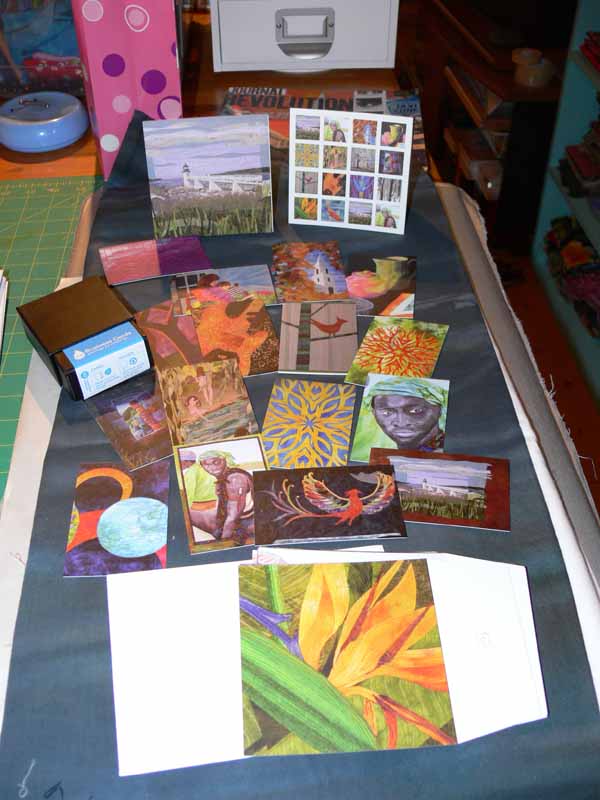
Wide angle of Moo Cards

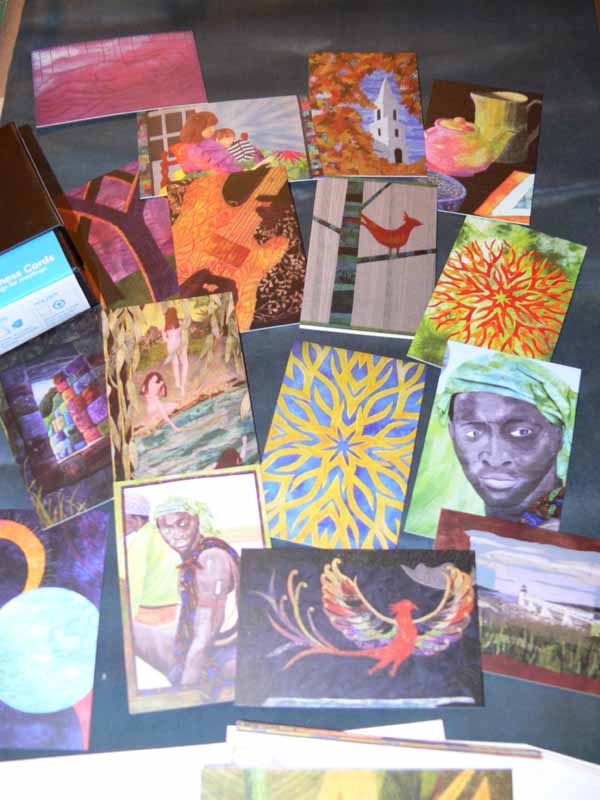
I had not realized the cards were printed in England, but even at that the cost for 200 2-sided (color both sides) business cards and sixteen easel notecards was only $120 including shipping!   The quality of the cards is astounding…. in the photo above, you can see the selection of cards (I had 24 different images, could have had more but decided just to go with these).  One side of the heavy, glossy cardstock is one of my quilts.  The reverse (and of course forgot to include that in the photo) has another photo… I used the yellow-blue Hawaiian quilt since it is also the background for my website and blog plus all my contact info in a coordinating turquoise ink.  They also include a nice black card holder box (on the left toward the back).

The notecards, seen at the back, have a square photo and a trapezoid-shaped white “wing” that bends back, allowing the card to stand up on a desk.  The sixteen cards plus envelopes cost about $25….(that was included in the amount above).  Anyway, I am thrilled with the quality, and will order from them again.  Here’s a closer view of the business cards:

Moo cards, business cards only

Here’s to hoping the cards will, eventually, lead to some contacts that might lead to some teaching jobs!