email Youtube

Home
Galleries
Blog
Workshops & Calendar
Store
Resources
About
Contact

Author Archive

Windows of Hope, a Journal Quilt for 2007

Saturday, November 3rd, 2007

As I mentioned last month in my post about the book Creative Quilting: the Journal Quilt Project, this is the final year for this fantastic journey. Instead of making nine paper-sized quiltlets each month, this year’s assignment was to use three (or more) techniques used in journals in the book to create our 17×22 inch (vertical orientation) journal quilt. Here is my journal quilt for this year:

Journal 2007 full

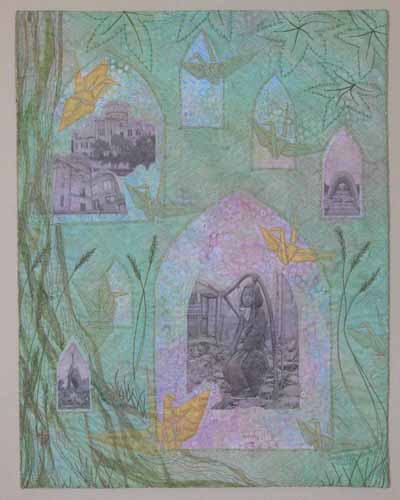
For several years, I have had lurking in my brain a quilt about peace, and the horrors of war, and its innocent victims. The need to create that quilt stems from a visit to Hiroshima in 1996 when my mom invited me to accompany her on a trip to Japan. She had served in Japan in 1946-47 with the US Occupying Forces, and fell in love with the country, its people and its culture. This quilt is a test-run for several techniques which I hope to use on the large Peace Quilt one of these years.

Jnl 2007 detail 2 girl

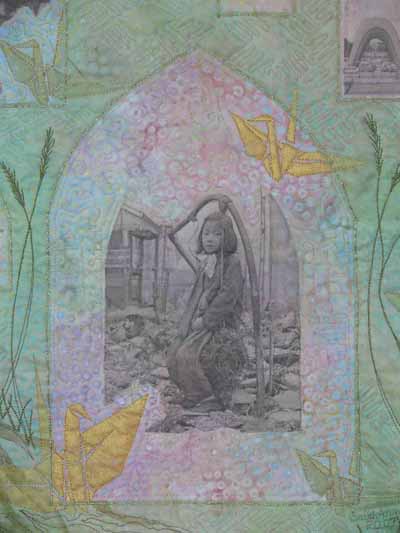
Mom has a photo album from her two years there, plus her travels to mainland China (before the Communist Revolution, which came two years later), Thailand and Cambodia. One photo in particular, above, was riveting: a somewhat melancholy girl sat on a make-shift swing someone had fashioned from the rubble of a bombed-out building in Tokyo, 1946. Mom purchased the photo from a Western photographer, but doesn’t know any more about it. For my first technique, I took a digital photo, manipulated it to improve sharpness and give a faded “old photo” look, and printed it on fabric. If ANYONE has any idea who took this photo, please tell me!

That photo alone, though, wasn’t enough to carry the quilt, so I decided to include some of my photos of the ruins of the Hiroshima dome, the cenotaph to mark the deaths of all the victims of the atomic bombs and the Children’s Peace memorial.

Jnl 2007 detail 1

That memorial features an origami crane in the sculpture because cranes represent good luck and long life. That led to the second of my techniques: a thermofax screen.

A what you ask? Do many of you remember dittos from school, before we had photocopying machines? We the ditto masters were made with these machines that can also be used with a special plastic-coated mesh fabric and a carbon photocopy (or pencil drawing) to create a stencil. I ended up having to order away for the stencils (fabulous service from Pam Relitz of Flying Images, rockitz@tds.net), but can see that I need to save up to buy one of the antique thermofax machines so I can make my own screens! (If there is anyone out there in blogdom who has blogged the process with photos–Gerrie? Rayna? send me a link and I’ll add it here).

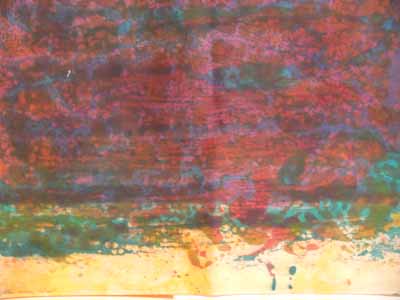
I made my origami cranes, photographed them, traced out the exact lines at the angle I wanted, and had several screens made, then used metallic and regular paints to screenprint onto the background batik fabric.

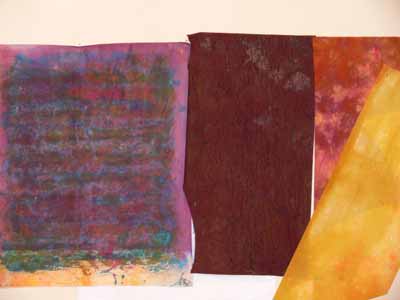
I was having trouble coming up with a coherent “whole”, however. In browsing the Creative Quilting book (while waiting for hubby who had just had rotator cuff surgery and was at post-op physical therapy), I spotted the ogival window shape in Larkin Van Horn’s piece and new I had my organizing element. I rooted through my sheer fabrics, intending to dye or paint something into which I would cut windows, when I came across a rejected but HUGE painted sheer piece (about 48×60 inches) that was the first attempt at one of the overlays for Tree Spirits 2: Song of the Solstice Grove (can be seen on my website here). As I tossed the piece over the batik the tree trunk landed on the left side of the quilt…PERFECT!

After sketching out the location of the windows on the quilt, getting a nice balance of large and small yet permitting the screenprinting underneath to be revealed, I made a paper pattern which I placed under an old storm window. I used a heat-tool (aka stencil cutter) to cut the windows in the sheer fabric. Since synthetic sheer fabric is notoriously wiggly, I lightly sprayed the sheer with basting spray to adhere it to the storm window before cutting; because the fabric was light, I could see the paper pattern underneath and cut the windows exactly in the correct places (a metal ruler helped on the straight edges!). I then placed the sheer over the background, couched (stitched) gold yarn around the windows, and quilted the entire piece.

The serendipitous placement of the treetrunk on the left led to the overall quilting design, with bark, grasses and leaves and branches. In the background of the overlay I used a basketweave pattern, while I used a swirly cloud motif inside the windows. Finally, I couched two twisted lengths of the gold “yarn” (more like a fine cord) to what would become the edges, added facings which were turned to the back, and stitched down the facings.

I hope you like it…and thanks to all who managed to read all the way to the end!

Surgery update

Friday, November 2nd, 2007

Joshua breezed through surgery, though was quite upset that he had to stay overnight in the hospital–a routine thing to make sure he comes out of the operating-room-pain-meds OK and is able to tolerate the pain with oral pain meds. As usual, surgery began late, but then the procedure to remove the screws used to hold the rod in his thighbone were removed (along with some bone growth where there shouldn’t have been any) since the screws were bothering him (you can feel them from the outside of his hip!) and he is well-healed on that bone.

Then they removed the external fixator, the metal stuff on the outside of his shin and replaced it with an ace bandage and a boot cast which he will wear for two weeks. At long last, next weekend he and I will go school clothes shopping! The doc said he can take the boot cast off while in the dressing room, just to wear it while walking. They did a strength and flex test on the shinbones while he was in surgery, and all is fine. He’ll be home sometime early Saturday afternoon we hope….at which point I’ll be teaching machine quilting in Rockland at Quilt Divas.

Thanks to all for your good wishes…clearly they made it to the OR in Bangor and whizzed things right along!

Joshua update

Thursday, November 1st, 2007

Tomorrow is Friday, November 2nd, and if all goes well, will be the sixth and hopefully FINAL surgery for Joshua (at least for this year…maybe one more in a year or so). Yes,  the rods and pins and hardware screwed into his shinbone are to come out! So if you chance to see this post on or before Friday, send good thoughts toward Eastern Maine Medical Center in Bangor, where he will be in surgery to remove the pins, a screw from the rod in his femur (thigh bone), and some bone growth that shouldn’t be there near the screw. Hopefully the last two items will help alleviate the pain when he rolls over on that bone-y, lanky hip! (I don’t think I EVER had that problem…..sigh….)

I’ll post an update at some point over the weekend.

Book Review: Creative Quilting: the Journal Quilt Project

Wednesday, October 31st, 2007

BOOK REVIEWS:

JQ Book cover

Karey Bresenhan’s book Creative Quilting: the Journal Quilt Project, (available here) came out about this time last year, and I intended to blog about it then, but life got away from me (what a surprise). Even if I didn’t have five (!!!) journals–small art quilts– in this book, I would recommend this 272-page tome heartily. I think this book will become a benchmark publication of where art quilting is in the earliest years of the 21st century. It is truly a remarkable, inspiring, and educational book that belongs on the shelf of every person who loves art quilts, whether they make art quilts or not.

So what is a journal quilt? The idea was to explore something each month–instead of writing in a paper journal, to document the month in cloth and thread and fiber and whatever, while also keeping a brief written narrative. The finished pieces were to be the size of a U.S. piece of copy paper: 8 1/2 x 11 inches, vertical orientation. I joined the QuiltArt list in late 2002 just as the first year’s journals were being sent in to hang in Houston. I signed up in early 2003 as soon as possible to participate the coming year, in part because I figured (happily I was wrong) it would be the only way I would ever have a quilt in Houston. For my January quilt, I wanted to involve my son, then in 3rd grade, since he was sometimes jealous of my quilting time. I asked and received the OK from both Joshua and Karey to use a piece of his second grade artwork as my very first journal:

January 2003

I cannot believe, now, how many firsts were in that quilt: first time using metallic thread, first time painting on fabric, first time fusing sheers and beading on a quilt! Now, those techniques are standard fodder for me. It is simply not possible to over-state how much doing the journal quilts has contributed to my development as an art quilter. This is the quilt and the project that launched a career! Best of all, it not only made it into the book, but is also included at thumbnail size in the introduction. You should have seen 13-year old Joshua’s eyes grow wide and fill with pride when I got the book and promptly opened it to show him HIS artwork (as interpreted by me)! That look is a gift from him to me that I will treasure forever.

The book is divided into seven chapters:

  1. Series
  2. Stories
  3. Flowers, Plants and Trees
  4. Animals and Insects
  5. L andscapes and Special Places
  6. Faces and Figures
  7. Abstract

Some of the most amazing works are those where the artist worked in a series in a given year’s journals. Maria Elkins and Rachelly Roggel’s are the ones that first spring to mind. I don’t think ANYone, in the six year run of this project has better utilized the potential for stretching and development through these quiltlets than Maria. By clicking on her name you can get to her gallery page, and from there view each year of her journals…prepared to be inspired and exhilarated!

The stories are equally amazing, from inspiring to heartbreaking. Some are humorous, like the woman undergoing chemo who left her hair on the sofa, literally (and used a tuft of fake fur on her pictorial version). Others are heartbreaking, documenting loss of loved ones and tragedies both personal and national.

The book is not a project book, but each entry shares the materials and techniques used by the artists. If it can be done to, with or on fabric, I think it was done in one of the journals! If you want to learn how to do a technique, you can go search out classes, technique books or magazines, such as Quilting Arts, that will teach you the how-tos. Creative Quilting is a book to savor and dip into at random, enjoying the journey.

January 2004 journal quilt

I was honored when Karey opened the section on Plants, Flowers and Trees with three of my journal quilts, including a full page (nearly life-sized) reproduction, above, of this quilt which features one of my photos printed onto cloth and quilted intensively. Also included are my January and February 2006 journals:

Jan 2006

Feb 2006

2007 is the final year of the Journal Quilt Project. This year, instead of making a different journal each month, Karey asked us to make a single piece 17″ wide by 22″ long (or four pieces of paper together) that used at least three techniques that were featured in journals included in the book. When the International Quilt Festival in Houston opens to the public on November 1, I will be able to share my journal for this year.

Even better, nearly ALL of the 400+ journal quilts in the book will be on display in Houston, in the order in which they appear in the book. I wish I could be there to see them, but will be content that I have had the unbelievable opportunity to learn and grow through this remarkable project.

Color Mixing for Dyers, week 2, continued

Monday, October 29th, 2007

As I mentioned earlier, we began our five-day workshop with Carol Soderlund working with thickened dyes and resists. As with textile paints, you can apply color to cloth with stamps, paintbrushes, rubbings (put stuff underneath and rub over it to get a relief, like a gravestone or temple rubbing), paint rollers (sometimes textured by wrapping with rubber bands or scored with a knife), mono-printing and more. Carol invited us to bring previously dyed cloth to over dye and print, so I selected a couple of fabrics known to dyers as “dogs.” Bleah. My first dog was a pale peach that was nearly solid and totally boring. I had yards of it. Ick. I tore the cloth into several pieces and started playing.

Peach to bubbles in progress, early

This first photo shows three of my pieces in progress. On the left is a cloth with Elmer’s blue washable school glue used as a resist (more on the blues and greens in a following blogpost). The bleah peach is in the center, with the first monoprint on it, and a fairly yucky monoprint on the right on white PFD (Prepared For Dyeing) fabric. PFD is cloth that does not have optical brighteners or other chemical treatments on it, so that it is ready to accept dye without “scrubbing” or washing.

The monoprinting was the one technique I hadn’t tried with paints, and I especially liked the visual texture created when you take a print paste mix, a gelatinous mix to which you add dye concentrate or dye powders and a dye activator (the latter added at the last possible moment), smear it on heavy vinyl (think the stuff old biddies used to use to cover and protect the sofa), wait for the goo to separate into blobs, then place a cloth on top. Carefully pat the fabric onto the gel, then lift the cloth off and “batch” it. Batching is when you allow the damp fiber-reactive dye react and form a chemical bond with the cotton cloth, usually for a period of 4-24 hours.

This photo shows four diferent pieces of cloth, all of which began as the same ugly peach (visible at the bottom of the piece on the left):Overydyeing peach

The one on the far left is my favorite… I love the way the blue print paste mix made a network of fine bubbles. Since I didn’t care about what happened to these fabrics, I think I did about three separate monoprints on this one chunk of fabric. Here’s a close-up:

Peach to blue bubbles

The darkest piece in the 4-piece photo (the picture above the photo immediately preceeding this sentence) was first rollered with a paint roller wrapped with rubber bands, then dipped in thickened dye. Next I did what Carol calls “black work”, where thickened black dye is put into a squeeze bottle with a fine tip. Since I was tired that day, I opted for the ever-easy and always-usable “tree bark”. Finally, I overdyed the whole thing to make it deep brown. Here is a picture of Carol showing a cheery and bright piece on which she did some black work:

Carol’s blackworkAnd as always, the “dye rag” often ends up being the best piece of cloth. I made a warms and a cools rag, and this ochre-leaf color will get used!

WIpe up cloth greens

I’m totally NOT into surface design, but I did have fun, and the next post will show some of the better pieces I made. They are blues and greens for a challenge piece that (eek, gasp, gulp) needs to be DONE by December 1! Fortunately, I have the idea done, the first sketch begun, and the fabric assembled, dyed, etc, so I can do it. So Larkin, if you are reading this, don’t panic. It WILL be ready!

Stay tuned for more pictures from this workshop, but in the next couple of days I have a few other things to share first……