email Youtube

Home
Galleries
Blog
Workshops & Calendar
Store
Resources
About
Contact

Archive for the ‘Travels’ Category

Anthea Blouse in Sky Blue Linen

Thursday, October 6th, 2022

While visiting my favorite local shop, Fiddlehead Artisan Supply, one of the young women working there had on her version of this blouse. Asked the pattern name–Anthea by Anna Allen–went home and ordered it! The colors I’m wearing are Maine Summer and it is so flattering to many body types and comfortable.

Today’s blogpost takes you through making an entire blouse, which presser feet I use on my Janome (I’m a brand ambassador and compensated, but I’d say all this good stuff anyway…they rock!) m7Continental, why and offer tips and tricks for garment construction. Pretty much all Janome machines have or have available these presser feet with the possible exception of the automatic buttonhole, which many but not all of the Janome models have. Comment and let me know what more you’d like to know and what you’d like me to feature on the blog! I’m scaling back travel teaching and hope to have more time for this sort of thing.

The first thing to do is sew your side and shoulder seams. I opted for French seams for a clean, no-fraying finish. With a 5/8″ seam allowance, I sewed with the WRONG sides together at 3/8.” First press the seam as stitched (flat), then trim to a scant 1/4″ and press the seam allowance open.
Be sure to trim off the whiskers–you won’t be able to coax them inside the enclosing seam and trimming them later.is a headache.
This shows me holding the fabric with right sides together; the fabric is folded EXACTLY on the first line of stitching. You then sew 1/4″ away to enclose all the raw edges.
Sew the second part of the French Seam at 1/4″. If you’ve trimmed any stray threads/whiskers, you’ll have a beautiful clean seam. Press to one side (for my blouse I pressed to the back). Notice that the edge of the fabric/seam is on the 3/8″ line but the needle is moved right of center to be at the 1/4″ seamline.
Next, I am stabilizing the button band by using cotton voile (preshrunk) as my interfacing. Unlike the polyesters or fusible we are used to using, it provides strength without bulk and retains a soft, fluid hand to the garment. I sewed the edges in place (so the strip won’t wiggle and wad up during use). The zipper foot is one of my favorite ways to get a perfect, consistent edge: set the side of the foot on the edge of the interfacing and move the needle toward the center. Be sure it won’t hit the foot but also doesn’t ride on the very outer edge of the interfacing and chew it up. ON the left you can see stay stitching.
I’ve folded the cut-on button band to the inside and am now stitching it to the front. When I have a “lip” or folded edge and want to edge stitch, I use either the edge stitching foot (on the right, which I think of as the Ice Skate with the metal guide in the center) or the over cast foot (on the left, in use). Using a straight stitch, place the foot so the blade is snug against the fold and move the needle to make a nice, narrow topstitch. Be sure the needle won’t hit the wires in the presser foot by hand-walking the needle for one or two stitches.
Next up: applying a bias binding to enclose the seam and act as a facing on the neckline. Here I’m using what may be my favorite presser foot, the F2 appliqué foot. The wide open toes and clear visibility help me sew more carefully and precisely. This photo applies to both facing the neckline and covering the edges of the set-in sleeve seam.
Buying a GOOD quality tailor’s ham and base to hold it has been one of the best, most useful purchases of the year. After 50 years of using my mother’s horrid old ham, I’m ready to sew! Here I’m pressing the bias in place on the neckline. You can see the narrow French seam on the shoulder in the center of the photo. As I press, I am easing the bias so that it lays nice and flat. I used my seam gauge to make sure the depth is even, then edge-stitch all the way around the neck.
Once the body is complete (except for the hem), it is time to start the sleeves. Although I have sewn garments for almost (GULP) 60 years–yes I started very young–I’ve been taking an outstanding online course with Philippa Naylor, Garment Makers Question Time. The price is phenomenal for the amount of instruction you get each of the 12 months. More projects coming up! Anyway, I learned to set the gathering stitches at 1/2″ and 3/4″ and sew down the middle at 5/8″. Philippa’s way works better: sew your gathering stitches one thread into the seam allowance from the final seam line and 1/4″ closer to the raw edge. Gather, distribute the gathering appropriately, and then sew the seam just barely to the left of the left-side gathering stitch. I like using a thin bamboo skewer to coax and ease the gathers as I stitch. Again, I love that open visibility foot!

Here is a link to Philippa’s Garment Makers Question Time home page. Highly recommended!

Here is the sleeve with the seam sewn and gathers gathered. I was a tad leery that the shoulders would be too narrow, but I did the right thing and made a toile (practice garment) out of cheap cheap cheap white fabric, and the sleeve seam is indeed set in from the shoulder point–this helps the gathers get that nice rounded puff! For the hem, at the top of the next photo, I sewed a linen bias strip to the right side, turned to the inside, and hand-sewed it into place.
LOOKIT that perfect match! On the first try no less! Once the sleeves are sewn to the bodice, you’ll need to finish the raw edges. The gathers in the sleeves make it too thick for a French Seam, so I chose to use I used a bias edge finish similar to a single-fold bias binding on a quilt. On the neck, the bias was entirely folded to the inside of the garment. Here, you stitch the bias strip of fabric–a lightweight cotton lawn in lime green–to the seam, wrap it around the raw edges, then stitch in the ditch to secure it. I also managed a perfect join on the bias for the “cuff.” Note that the pattern has a wide opening for the bottom of the sleeve–way too wide for the size of my arms. I gathered it up more, making sure it still moved smoothly over/around the elbow, and just made mine narrower.
Covering up the raw edges where the sleeve joins the body. Again I’m using the zipper foot. For the way my eyes and brain work, I get the needle closest to the edge of the bias using the zipper foot and moving the needle as far right as it goes. Keep a hawk eye on your stitching because it is all too easy to wander and veer onto the bias.
Janome’s automatic buttonhole foot (available on select models including the 9450 and M7) is amazing. You set the button into the back and it picks the perfect size. You can fine tune it if the button is thick or thin. ALWAYS to a test-stitch on a scrap (using the same interfacing and number of layers). You can see I have carefully marked the center of the button holes plus the start and stop lines. The Janome foot has a metal base plate that keeps everything flat and feeding perfectly. Here’s a video of it in action!
You can subscribe to my YouTube channel by clicking on the YouTube link (bottom left) and then following the subscribe button on that site, I don’t post often, but there are some useful videos there. Or just click here to go to my YouTube home page.
This is the setting I used.
Worn tucked in with a linen skirt in gray. Blouse fabric is the IL-19 5.3 oz linen from Fabrics-store.com. Skirt linen is the Driftwood Linen from Fiddlehead Artisan Supply near me in Belfast, Maine; I bought the Brumby skirt pattern there, too. Yes, they do online / mail order!
I had some leftover linen, so I made a scarf, too. I sewed a narrow zigzag on all four sides, then carefully frayed the edges. Here’s the link to the pattern again: Anthea by Anna Allen.
You can also wear the blouse out–it has a narrow 1/2″ hem.
You can even wear it to Broomstick Riding Lessons (at Alnwick Castle this summer)! Funnest photo and time ever!
And you can also wear it after you have walked from Scotland to England—all the way across a 100 foot long bridge! With my oldest son and DIL on a trip of a lifetime.

Well I can’t believe it has been half a year since I blogged… that tells you how crazy busy this summer has been. All good stuff, but all at once. I am looking forward to being HOME for three straight months once I return from Houston / International Quilt Festival where I’ll be teaching again. I will try my best to be back before the end of the year…like maybe even in a month?

Down the rabbit hole to Sutton Hoo

Friday, May 14th, 2021
In 2014, I decided to travel to England again.  Back in 1978 I spent a semester in college in London, and while there saw and always remembered the phenomenal artistry in the Sutton Hoo artifacts at the British Museum.  Jump to 2014: Eli, our second son, asked if he could come.  Well, YES (except, food bills!  Teenage boy! kaChing!) !   How many 16 year old boys want to travel with their mom?  One that REALLY wants to travel LOL!  We had the trip of a lifetime!  First stop on Day 1 was the British Museum. You can visit online and see great pics.  The helmet at left is a re-creation based on the original artifacts (the silver had rotted over the millennia).  The buckle shows the unbelievable metalwork from circa 685 A.D.! 
My photos taken at the British Museum in 2014
Now jump to 2021: So out  of the blue this week I get an email from a guy at Kellycodetectors.com, which I discovered sells metal detectors.  He asked if I’d link to his article–well, I nearly NEVER do stuff like that, but what a fun rabbit hole I fell into!  If I lived somewhere with the potential for finding archeological things (one of my career wishes as an adolescent) I could do that.  

So, not only was it not spam, but it led me down a delightful path:  They have four interesting articles if you are in to amazing art and lesser known history:

The Sutton Hoo Treasure, one of the richest treasures ever found on British Soil
The Hoxne Hoard:  The Largest Unearthed Roman Treasure Ever
The Staffordshire Horde
and
The Cuerdale Hoard:  the Largest Viking Hoard of Silver (in the UK/outside of Russia)

The links to my two blogposts after the trip are here and here, with my photos at the Museum and at the Sutton Hoo site.  Some 14 years after first seeing the Sutton Hoo treasures, while living in central Africa actually, I learned that one could now visit the site!  So I resolved to visit someday.  That turned out to be 2014.  The discoveries are now a fun movie called The Dig, available on Netflix. Hope you enjoy the diversion!  

Ready to travel? Come to Japan with me!

Thursday, April 1st, 2021

I am beyond elated to share that I will be your US host on a 10-day trip to Japan March 2-11, 2022! Here’s a link to the complete PDF Brochure which you can download or print, but I’ll post each page here in the photos. Originally, this trip was to have been in January 2021 but was cancelled due to COVID. It was rescheduled to January 2022 to coincide with the Tokyo Quilt Festival, but that looks like it won’t happen either so we are now in March 2022. BUT, I think the March itinerary is EVEN BETTER–so many cool things, including quilts, shibori workshop, my bucket-list-dream-item visit to the Itchiku Kubota museum (see my Kubota Pinterest board here), and so much more (and not as cold as January)! AND here’s some more eye candy, my Japan pinterest board.

A friend asked about food restrictions, and the company replied: “Regarding diets.  We have a place on the registration form for them to include dietary restrictions.  They were really good about it in Japan.  The meals that are included will be notified ahead of time regarding any restrictions and they do make substitutions.  Both years I have gone we have had guests that were vegetarian and gluten free.  They were prepared separate meals.  Also for when she eats on her own she should give the Japanese guide an index card and ask her to write in Japanese what she is allergic to and dietary restrictions then she can show it to waitresses when she eats on her own.  This worked well.” Fantastic! So don’t worry if you are vegetarian or gluten free or whatever you can travel on this trip!

I am so excited about this trip…. while many go on these trips just to go to the Tokyo Quilt Festival, comparing the two itineraries and activities, I actually think this is a better trip! AND the weather won’t be as cold in March! I hope you’ll join me–I’m already thinking of little on-tour goodies for you should you join me! Please do write and ask any questions!

The Quilt Show–Sarah’s Episode!

Friday, April 12th, 2019

What a delight it was to be invited to tape a show for the Ricky Tims and Alex Anderson online “tv” show, The Quilt Show (TQS)! In the past I have taped for two seasons of Quilting Arts TV (on PBS) and did a video workshop for Interweave (Art Quilt Design from Photo to Threadwork, available as a download), but TQS is on a whole other level of professionalism. It was filmed in the Comcast center near Denver…as you walked by the main office there was an entire cabinet of awards including a few Golden Globes! And to get it up front: THANK YOU ADELE Merrell for all these great photos and Gayle Schliemann from Bernina for a bunch more!

Intro segment with Alex Anderson and Ricky Tims…yes, they color coordinate their tops with the guest’s outfit! My dress is a Marcy Tilton pattern, Vogue 9112
I was so excited that I was able to pull off my surprise gifts for Alex, Ricky, John and Justin: custom TQS aprons made with a thermofax screen I made for them (with behind the scenes help from Producer Shelly to help with a graphic and favorite colors for them).
After the intro we got together and everyone modeled their custom TQS aprons. Sorry folks, there are only four of these that exist, but I’m delighted they are already using them with other guests. I bought all cotton colored aprons on Amazon (where else?). If you like the milkweed design on mine, I am selling my custom screens on my website for a limited time (maybe six to 12 months) so you could make your own!
There are two guests taped each day–I had Saturday morning. They hang the quilts first as all the other prep begins, and well before the audience comes in. The lighting is SUPERB…both of the guests and the quilts. There are light colored walls behind the seat walls with bounce diffuser lights that reflect off the exterior studio walls to create a smooth even light, then each quilt has a spot…there wasn’t a single “hot spot” or deep dark area (unless it was intentional)

And a panorama shot…the detail isn’t great because of the re-sizing I had to do for the blog, but I am standing in the center of the audience area. There were four large quilts including this year’s BOM, Sizzle, then the door to the Green Room, a monitor, the areas of the set from the “brick” wall, seating area, gallery space. The big tables are all on rollers as is the longarm and Q20 so everything can be moved easily for each segment. Another monitor on the middle-right, the staff and guest cubbyhole is behind that wall, you can see a long light thing that is the longarm, then Alex’s quilt (which is gorgeous in person) and right bank of the audience seating. There are usually 50-70 guests for each show. Tickets are free but you must reserve in advance…check the TQS website for info.
Justin Shults, Ricky’s partner, consults with the team in an area to by one side of the set where they collect the guests’ “stuff” for the episodes and serves as staff work space. I love that they said “welcome to the family.” Everyone staying at the DoubleTree collects in the same zone of the restaurant for breakfast (travel, meals, hotel are on your own dime, but it is so worth it!) and eat together. It is a delightful way to get to know the crew and principals. Left to right: Lilo Bowman, Justin Shults, Mary Kay Davis and Katie. Justin is the guy coordinating things on the set while Shelly Heesacker, the Producer, is in the control room. They communicate by headsets.
This is pretty close to the image folks will see when the show airs online sometime this autumn.
And here’s what that looks like from the sidelines
Sarah Ann Smith visits The Quilt Show with Alex Anderson and Ricky Tims
My first segment was about using paint on cloth (and I now have custom paint kits available here) and using shrink fabric to make my sunflower quilt (a blogpost to come). Here Ricky and I reviewed what I brought and what we could fit into the 10-14 minute segment. While the guest and hosts review the segments, groups of folks from the audience are allowed to come up and see the quilts up close.
In the breaks between segments, John Anderson (Alex’s husband) keeps the audience entertained, shares quilts from upcoming guests and more. This one is at the end of the day when Ricky came to chat with the audience.

Rehearsing for the thread segment: Ricky, Alex, me and Mary Kay Davis taking a close up photo.
Thanks SO MUCH to Adele, who dresses the set, for taking a billion photos for me. I especially wanted this one from inside the control room that shows what a polished and complicated production this is. Producer Shelly Heesacker is in the bottom left and she crafts each episode and runs the show.
And a close up of the screens as I am taping my second segment, with Alex, on how I do my Threadwork.

After-taping shots: here, I am holding a photo by Chris Maher from the online Photo Critique Group–it is a mock movie poster, with Ricky, Justin and many of our classmates in the assorted cast and crew roles. Too much fun!
I made TQS screen prints on my hand-dyed fabric for the audience as a little gift. MAJOR thanks to Iris Karp of MistyFuse for donating a package of MF (which changed my life and makes what I do possible!!!!! and that is NO exaggeration) so I made up a pattern for the sunflower that I demonstrated on set.
Time for some portrait shots with my quilts…this was one of the best!
Going to use this one for my FB profile photo for a while…THANK YOU ADELE!
Question and Answer session with the audience (and you can see that fun dress!) after taping.

I have to say, I wasn’t all that nervous thanks to being UBER prepared and having done Quilting Arts before, but I was wired for sound LOL..by the time of the Q&A I was relaxed and ready to have even more fun sharing.

At the end of my segment saying “It’s a new day EVERY day,” the TQS motto. Can you tell we were having fun?!!!!


My episode will air sometime in late summer/autumn. Star Members of The Quilt Show will have the first view, then there will be one week where the episode will be free to everyone. I will be sure to post, but gosh there are so many wonderful guests that I am so glad I am a member–and did you know I joined the very first day TQS began: January 1, 2007? And now, here I am as a guest! WOOT! Life is GOOD!

Speak Up, Speak Out

Thursday, April 27th, 2017

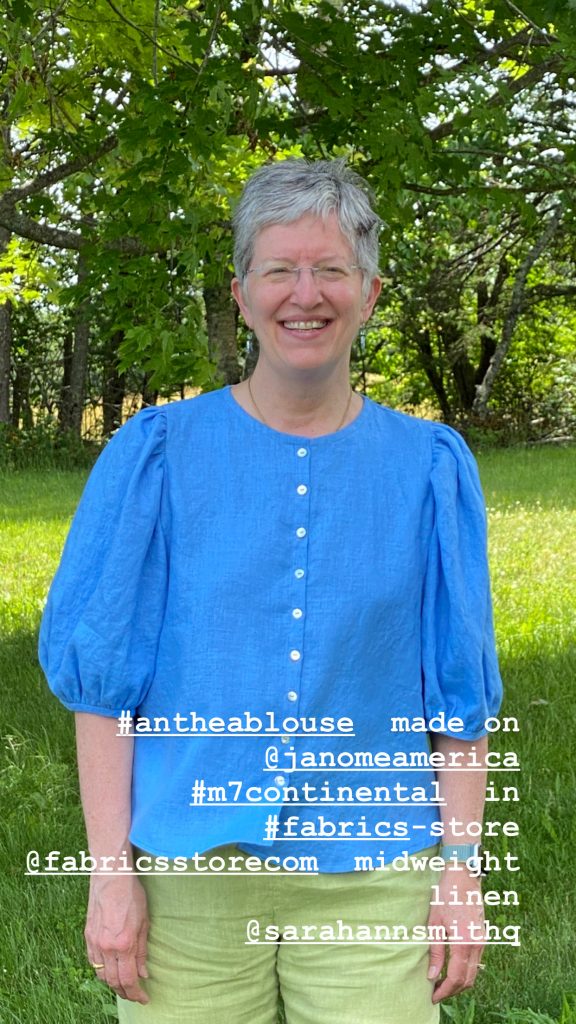
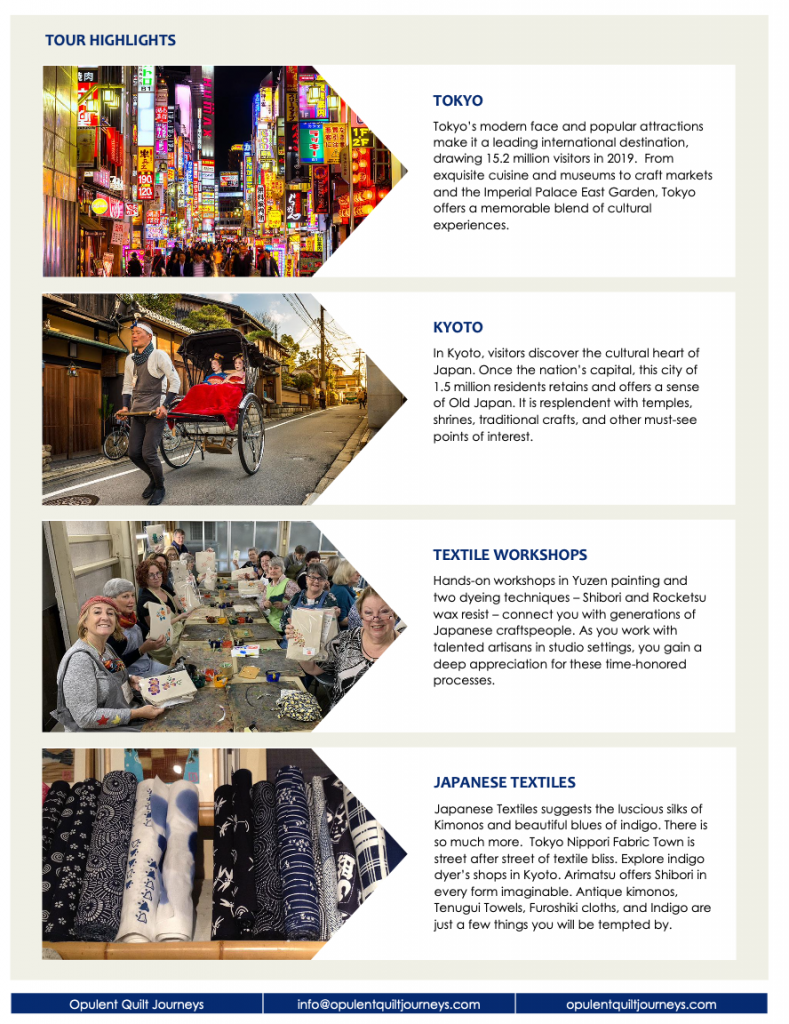
Emerging briefly from the production tunnel to share my latest piece which, thankfully, I CAN share despite the fact I’ve entered it in the Threads of Resistance Call for Entries (Deadline in about 2-3 days)!  As many of you who have known me for a while know, I haven’t usually been politically involved or spoken out.  This is, in part, the legacy of being a federal employee, when you were not allowed to be political (there were ways you could do it, but it was such a fuss that it was easier just to NOT).   However, the last election cycle aggravated me so much I began making political posts and comments on Facebook and getting involved.   Even though I didn’t really have the time, when a group of art quilters got together with this exhibit concept and called for entries, I knew I wanted to try to make a piece.

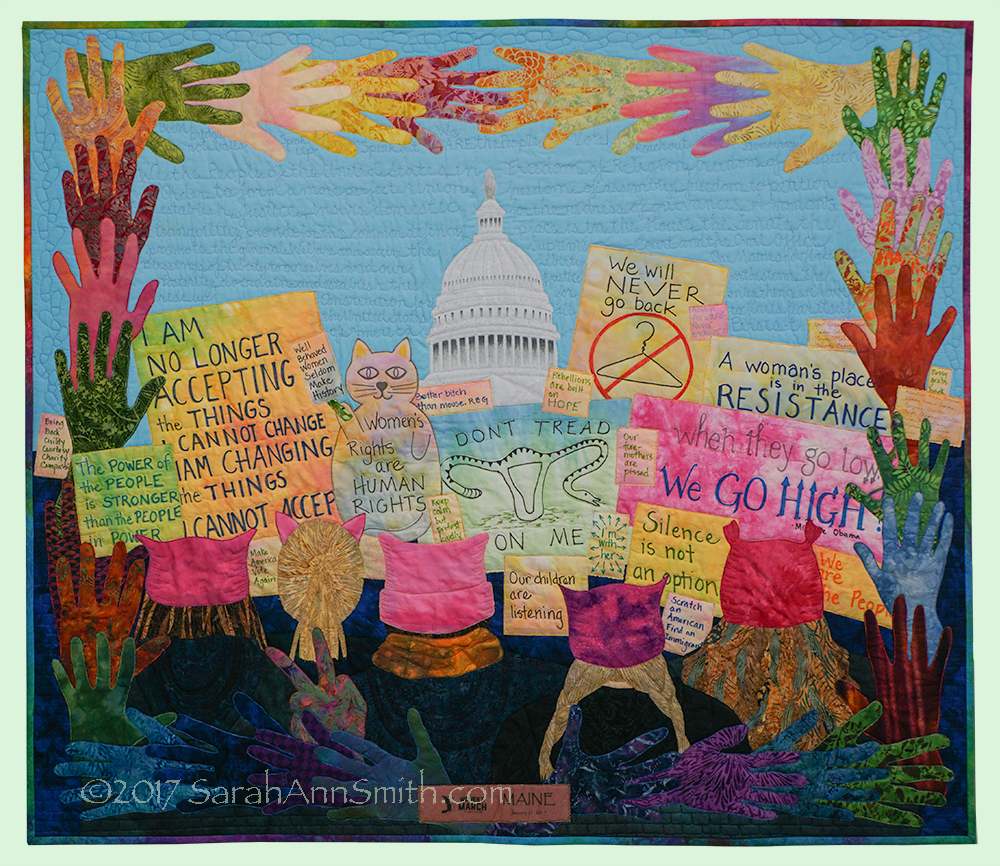
Speak Up, Speak Out © Sarah Ann Smith 2017. Although the Women’s March imagery has become ubiquitous since the March, I decided to proceed with my concept because it was my experience.

It began during one of the debates last autumn (2016).  The then-Republican-candidate (I *refuse* to use his name) kept saying “Make America Great Again,” as if it weren’t great already!   I will be the first to say that we are an imperfect union, this great nation of ours, but that is part of why we are a great nation….or were and must recover from the collective idiocy currently gripping the country.  I started sketching during the debate and came up with two ideas for art quilts, one about Maine, one about our nation.  The latter was to have a border of hands, holding hands, and phrases and words that represented the US, but the center wasn’t yet clear to me.

With my soon-to-be daughter-in-law Ashley G., I traveled to the Women’s March on Washington on an overnight bus (overnight going and returning…LONG nights sitting up!).   I bought a cheap spiral notebook and asked riders on the bus, if they wished, to trace their hands so I could use them as the border in this piece.  Every hand traced is here (one twice, because I needed one more hand to make things fit properly).

At the March, I took many many photos and as the day wore on I knew that being in this sea of humanity, most in some sort of pink hat or cat ears (reference to the-one-who-shall-not-be-named joking that he would grab a woman by the pussy–slimeball! that’s sexual assault you jerk!) I had found my image for the center of the quilt.  The images of women and men marching, protesting peacefully (not a single arrest!), has since become ubiquitous.  So much so that I considered NOT doing this view because it has been seen.  But I decided that since I conceived of the quilt before the march and finalized during the day of the March as the images had barely first been seen on the internet, I decided that since it was also “my” March, I would proceed.

This photo became my starting point–it is the only photo I didn’t take (since I’m in it..someone on the street offered to snap pics for us):

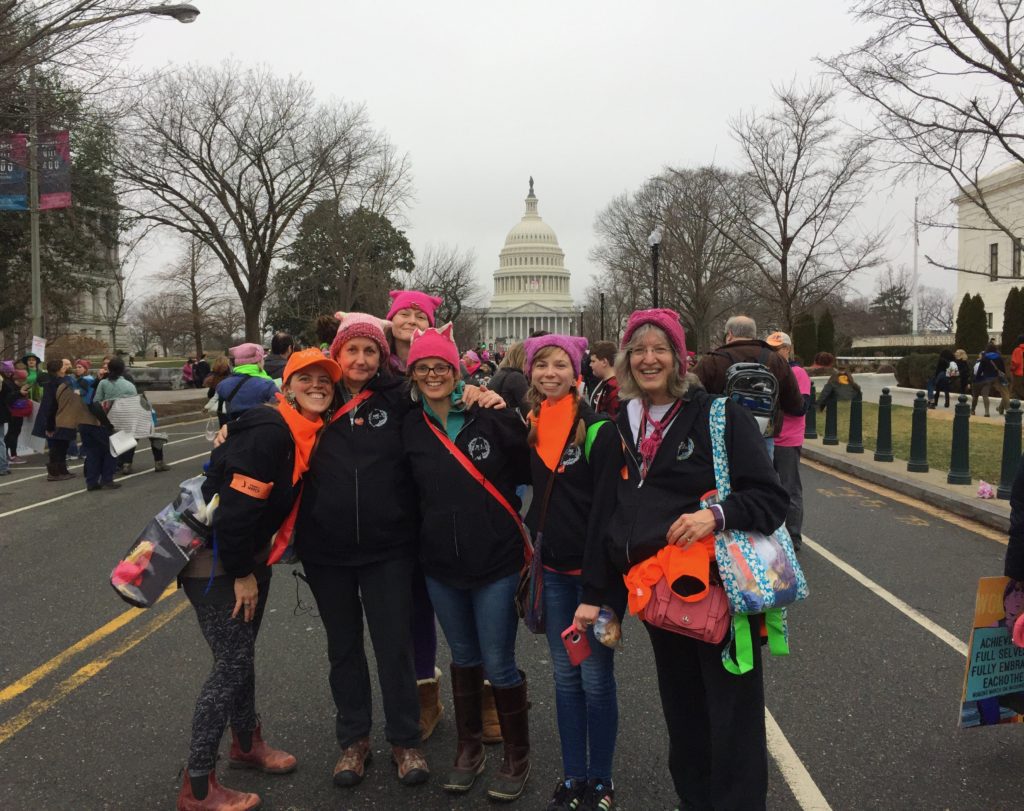
Some of the ladies from the bus. We are on East Capitol Street heading toward the Capitol. Mainers were to wear blaze / hunter’s orange. I’m on the far right standing next to Ashley, who has her orange scarf on, and we’re wearing the hats I made us.  There is an odd aberration in the photo, but so it goes.  I printed this photo on the label.

Usually when you see photos of protest marches, so many of the signs are manufactured, a printed graphic done by someone professional (ish).  What impressed me about this March is that almost all–upwards of 95 percent–of the signs were homemade and many were clever and/or inspiring.   I selected my favorite ones and used them.  One of the signs in the quilt is the actual sign that I made and wore on my jacket during the March.

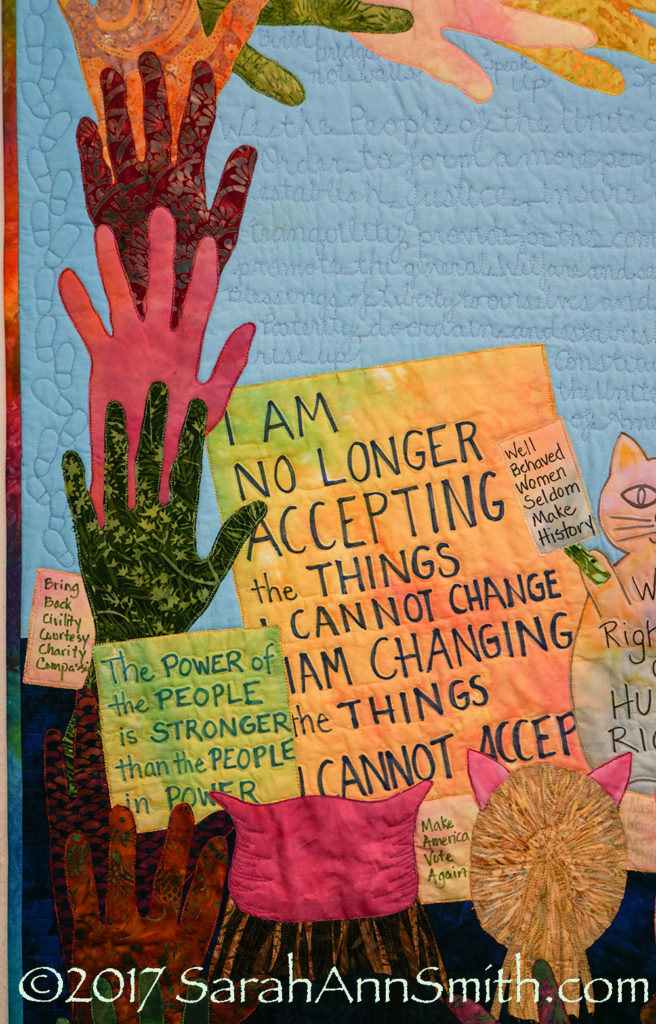
Left side of the quilt. I loved the sign calling for a return to civility, courtesy, charity and compassion.

In the sky above the marchers, surrounding the capitol dome, I quilted the Preamble to the US Constitution on the left.   Brief signs/slogans are under the hands at the top.  On the right I quilted the First Amendment’s four freedoms of speech, religion, assembly, and right to redress the government for grievances (which is what we were doing!  Democracy living and in action!), as well as more slogans and thoughts.

There were three huge signs in the shape of cats, maybe 4 feet tall, so I appropriated one of them to use.

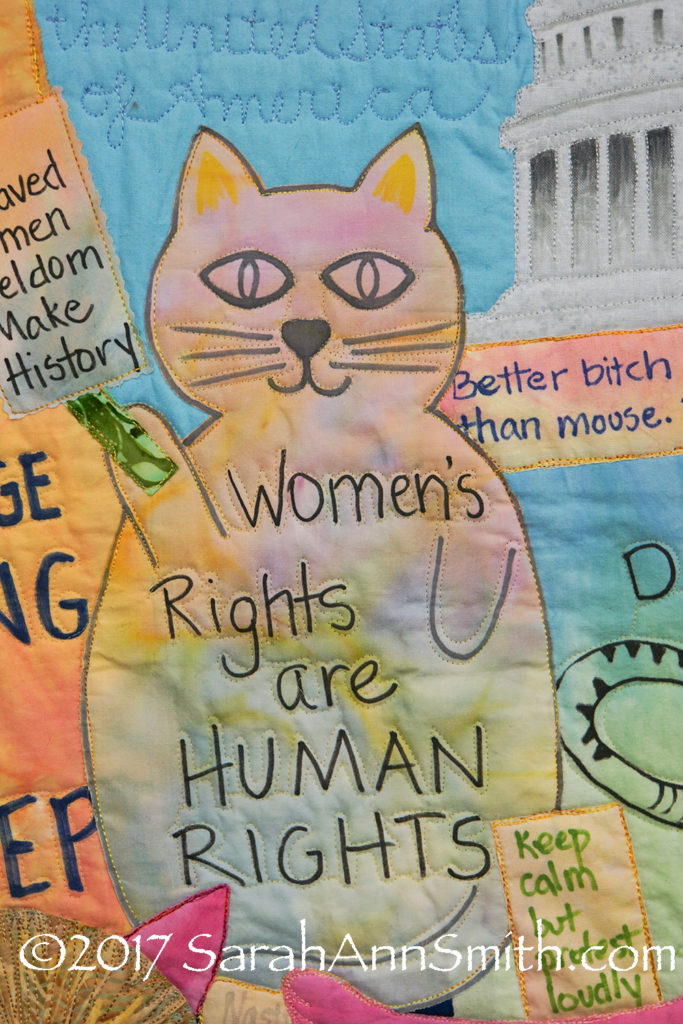
Center left. I LOVED the quote attributed to Supreme Court Justice Ruth Bader Ginsberg (I think I am falling in love with that woman!) and made sure she really did say it before including “Better bitch than mouse” as one of the signs.

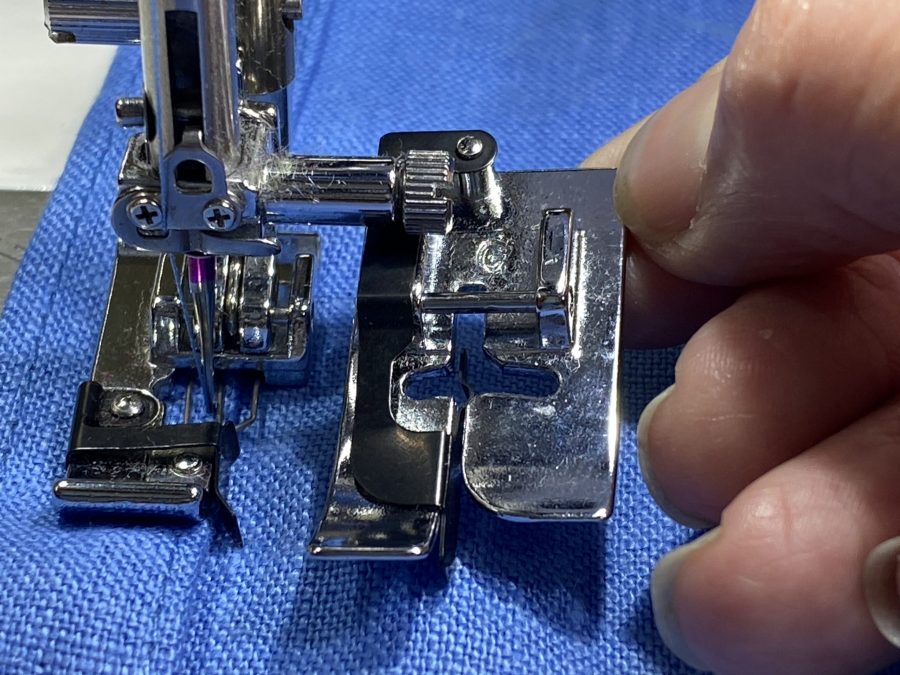
By the way, I used Fabrico felt tip pens and Pitt Artist pens (brush and bullet tip) for the signs.

When I graduated from Georgetown University (in DC) in 1979, a t-shirt was popular that said “A woman’s place is in the House, and in the Senate.”  At the time, no woman had been elected (or maybe just one or two…I’m thinking Margaret Chase Smith and Nancy Landon) to the Senate that had not gotten there by taking her late husband’s seat.  It was still common to be told that a woman’s place was in the home and the kitchen, not the office.  Now I’ve said “A Woman’s place is in the House, the Senate, the Supreme Court and the Oval Office!”

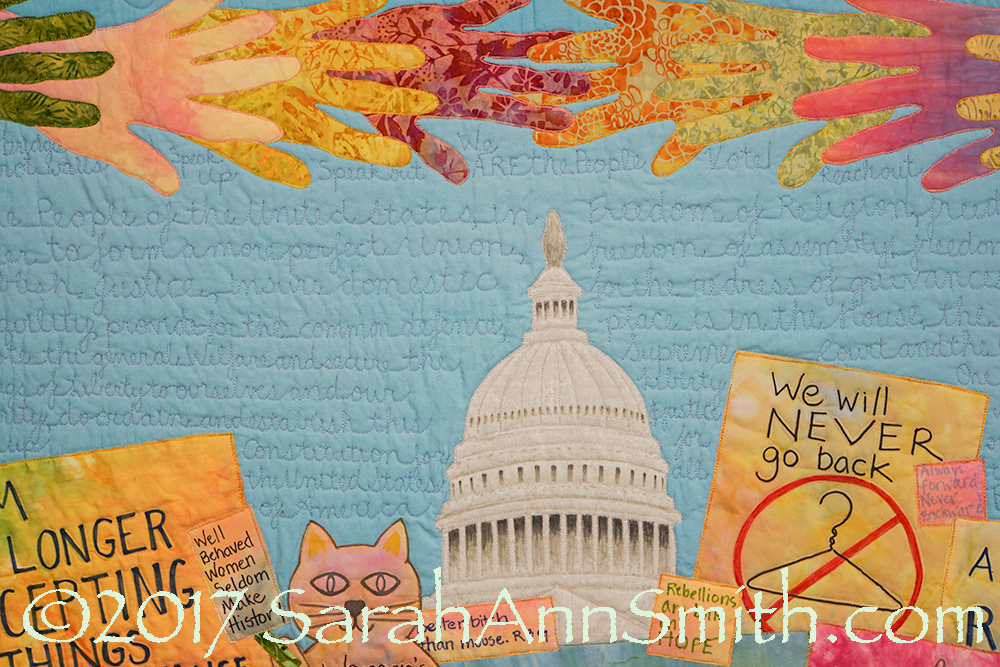
Center of the quilt. I was really pleased at how the dome turned out. I used my photo as my guide and sketched out the pattern, cut the shape (as usual I am using Mistyfuse on fabric and raw edge collage; the dome is a rare case of me using a print fabric instead of a batik. The peach-yellow hand on the left is my dyed fabric, the salmon-pink-purple on the right is Laura Wasilowski’s, from a fat quarter from a class I took with her.  The fabrics in the signs are mostly my hand-dyes.

The coat hanger sign is a combination of two such signs that I saw.   I loathe the idea of abortions. But when I was in my 20s, I was a US visa officer.   I was processing the paperwork for a British man’s visa based on his marriage to a US citizen.  When you do that, you need to establish that the marriage is legal and valid, so you need to see if there were any prior marriages and, if so, that they ended legally.  He was a widower.  To break the tedium, I used to look at cause of deaths when these cases came across my desk.  His first wife died of septicemia (blood poisoning) from a self-induced abortion (because it was illegal in the UK at that time). Ever since, I have stood for freedom of choice because there will ALWAYS be women who are that desperate, no matter how awful I or others believe abortion to be.  Moving on…back to the quilt.

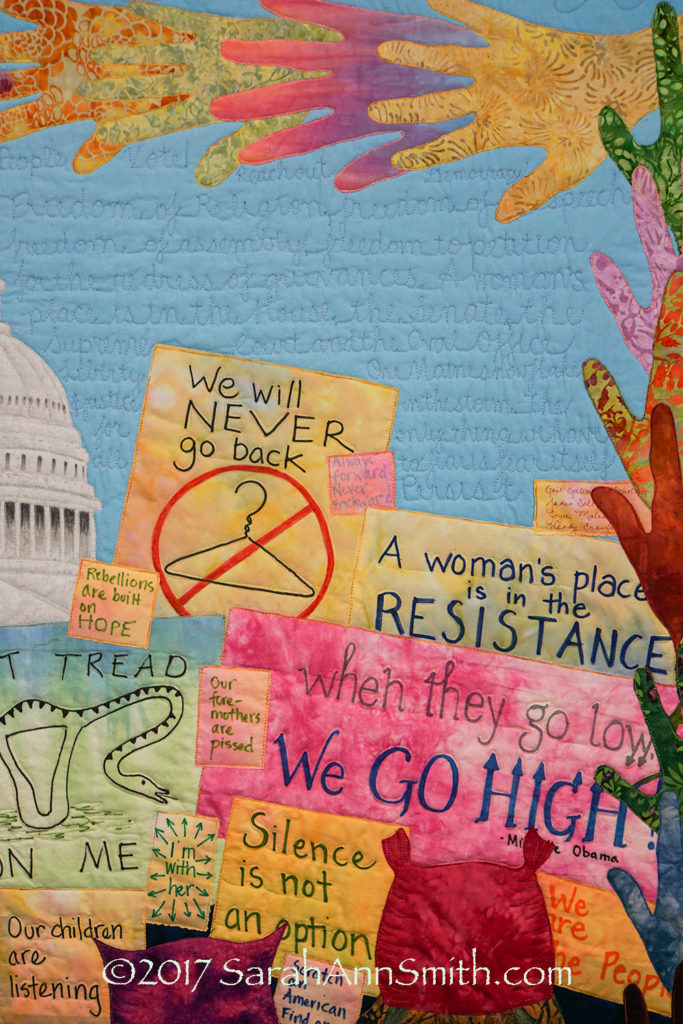
Center right. I loved the take on the Don’t Tread on Me flag from revolutionary war times that turned the snake into a uterus and says Don’t Tread On Me (on left, on Laura Wasilowski’s fabric).  The big pink sign with Michelle Obama’s mantra is what I wore at the January 21, 2017 March on Washington.  That’s my DIL Ashley on the left in this photo, me on the right. I modified a sign carried by a Vermonter to read (in the sky writing) One Maine snowflake in a storm.

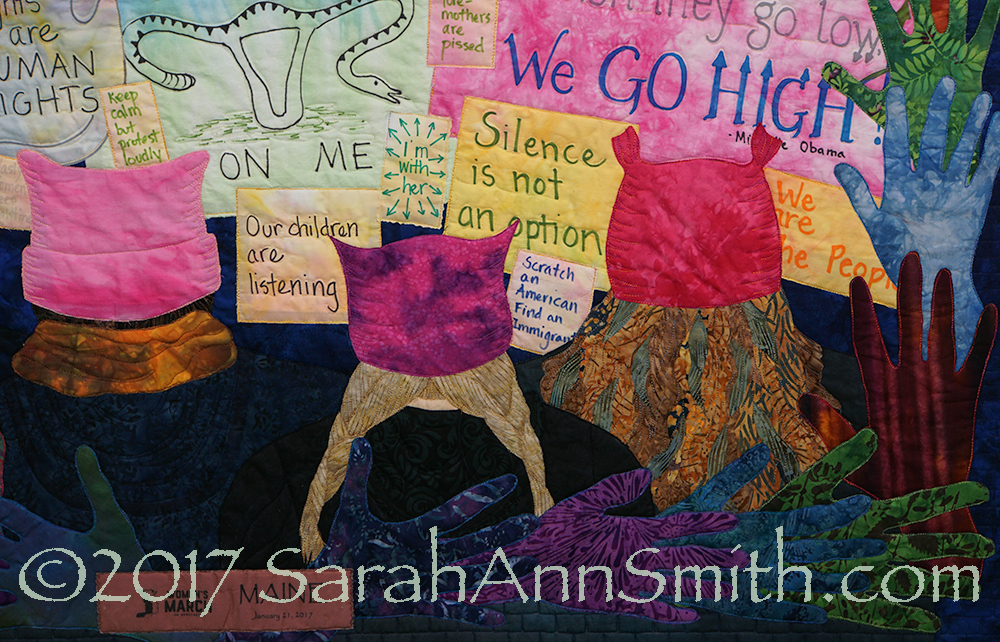
Center bottom right. A bit sharper photo.  In the bottom left, under the copyright, you can see a “ribbon.”  The center woman I think of as “Everywoman.”  Then there is Ashley (DIL) in braids, and me on the far right.  Ashley’s hand is the purple one at her right shoulder, mine is the blue one next to Ashley, one in from the corner.

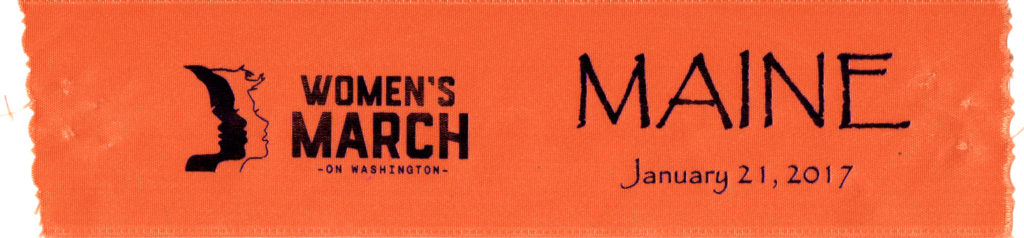
Some generous unknown-to-me person who couldn’t go to DC made and gave away these ribbons to those from Maine who marched. It was done in the Mainer’s blaze/hunter orange. That was pretty bright for the front of my quilt, and I didn’t want it to distract from the imagery. So I scanned the ribbon into the computer, then in Photoshop darkened the color so that it would work visually on the front. THANK YOU whoever made these!

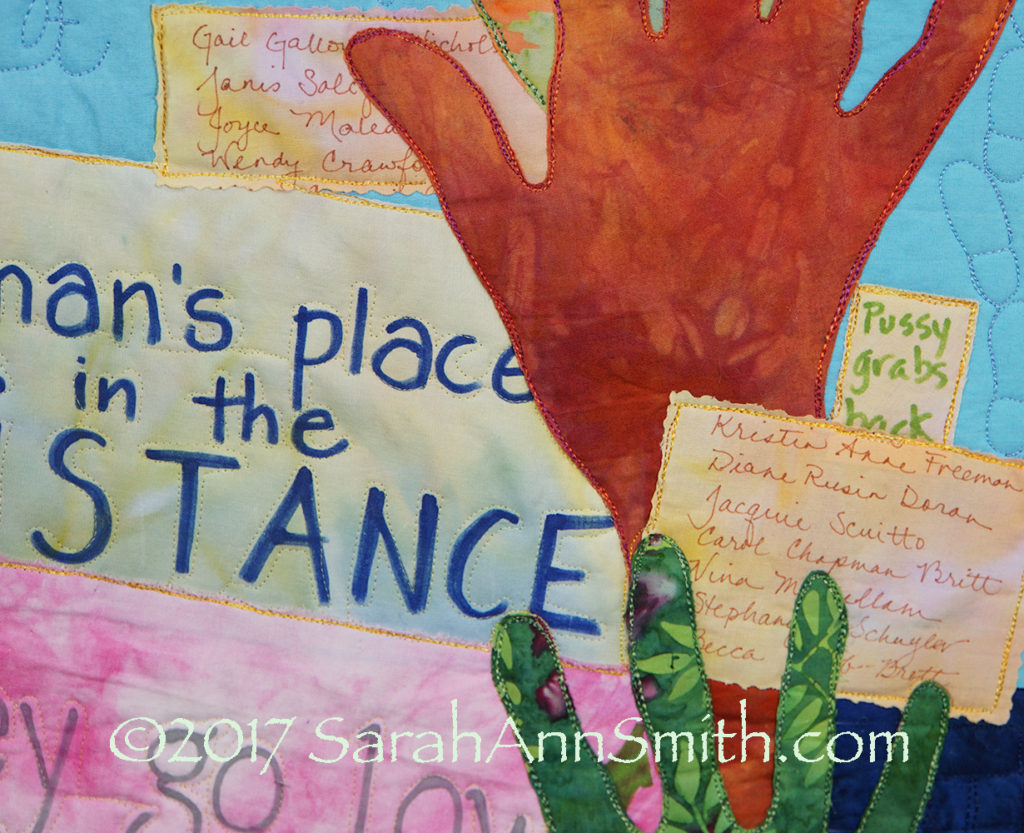
Far right. My friend Gail Galloway-Nicholson used to be the Curator for the Supreme Court so is as familiar with Capitol Hill as I am, if not more so from having worked there for a good bit of  her career..  I worked for a US Congressman for two years, and we also lived just two blocks behind the capitol (yes, I got to see our old house).  She asked me to carry her name in my pocket since she couldn’t go to the March. I did, and added the names of more friends (some I’ve only known via the internet and quilty stuff).  Thank you all for being there with me!   I love knowing you and that you wanted to be there in spirit and on the cloth!

So that is all the details, well, most of them, of what went into this quilt.  Don’t know if it will get juried in–I know there is some awesome art being made for this that doesn’t use the ubiquitous image–but I am glad I made it!

And I have decided to get involved volunteering for my Town of Hope, Maine.  I decided that one needs to put your time where your mouth is, and as the saying goes, all politics is local.   Here’s to giving back to my adopted-shoulda-been-born-here home state of Maine!