email Youtube

Home
Galleries
Blog
Workshops & Calendar
Store
Resources
About
Contact

Author Archive

Lobster Homicide

Friday, August 24th, 2007

Joshua’s girlfriend Kristina comes from a lobstering family, and at least one day a week during summer works on the boat. As a major treat she brought us FOUR lobster. Lobster Homicide 1 Now, I haven’t had a whole lobster since I was on a vacation in about the mid 80s, and haven’t fixed one since I was in grad school in 1982 (and then I just took them home from Boston to California and Mom cooked them). Well. My squeamishness about raw meat products (I won’t touch raw chicken, and Paul has to do the turkey until it is at least half-cooked) did me in. Here’s what happened:

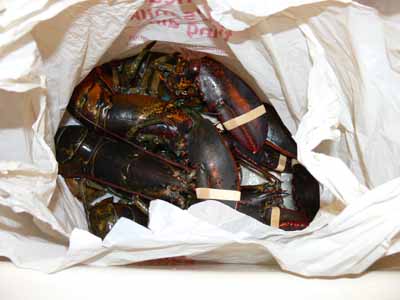
We set the bag of lobsters (they spent the night inside a bag in the fridge…Paul said when he opened the door in the middle of the night to get something to drink the bag moved….) into the sink since it was drippy:

Lobster Homicide 4

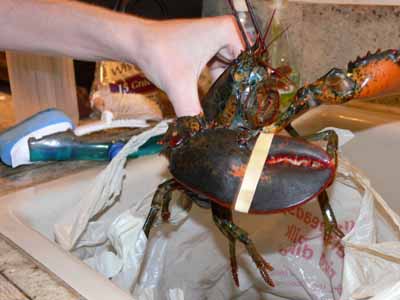
Joshua picked up a lobster for us to see:

Lobster Homicide 2

I couldn’t bring myself to pick one up, even wearing rubber gloves. Somehow, awkwardly, I managed to use tongs while wearing gloves to pick one up and transfer it:

Lobster Homicide 3

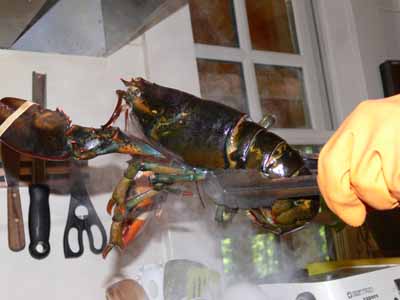
Into the pot—fortunately no banging on the sides of the pot (which I have heard…shudder) or screaming/hissing:Lobster Homicide 5

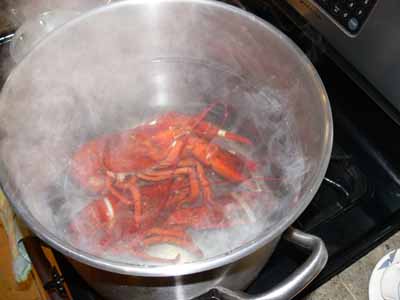
The look of the steam/vapor, however is totally cool. I don’t know that I can ever use these photos for a quilt tho…too traumatic.
By the second round of boiling (pot fit 2 at a time), I couldn’t even manage with gloves and tongs, so Eli did the courageous honors (or is it dastardly deed?):Lobster Homicide 6

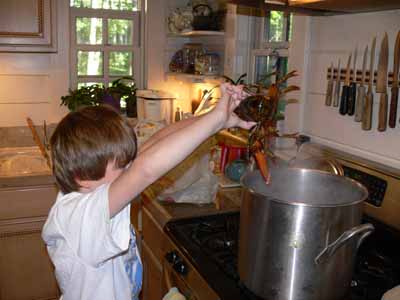
Then, he decided to be cute:Lobster Homicide 7

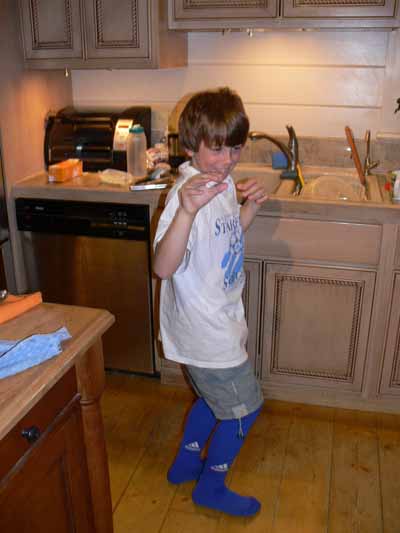
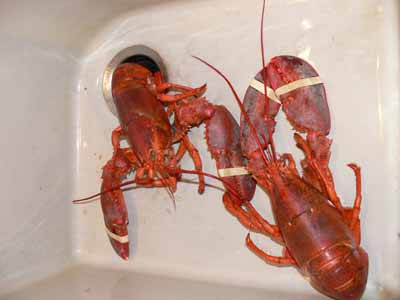
Here are two of the lobsters, truly dead and red, in the sink:

Lobster Homicide We had to call Kristina and ask her how to get them open. Answer: pull off legs and claws. Grab head and tail in hands and twist apart. Gut. Shell. Eat. That’s when I lost it. I couldn’t do it. Joshua was able to pull off the claws and legs from one, but wouldn’t gut them. I couldn’t. Paul’s shoulder is bad and he only has one hand these days (the rotator cuff surgery thing), so he isn’t able to do it, though he would if he could. So we now have a king’s ransom in the fridge, boiled bright red, intact…. if I can get someone to gut them for me, I think I can get the meat out, but who…… I know. I’m a wuss. I don’t care. I can’t kill and dismember and gut. Sigh. I may have eaten the last lobster tail of my life nearly 25 years ago.  And I feel guilty about such a wonderful gift, and not being able to live up to it.  Anyone wanna come gut my lobsters?  I’ll be more than happy to share  the meat….

Just a note

Wednesday, August 22nd, 2007

Just a quick note to let you all know I haven’t dropped off the face of the earth! It has been busy here… Paul is recovering from rotator cuff (shoulder…torn tendons) surgery. Days are pretty good, nights off-and-on…. some good, others not so great. Joshua is doing quite well with his leg, and the plastic surgeon said on Monday that he doesn’t need to see him again. We are to keep the dressings on for a while longer, then the rest is just growing bone, healing and recovering muscle. Joshua is making up for having lost all that weight in the hospital (I’m guessing maybe 15 pounds in ten days?) by eating us out of house and home.

Today I take Eli to Freeport, home of LL Bean, for school clothes shopping, then this afternoon a first for us: Lobster! Kristina, Joshua’s girlfriend, is from a lobstering family and works on the boat once or twice a week. Yesterday, she treated us to four, so we now have a moving bag inside the fridge… I’ll take pics! Time to run…gotta get on the road (Bean is about 80 minutes from here, and we need to be home early enough to fix and eat lobster before Eli’s soccer practice at 6….).

Quilty stuff eventually, Cheers, Sarah

Binding with Sheer Fabrics and ribbons

Saturday, August 18th, 2007

Today’s tutorial will add a bit more depth to the section of the Quilting Arts article on edge-finishes published in their August/September 2007 issue. Please order a copy here so you can have the whole article, then feel free to refer to this blogpost for more in-depth explanations! I hope someday to convince a publisher to let me do a book!!!!Sheer-finished quiltlet

To “cut” your strips, place your synthetic sheer fabric on top of an old storm window or a piece of glass from a photo frame (tape the edges of the glass to avoid cuts). A cutting mat under the glass gives you lines to Heat-tool to cut sheers, 1follow. Secure the fabric with tape at each end.

On a corner, test your heat tool to make sure it is hot enough to cut / sear the edges.

Heat-tool to cut sheers, 2

Cut your binding at least 1½ inches wider than the desired width. For a ½” edge, cut your strip 2 ½ to 3 inches.

Hints: if you sear too close to the stitching, your sheer may pull loose. Also, you might melt your threads–eeek! Practice on a scrap and on the back side of the quilt before working on the front. Keep the heat tool somewhat vertical or you may accidentally melt the binding with the hot shaft of the tool. This polka-dot look could be really fun (what if?!) on the right quilt. Here’s what not to do:

I hope these extra photos help explain how to have fun playing with sheers as a binding! If you have any questions, just ask.

Cheers, Sarah

Facings as an edge finish

Tuesday, August 14th, 2007

The following tutorial builds on the article published in the August/September 2007 issue of Quilting Arts Magazine. The Pillowcase (or bagged back, or escape hatch) finish for a small art quilt is simply a one-piece facing that covers the entire back of an art quilt. This method is useful if you have lots of knots or carried threads that you wish to cover, for example after extensively beading a piece. For larger quilts (or even small ones) you may not wish to cover the entire back. Instead, you can use facings. On a quilt with straight edges, like Koi, you can use a straight strip of cloth as I did here on the back / under / second side of this quilt. However, just like a dress neckline, facings work well on curved and irregular shapes. From the front, you can’t tell if this quilt is a Pillowcase backing or a faced edge:Faced quiltlet

Facings:
Borrowed from dressmaking, a facing is simply a piece of fabric that echoes the outside edges that is turned completely to the back side of a quilt. Large and small quilts with irregular edges are great candidates for facings!

1. Cut a strip of fabric that extends ½ inch beyond the outside outermost edge and 2-plus inches towards the center of the quilt from the innermost “innie”.

Facing a weird shaped edge

2. Pin the facing to the quilt top, right sides together, on the FRONT side of the quilt.
3. Sew a ¼ seam (photo below, left)

Facings–sew seam, edgestitch
4. Trim excess fabric from the seam allowance.
5. Clip /notch curves, clip inside corners and trim outside corners.

Facings –clip curves
6. Press the seam as stitched. Fold facing over the seam allowance and press again.

7. Edgestitch facing to seam allowance a scant 1/8” from seam line; this will encourage the seam allowance to stay put and not try to roll back to the front. (photo above right)
8. Fold facing to the back, “favoring” the edge. The little bit of yellow-green that you see in the photo below is the “favored” edge, which is a bit of the front rolled to the back.

Facings, favored edge
9. Iron the seam allowance and facings towards the center of the quilt. (See Step 9, above)

10. Turn under the edge of the facing and stitch in place. See the photo about edgestitching to see the turned, pinned edge.

11. Repeat on the other sides, turning under the short ends of the facing and stitch down to create a completely finished facing.

The Frayed Edges Artists’ Reception, Camden Public Library

Sunday, August 12th, 2007

On a glorious Saturday afternoon in Maine, we had our artists’ reception at the Camden Public Library. The room was colorful, even more so because of the gorgeous flowers Kate brought, some from her garden (sigh…someday I will have a garden that has SUN).

Thos flowers Kate also had the brilliant idea to put out some “Quilt Show” signs to alert passersby, and it worked! Unfortunately, I didn’t get pics of those, but I can tell you Kate made up the “flags” at home, then she and Kathy cut out the fused letters and ironed them on while camping at Mount Battie here in Camden, using the electricity in the bathroom. Now that’s dedication!Kathy, Hannah, front end of room

Just above, you can see Hannah, her oldest daughter, Kathy, a friend of Kathy’s and the “kitchen” end of the room (the kitchenette is behind the folding doors), with our refreshments table in the center with Kate’s beautiful batik cloth. Our grid piece is on the right.

Here is my dear friend Betty Johnson who came with her daughter Karen Martin. Both are mainstays in the Coastal Quilters, and I’m so glad they are both there. Betty is an amazing art quilter with an unerring eye, and Karen does the most perfect piecing I think I’ve ever seen…lots of detailed paper piecing too! Gorgeous! Betty is looking at our 5×5 / Five Artists, Five Views piece where each of us interpreted the same photo (each column), and where each row shows a single artist’s variation on the five photos. Betty looking at quilts

Betty also surprised me with this little “Inchie and three quarters”… I had bid on her small art quilt at our Coastal Quilters fundraiser but got outbid, but she remembered and made me a “congrats” on the show and my Quilting Arts article with her bunny fabric (I have a thing for bunnies). I may make this into a pin or necklace!

Betty’s Inchie and three quarters

Here’s a closer look at the items in the display case and above it (from left to right on the wall, Kathy’s birches, Sarah’s Autumn on the Village Green, and Kate’s interpretation of http://www.esteritaaustin.com/s pattern of a stone-flanked doorway):

Display case area

Here is another view, this time of the corner opposite the kitchenette, with my Koi on the far wall (the wall you see as you look through the doors into the Picker Room) and Deborah’s “Anthony Avenue” anchoring the wall on the right.

Hannah, Kathy and friend far end of room

I am still trying to catch up on lost sleep from all those hospital nights, but life is good. The show was fun, there are many wonderful comments in our guest show book (another one of Kate’s grand ideas!), Joshua is eating more, and getting more like his usual (sometimes teen-attitude) self, which means he is healing, his skin grafts look better (ok, less bad!) every day, and nighttime temps are ever-so-slightly beginning to drop. The first green acorns are already dotting the driveway, and school starts in 24 days. Not that I’m counting… GRIN! Now, to get to work on the book….