email Youtube

Home
Galleries
Blog
Workshops & Calendar
Store
Resources
About
Contact

Author Archive

Foolproof miters on any width binding–Binding Tutorials (1)

Friday, July 20th, 2007

The double-fold bias binding with a mitered corner is probably the most familiar edge finish for contemporary quilts. In the set of mini-quilts I made for my forthcoming article on bindings in Quilting Arts magazine (August 2008), I created an outside edge that includes corners, a point, and inside and outside curved edges which covers most of the challenges you will face.

I hope you’ll check the forthcoming issue (due on stands and in mailboxes near you at the very end of July and early August) for more details. Because there is only so much space available, they didn’t have room to include instructions for “any-width” bias binding, only 1/4″ bias binding. I actually prefer this technique to the one described in the article, so you have my permission to make ONE copy of this blogpost, for you personal use ONLY (since I make a living, albeit modest, teaching and selling quilts, thank you in advance for respecting my copyright!).

As soon as the article is out, I’ll insert a picture of the mini-quilt here. In the meantime, the close-up above of a good mitered binding will have to do! Thanks for understanding!Cut your binding strips SIX times the width of the desired binding,Double-fold Wrap plus ¼” (or up to ½” extra if you’d like a little more wiggle room). For a binding that finishes at 3/8” that is [(6 x 3/8) + 3/8 = 18/8 + 2/8 = 20/8 or] 2 ½ inch wide strips. Sew your binding strips together with a ¼” seam allowance until you have the length of your quilt perimeter plus several inches. The seams are on the straight grain, so when folded they run at an angle to the side of the quilt (making them less noticeable). Fold the strip in half lengthwise, finger-pressing or lightly pressing with an iron.
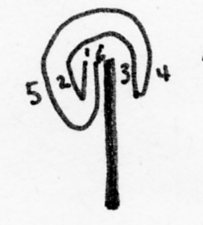
Think Boomerang: first the binding goes away, then it comes back:

1. Sew binding strip to the quilt edge, beginning at least four to six inches from a corner, and leaving a tail of about four to six inches (on large quilts, 12 inches or more is better), figure 1. In North and South America, Europe, and Africa, since we read from left to right and top to bottom, I like to start the binding on the lower left side, where the join is relatively unnoticed as the eye travels in its accustomed path across a quilt. Loosely run the binding strip around the quilt to make sure a seam doesn’t land on a corner (too much bulk); if it does, adjust your starting point slighly.
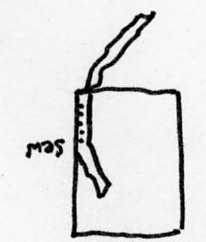
Double-fold Step 1

2. When stitching is about 2 inches from corner, fold the binding strip back on itself exactly on the edge of the quilt and finger press. You may wish to mark with a pin or chalk to see the line better. Diagrams 2
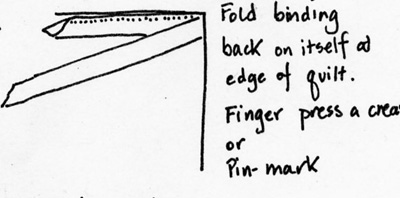
Double-fold Step 2

3. Fold the binding strip UP so that the marked line is now exactly even with the top edge of the quilt; finger press a crease at the 45 degree line. Mark with chalk on the inside of the binding if you need to improve visibility. Diagram 3
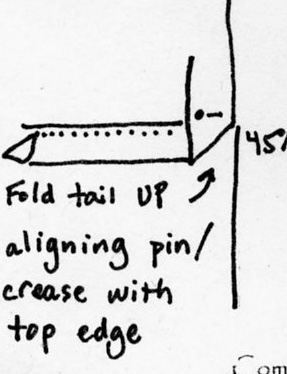
Double-fold Step 3

4. Continue to sew the seam until you reach the 45 degree chalk line. Backstitch 3 or four stitches. Diagram 4.
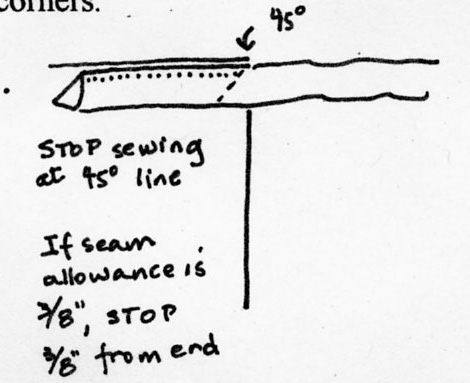
Double-fold Step 4

5. Pull the quilt out from under presser foot and (this is the boomerang part) : first fold the binding away on the marked lines, then back down so that the binding turns the corner and goes down the next side. Diagram 5.
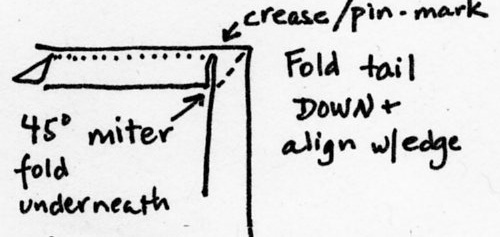
Double-fold Step 5

6. Stitch from the very outside edge of the quilt down the next side. Diagram 6.
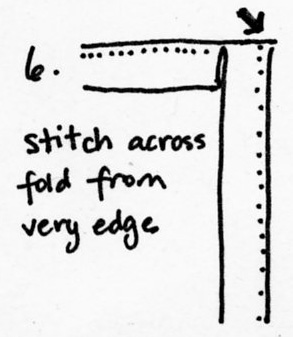
Double-fold Step 6

7. Repeat at the other corners.

8. Stop stitching about 4-6 inches from where you began.

After you have used this method enough, you will be able to fingerpress and eyeball the corner turns instead of marking.
Guardian Angels wear helmets

Thursday, July 19th, 2007

Well, this falls into the category of “Do not go faster than your guardian angels can fly,” as week took a decided turn toward the unexpected at about 4:45 pm Monday. That is when our son Joshua, 13, and NOT wearing a helmet (despite us badgering him, taking the bike away, etc.) was on his bike and hit by a car. Thanks to a not-so-small miracle, and a host of guardian angels, he will (after he heals) be fine, as he “only” suffered breaks of all three major bones in his left leg. I am so grateful I still have two sons alive, that Joshua is (a) not dead, (b) not a vegetable, (c) not paralyzed, (d) not full of massive internal injuries and shattered bones, or (e) a combination of all of the above.

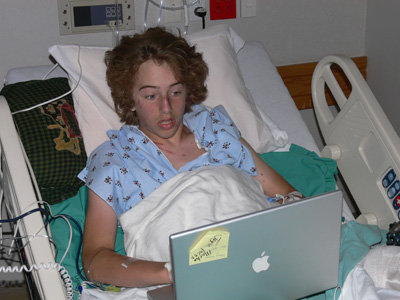
SQUEAMISH ALERT: I will be posting photos of Joshua in the hospital down a bit, so if you don’t want to see it, don’t look. However, if you want your kid to realize that they are not invulnerable, make them come read this post and the article in our local newspaper that is online (link below).

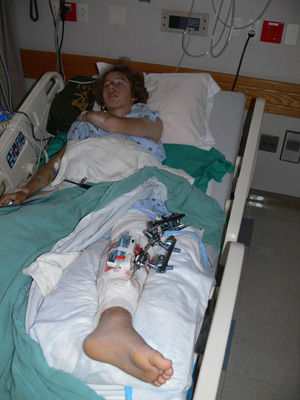
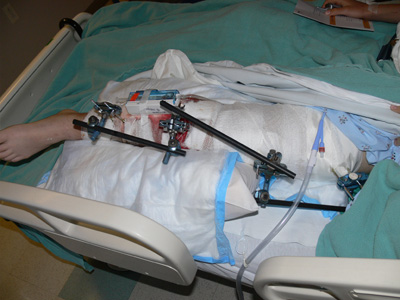
On Monday at about 4:30, our son Joshua, 13, headed to town on his bike to the library. He took a right turn onto a moderately busy road (by Maine standards anyway) too fast, way too fast, and his brakes didn’t work well, or he was going too fast, and there was gravel. …whatever….. he swerved into the far lane and oncoming Jeep SUV, as usual NOT wearing a helmet. The left front of the car hit Joshua in the left leg hard (35 mph zone)… when we got to him (a block from our home) his left leg was a “Z” (or maybe two). His thigh bone went in a “V” in one direction, and his shin bones went in a “V” in the other (and one poked out). His three major leg bones are broken–pic below of after surgery.

The miracle is that that is ALL that appears to be seriously wrong: not dead, not a vegetable, no head trauma other than one stitch on his scalp (a staple…remember the staples challenge?), no internal injuries, back and neck not broken, nothing else broken…….. his vision is a little blut=rry but that may be exhaustion… I hope. He will have a painful recovery, and I’m sure this is NOT what he wanted to write in “what I did this summer.” His leg looks like an erector set (an external fixator it is called…. I think the subject of my journal quilt just changed)….. eight pins screwed into the leg, three long rods on the outside. The only major concern is potential for infection through the wound where the tibia (or fibula?) tore through the calf…

Joshus looks at the Village Soup online article

Anyway, I don’t know how many angels were riding pillion on his bike, and how many more were riding with the petrified young woman who hit him (poor thing I think is going to have nightmares for a long time…we called them from the hospital again this morning to say he was gonna be OK once he heals, and he is young and strong and
healthy), and her dad told me they locked eyes at one point…shudder for both. Joshua doesn’t remember much …seeing the car and thinking “Oh oh, this isn’t gonna be good.”
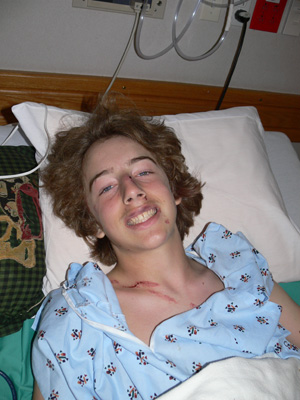
Joshua grinning

Paul and I have been taking turns staying overnight at the regional trauma center in Bangor, 90 minutes away, and taking Eli to camp and semi-normalcy down in Camden. How Joshua managed no head trauma is beyond me…. and the support of friends and community is overwhelming…….

Here’s a link to the coverage in the local online paper which was quite good.

So tell everyone you know, WEAR YOUR HELMETS. If Joshua had been 6 inches farther into the lane, he would have had massive internal injuries, possibly a crushed skull and dead.

leg 2If he had been riding his old bike, which he prefers, he would have been killed instantly–if his head had looked like his leg, it would have been over right there.

leg 1

Joshua was in surgery on Wednesday (I’m typing part of this as he is in the 7th hour of surgery to repair his leg) to get rid of most of the external fixator (the rods on the outside), get a “pin” / metal rod inserted into his thigh bone, and clean up the wound where the bone broke the skin. He will be in the fixator and/or a cast for 6-8 weeks, and the surgeon told us an hour ago (came up to give us an update as a colleague worked on the other part of his leg) that it takes 4 months for a shinbone to heal completely. He will be on crutches, maybe a wheelchair. So kids, this isn’t a picnic. WEAR YOUR HELMETS! and obey the traffic laws (like stopping at the stop sign!), and don’t go too fast on blind curves. In a close encounter between you and a car, the car is going to win.

Immeasurable thanks to all who have written sending prayers and white light and love and support…it helps more than you can imagine.  I will share your messages with Joshua later–he is so very touched by all his friends and those of you at the other end of the ether who are pulling for him.

   Hugs, Sarah, who is grateful to all the gods and angels in all the worlds that I still have two living sons

A little gloat!

Saturday, July 14th, 2007

First off, happy Bastille Day (France’s National Day) to one and all. Now, to our regularly scheduled blogging:

… Oooh boy, has it been a good week! Earlier this week I received in the mail my very first EVER paycheck for writing something: an article for a major quilting magazine! I will be able to tell you more about that in about 2 weeks. Then, yesterday (so much for Friday the 13th…hah! It is good luck Friday this time!), I got another check, this one for two projects that will be in a Lark Books publication that will come out in May 2008! I’ll share more about that next spring when we get publicity stuff, but to say that I am chuffed (to borrow some Aussie-speak, I just love that word) is a major understatement.

The funds are earmarked for paying for a five-day workshop with Carol Soderlund at ProChem, in Fall Rivers, Massachusetts. Long-time readers (thank you!) may remember that I took a 5-day intro dyeing class there with her last summer. Well, I get to take Week 2 this October, and I can’t wait. I haven’t done much dyeing since then (like one yard only!), but will do about 50 t-shirts this coming week and a bunch more in September. And I can say that if you EVER want to learn to dye fabric, take Carol’s class. She earns rave reviews from EVERYone for a reason, and your “color bible” is indeed one of those “grab when the house is on fire” items!

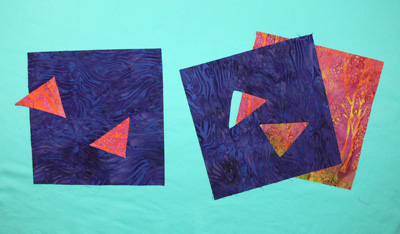
Been working madly on the book….. here is a wicked little tease, a photo to illustrate applique and reverse applique:

ApplRevAppl

and another bit of a tease, since I won’t even tell you what it’s for!

Pineapple corner

way cool graphics

Thursday, July 12th, 2007

Just a brief note today…. somewhere in catching up on various blogs I came across this link for a man who does graphic designs, book covers, posters and websites.  Honestly, the site is not very intuitive.  You have to wait for a flash opening, then a skinny line with no words or any other hints pops up.  Click on the middle of it, and the line will blink, and then you can mouse over the color bars to see Covers, Books, Web, Type, Posters and Contact.  Little circles will appear on either side of the color bar.  If you click on THOSE you will be rewarded for navigating this not-so-helpful site design with a feast of glorious, and very different designs.

I love this book cover, and this one.   Hmmm…OK, those links may take you to the same page.  Click on the third and fifth dots to the right of the vertical color band!  And the first poster I would order if he still had it…. try clicking here, it is the top dot:  here .

I’m screamingly busy working on my book, so hope to have more quilty and art-y content anon.

Strawberry Jam recipe

Sunday, July 8th, 2007

Hi all! I’ve been asked for my jam recipe. Glad to oblige! I do a hot-water-bath canning, following the instructions in the Ball Blue Book, which is the home canners “bible.” You can get a lot of canning supplies at www.homecanning.com, and I heartily recommend the Blue Book (which I even saw at Wal-Mart the other day!). The Basics kit at that website is a good one…. an outlay at first, but SO worth it to get the jar-grabbers, blue book, proper canning pot, etc., all at once.

I prefer Pomona’s Universal Pectin, which is usually found in health and natural food stores. I like it because you can use either honey or lower amounts of sugar, so that you taste the berries, not just “sweet.” In the box you get two packets, one of pectin and one of powdered calcium. Using their instructions, you make “calcium water” (1/2 tsp. of calcium powder per half cup of water).

Mash / chop 4 cups of berries. Place in heavy pan (I used our second-hand Le Creuset enameled iron pot on low to medium heat); add 2 tsp. calcium water and heat to boiling.

Most pectins require an equal amount of sugar, so 4 cups sugar for 4 cups berries…erg. Pomona’s has you use 3/4 to 2 cups for 4 cups of berries depending on sweetness. I used about 1 1/4 cups per recipe since the berries were nice and ripe. Measure sugar into bowl and stir in 2 tsps. pectin.

When fruit reaches boiling, stir in sugar/pectin mix. If, after mixing, it is still a little tart, add a bit more sugar. Allow to reach boiling again.

Meanwhile, have lids and rings in a saucepan of simmering water to sterilize, and boil your canning jars (do NOT re-use commercial jars–they are single-use only and can shatter if re-heated again!) also to sterilize. Just before the jam comes to a boil the second time, remove the jars from the hot water bath to ready for filling.

I set the jam pan on a hotpad next to the jars (which are set on a rack), and use a wide-mouth funnel to fill the jars to 1/4″ from the top. The proper amount of headspace is important for avoiding bacterial contamination and getting a proper vacuum seal. If the strawberry jam is foamy on top, which it usually is, take a dollop of butter on a fork and swirl it around the top to cut the foam (which looks icky but is actually OK to consume). Ladle into jars. If need be, clean drips from the top edge of the glass jar and place new lid on top, then screw down sealing ring. (You can’t re-use a lid…must have virgin rubber ring on it to get a proper seal).

Place jars in hot water bath for about 20 minutes after the water returns to a boil. The fruit in the jam will rise to the top of the jars…when you open a jar up, just stir and mix it back up.

Allow jars to cool, then remove the rings! If jam has oozed out, wipe clean. Make sure the lid “pops” and “sucks down” to make a vacuum seal (so as not to poison yourself with spoiled jam!). If the lid doesn’t seal, remove the lid, try a new one and hot-water bath again (I only had this happen once in 47 jars), or just pop that one in the fridge to use first.

That’s it!

For other jams, you can get fancy. Blueberries need an acidifier, so instead of lemon juice, try lime…yum! And the Ball Blue Book recipe for Plum jam in the “fancy jams” is heavenly. I made Shiro plum (yellow plums) with zest from Clementines and Mandarine Napoleon liqueur once…definitely not for PB&Js….. great on fresh biscuits!

Thanks for asking! In about two weeks, maybe raspberry jam!