email Youtube

Home
Galleries
Blog
Workshops & Calendar
Store
Resources
About
Contact

A brief return to quilting….teaching in Montreal and Lowell, Mass.!

July 21st, 2007

Well, just a quick note and alas no pictures, but I am THRILLED to say that I will be teaching in two wonderful venues next year! I have been invited to teach at Salon 2008, in Montreal, Quebec, Canada, May 22 to 25. The show is sponsored by Courtepointe Quebec Quilts. I will be teaching in English, but my rusty French may be revived and expanded to include quilting terms!

AND I just learned that I will be teaching at the Images Quilt show / Quilt Festival in Lowell, Massachusetts next year August 7-10. WOOHOOO!

Will return in a couple of days with a Joshua update, and hope that life returns to a semblance of normalcy in a week or two (at which point hubby Paul will go in for his delayed rotator cuff surgery, which was to have been the day after Joshua’s accident). Oh joy…two male patients in the house LOL! Wonder if Doritos would help? for them…I’ll take the pina coladas…..

Update on Joshua

July 21st, 2007

The outpouring of caring, friendship, concern, prayers, white light and good thoughts is amazing, sustaining and just plain wonderful…thank you, thank you all!

Joshua has, as of Friday evening, had three surgeries in one week! The first, right after the accident, was to stabilize the breaks until he was stable enough for the long “fix it” surgery. That one began at 1 pm Wednesday and lasted SEVEN hours! They placed a rod in his femur, and external fixator (tinker toy on the outside) of his shin / calf, and had to do two fasciotomies (sp?) which are long incisions on either side of his calf. These were to allow the wounded muscles to swell without killing muscle tissue (from the constriction that would have happened if squoze by the skin)…had they not made these incisions, he could very likely have had gangrene and lost his leg—shudder! (here’s a link, but I warn you the photo is not for the squeamish).

On Friday, he went in for “maintenance” surgery; basically, cleaning the wounds and changing the dressings is so painful, they do it under a general anesthetic. They were hoping to close one of the fasciotomies, but as I type I’m not sure what the results were as I am home with Eli and the animals, and Paul is with Joshua in post-op recovery (last minute note: swelling still too much to close up, so maybe Sunday). The only bad news is that Joshua had to have a transfusion because of serious anemia; I REALLY don’t like the idea of a transfusion in an AIDS world, but not to have one would have been worse. Erg. (Last minute update…hoooray! They didn’t do it after all… I will donate a unit tomorrow as we have the same blood type…hope he won’t need it, adn they can then put it into the general blood bank!)  Best of all NO signs of any infections…hallelujah!

Anyway, Joshua has been an amazing trooper, getting through the pain (the changing of sheets and bathing today was the only thing that has brought me to total tears), being polite to all the staff no matter how much he hurts. He makes me incredibly proud of him–even more than I already was, if that’s possible! Eli, too, has been a trooper through all the disruption, and our friends and neighbors and parents of his friends have been phenomenally supportive and helpful; just knowing they are there in case we need them to take Eli for an evening or a night is the most amazing help–even if we never need to take them up on the offer. Another blessing!

Now I need to go deal with the house. And oh yeah…amidst all of this today, my cell phone croaked! So an emergency replacement will arrive tomorrow…so I have to stay home and WAIT for it before returning to the hospital. AAAARGH. At least Verizon was understanding and cooperative and helpful, and tolerant of my crankiness (for which I apologized in advance, explaining I was ultra-stressed and why). Paul and I are both holding up well. As I said before…the fact that Joshua is alive makes these incredibly serious fractures and some complications seem minor in comparison. Blessed again.

I think there are many more angels out there than I ever realized.

Facings as an Edge Finish

July 20th, 2007

The following tutorial builds on the article published in the August/September 2007 issue of Quilting Arts Magazine. The Pillowcase (or bagged back, or escape hatch) finish for a small art quilt is simply a one-piece facing that covers the entire back of an art quilt. This method is useful if you have lots of knots or carried threads that you wish to cover, for example after extensively beading a piece. For larger quilts (or even small ones) you may not wish to cover the entire back. Instead, you can use facings. On a quilt with straight edges, like Koi, you can use a straight strip of cloth as I did here on the back / under / second side of this quilt. However, just like a dress neckline, facings work well on curved and irregular shapes. From the front, you can’t tell if this quilt is a Pillowcase backing or a faced edge:Faced quiltlet

Facings:
Borrowed from dressmaking, a facing is simply a piece of fabric that echoes the outside edges that is turned completely to the back side of a quilt. Large and small quilts with irregular edges are great candidates for facings!

1. Cut a strip of fabric that extends ½ inch beyond the outside outermost edge and 2-plus inches towards the center of the quilt from the innermost “innie”.

Facing a weird shaped edge

2. Pin the facing to the quilt top, right sides together, on the back side of the quilt.
3. Sew a ¼ seam (photo below, left)

Facings–sew seam, edgestitch
4. Trim excess fabric from the seam allowance.
5. Clip /notch curves, clip inside corners and trim outside corners.

Facings –clip curves
6. Press the seam as stitched. Fold facing over the seam allowance and press again.

7. Edgestitch facing to seam allowance a scant 1/8” from seam line; this will encourage the seam allowance to stay put and not try to roll back to the front. (photo above right)
8. Fold facing to the back, “favoring” the edge. The little bit of green that you see in the photo below is the “favored” edge, which is a bit of the front rolled to the back.

Facings, favored edge
9. Iron the seam allowance and facings towards the center of the quilt. (See Step 9, above)

10. Turn under the edge of the facing and stitch in place. See the photo about edgestitching to see the turned, pinned edge.

11. Repeat on the other sides, turning under the short ends of the facing and stitch down to create a completely finished facing.

Foolproof miters on any width binding–Binding Tutorials (1)

July 20th, 2007

The double-fold bias binding with a mitered corner is probably the most familiar edge finish for contemporary quilts. In the set of mini-quilts I made for my forthcoming article on bindings in Quilting Arts magazine (August 2008), I created an outside edge that includes corners, a point, and inside and outside curved edges which covers most of the challenges you will face.

I hope you’ll check the forthcoming issue (due on stands and in mailboxes near you at the very end of July and early August) for more details. Because there is only so much space available, they didn’t have room to include instructions for “any-width” bias binding, only 1/4″ bias binding. I actually prefer this technique to the one described in the article, so you have my permission to make ONE copy of this blogpost, for you personal use ONLY (since I make a living, albeit modest, teaching and selling quilts, thank you in advance for respecting my copyright!).

As soon as the article is out, I’ll insert a picture of the mini-quilt here. In the meantime, the close-up above of a good mitered binding will have to do! Thanks for understanding!Cut your binding strips SIX times the width of the desired binding,Double-fold Wrap plus ¼” (or up to ½” extra if you’d like a little more wiggle room). For a binding that finishes at 3/8” that is [(6 x 3/8) + 3/8 = 18/8 + 2/8 = 20/8 or] 2 ½ inch wide strips. Sew your binding strips together with a ¼” seam allowance until you have the length of your quilt perimeter plus several inches. The seams are on the straight grain, so when folded they run at an angle to the side of the quilt (making them less noticeable). Fold the strip in half lengthwise, finger-pressing or lightly pressing with an iron.

Think Boomerang: first the binding goes away, then it comes back:

1. Sew binding strip to the quilt edge, beginning at least four to six inches from a corner, and leaving a tail of about four to six inches (on large quilts, 12 inches or more is better), figure 1. In North and South America, Europe, and Africa, since we read from left to right and top to bottom, I like to start the binding on the lower left side, where the join is relatively unnoticed as the eye travels in its accustomed path across a quilt. Loosely run the binding strip around the quilt to make sure a seam doesn’t land on a corner (too much bulk); if it does, adjust your starting point slighly.

Double-fold Step 1

2. When stitching is about 2 inches from corner, fold the binding strip back on itself exactly on the edge of the quilt and finger press. You may wish to mark with a pin or chalk to see the line better. Diagrams 2

Double-fold Step 2

3. Fold the binding strip UP so that the marked line is now exactly even with the top edge of the quilt; finger press a crease at the 45 degree line. Mark with chalk on the inside of the binding if you need to improve visibility. Diagram 3

Double-fold Step 3

4. Continue to sew the seam until you reach the 45 degree chalk line. Backstitch 3 or four stitches. Diagram 4.

Double-fold Step 4

5. Pull the quilt out from under presser foot and (this is the boomerang part) : first fold the binding away on the marked lines, then back down so that the binding turns the corner and goes down the next side. Diagram 5.

Double-fold Step 5

6. Stitch from the very outside edge of the quilt down the next side. Diagram 6.

Double-fold Step 6

7. Repeat at the other corners.

8. Stop stitching about 4-6 inches from where you began.

After you have used this method enough, you will be able to fingerpress and eyeball the corner turns instead of marking.

Guardian Angels wear helmets

July 19th, 2007

Well, this falls into the category of “Do not go faster than your guardian angels can fly,” as week took a decided turn toward the unexpected at about 4:45 pm Monday. That is when our son Joshua, 13, and NOT wearing a helmet (despite us badgering him, taking the bike away, etc.) was on his bike and hit by a car. Thanks to a not-so-small miracle, and a host of guardian angels, he will (after he heals) be fine, as he “only” suffered breaks of all three major bones in his left leg. I am so grateful I still have two sons alive, that Joshua is (a) not dead, (b) not a vegetable, (c) not paralyzed, (d) not full of massive internal injuries and shattered bones, or (e) a combination of all of the above.

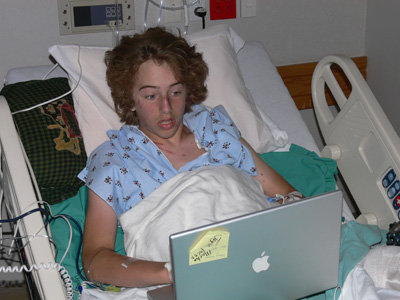
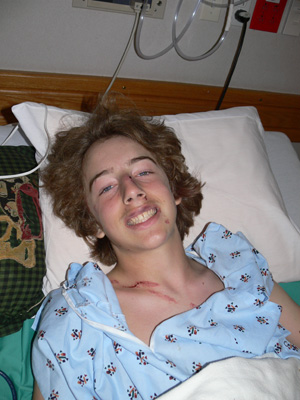
SQUEAMISH ALERT: I will be posting photos of Joshua in the hospital down a bit, so if you don’t want to see it, don’t look. However, if you want your kid to realize that they are not invulnerable, make them come read this post and the article in our local newspaper that is online (link below).

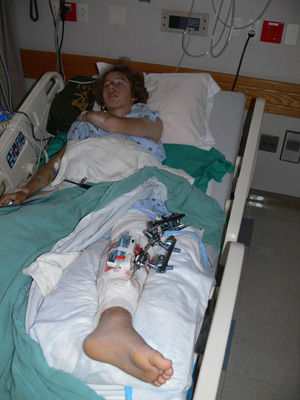
On Monday at about 4:30, our son Joshua, 13, headed to town on his bike to the library. He took a right turn onto a moderately busy road (by Maine standards anyway) too fast, way too fast, and his brakes didn’t work well, or he was going too fast, and there was gravel. …whatever….. he swerved into the far lane and oncoming Jeep SUV, as usual NOT wearing a helmet. The left front of the car hit Joshua in the left leg hard (35 mph zone)… when we got to him (a block from our home) his left leg was a “Z” (or maybe two). His thigh bone went in a “V” in one direction, and his shin bones went in a “V” in the other (and one poked out). His three major leg bones are broken–pic below of after surgery.

The miracle is that that is ALL that appears to be seriously wrong: not dead, not a vegetable, no head trauma other than one stitch on his scalp (a staple…remember the staples challenge?), no internal injuries, back and neck not broken, nothing else broken…….. his vision is a little blut=rry but that may be exhaustion… I hope. He will have a painful recovery, and I’m sure this is NOT what he wanted to write in “what I did this summer.” His leg looks like an erector set (an external fixator it is called…. I think the subject of my journal quilt just changed)….. eight pins screwed into the leg, three long rods on the outside. The only major concern is potential for infection through the wound where the tibia (or fibula?) tore through the calf…

Joshus looks at the Village Soup online article

Anyway, I don’t know how many angels were riding pillion on his bike, and how many more were riding with the petrified young woman who hit him (poor thing I think is going to have nightmares for a long time…we called them from the hospital again this morning to say he was gonna be OK once he heals, and he is young and strong and
healthy), and her dad told me they locked eyes at one point…shudder for both. Joshua doesn’t remember much …seeing the car and thinking “Oh oh, this isn’t gonna be good.”
Joshua grinning

Paul and I have been taking turns staying overnight at the regional trauma center in Bangor, 90 minutes away, and taking Eli to camp and semi-normalcy down in Camden. How Joshua managed no head trauma is beyond me…. and the support of friends and community is overwhelming…….

Here’s a link to the coverage in the local online paper which was quite good.

So tell everyone you know, WEAR YOUR HELMETS. If Joshua had been 6 inches farther into the lane, he would have had massive internal injuries, possibly a crushed skull and dead.

leg 2If he had been riding his old bike, which he prefers, he would have been killed instantly–if his head had looked like his leg, it would have been over right there.

leg 1

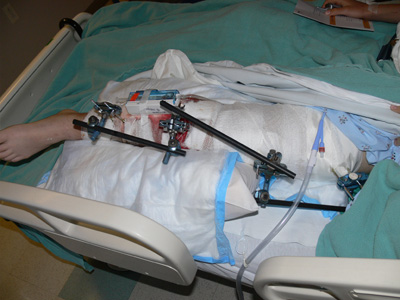
Joshua was in surgery on Wednesday (I’m typing part of this as he is in the 7th hour of surgery to repair his leg) to get rid of most of the external fixator (the rods on the outside), get a “pin” / metal rod inserted into his thigh bone, and clean up the wound where the bone broke the skin. He will be in the fixator and/or a cast for 6-8 weeks, and the surgeon told us an hour ago (came up to give us an update as a colleague worked on the other part of his leg) that it takes 4 months for a shinbone to heal completely. He will be on crutches, maybe a wheelchair. So kids, this isn’t a picnic. WEAR YOUR HELMETS! and obey the traffic laws (like stopping at the stop sign!), and don’t go too fast on blind curves. In a close encounter between you and a car, the car is going to win.

Immeasurable thanks to all who have written sending prayers and white light and love and support…it helps more than you can imagine.  I will share your messages with Joshua later–he is so very touched by all his friends and those of you at the other end of the ether who are pulling for him.

   Hugs, Sarah, who is grateful to all the gods and angels in all the worlds that I still have two living sons