email Youtube

Home
Galleries
Blog
Workshops & Calendar
Store
Resources
About
Contact

Archive for the ‘Challenges’ Category

Never underestimate the inspiration caused by a group project

Sunday, December 20th, 2020

Art should be like a holiday: something to give a man the opportunity to see things differently and to change his point of view. -Paul Klee, painter (18 Dec 1879-1940) 

So I’m part of Mt. Battie Modern Quilt Guild, one of two local groups. This chapter, part of the MQG (Modern Quilt Guild) is the smaller of the two and is almost completely comprised of members of Coastal Quilters (the other group) which is part of the statewide Pine Tree Quilt Guild (Maine is the Pine Tree state). For once, I decided to participate in a round robin sort of thing. This year, the group opted to have each person do a block for ONE member of the group, doing it every other month or so.

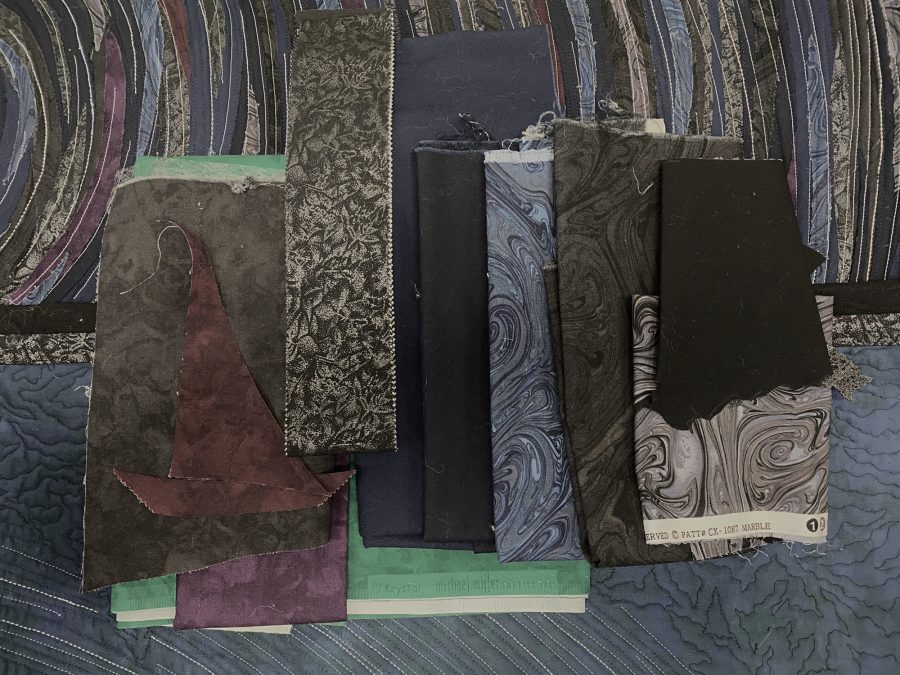
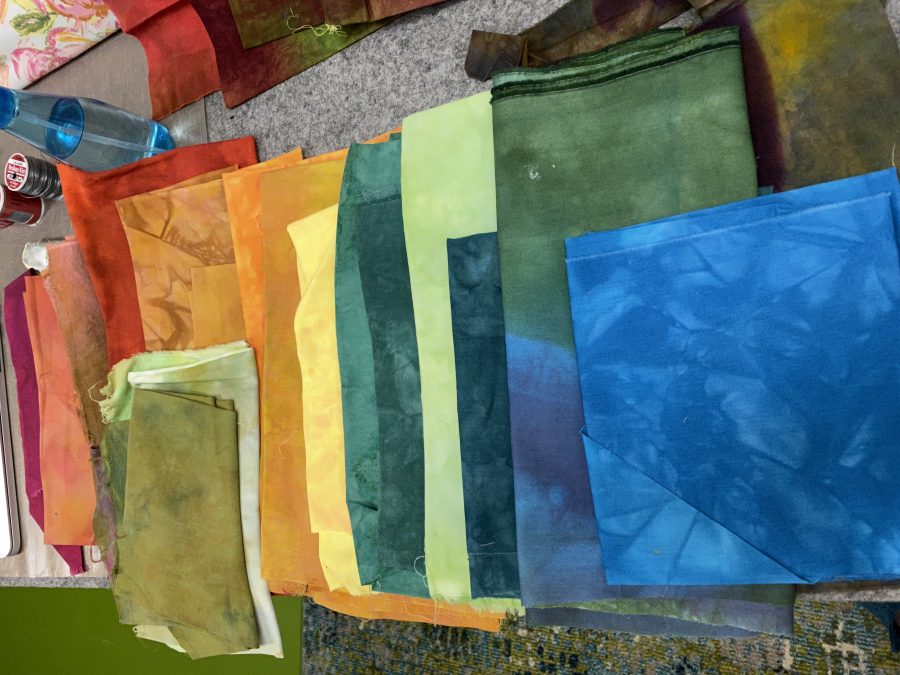
Let me tell you I was stumped. I started by pulling fabrics.

Other than the sky fabric which I purchased because I didn’t have the right color or the time to dye something to order, I used only my own hand-dyes, above.

This past month was Becca’s turn. At first her prompt had me totally baffled: Paul Klee – Swiss/German Artist 1879-1940, use solids/read as solids, and she quoted several bits about his style and inspiration:

  • Klee … greatly admired the art of children who seemed free to create free of models or previous examples. In his own work, Klee often strove to achieve a similar untutored simplicity, using the intense colors inspired by an early trip to North Africa and by line drawing in the unstudied manner of everyday craftsman.
  • Klee suggests that color, shape and the faintest suggestion of a subject are enough to powerfully recreate in the eye of the viewer the actual feeling of repose the artist experienced in the original landscape.

Once I started pulling fabrics, though, I got excited. I googled Paul Klee…well first I googled Klimt and it didn’t seem to jive, then Becca corrected my mental jump from Klee to Klimt and things made more sense. I thought this quilt looked like good imagery for improv piecing:

Paul Klee’s Castle and Sun

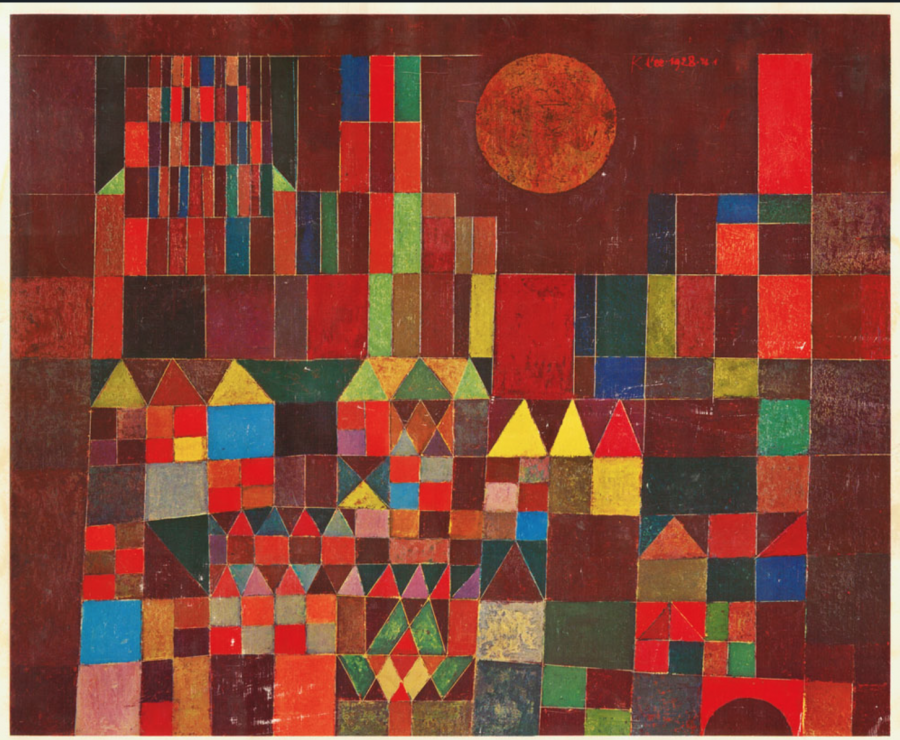
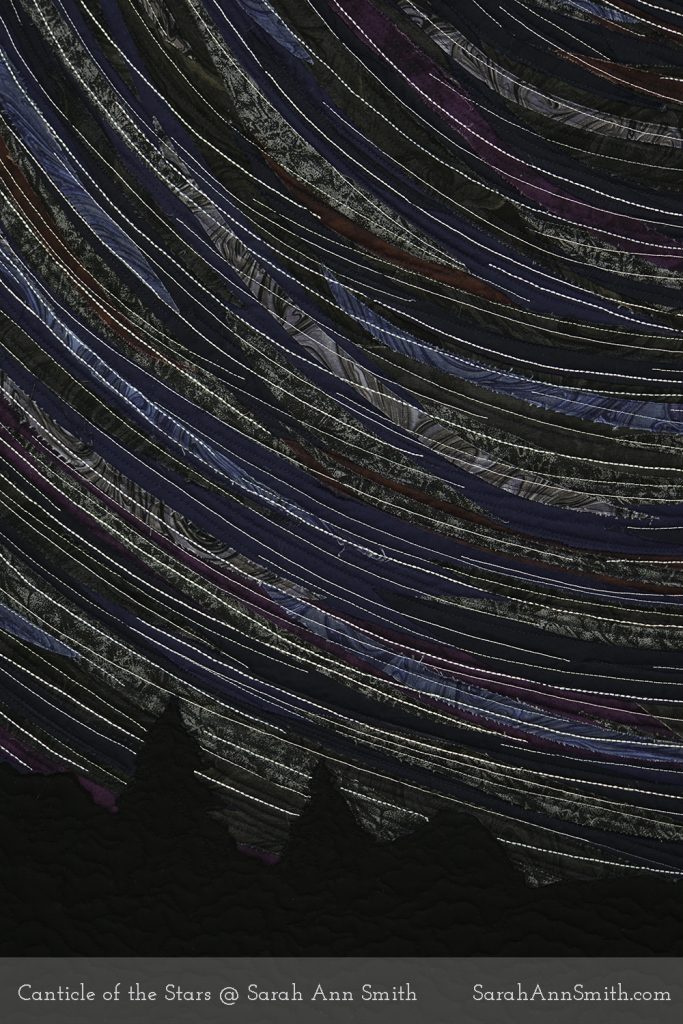
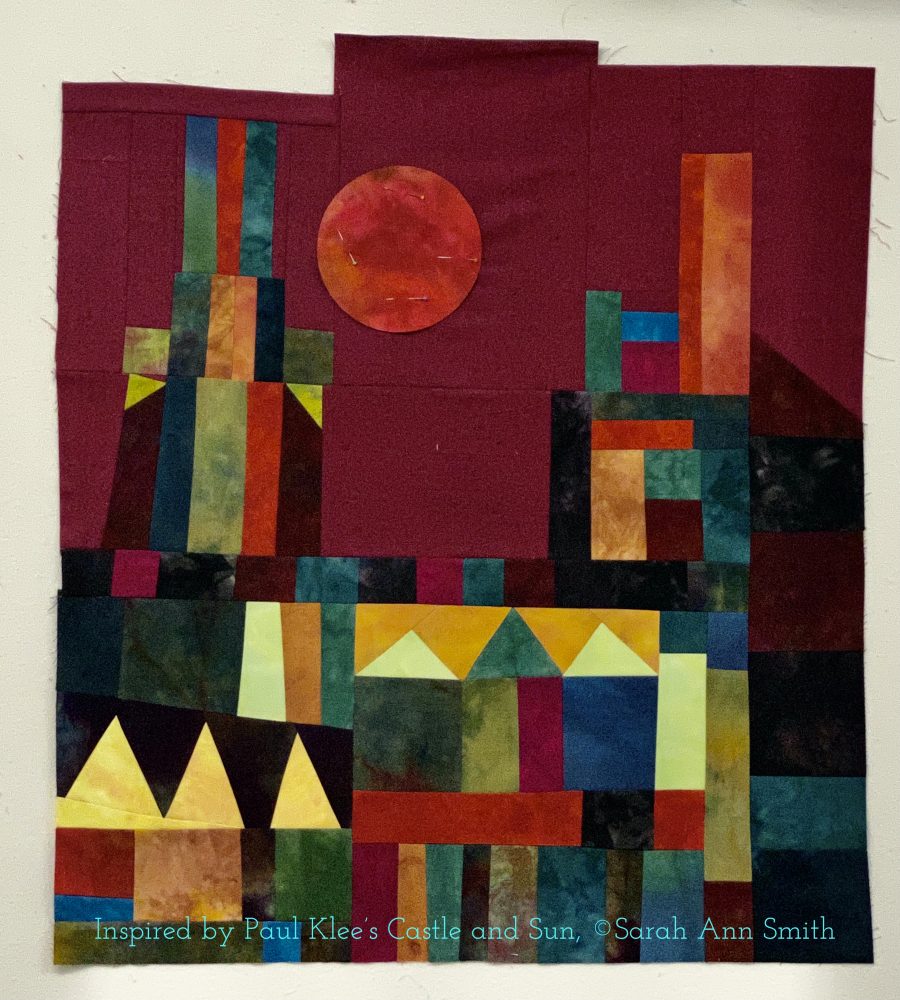
I started with the pointy roofed houses and made two sets, then did some strips. I made my castle wall darker and shorter than his, but opted to have two towers reminiscent of the ones here. I used a few pops of the brighter yellow and ochre and the light green and the bright blue scattered hither and yon as in the original. I really liked the odd jigs at the top so left it up to Becca to leave them or trim.

At about 24 x 27 inches, it is a rather large “block,” but only took me a couple days to put together. There may be something to this improv stuff! Anyway, I had a ton of fun and am energized to dive into dyeing fabric and new work in January once the holidays are done. Hope you’ve enjoyed!

Canticle of the Stars

Monday, May 11th, 2020
Canticle of the Stars, or should I call it Anthem of Light? Chime in!
Completed May 2020, 36 tall x 46.5 wide.

There is a thing called star trails photography (just google it…it’s really cool). The earth rotates on its axis. The North Star is static in our northern skies. If you take time lapse photos and then “stack” (merge) them, you get star trails….images that describe the lines created by the light of the stars. Did you know that starlight comes in different colors??? It does… I love the feeling of the vastness of space. When I went to college, I comforted myself knowing that my then-boyfriend and I could both look up at the constellation Orion in the sky even though we would be 3000 miles apart. I love wondering what is out there, and feeling snug and at home in my own world. The universe is Out There and it is Within Us. I love the resulting art quilt. While trying to figure out the title (star trails was too boring), I wrote a poem to go with this quilt:

As many of you know by now, I was selected to be a Michael Miller Brand Ambassador this year. At the start (last December) we received a box STUFFED with goodies (post here). I decided to challenge myself, using items ONLY from this box to make an art quilt in my style, but using fabrics that are totally not in my usual wheel house: commercial solids, prints, and bling. I love the result…in trying to figure out the title (star trails was too boring), I wrote a poem above. Help me decide should the title be Canticle of the Stars? or Anthem of Light? Leave comments and thoughts!

So, how do you make an image that is DARK work successfully as an artwork? In this case, the answer is a lot of quilting with light thread in seven shades from pink to peach to green to blues! Here are the fabrics I used:

The quilt is under the fabrics, with the top visible in the upper half and the backing below. The Michael Miller Fabrics are from left to right: Michael Miller Krystal in Aubergine 1278, Wine 2248, Coal 1302 and 1257 Evergreen. Fairy Frost in Black. Cotton Couture SC5333 in Midnite and Ink. Marble CX1087 in Stone, graphite (or onyx) and night (I think on the denim blue). Michael Miller Jet Black which is part of the Cotton Couture line. I overdyed the green with a navy dye to use as the backing.

The quilting was done entirely on my Janome M7 Continental. The sky was done with the walking foot and the trees was free-motion quilted. It has been eons since I did walking foot quilting…I may do more of it soon! And the threads I used:

It is VERY rare for me to use a walking foot for quilting, but for the sky on this one I did. I used the dark blue So Fine to help hold down the Mistyfused pieces (cut curved, but on the bias so I could adapt their arc) and solid black (I can’t remember if it was the Mettler or So Fine) for the treelike silhouette. The six colors are the star trails in the sky. I used both regular straight stitch and the triple-straight stitch with the walking foot.
Detail, Canticle of the Stars. The edges of the print fabrics are definitely rougher than I am used to with the batiks and hand-dyes I use due to the different thread count, but I think they work because the light edges become another star trail.
And a very close up of the raw edges, some wool lint (sigh…do you know how many times I vacuumed and lint roller this quilt??????) from my pressing surface, and the quilting. The pale green turned into that creamy yellow color when quilted. It’s amazing what thread will do!

I hope you’ve enjoyed this journey to the stars, and back to home on Earth.

Foto Friday, Week 44: Panorama

Friday, November 13th, 2015

Hi all!  Just a quick post to share last week’s quick effort at our Ricky Tims’ 52-Week Challenge lesson on how to “stitch” together photographs in PhotoShop.   Honestly, the software does all the work.   The photo below was created from five photos taken of the view from our house, then I did a few edits to get the colors captured to equal what it really looked like.

Did the panorama merge. Lightened the very deep shadows on the lawn, the row of scrub along the stone wall and the small woods on the left. Minor enhancements to get it to look more like it really looked to the eye (had to meter for the bright spot in the center) with the low 3 pm-ish afternoon light. This is the view from our house/lawn! We live in a town called Hope (Maine), and in the distance can see the towns of Liberty and Freedom (along with Appleton, Morrill and other spots). On a good night the Milky Way runs over us and is visible. The far ridge is probably 40 miles away to the North. The only drawback is the house faces North, and we have woods on the other three sides, so getting early morning or late afternoon “golden hour” is problematic as the sun is behind the trees or hills. We have wild turkeys, porcupines, skunks, foxes, deer, birds of all sorts, and a sheep farm behind us.

Did the panorama merge. Lightened the very deep shadows on the lawn, the row of scrub along the stone wall and the small woods on the left. Minor enhancements to get it to look more like it really looked to the eye (had to meter for the bright spot in the center) with the low 3 pm-ish afternoon light.
This is the view from our house/lawn! We live in a town called Hope (Maine), and in the distance can see the towns of Liberty and Freedom (along with Appleton, Morrill and other spots). On a good night the Milky Way runs over us and is visible. The far ridge is probably 40 miles away to the North. The only drawback is the house faces North, and we have woods on the other three sides, so getting early morning or late afternoon “golden hour” is problematic as the sun is behind the trees or hills. We have wild turkeys, porcupines, skunks, foxes, deer, birds of all sorts, and a sheep farm behind us.

Since this photo was taken we have had wind and rain and wind, so we are no in the bare, brown and gray phase of the year.

The great news is that Ricky has opened sign-ups for a repeat of the 52-Week Challenge for 2016.  I’ll blog about that in a couple days, but since this is my second post today, I want to take a bit of a breather!

Foto Friday, Week 42 (out of order): HDR = High Dynamic Range

Friday, November 6th, 2015

To my utter astonishment, our younger son (who at best tolerates grimly my taking photos of him), ASKED me to take a photo–his Senior Yearbook Photo!  Knock me down with a feather!   I had thought he would use his school pictures photo:

Eli's annual school photo. The usual.

Eli’s annual school photo. The usual. Boring.

So while I was at taking the senior/yearbook photo, I knew it would be a crazy-busy week so I took a series of photos to do an assignment called “High Dynamic Range” where you merge 3-5 (or more) photos to account for the fact that there is strong light and strong shadow in one place.

This is the photo I ended up submitting for the class. I is a "merge" of four photos. Can I say Photoshop is remarkable?

This is the photo I ended up submitting for the class. I is a “merge” of four photos. Can I say Photoshop is remarkable?

The above photo is “composed” of these four photos (which despite my attempts to place them are going where they want…sigh):

(c)2015-SarahAnnSmith.com-5895

First image, very over-exposed so you can get detail on the right side

Second image/exposure

Second image/exposure

Third Exposure, darker. Not as blown out on the left, but the right side of his face is hard to see.

Third Exposure, darker. Not as blown out on the left, but the right side of his face is hard to see.

Fourth exposure: right side detail is very hard to see.

Fourth exposure: right side detail is very hard to see.


We decided that as lovely a backdrop as the maple tree was, the light was simply too harsh.  Eli suggested we go down by the arbor/cut-through to the big meadow.  He thought he could lean up against the post and it would look more natural.  Turns out there is too much bittersweet, but the photo turned out great!

Eli selected this shot, which used a fairly shallow depth of field (to blur the background) and was taken from a tripod.  I can confidently say there is NO WAY I could have gotten such a good shot (with minor post-production/editing work) when I began this class in January.   YEAH!  I’m learning!   And Eli is happy.  And will now return to grumbling when I take photos of him.  <<grin!!!!>>>

Eli's choice for his yearbook photo. They also do something utterly cool...see next photo....

Eli’s choice for his yearbook photo. They also do something utterly cool…see next photo….

Happy boy, happy dog!

Happy boy, happy dog!


That’s it for now!


Foto Friday, Week 43 (out of order): Halloween

Friday, October 30th, 2015

The image of a thousand edits!  I combined four images:  a photo of the moon, two different photos on my iPhone of the willows shot on a misty dog-walkies and the flash fired, and the bats are from a silhouette of my hands, seriously edited.  I’ll post more info below including a link to the orignal images in my Flickr November album.

The image of a thousand edits! I combined four images: a photo of the moon, two different photos on my iPhone of the willows shot on a misty dog-walkies and the flash fired, and the bats are from a silhouette of my hands, seriously edited. I’ll post more info below including a link to the orignal images in my Flickr November album.

Normally it doesn’t matter if I post my photo a week late, but since the theme was Halloween, and since I’ve actually done this at not-the-last-day, I’m doing week 43 today and I’ll fill in with week 42 next week!    And oh…if you haven’t been around, this is part of the year-long 52-Week Photography Challenge class I’m taking online with Ricky Tims.  This composite image was something that I would NEVER have been able to do at the start of this class! I used four photos (two of the widows, one of my hands, one of the moon).For anyone interested in how I did it, here you go (Long!)

This week’s theme was Halloween.   Apparently Ricky had planned on Hands, then changed it to Halloween.  But the “use hands” didn’t get edited out (until someone asked about it and he said typo!).  By that time I had this hare-brained idea for my weekly submission.  Our challenge was to do something creepy for Halloween (or otherwise Halloween-y) using what we’ve learned.   This may be one of those instances that Ricky refers to as “Just because you can, doesn’t mean you should.”   Oh well!  It was a fun flight of bat-ful fancy!

1. Darken photo of moon. Select to the right of the moon extending area quite a bit to the right. Use content aware fill to “reposition” the moon.

(c)2015-SarahAnnSmith.com-6148

Bottom layer. Photo of moon. NO idea why I’ve got those odd spots–the moon equivalent of a sun flare?

2. Take first of the two willows in the night mist photos (shot on iPhone, which used last and showed those cool streaks in the mist). Since the photo was square, add a layer and paste. Add another layer and paste again, so that the two images overlap. Use soft-edge eraser brush to blend the two photos. Some Dodge and Burn to even out the overlap. Flip horizontally.

First of two photos taken on my iPhone a couple months ago.

First of two photos taken on my iPhone a couple months ago.

3. Take the second of the two willows-in-the-night-mist and repeat the above process in Step 2.

Second willows photo.  The mist is going a different direction, and I like the layering that happened.

Second willows photo. The mist is going a different direction, and I like the layering that happened.  Notice I flipped the photos horizontally to have the weight of the willows balancing the brightness of the moon.

4. Reduce opacity to about 30-35 on both willows layers.
5. Merge down layers so the four willow layers end up as one (or was it two) layer(s).

MoonMist

The first layer of montaged willows over the moon.

6. Spend a ridiculous amount of time trying to make assorted masks work to let the moon shine through without overlaying leaves. Give up and use an enormous, soft-edge dodge brush to lighten the layers over the moon.
7. Dragoon hubby into taking shots of my hands as a bat (after google searching). Set up light and tripod/camera etc first.

The original photo of my hands.  Had a photography (for quilts) light shining up to get a sharp silhouette.

The original photo of my hands. Had a photography (for quilts) light shining up to get a sharp silhouette.

8. Remove background around hands. Reduce opacity, use burn tool to knock back highlights on my fingers.

Background removed.

Background removed.

Edit out arms using a large hard-edged eraser brush to create wing scallops.

Presto chango, let there be a bat.

Presto chango, let there be a bat.

9. Create multiple layers, using “transform” to scale and rotate to edit the “bat.” Mull over whether to have one or three bats. This is seriously one of those “just because you can, doesn’t mean you should” moments. Still not sure about one versus three. But after HOURS of edits, I’m going with three!
Time for lunch and other work!

The image of a thousand edits!  I combined four images:  a photo of the moon, two different photos on my iPhone of the willows shot on a misty dog-walkies and the flash fired, and the bats are from a silhouette of my hands, seriously edited.  I’ll post more info below including a link to the orignal images in my Flickr November album.

The image of a thousand edits! I combined four images: a photo of the moon, two different photos on my iPhone of the willows shot on a misty dog-walkies and the flash fired, and the bats are from a silhouette of my hands, seriously edited. I’ll post more info below including a link to the original images in my Flickr November album.

So that’s it!  My Flickr album for November is here, and for the page with all my albums is here.