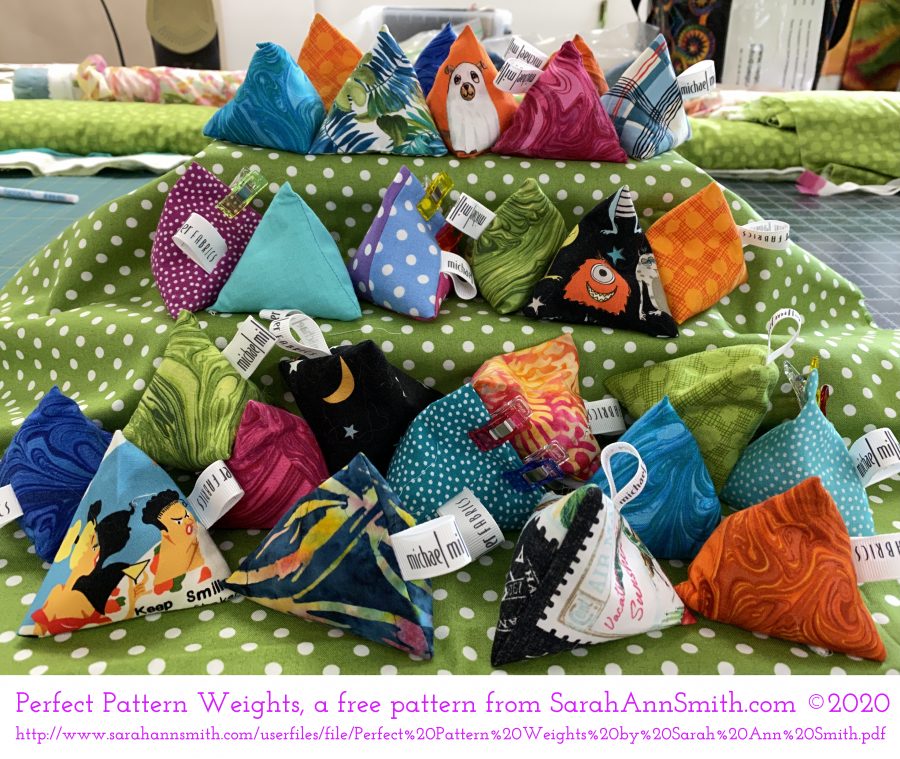
These just-perfect sized pattern weights, 3″ on a side, are not only just the thing for YOUR sewing room, but they make quick and easy gifts for anyone you know who sews!
Can you tell how much FUN I had? Lookit the doggie as a Halloween Ghost (top row) and the goofy Space Alien (center right) and those fantastic Garden Pindots (middle and lower rows)! See free PDF for pattern and Michael Miller Fabrics fabric details.
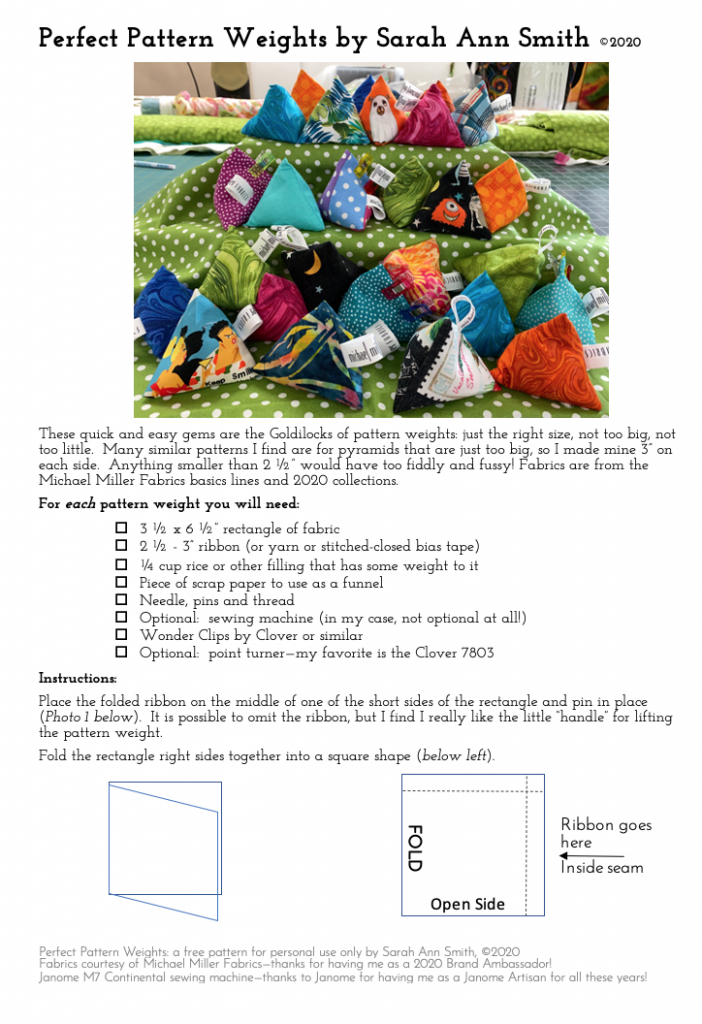
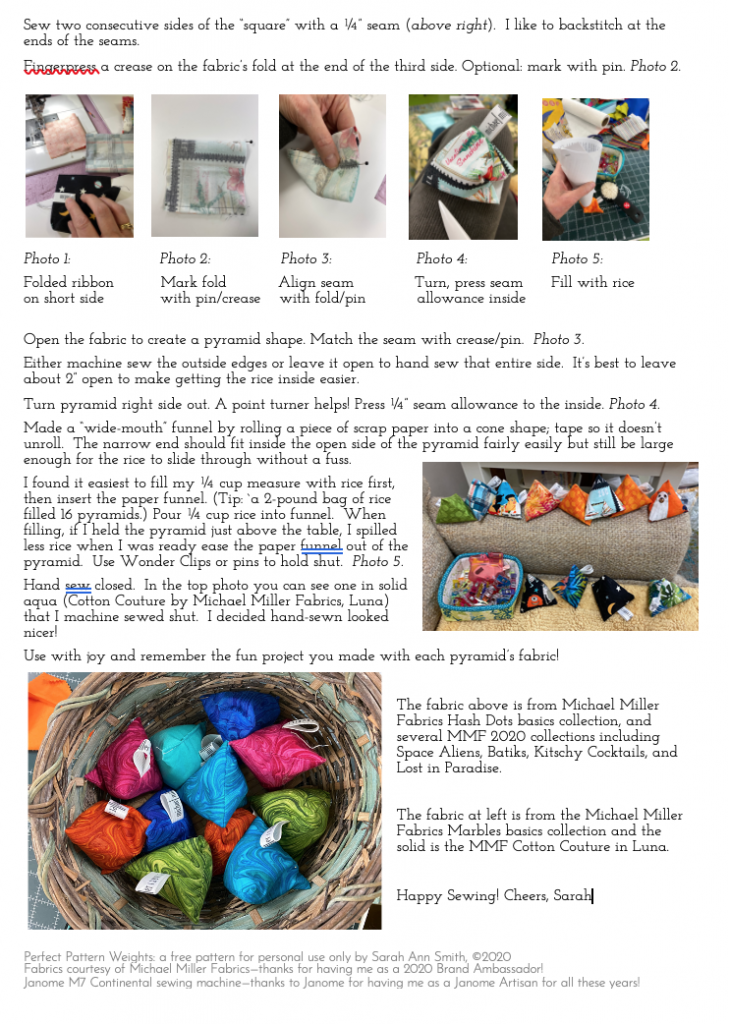
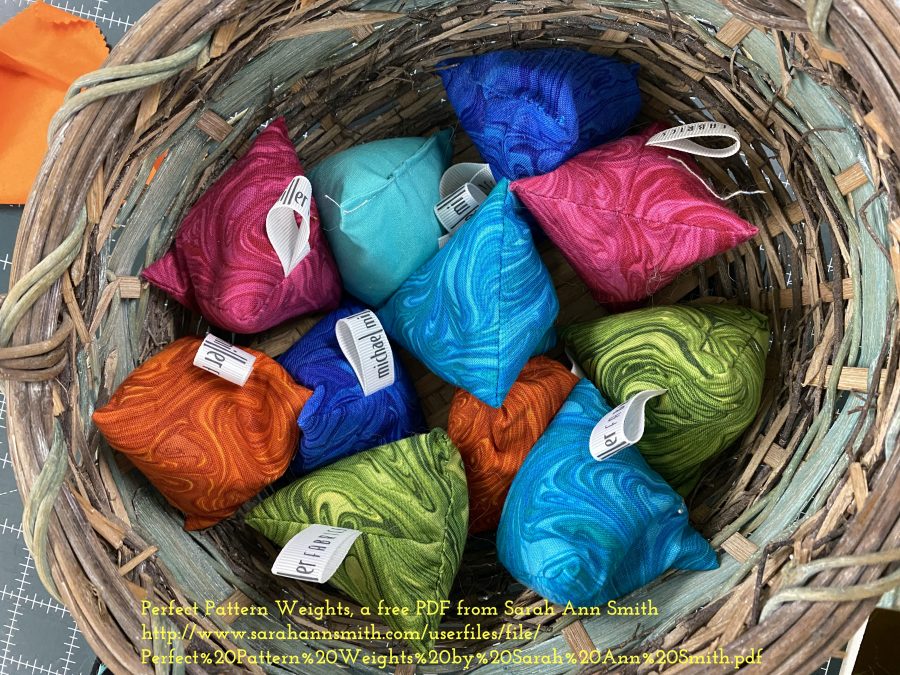
Early in my year as a Michael Miller Fabrics Brand Ambassador for 2020, I decided to use some Marbles (MMF Basic collection) for a much-wished-for set of pattern weights. Most patterns on the internet were way too big–at least 4″ on a side. I wanted mine smaller, to fit into smaller areas. As I made them I thought what fun it would be to remember this year by using fabrics from each collection and project that I made in more weights. It’s now December, and here’s what I have….FUN! Even better, Here is a FREE Printable PDF so you can make your own. The printable version duplicates what comes next:
And some new info: My cousin said the rice filled ones can be popped into the microwave (briefly!) and make nice handwarmer’s, and a friend said she uses a combination of fiberfill for soft outside and buckshot for the center to add the heft that you need for a pattern weight.
ENJOY and stay safe–here’s to hoping next year at this time we’ll be like to something approaching normalcy with COVID controlled, almost everyone vaccinated, and holidays celebrated with a LOT OF HUGS!
Good tools (AccuQuiltGO!), good fabric (Michael Miller Fabrics), good thread (Aurifil), good machine (Janome Continental M7), and some experience, and you can do a lot! This return to my quilty roots just makes me happy!
Over the course of the year I’ve shared progress on this quilt:
First, there was learning to use the AccuQuiltGO! which I blogged about here. It was a different block, but the easy applies.
Then there is the PIECING of CURVES: see the blogpost here or go directly to the video on my YouTube Channel here.
Now there is the quilting video (that covers a couple other things), embedded below and share-able on my YouTube Channel here.
Full disclosure: I have proudly been a Janome Artisan since 2003, and this year am a Michael Miller Fabrics Brand Ambassador for 2020. MMF provided the fabric and we were given, as part of being a brand ambassador, an AccuQuiltGo and several dies. To my surprise I enjoyed the process so much I have purchased both the Winding Ways and Crossed Canoe dies. Stay tuned for more!
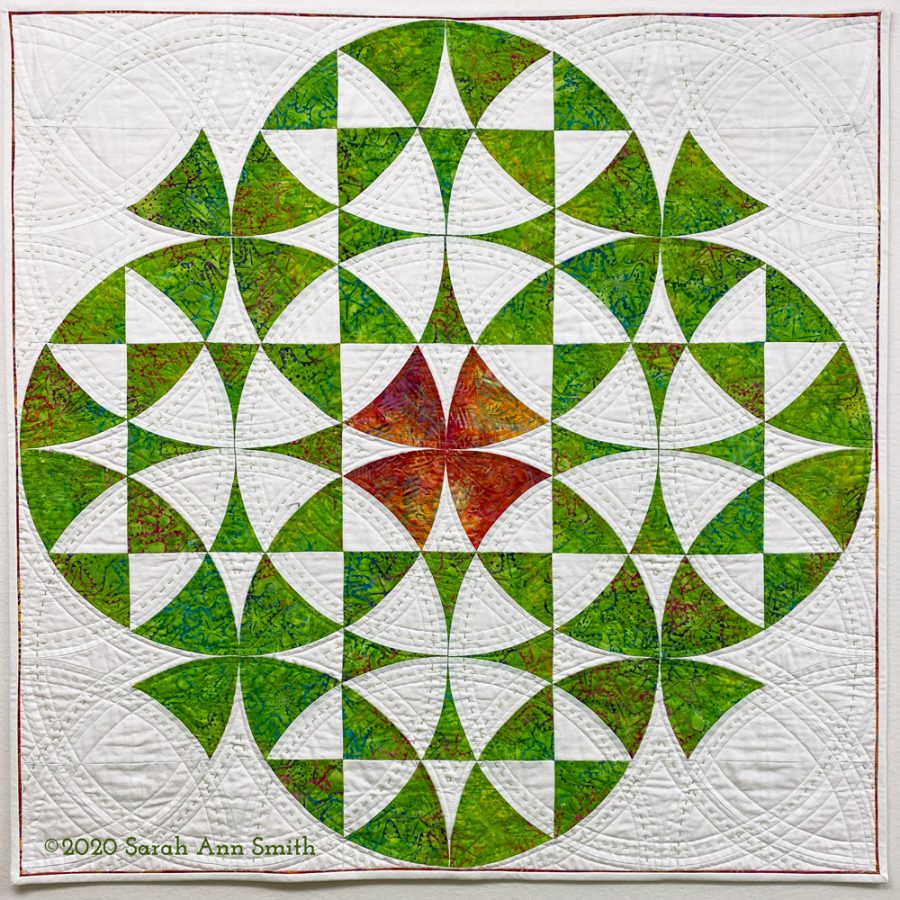
This is the die that I purchased to make the Winding Ways, which has always been one of my favorite traditional blocks. Click this link to see a blogpost of using the AccuQuiltGO (for another block, but it’s the exact same process) including a video.I found this design somewhere on the internet and printed it out to mess around with a design for a future quilt! Stay tuned for a WANDERING Winding Ways! Using a grid like this can help you plan out fun color fades and settings.
Next came machine quilting. I worked on that a while back–I did end up teaching for the Mancuso Online Quiltfest in August and will do a Threadcoloring the Garden workshop in October! More info on that soon! In this video I’m practicing making a video, demonstrating at the machine, and it just happens to be walking foot quilting (fast! easy!) on my beloved Janome M7. Even if I had paid full price instead of being a Janome Artisan I’d rave about this machine’s wonderfulness! Their new slogan, Reliability by Design, is really true!
Then, the hand quilting and the finishing!
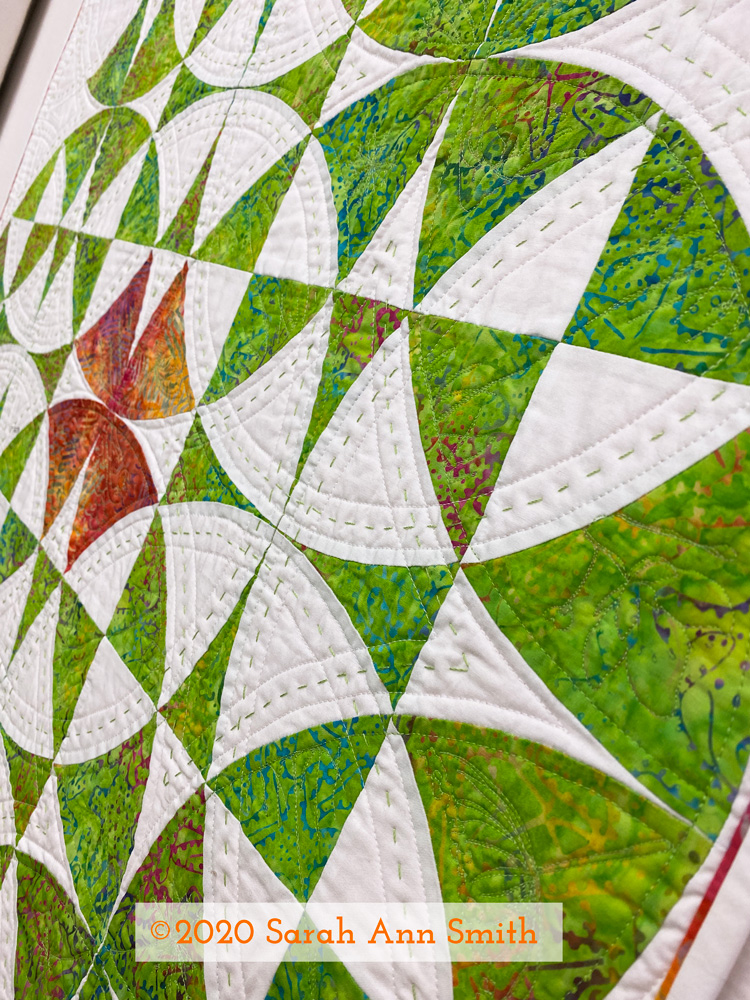
I haven’t done any hand stitching in a thousand years, but nearly two years ago I bought matching green thread from aurifil in piecing/light quilting weight and a heavier 12-wt that is about the size of a light perle cotton or 6-strands of floss. I LOVE IT…and it went so fast! I can remember clearly sitting on the porch in early summer, something to watch on the iPad, stitching away.
I just love how an angled shot shows the texture and dimension. I was surprised at how quickly the hand stitching went. I used the same green color of thread on the green parts for machine quilting as the green in the heavyweight Aurifil thread.
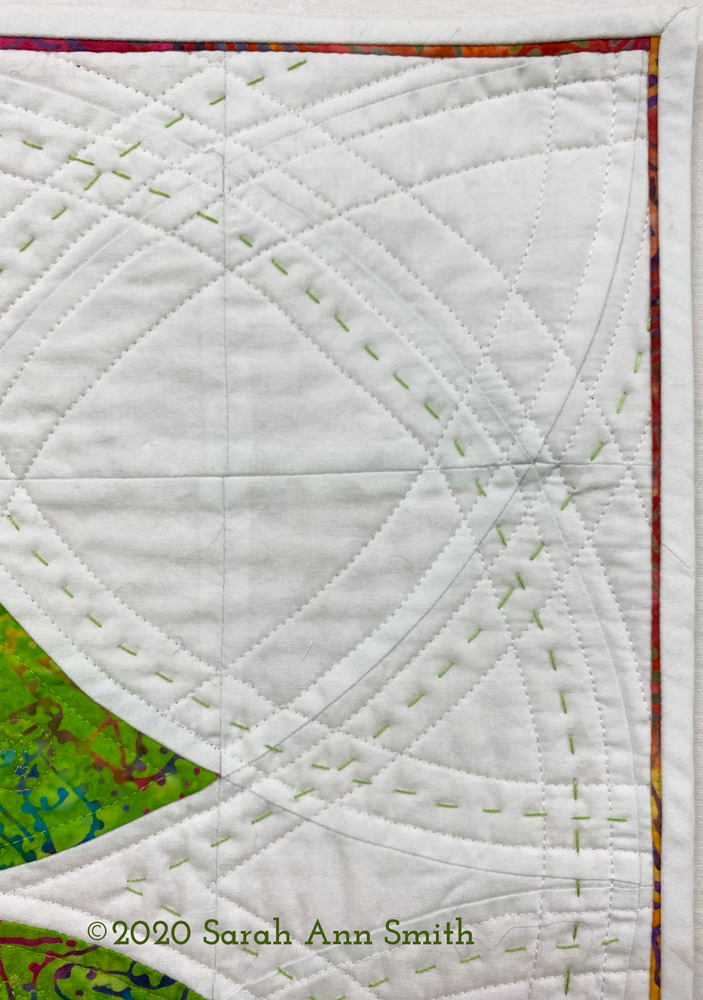
I wanted to repeat the orange batik in the center on the edges, but using it as the binding was too much. I instead inserted a tiny stitched down “reveal” that is a scant 1/8″ just inside the white binding. Can I also put in a plug for Michael Miller’s Cotton Couture solids? The quality of the base cloth is SO GOOD! And the consistency in color / dye lots over the years is really amazing. I dye fabric and know how hard it is to get perfect matches from batch to batch and it does.
Last but not least, those skinny inserts and perfect corners.
I taught the half day version of my bindings workshop at the Mancuso Online Quiltfest in June and may do so again in the new year. I am scheduled to teach and have an exhibit of my work at the Mid-Atlantic Quiltfest in Virginia in February, but at this point who knows if it will be in person or online! I promise I will teach the bindings (full or half day) again in the new year online, just need to figure out when. My students in June had GREAT results online so it works online too!
Anyway, I hope you’ve enjoyed my 2020 detour back to my quilty roots. Coming soon, a new art quilt!
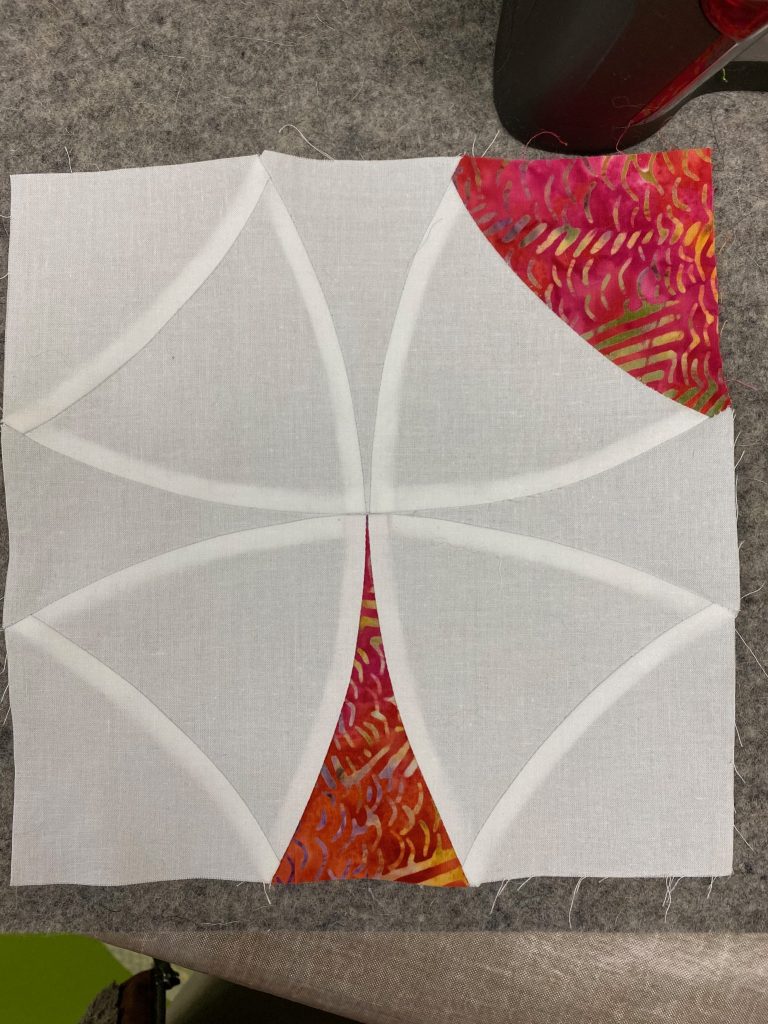
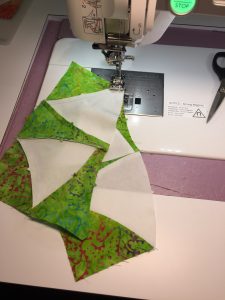
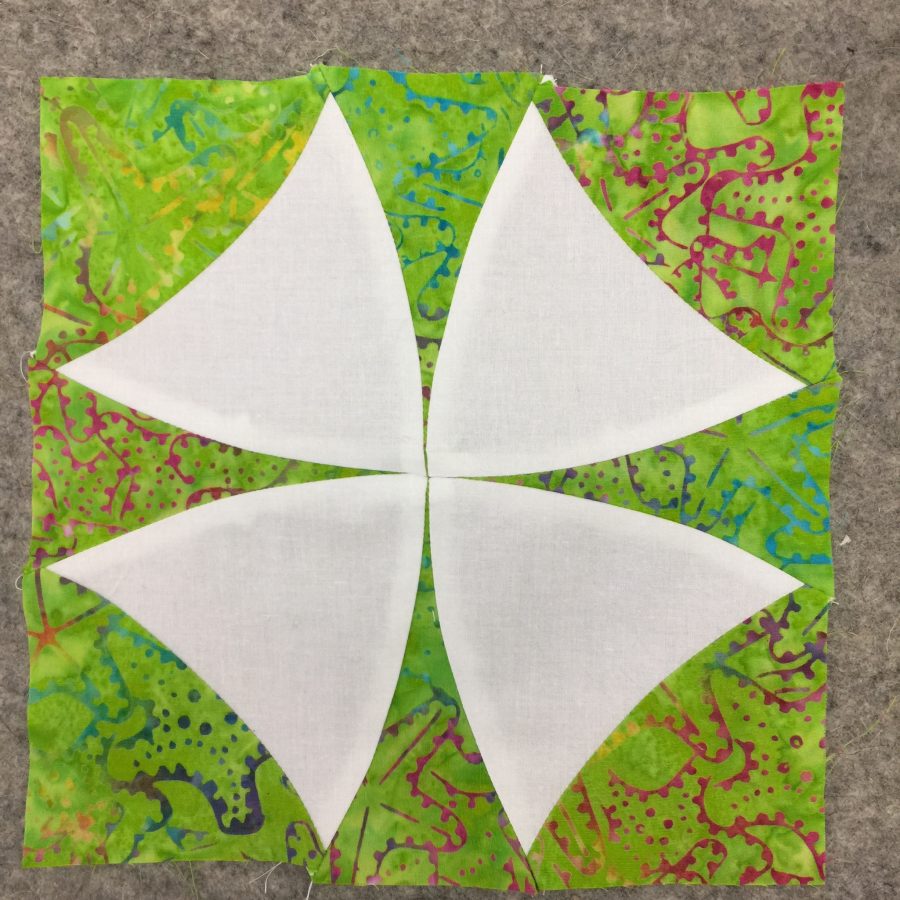
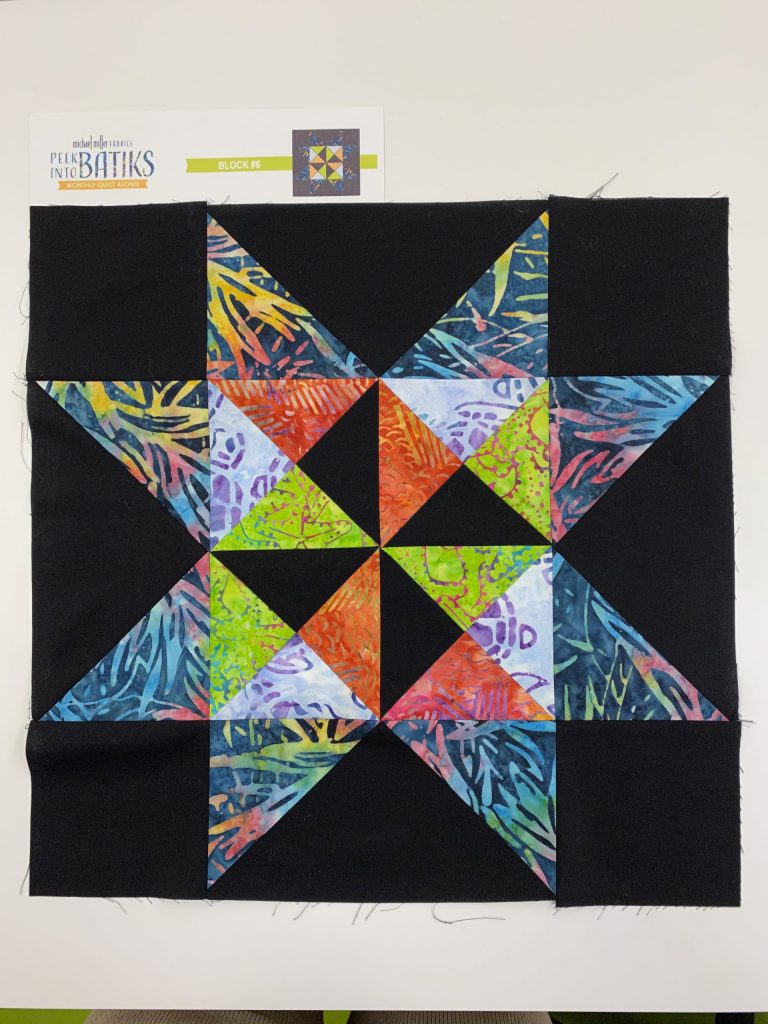
Whoo-eeeee! Lookit those perfect seams… this was my second block, and I think it looks pretty durn good for someone who doesn’t really piece a lot! There are a few MINOR things I can fuss at (like the seam allowance on the center top spike is a skosh wide and the upper left corner edge isn’t perfect, but still! Fabrics are batiks and Bright White Cotton Couture from Michael Miller Fabrics.
Precision piecing has never been my strong suit, but I am — like Michaelangelo at age 80 — still learning. One of the things I’ve learned is that it is OK to use specialty tools like the AccuQuiltGO! and byAnnie’s stiletto. Thank you to Michael Miller, for whom I am a Brand Ambassador this year) and Janome America for having me as an Artisan. For me, careful cutting for squares, rectangles and triangles isn’t too TOO challenging (as long as I’m paying attention which is never to be take for granted LOL). But CURVES? Not so much.
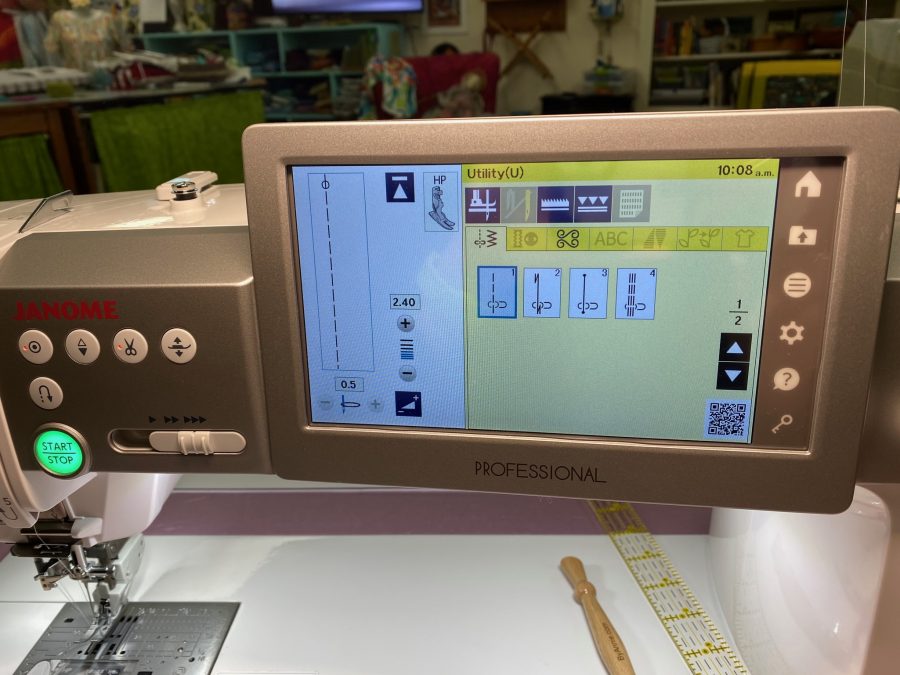
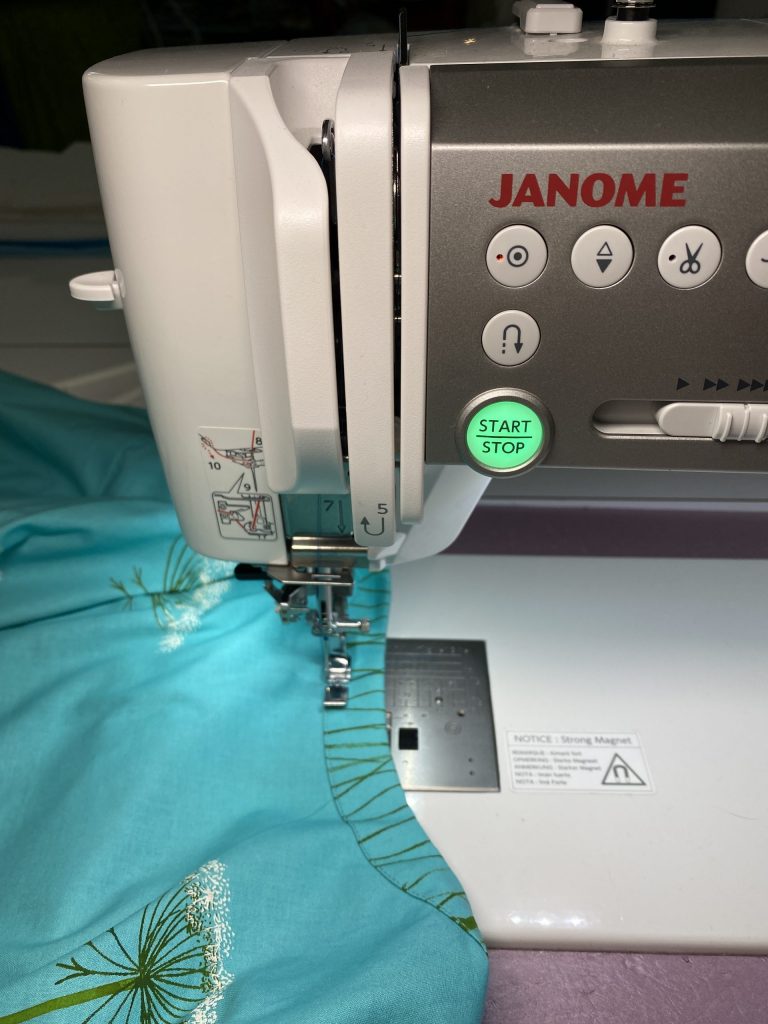
Back in May, I shared a video that tells yo about the amazing (Heavenly Perfection?) HP presser foot and throat plate, herhttps://www.sarahannsmith.com/weblog/?p=13206e. If you have a Janome with this option and haven’t tried it out, DO! Go watch the video… it’s a brief but I hope helpful mini tutorial. The video is also on my YouTube channel, here. I’ve been doing a bit more with brief videos…looks like about one a month. I’ll have another later this month about using the blind hem stitch for some slacks I made–you can subscribe to the channel.
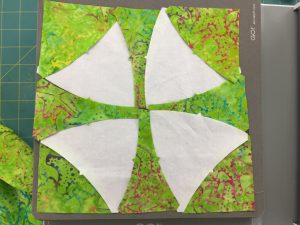
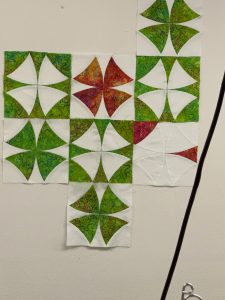
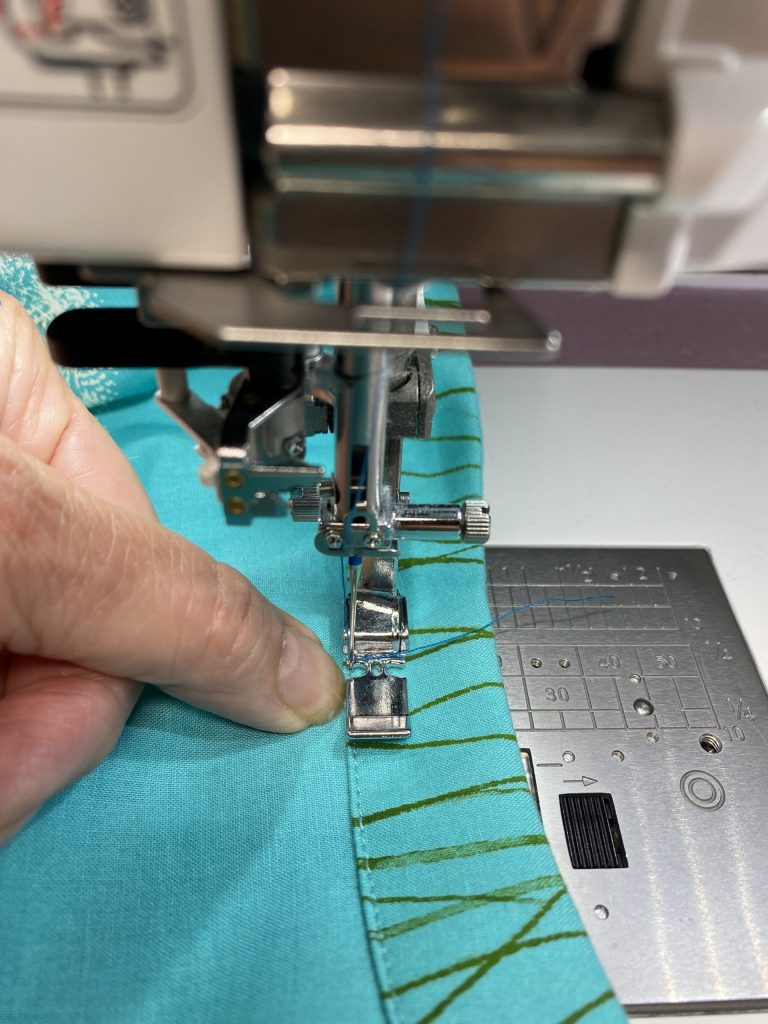
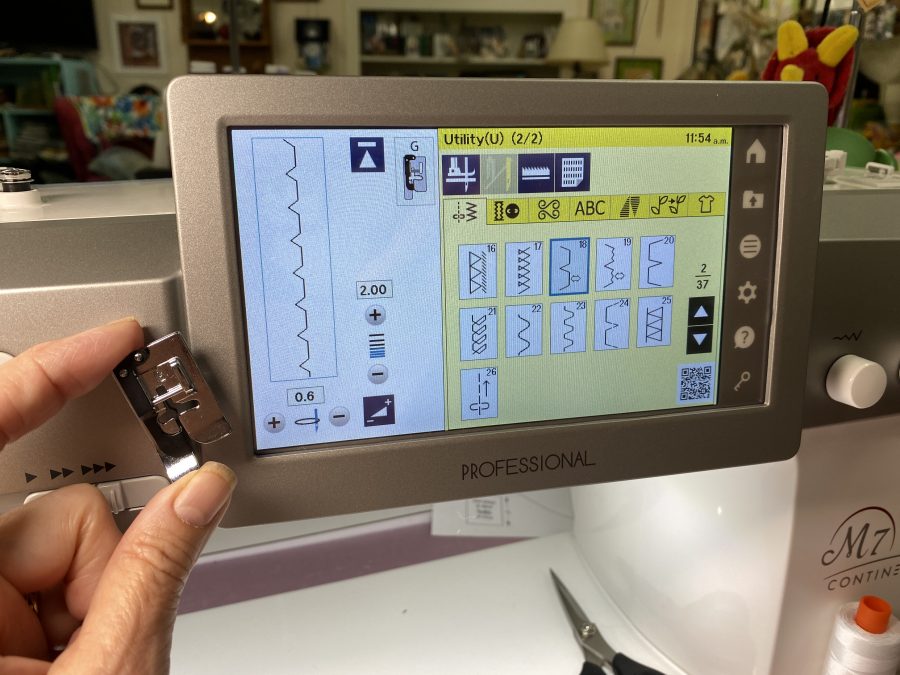
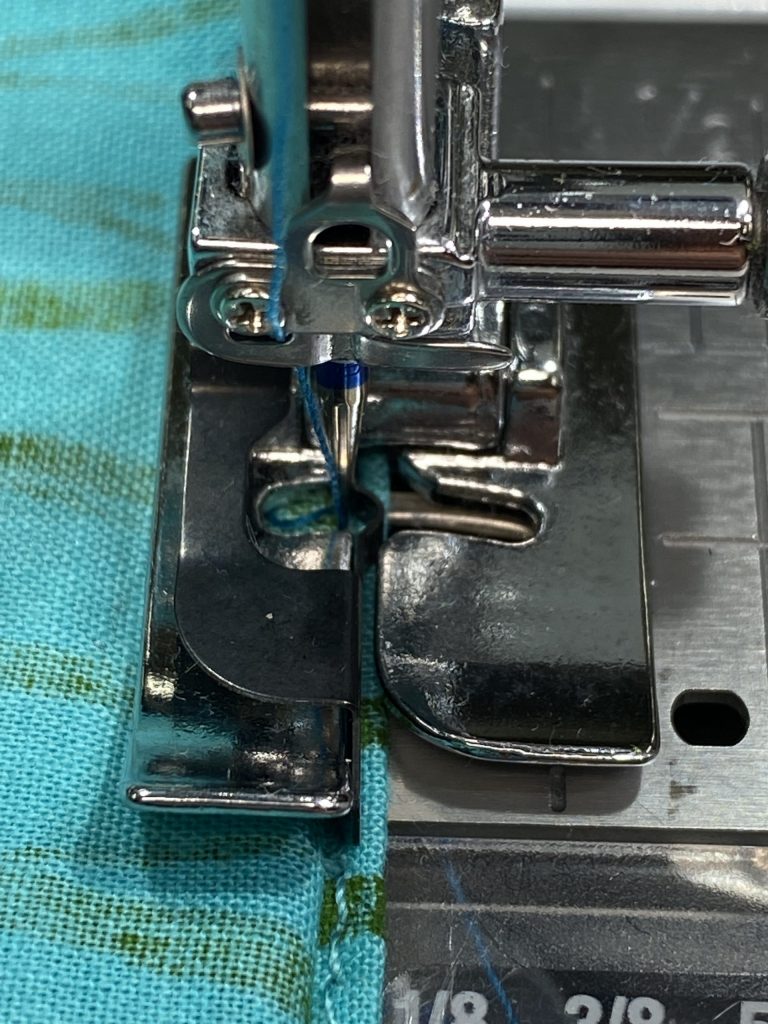
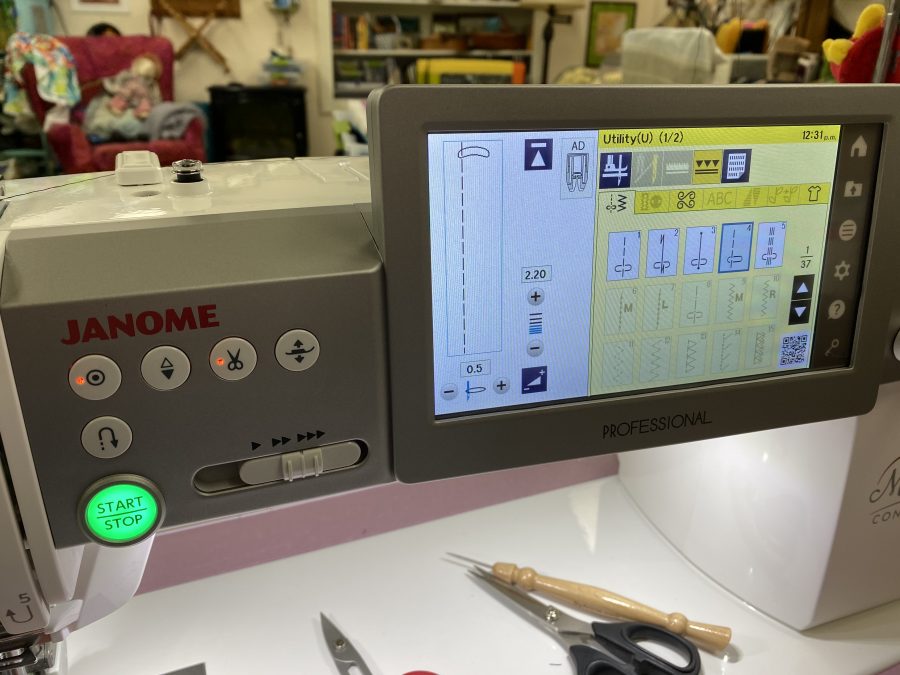
After cutting using the Winding Ways die (requires the AccuQuiltGo or similar cutter, too), I laid out the blocks to see how they looked (and to make sure I had enough of each shape).Here are the settings on my M7 for the HP foot which helped me get such amazing accuracy and careful piecing. Slowing down helps, too. Ahem.First, I cut and assembled segments.
Here’s a quick video of me using the oh-so-wonderful HP accufeed foot and throat plate from Janome, on my M7. Thanks to Kimberly Einmo who shared her love of this accessory at the 2018 Janome Education Summit! Like I said…there is ALWAYS more to enjoy learning.
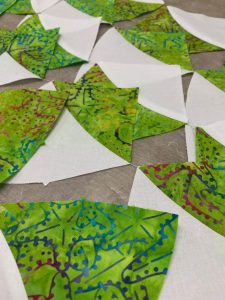
Sub-units createdFollowing the assembly instructions that come with the Winding Ways die, you press seams in specific directions and create and assemble sub-units in a specific order. Then you get as close to perfection as I am ever going to get! There is still some fine tuning I need to do (meaning the dreaded P-word: PRACTICE) to get the outside edges straight, but I mean really, look! Here’s my Winding Ways on the design wall, considering various settings. I ended up going fairly traditional…I’ll share “done” in a week or two.
Hope you’ve enjoyed my detour from art quilting. I’ve actually needed a break to recharge myself, and this has been DELIGHTFUL. I’m thrilled with the finished quilt… will post it in about a week or so.
Full disclosure: I’ve been a Janome Artisan for 16 years, and am forever grateful for their support and machines. I’m a Michael Miller Fabrics (MMF) Brand Ambassador for 2020; the batiks and white fabric were donated as part of that ambassadorship. The AccuQuiltGO! was a GIFT (!!!!) as part of the MMF thing, and I purchased the Winding Ways die once I realized that wow, I could USE this machine! Whooda thunk it? Well, I should have. Having FUN! And lastly, thanks to byAnnie.com; their donations to the Teacher Goodie Bags in Houston one year netted me that awesome (and not expensive) Stiletto!
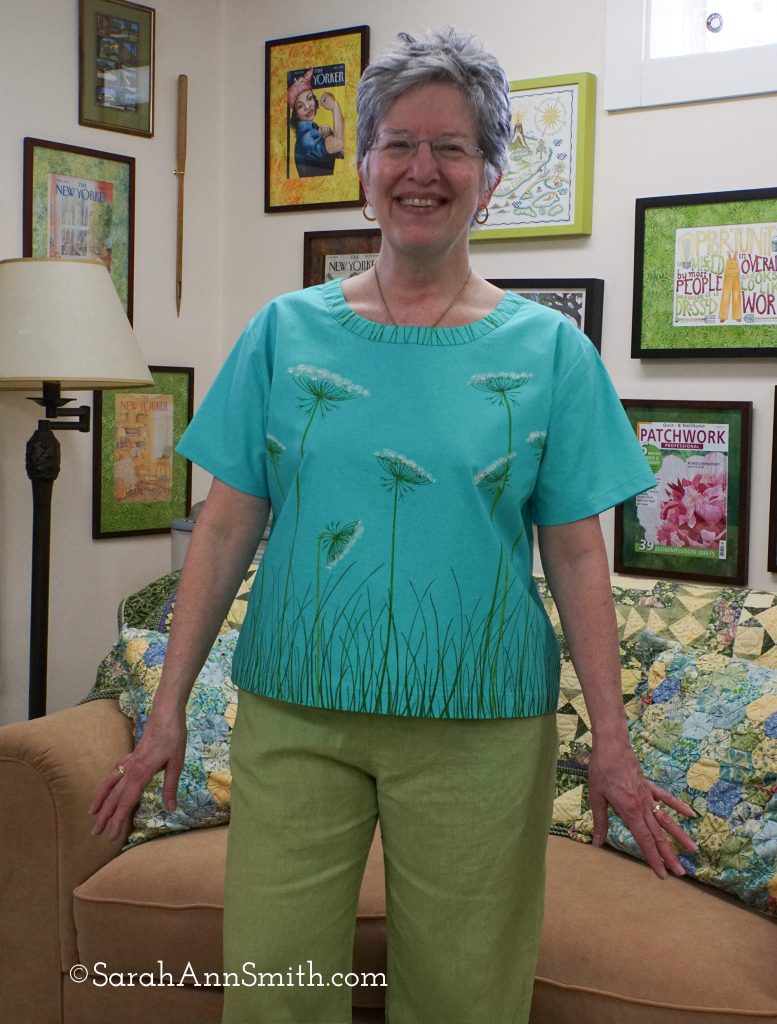
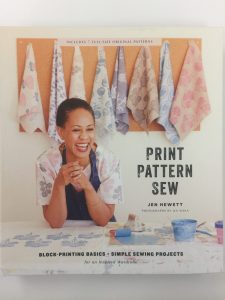
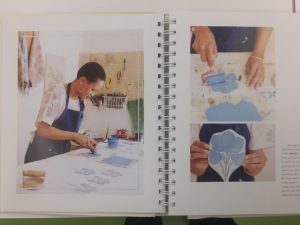
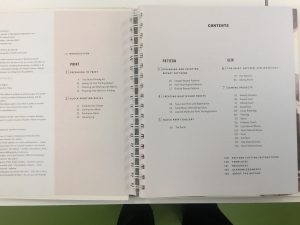
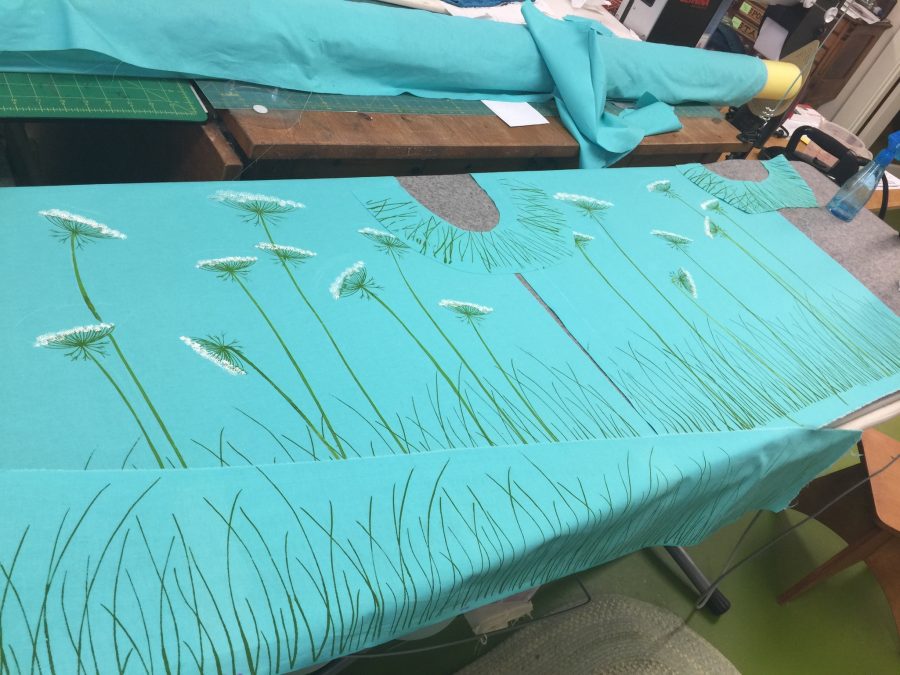
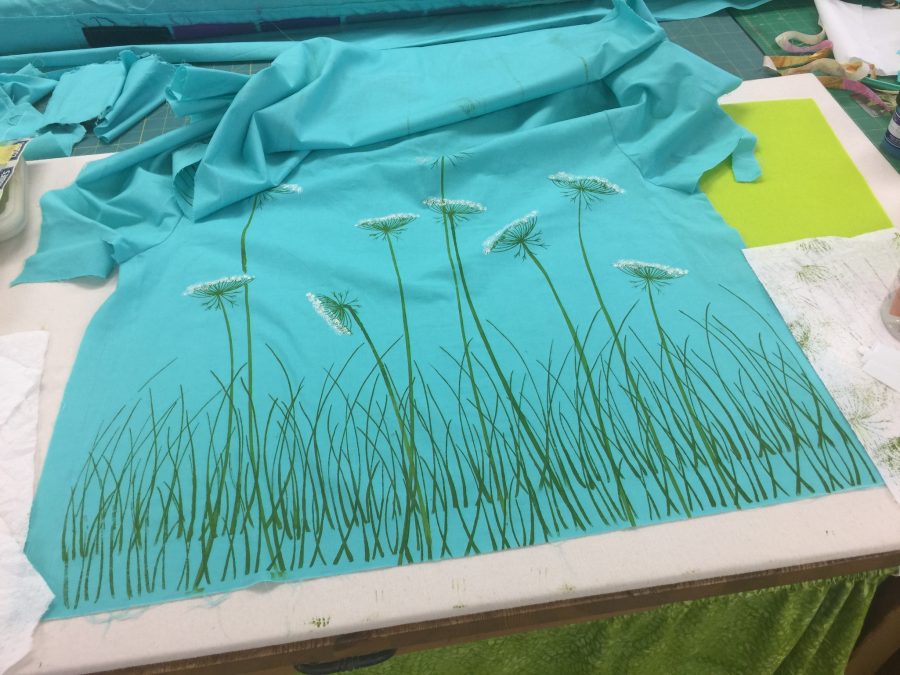
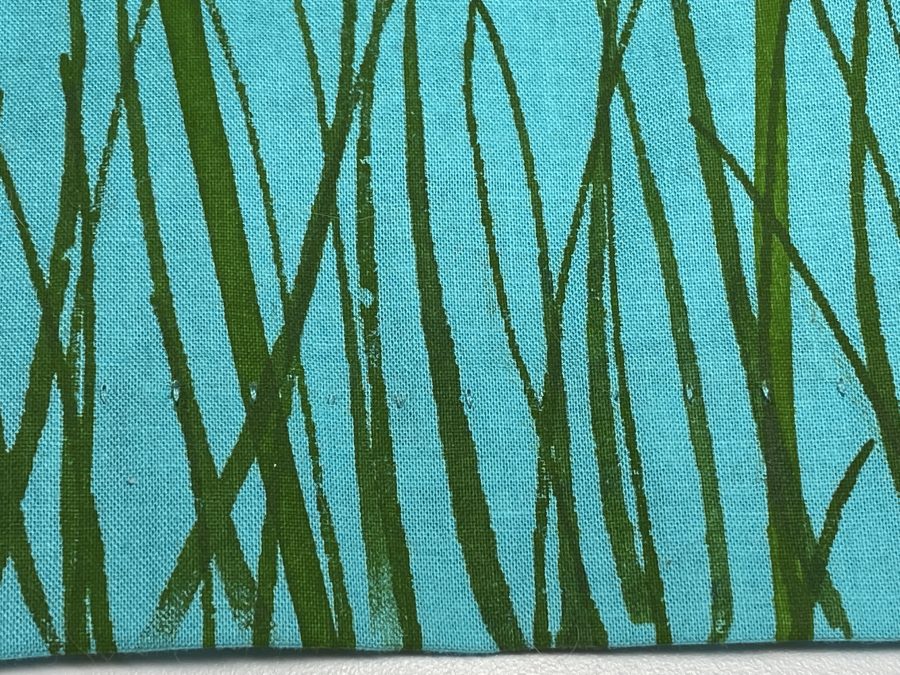
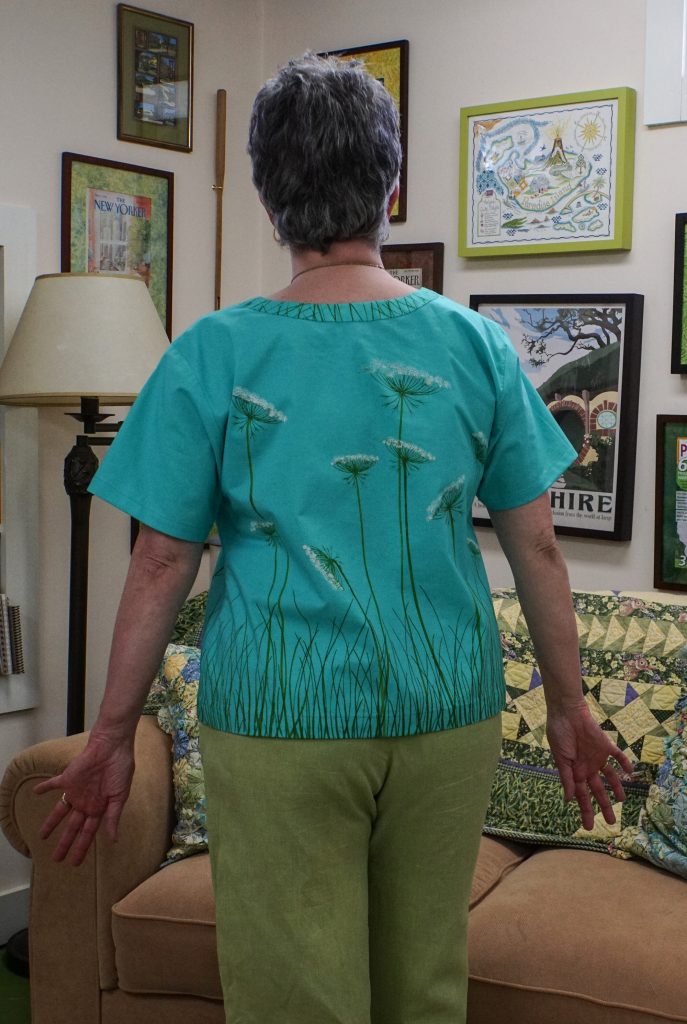
My new Queen Anne’s Lace top. I screen printed my custom designs onto Cotton Couture solids (courtesy of Michael Miller Fabrics), this color is “Luna.” In the summer of 2020 I saw Print Pattern Sew by Jen Hewitt somewhere online and ordered it immediately. It’s FAB! is available many places including Amazon . DO check out Jen’s site, here. Of course it took until April to start playing and until now to post. For the workshop and this post I wanted to use a pattern currently available that is similar to two vintage (circa mid 1980s) patterns that I still make over and over because I love them so much. There are LOTS of great photos and step outs in the book.Table of ContentsSince my favorite patterns are decades out of print, I selected this one for this project in case anyone wants to buy the book for further instruction. It comes with the pattern included.
I’ve been developing some new classes using paint on cloth and I thought as part of being a Michael Miller Brand Ambassador and a Janome Artisan what better thing to do than combine all these things I love in one! Some of you may remember this post from when I did a DIY improvement to my hall sconces; one of the lampshades was Queen Anne’s Lace screen printed on linen. I used the thermofax screens I made for that again for this top.
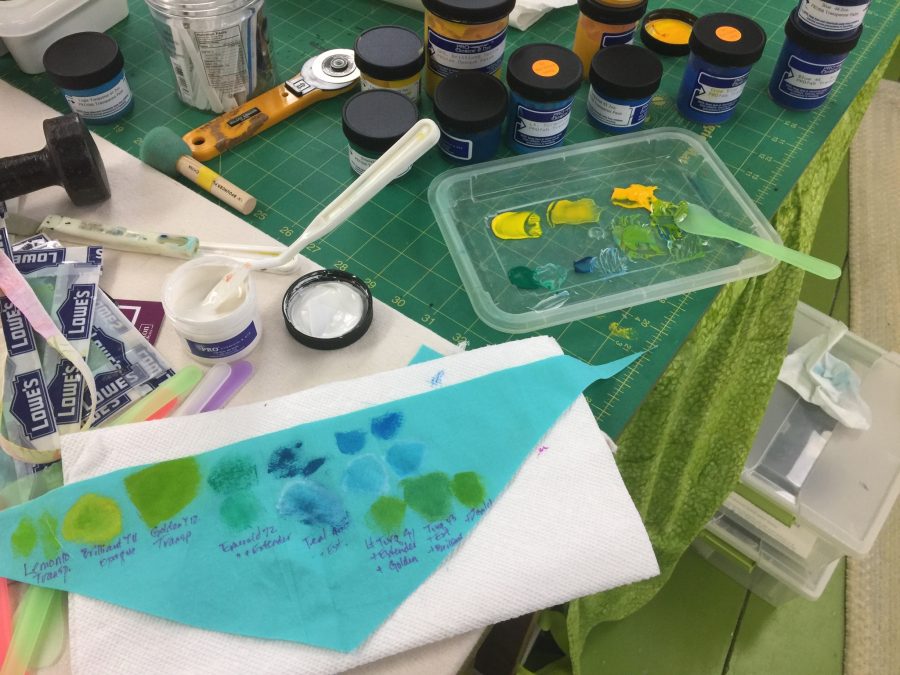
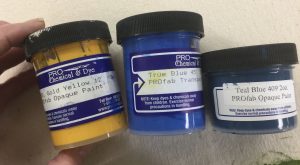
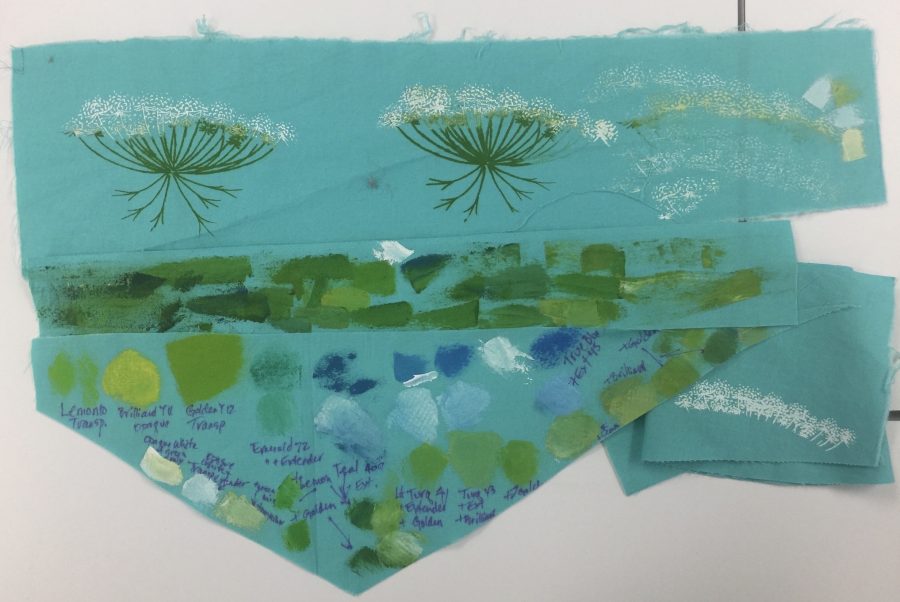
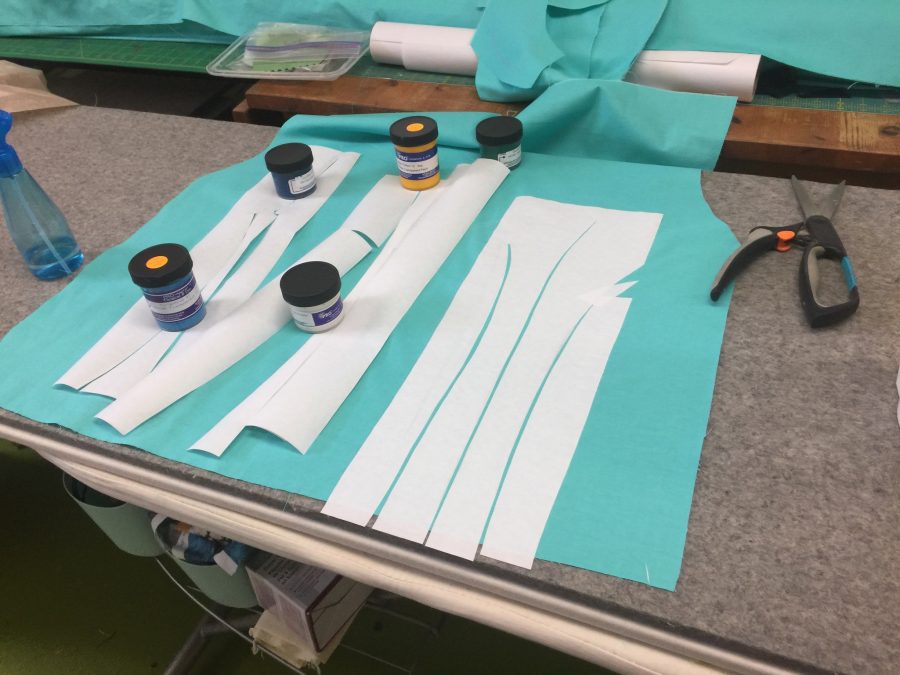
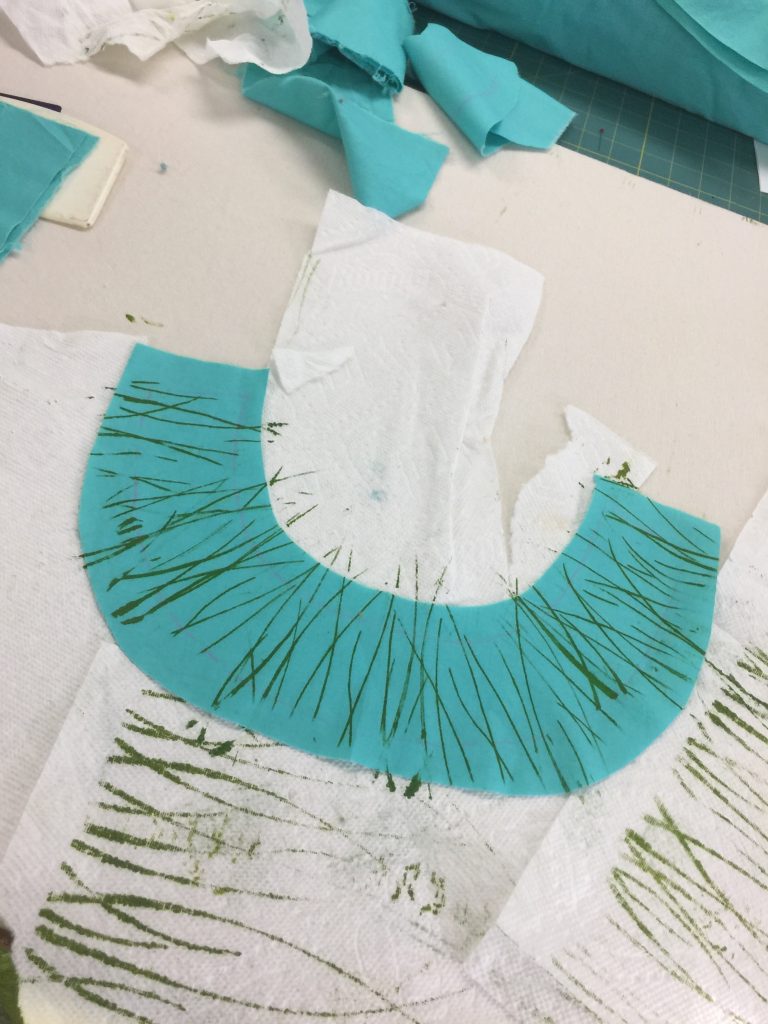
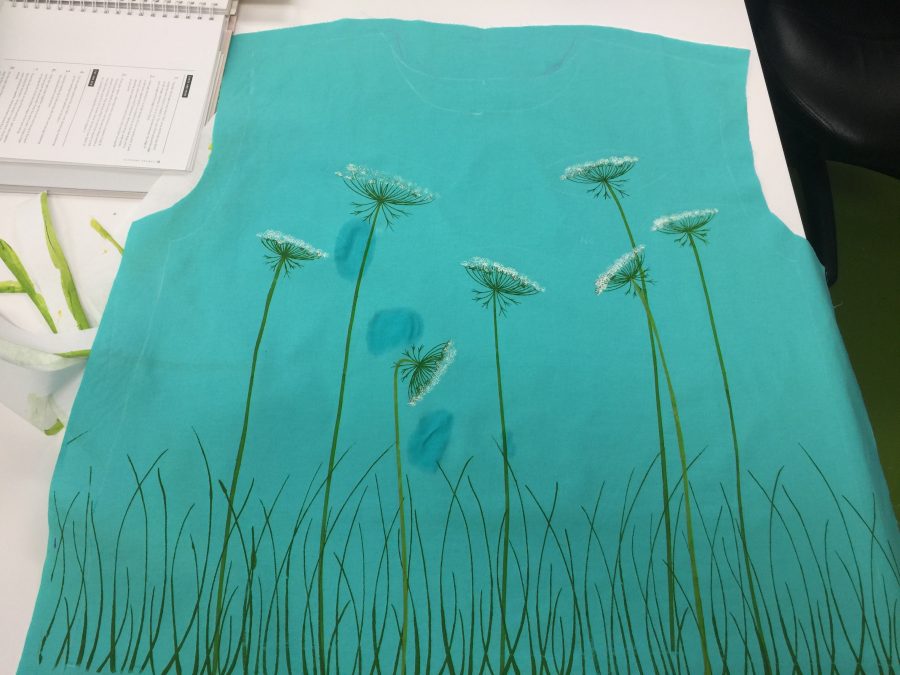
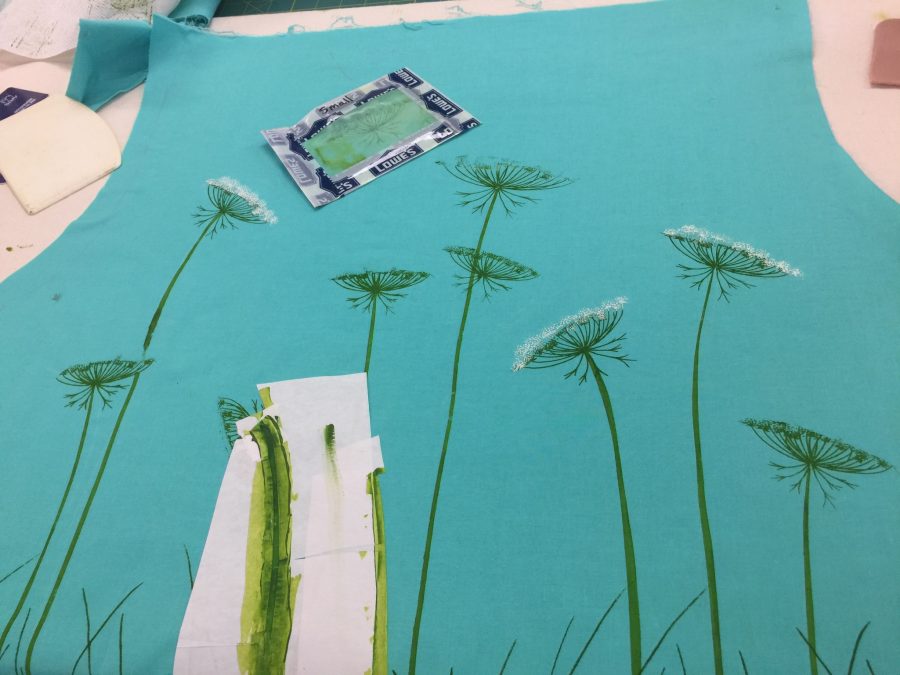
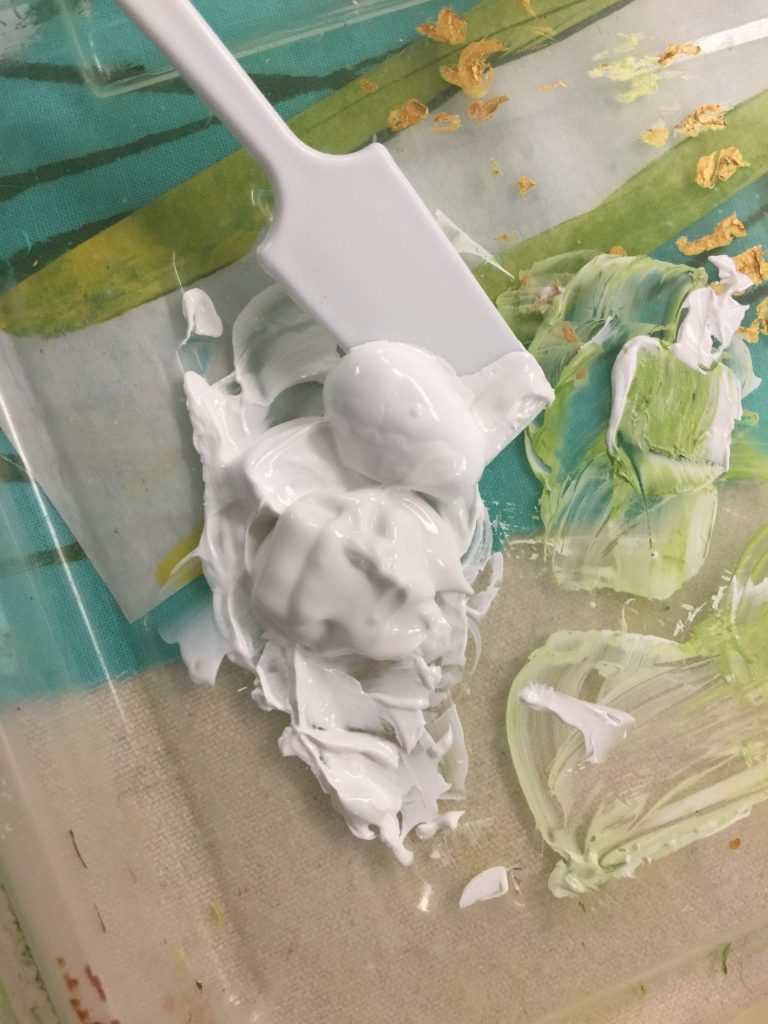
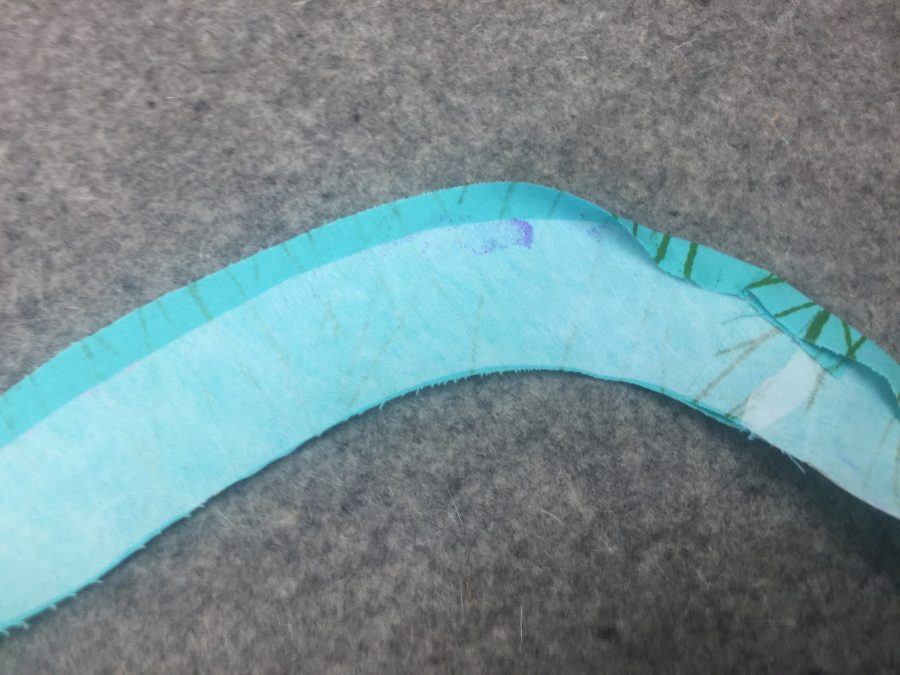
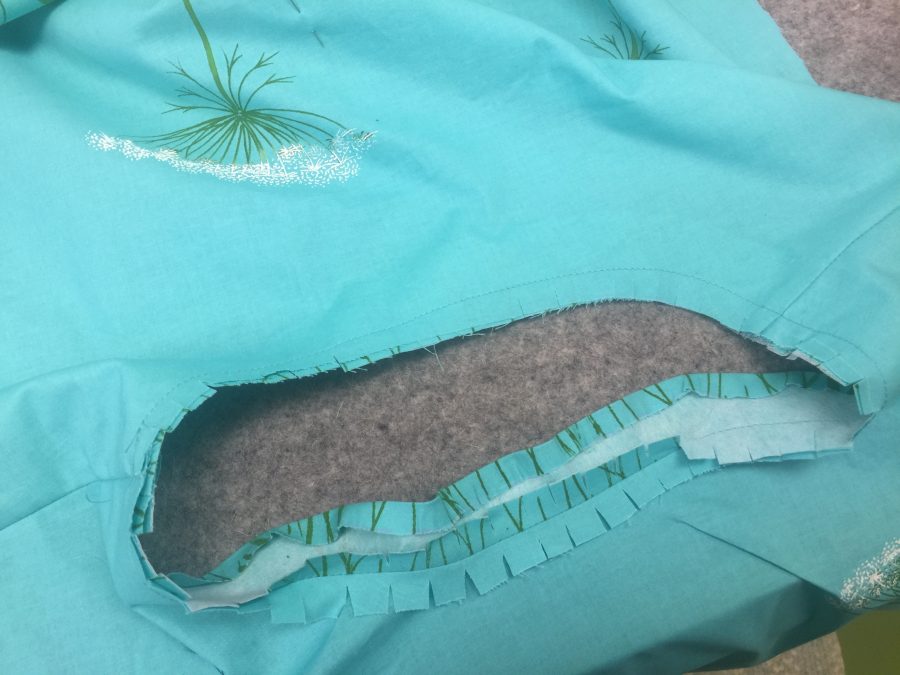
Step one is testing various mixes of color to get just what I wanted. You can see a colorful little plastic “flat not-a-spoon”–that is a make-up paddle, available in packages on Amazon for about $5 for 100 (more than a lifetime supply). They are great for getting into small paint jars. I used to use some Gelato spoons a shop gave me, but the flat paddles are better for scraping off (and not wasting) excess paint). The paints I used are ProFAB Transparent paints from ProChemical and Dye, but most textile paints will work. These have a particularly soft hand to them. Starter kits are a great and cost-effective way to try them out (I have a pair of kits available here; also available in just one or the other types of paint).LABEL what you use, what base paints are in the mix. I can promise you, with three yellows and three blues in 15 minutes I will forget which one is which! I keep these test-scraps for future reference. I used freezer paper to make stencils for the stems. I could have made a thermofax screen, but the mesh is expensive and Freezer Paper is cheap. I used a thermofax screen of grasses I had used for my lampshade for the bottom of the garment. I cut oversized pike for the front, back, and what I thought would be a trim for the sleeves. I later decided to leave the cuff/bottom of the sleeves plain. I used the grass screen to decorate the “facing” piece. Instead of putting the facing on the inside of the garment, I turned it to the outside as a decorative element. Ooops! Sometimes goobers happen. Any unwanted random little smudges of paint are quickly wet and scraped away. Or you just live with them.The printing was done in four steps: 1. Print stems over freezer paper stencil and let dry. I ended up adding another flower later on, so had to add another stem as seen here. 2. Print grass with thermofax screen. Let dry. 3. The thermofax screen for the Queen Anne’s Lace was made from my pen and ink drawing. My lampshades were all green on white linen. For this blouse, I wanted the flowers to be white, so I **carefully** screen printed the stems through the screen (seen above left) and let them dry. 4. Then I went back in with a creamy white (mixed from white with a dab of yellow) to do the flowers. This is the point where you pray you don’t mess up!When mixing light colors, start with a larger amount of the lightest color and put in just the TINY-est touch of color…it takes surprisingly little yellow to turn that glob of white into a softer white or barely-green. After purchasing the multicolored make up paddles, I discovered these square cornered white ones. They are great for applying small amounts of paint carefully through a thermofax screen and for getting into the bottom edges of the ProChem jars.Once I had the front and back printed, I pinned them together and tried them on. The grasses on the bottom looked sparse, wimpy. And I wanted the shirt a bit shorter. So I went back in with the same screen, offsetting it so the same shapes weren’t repeated too closely, and did a second layer higher up. I didn’t care if the printing didn’t follow all the way up what would become the hem on the inside. And that way I could just use the same screen instead of making another one.For the “facing” on the outside, I cut the outer edge of the interfacing very carefully so I could iron the seam allowance over it and create a lovely, smooth outside curve.If you are new to garment making, be SURE to clip your curves well so that the facing turns and lies nice and flat.My favorite way to get a perfect edge stitch is old school: using the zipper foot!Place the edge of the zipper foot against the edge where you want to stitch. In this case I need to use the left side of the foot. Move the needle so that it drops a few threads away from the folded edge. I use a fingernail or thumbnail as an edge guide and don’t sew too quickly. There are indeed “edge feet” for this purpose, but I find that the blades can bend or not be as precise as I want them to be (not to mention visibility isn’t as good as doing it this way). I’d already completed the top when I took this shot, so you can see how perfectly my Janome M7 stitched!For the hem, I decided I would use a blind hem stitch instead of hand-sewing it. The blind hem stitch I selected is for woven cloth, with straight stitches in between the zigs (#18…on the yellow part of the screen you can see that stitch 19 is a blind hem stitch for knits). Over on the white, it shows the settings and to use the G foot which I am holding up It has an “ice skating blade” (i.e. guide) in the middle.You can see the metal guide in the center of the foot. As above, I set up this photo after the garment is complete, which is why you see stitching at th bottom of the image. To prepare for blind hem stitching, you fold the hem up with the raw edge pressed to it will be inside the hem. You then fold back the outside of the garment so that the soon-to-be-hidden part of the hem is barely visible, about 1/8″. The body of the garment folds away to the left. The straight stitching on the hem is done with the needle in the curvy part of the “blade” where it stitches on the inside of the hem. The flat part of the blade snugs up against the folded back fabric, and the “Zig” part of the stitch takes a little nibble of the outside of the garment. My thread matched the Luna Cotton Couture perfectly. It is challenging to see those tiny hem stitches on the right side of the garment.Back viewSide view–I love how the design goes all the way around. I hope you’ve enjoyed this mini tutorial! Thanks again to Janome for their 16+ years of sponsorship and to Michael Miller for having me as a Brand Ambassador this year!
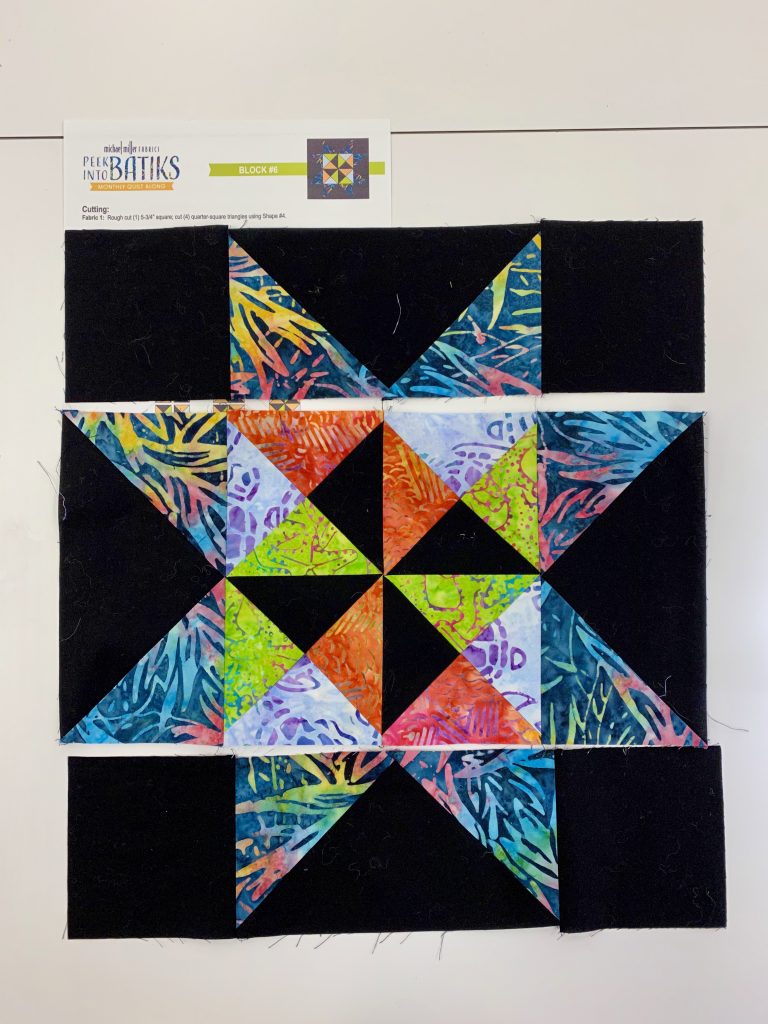
Earlier in the year I shared that Michael Miller Fabrics is doing a Block of the Month called Peek Into Batiks. It all began here. That post has links to each month as the new block goes live. Well, June is my turn! I’ve got still photos and (gasp) a video! And, drum roll here is the link to the JUNE Pattern and instructions.
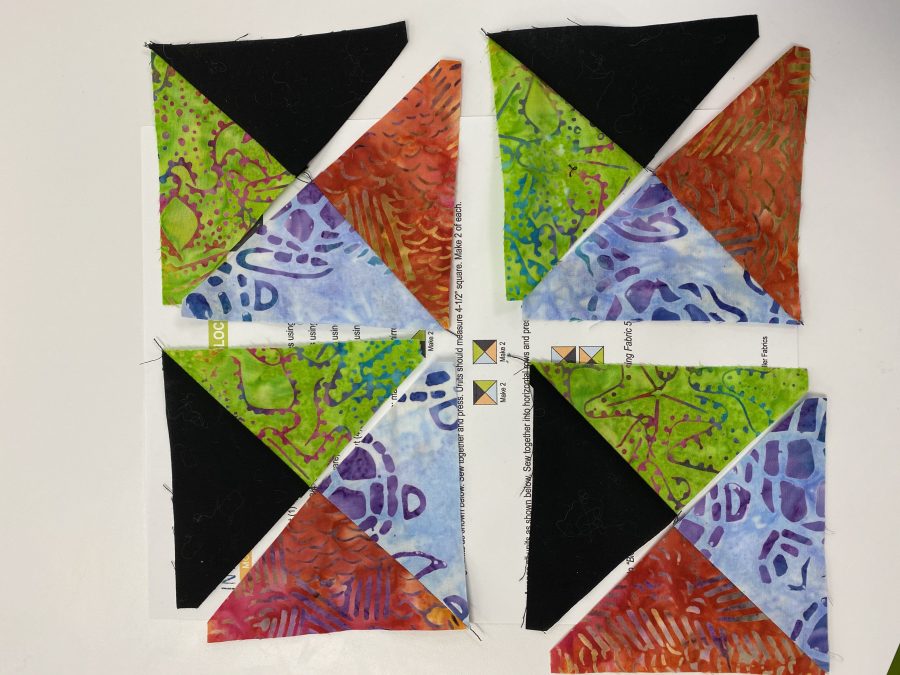
Here’s the finished block! Read on for step by step instructions.
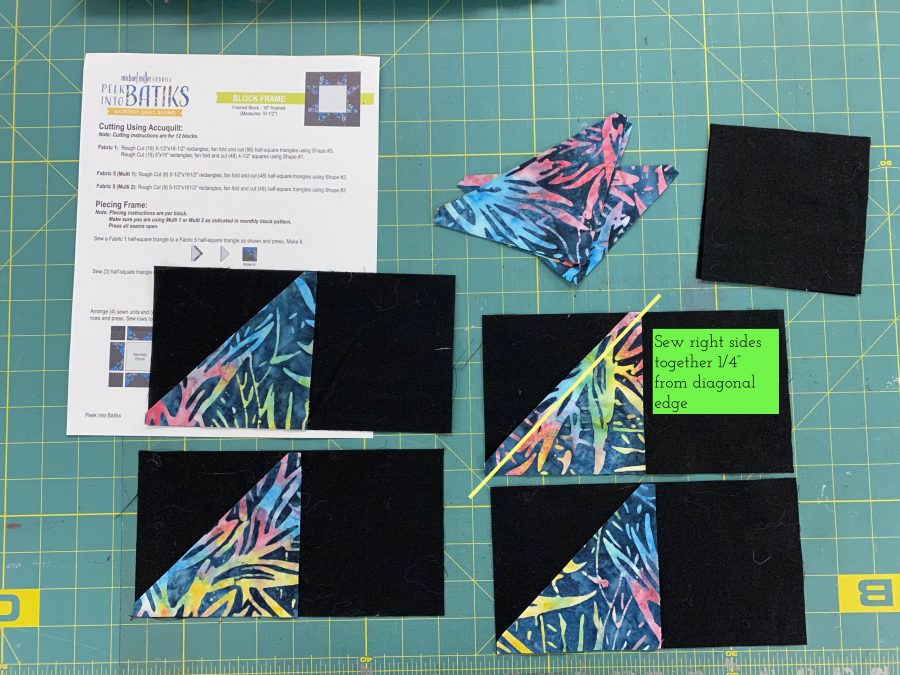
First, of course, you need to cut your fabrics. I used a hybrid method using the AccuQuiltGo! for everything except the large black triangles on the border. First, let me show you how fast it went cutting the components on my AccuQuiltGO! in this video. The video isn’t perfect–I’m improving in my editing skills. I need to mark what is within camera view though! Next video will be even better…I’m learning! When I was playing, it stopped a couple times so just click play again to continue–keep an eye on where the progress bar is. Dunno what’s up with that…another learning curve LOL!
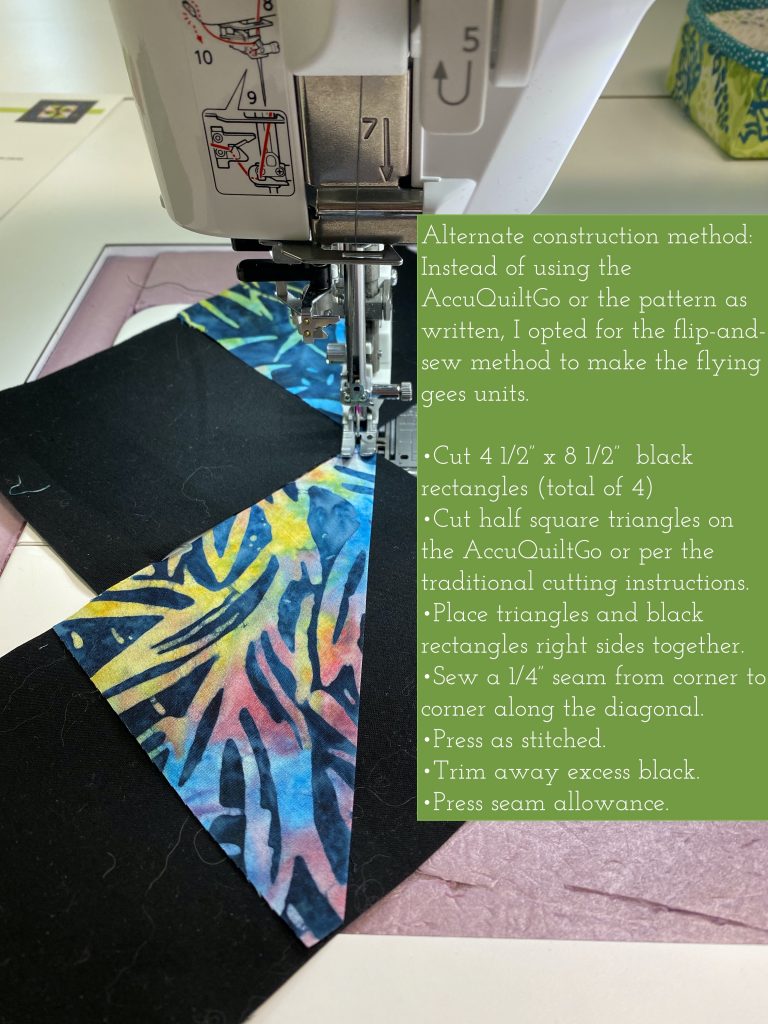
Wasn’t that amazing? Wait until you see the Winding Ways quilt I have in progress for later this year! For now, let’s stick to Peek Into Batiks! This step is where I veer from the instructions (of course, it’s me… who follows instructions EVER completely? Not me…) In the interest of fewer seams, I chose to use the flip-and-sew method for the Flying Geese Units.
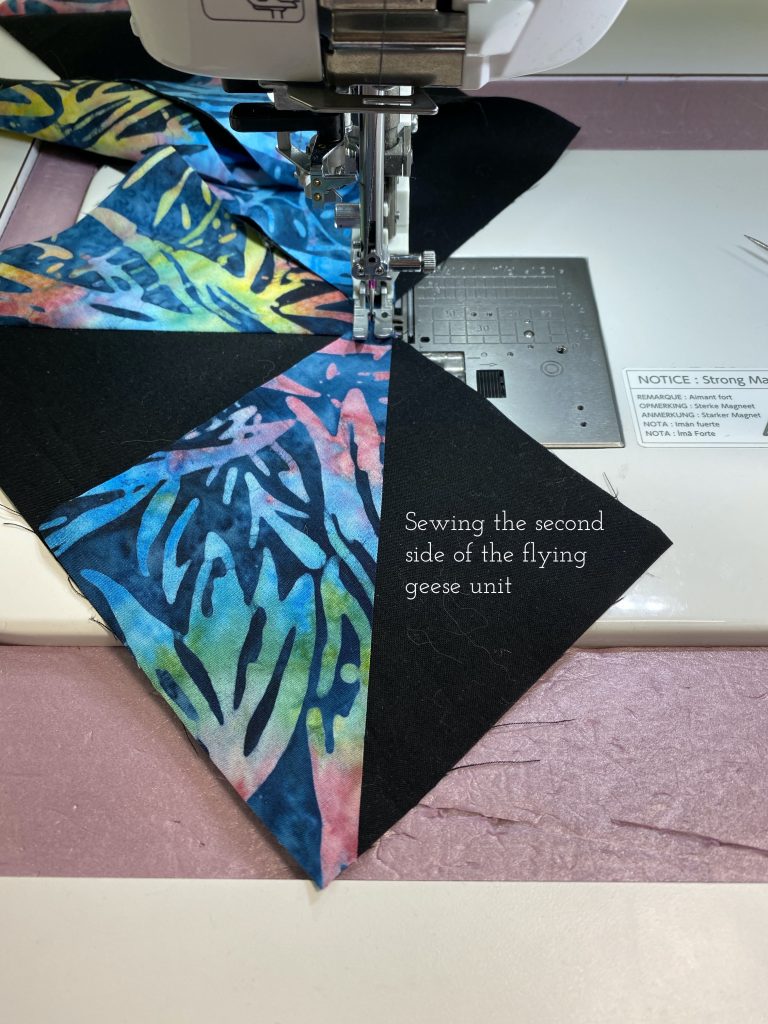
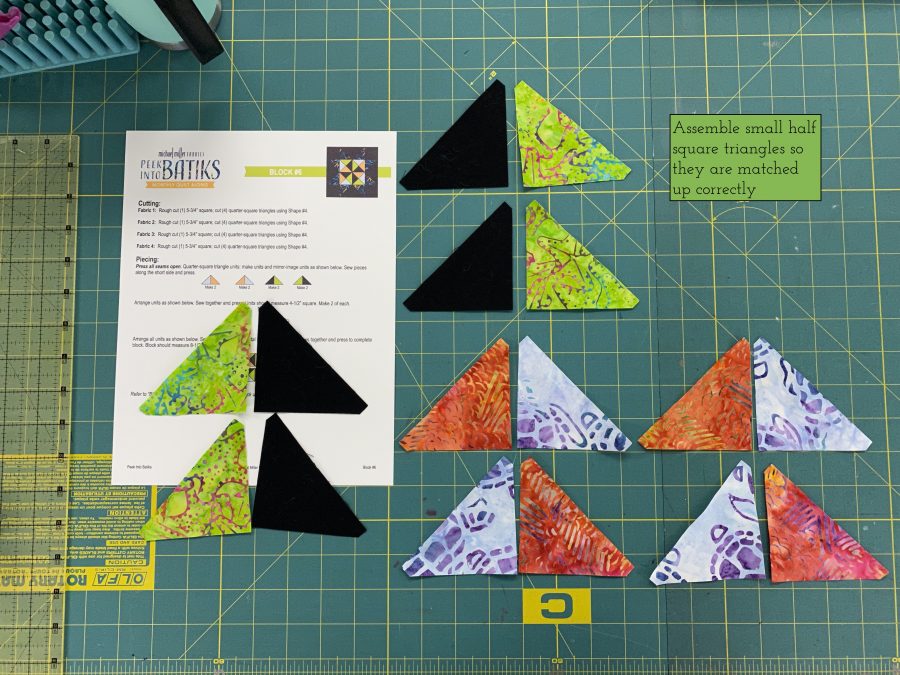
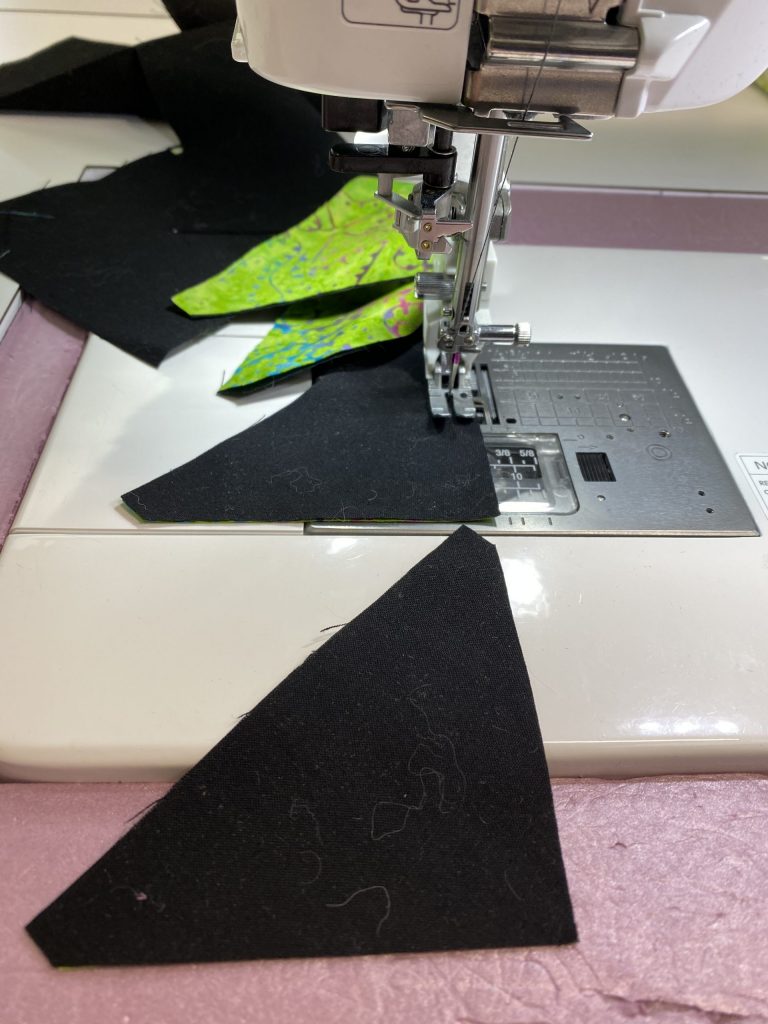
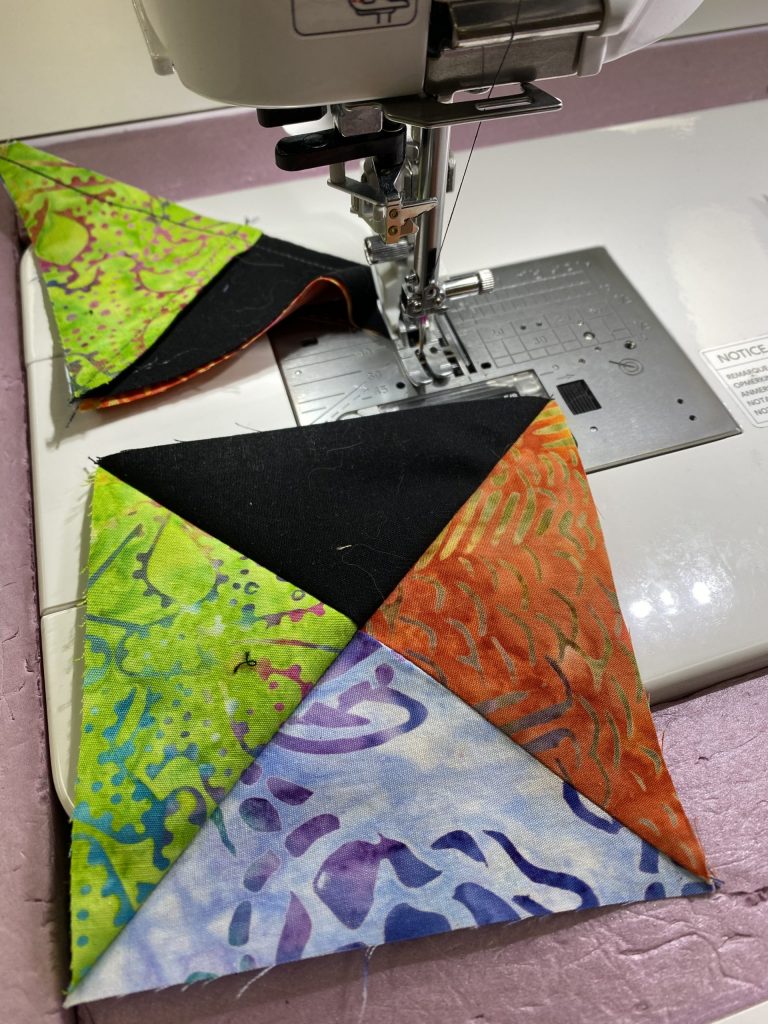
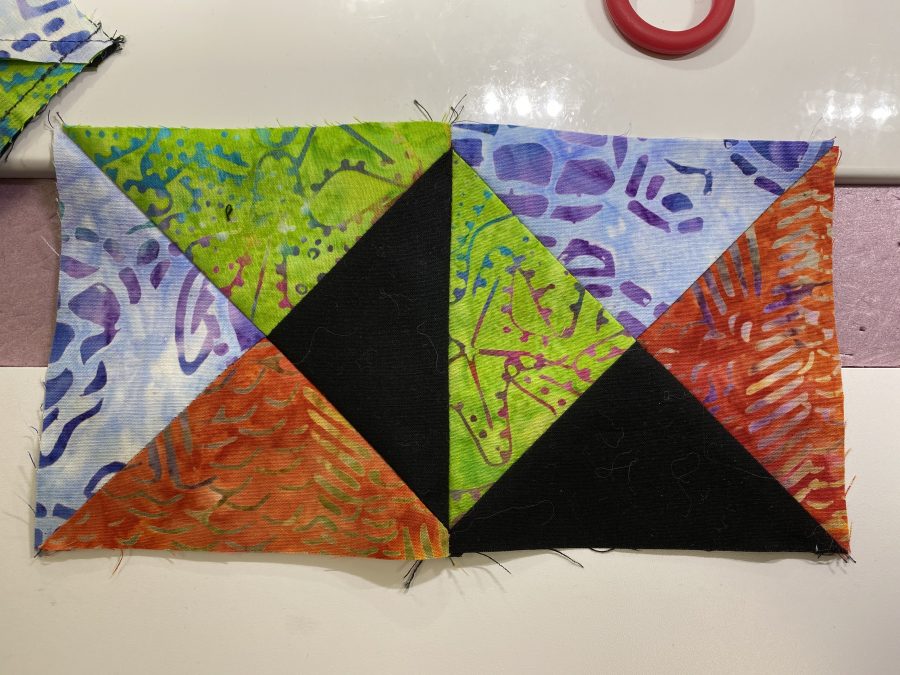
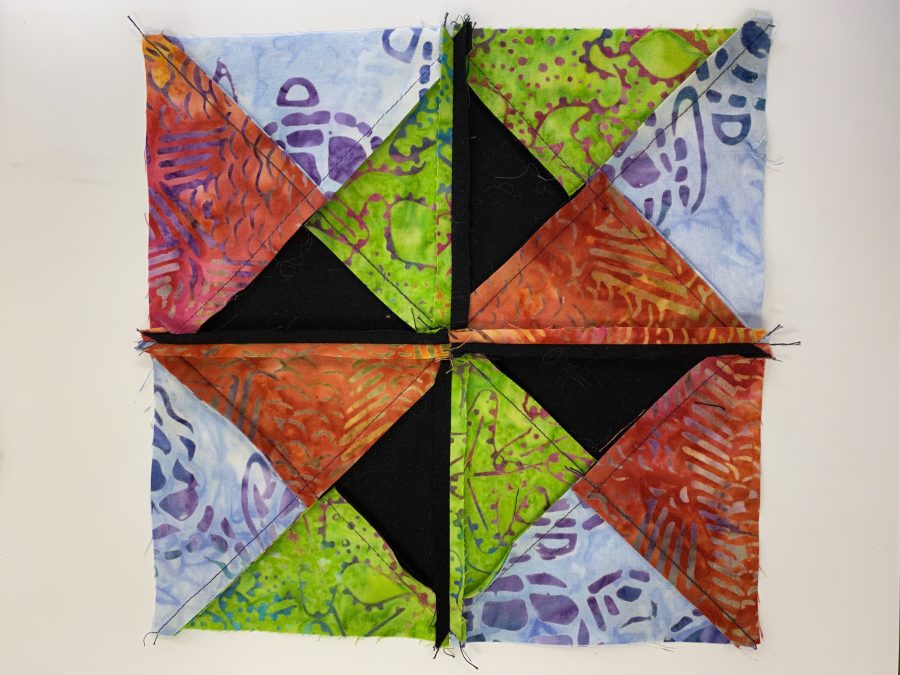
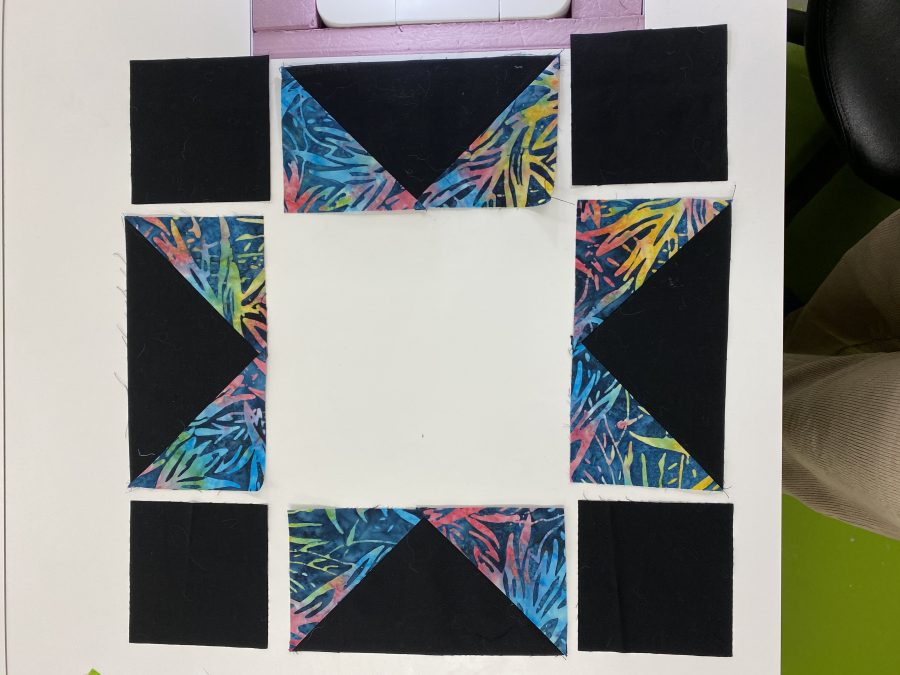
I’ve set out the large rectangles and half square triangles to make the frame for the block.Then I chain pieced the first side of the large Flying Geese.For the second side of the Flying Geese, same process, just make sure you get the triangles doing in the correct direction. Sew, trim, press.And the actual sewing bit…In the interest of not ripping out seams, it really helps to lay these out so you have theirs organized correctly.Next up, piecing the quarter-squares for the center. First, sew two triangles together. The Janome M7 Continental lets me piece SO accurately. Between the M7 and AccuQuilt, even *I* can be precise! I paired up the two-triangle units to make sure I didn’t mix them up while sewing.Then, sewing the pairs together. Using the M7’s HP foot and throat plate meant PERFECT piecing. See next pic!And two of the quarter-squares sewn together. I can’t believe I pieced that perfectly!Here’s the back of the block. Notice that some seams are pressed to one side, but the main seams joining the four squares are pressed open. This helped keep everything nice and tidy and perfect on the front.Once the center unit was ready, I set up the “frame” for the block.I sewed the sections together in three rows. Notice the only imperfection is down where *I* used rotary cutting…sigh……..Here’s the finished block again!
Remember, go here or HERE for all the links to the six blocks so far and to check in for the rest of the year. The finished quilt is beautiful!