email Youtube

Home
Galleries
Blog
Workshops & Calendar
Store
Resources
About
Contact

Archive for the ‘Studio pics’ Category

Birdie Bernina takes her first drive….

Wednesday, December 28th, 2016

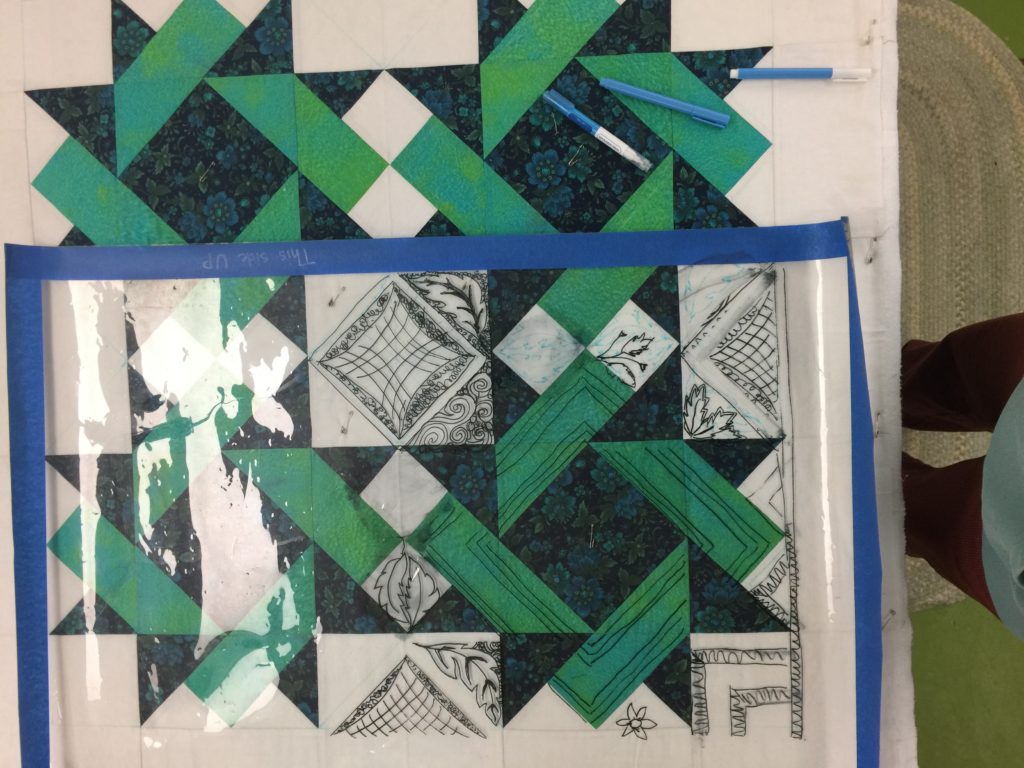
Imagine that…working on a quilt, and not an art quilt! AND it’s a UFO! Here I’m trying out various design options.

We moved to Maine in 2004.   This top pre-dates that move by at least a year–I made it as a local quilt group mystery quilt (design by Debbie Caffrey but don’t remember the name).  I only made four blocks, made it into a small top, and it has sat in a basket mocking me lo these many years.

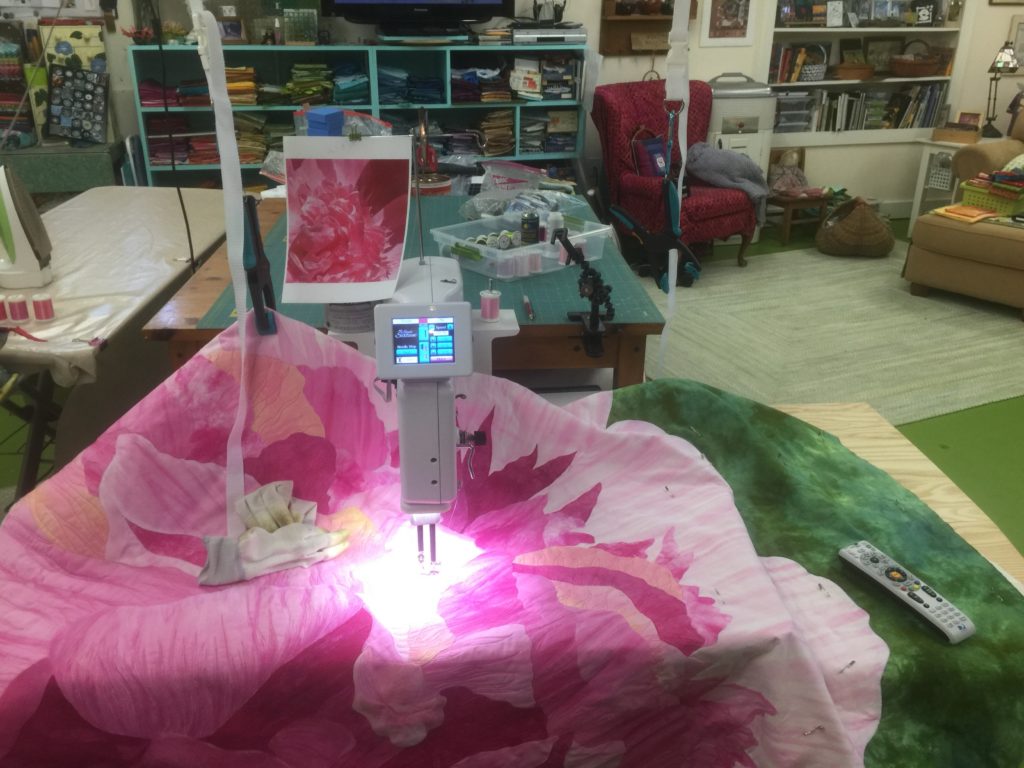
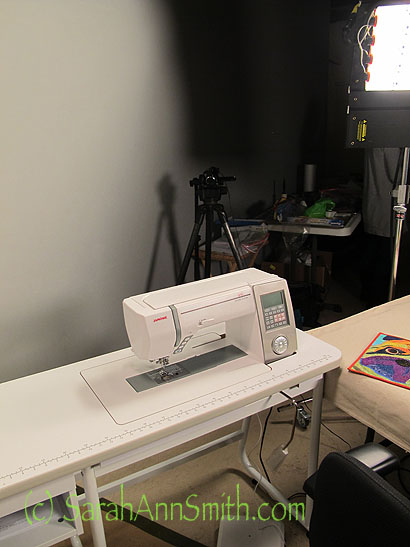
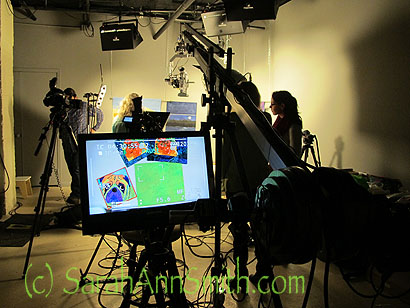
Fast forward:  I SPLURGED.  I ***seriously*** splurged.  I bought a Bernina Q20 sit down.  Yes, it costs as much as a nice used car.   And Oh. My. Yes. it is worth it…what a DREAM!  I figured you only live once, quilting is my favorite thing, so I’m gonna just go for it.   And yes, I am beyond grateful that I have been able to earn enough by writing, teaching and selling my art quilts to be able to afford this indulgence!  To each and every person who has ever read an article or my book, watched my DVD, or taken a class or bought an artwork, THANK YOU!

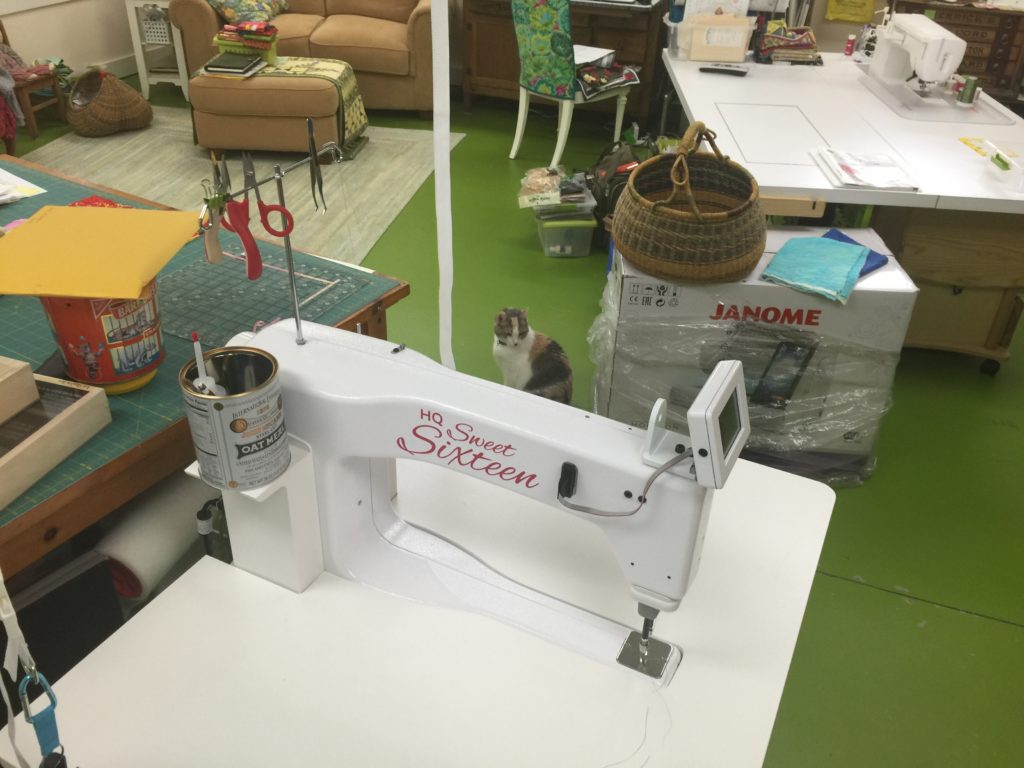
But that means  need to learn to use it and not be a tad intimidated.  Light Bulb Moment!!! Take those two UFO mystery quilts (yep, there’s another larger one) and use them to test-drive the new Bernina, named Birdie because of the beautiful bird’s eye maple cabinet (yes, I splurged a little more and upgraded to the cabinet…pics below).  So I got the somewhat soiled, tired, not particularly well pieced tops out, ironed them, and decided to go for it.

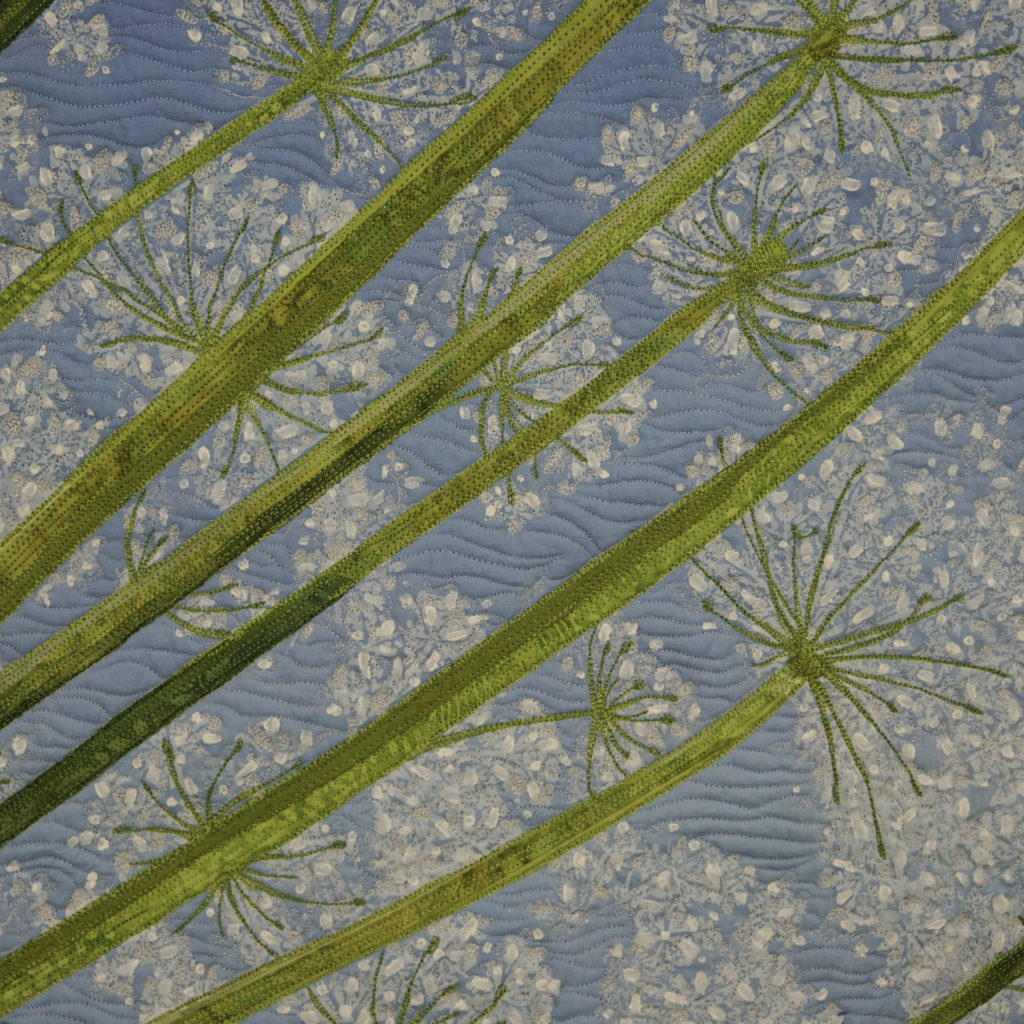
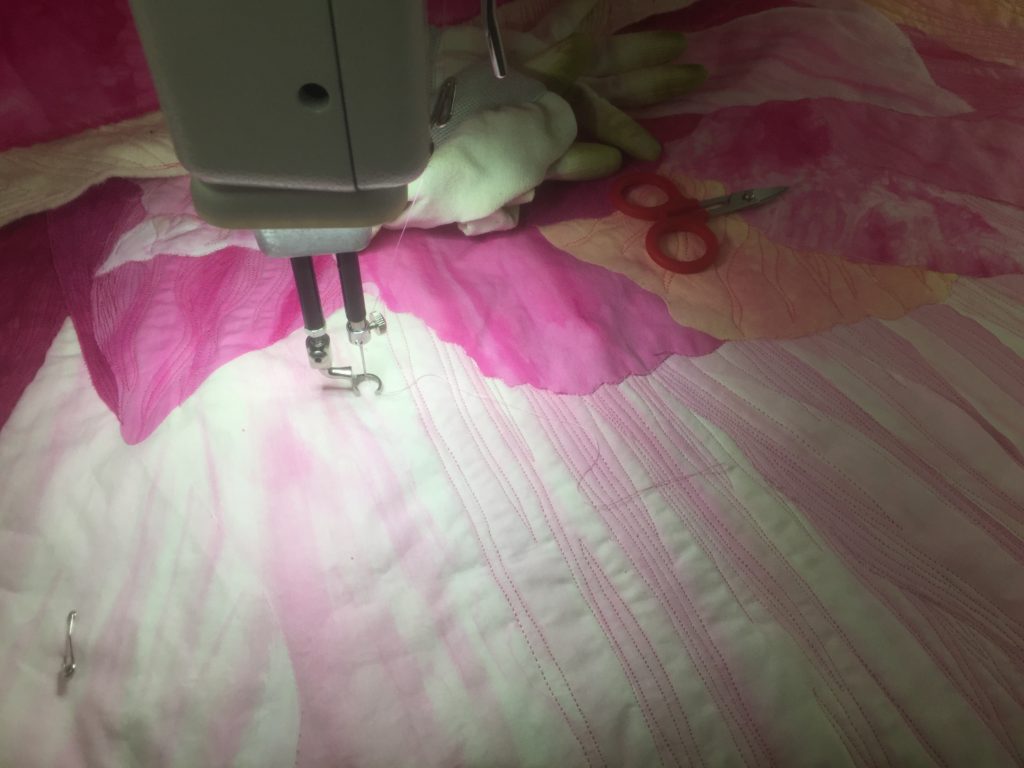
You can see some of my quilting design. I planned to do some straight line work with a ruler and ruler foot in the green. I wanted to do more ruler work and curved cross hatching in the white spaces. And since I’m adept at free-motion, some of that using a leaf motif from the navy print in the corners and small squares. I’m not positive yet what I’ll do in the navy floral, but may just use navy and outline the flowers.

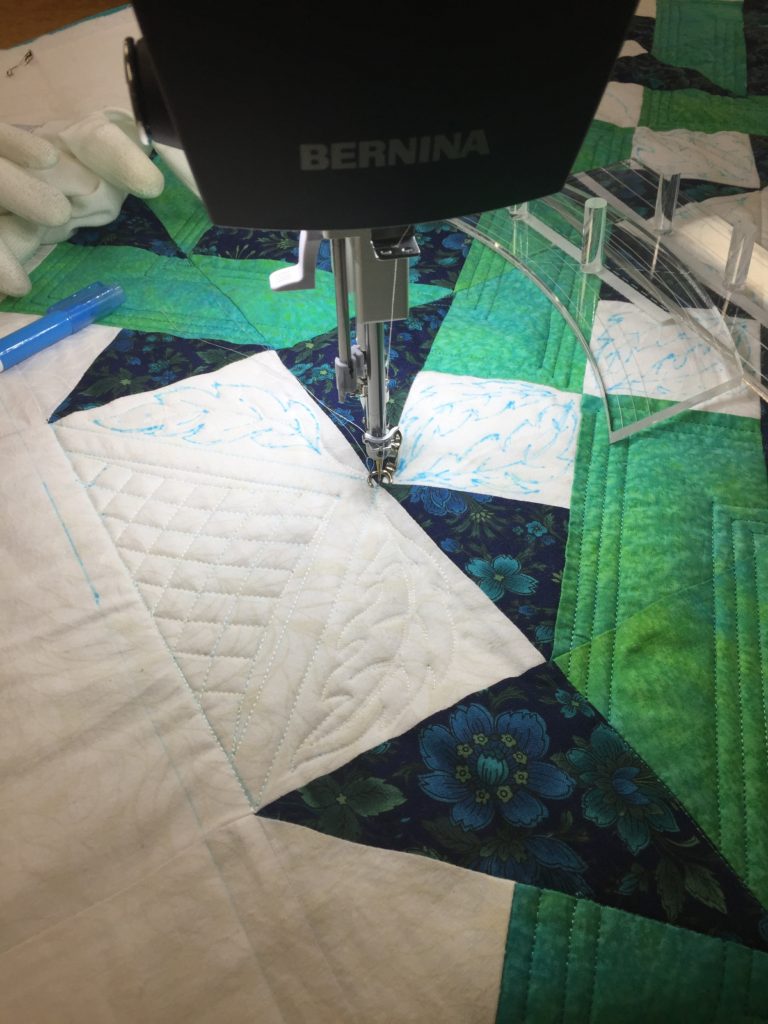
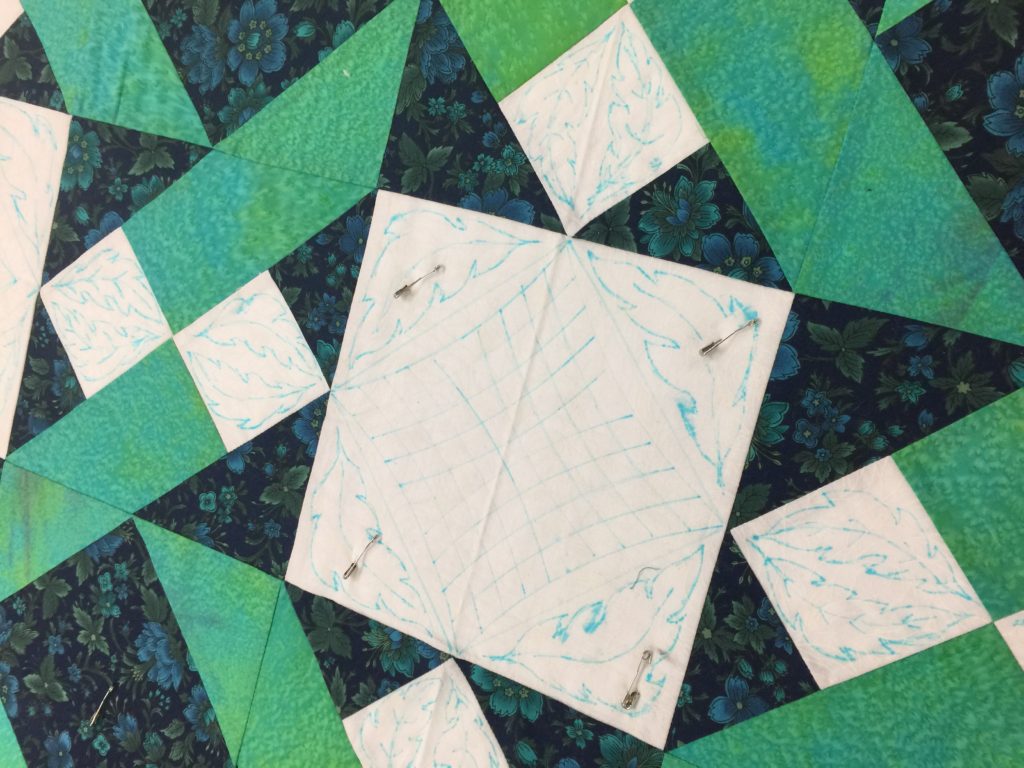
Here I’ve completed the straight line work on the green (not perfectly, but not bad for a first attempt as I get used to using the stitch regulator with the rulers. I just LOVE LOVE LOVE curved cross hatching! And then I began on the free-motion for the leaves. I plan to go back in with a lighter weight thread–I’m using 40 wt Superior trilobal poly here–to to a background dense fill around the leaves. There is a half inch outlined space between the leaves and the cross hatching.

I have to say the included-with-the-machine video was great, although I have no clue WHY Bernina doesn’t make it able to play on a DVD player–only a PC or a Mac.  Have they not noticed that computers don’t come with disc drives any more?????  Luckily, separate disc drives are cheap (about $30 or less) and I had planned on buying one for other reasons (moving CD music to the laptop).  But still.   The disc ought to be able to be played on a DVD player!   Anyway, it is well done, as is the manual.

The Q20 comes with a bobbin tension gauge and the manual says (yes, I read manuals! you should, too) you should test every bobbin.   So for now at least, I am.  That helped me get my combination of thread–40 wt. trilobal poly in the needle and 60-wt very fine Bottom Line poly in the bobbin–adjusted with a minimum of fuss.  The stitch balance is simply fan-flipping’-tastic.  I DO match needle and bobbin thread always, though, just in case!

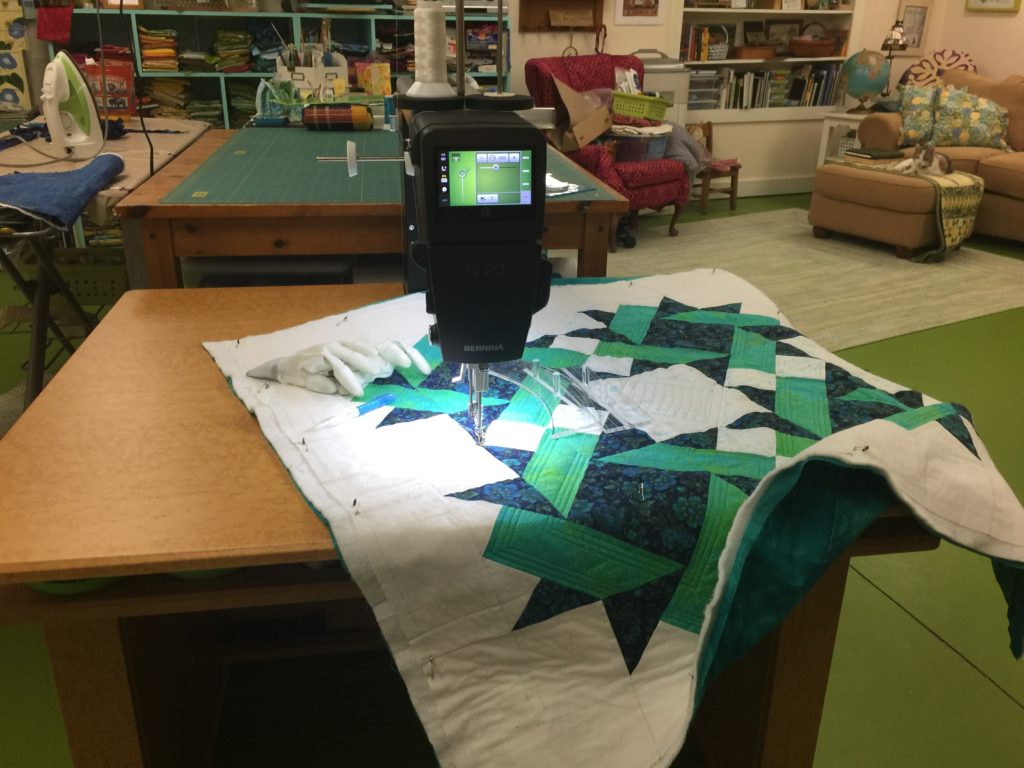
And here’s my beautiful Birdie Bernina on her maiden quilt. Contented SIGH.

I need to thank three people:  Barb Black and Karen Miller are friends who have the Q20 (Barb’s is a sit-down like mine, Karen’s on rails) and Jeanie Cook-Delpit of Bernina for their advice, rave reviews and, from Jeannie, help.  When I saw Barb at Quilt Festival I got a great big laugh out of her when I greeted here with “Thank you for leading me into temptation!”  It’s totally true.  And Jeanie — you helped make this possible.  THANK YOU!  You are the creme de la creme of Bernina Ambassadors.  I’ll post more pics when done.   Let’s hope the power doesn’t go out tomorrow during the incoming storm, which is supposed to be heavy, wet snow.  I wanna quilt!

Sweet Sixteen for sale…nearly new!

Monday, October 3rd, 2016

Update:  machine is sold.  About a year ago I took delivery of a wonderful machine:  the HQ Sweet 16 sit-down quilting machine.  It has both regular and ruler feet, all the regular parts.  In outstanding working order, well maintained, clean.  I’ve got all the original packing materials for transporting it to you.   I’m also including 14 M-class bobbins (empty) and a bunch of appropriate machine needles.  I will say the HQ dealer and tech support is OUTSTANDING.  I’ve decided to upgrade, and need to sell this one to make way for the next beastie.  MSRP is $5,599. For sale for $3750 plus shipping.  If you live within a 4 1/2 hour drive of Camden, Maine, I’ll deliver to your driveway free of charge!

Contact Sarah at the Contact Me page or comment on this post.  You can also find more information about this beauty on the Handiquilter site here and here.

HQ Sweet Sixteen for Sale (Sept 2016), just under one year old, mint condition

HQ Sweet Sixteen for Sale (Sept 2016), just under one year old, mint condition.  Cat not included. This is the most recent version of the Sweet 16 and has the thread tension information (so it’s not a guessing game).  Does not have a stitch regulator, but it can easily be added (consult with your local Handiquilter dealer). Contact Sarah here, sarahannsmith.com/contact.php

Straight on view of HQ Sweet Sixteen for sale. Use the contact me page at SarahAnnSmith.com for more info.

Straight on view of HQ Sweet Sixteen for sale. Leave a comment or use the contact me page at SarahAnnSmith.com if you are seriously interested and have questions.  More pictures at end of blogpost.

Here are three quilts I have quilted on this beauty, so you can see the quality of the stitching:

Umbelliferous: Queen Anne's Lace No. 1, quilted on the Sweet Sixteen sit-down machine for sale.

Umbelliferous: Queen Anne’s Lace No. 1, quilted on the Sweet Sixteen sit-down machine for sale.

Detail showing quality of stitching, Umbelliferous: Queen Anne's Lace No. 1, (c) Sarah Ann Smith.com

Detail showing quality of stitching, Umbelliferous: Queen Anne’s Lace No. 1, (c) Sarah Ann Smith.com

My most recent project, Peony, done on the Sweet 16. ©SarahAnnSmith.com

Milkweed No. 1, ©SarahAnnSmith.com. Quilted on the Sweet 16 that is for sale.

Milkweed No. 1, ©SarahAnnSmith.com. Quilted on the Sweet 16 that is for sale.

My most recent

My most recent work, Peony, quilted on the Sweet 16.  ©SarahAnnSmith.com

Working on the lighter petals on the big peony quilt. It will finish about 45x55 I think.....depends on how much I trim off and/or turn to the back.

Working on the lighter petals on the big peony quilt. It will finish about 45×55 I think…..depends on how much I trim off and/or turn to the back.

Side view

Side view.

HQ Sweet Sixteen, less than a year old, for sale! Contact Sarah at the Contact Me page or comment on this post.

HQ Sweet 16 for sale

Tuesday, September 6th, 2016

Update:  machine is sold!  Just under a year ago I took delivery of a wonderful machine:  the HQ Sweet 16 sit-down quilting machine.  It has both regular and ruler feet, all the regular parts.  In outstanding working order, well maintained, clean.  I’ve got all the original packing materials for transporting it to you.   I’m also including 14 M-class bobbins (empty) and a bunch of appropriate machine needles.  I will say the HQ dealer and tech support is OUTSTANDING.  I’ve decided to upgrade, and need to sell this one to make way for the next beastie.  MSRP is $5,599. For sale for $3995 plus shipping.  If you live within a 4 1/2 hour drive of Camden, Maine, I’ll deliver to your driveway free of charge!

Contact Sarah at the Contact Me page or comment on this post.

HQ Sweet Sixteen for Sale (Sept 2016), just under one year old, mint condition

HQ Sweet Sixteen for Sale (Sept 2016), just under one year old, mint condition.  Cat not included. This is the most recent version of the Sweet 16 and has the thread tension information (so it’s not a guessing game).  Does not have a stitch regulator, but it can easily be added (consult with your local Handiquilter dealer).

Straight on view of HQ Sweet Sixteen for sale. Use the contact me page at SarahAnnSmith.com for more info.

Straight on view of HQ Sweet Sixteen for sale. Leave a comment or use the contact me page at SarahAnnSmith.com if you are seriously interested and have questions.  More pictures at end of blogpost.

Here are three quilts I have quilted on this beauty, so you can see the quality of the stitching:

Umbelliferous: Queen Anne's Lace No. 1, quilted on the Sweet Sixteen sit-down machine for sale.

Umbelliferous: Queen Anne’s Lace No. 1, quilted on the Sweet Sixteen sit-down machine for sale. ©SarahAnnSmith.com

Detail showing quality of stitching, Umbelliferous: Queen Anne's Lace No. 1, (c) Sarah Ann Smith.com

Detail showing quality of stitching, Umbelliferous: Queen Anne’s Lace No. 1, (c) Sarah Ann Smith.com

Milkweed No. 1, ©SarahAnnSmith.com. Quilted on the Sweet 16 that is for sale.

Milkweed No. 1, ©SarahAnnSmith.com. Quilted on the Sweet 16 that is for sale.

My most recent project, Peony, done on the Sweet 16. ©SarahAnnSmith.com

My most recent

My most recent work, Peony, quilted on the Sweet 16.  ©SarahAnnSmith.com

Working on the lighter petals on the big peony quilt. It will finish about 45x55 I think.....depends on how much I trim off and/or turn to the back.

Working on the lighter petals on the big peony quilt. It will finish about 45×55 I think…..depends on how much I trim off and/or turn to the back.

Side view

Side view.

HQ Sweet Sixteen, less than a year old, for sale! Contact Sarah at the Contact Me page or comment on this post.

a video of me quilting and progress on the Peony

Monday, August 29th, 2016

So over on Facebook I’ve posted some  photos of my current project, a hugely oversized peony…well, part of a peony.  I decided I’d try a quick video posted via youtube so show me actually quilting.   Along the way, I added a quick visit to my studio.   The studio is sort of “midway messy,” true to life.  I have a couple things piled on the floor that are: find time to sort and put away, try to get rid of in some way, and prepping for teaching in Houston piles.  When I’ve found time (usually after just barely meeting a deadline), I have a tidy attack.  Mid project it is utter chaos.  This is in the middle. And apologies for the overly loud and enthusiastic hello at the start.  Learning.  I’m learning…..ps:  if the video doesn’t display at first, hit refresh on your browser. Update:   thanks to Donna for some good questions, so I’ve added info at the end of the post about holding your thread tails and my appliqué press sheets.
On the video, I mentioned how I select threads in a value range.  The reason the light ones are in the box and the dark ones to the side is that I have used the dark ones.  When done, I put them aside so I know what I’ve used.  I keep them in the order in which I used them, which helps if I need to go back and do more in a certain shade.

I had clamps by my Janome for working on larger projects, but hadn’t set up hooks from the floor joists (my ceiling) near the Sweet Sixteen until yesterday.  WHAT an improvement!!!!!!! I’ve been using dyed-by-me cotton duck on the backs, and let me tell you the quilts have been HEAVY.   So that’s why there is a blue-handled clamp visible.  I didn’t use the one on the right because of where I had the phone set up to film.

If you like this, let me know and maybe I can do some more videos of me just quilting.  And yes, I sound like a dolt when I try to narrate while quilting–I can’t concentrate on the quilting and manage to talk in a normal rhythm at the same time.

Working on the lighter petals on the big peony quilt. It will finish about 45x55 I think.....depends on how much I trim off and/or turn to the back.

Working on the lighter petals on the big peony quilt. It will finish about 45×55 I think…..depends on how much I trim off and/or turn to the back. You can see both of the hanging clamps in this photo, as well as the photo of the peony clipped to the left side of the thread stand on the machine.

IMG_0009

Detail of laying in the darkest-on-this-petal pink.


Showing the clamp on the right in use

Showing the clamp on the right in use.  Some folks have started using those dog-grooming things that you clamp onto the table and attach the dog with a short leash for grooming, but substitute a clamp.   That idea became common AFTER I set things up over at the Janome; since I have bare (primed) joists and sub-flooring for a ceiling, I opted for the much less expensive hook in the joist!


UPDATE/Addition:    About the move to another bit, be sure to press down on the threads (top and bobbin) when you begin stitching, even if they are still attached.  If the pulled out part is longer than the “jump” (which it sometimes is for me because I need tails long enough to bury), you can still get a snarl if you don’t hold the tails firm to the machine for the first stitch or few.

Non stick sheet on the wall:   same as on the ironing table, just hold the iron vertically.   I tend to make smaller components flat on the ironing board, then move to the wall.   Sometimes I don’t use the wall…just depends.   If I have draw a full cartoon/sketch, it goes UNDER the non stick sheet that is on the big board, so I just work there.   On the rare occasions where I am working improvisationally or something seems amiss, up on the wall it goes.

I ordered my sheets from Valerie Hearder in Canada…the exchange rate is very favorable at the moment.  She sells 24 and 36 in wide, by the foot.  So I got two that are 72 inches long.   They should hold me for a couple decades.  Misty fuse now has the Holy Cow, which is 36×48.   Had that been available when I got mine I might have done that instead. However, I REALLY like having my Big Board totally covered, and it is about 22×60 inches.

Thanks for writing!   The peony is done and I am revelling in having the Peony DONE and HUNG!

My (!!!) Quilting Arts DVD Workshop

Friday, May 3rd, 2013
On the set at Interweave in Loveland, Colorado, to film a Quilting Arts Workshop! (Who me?!!!!)

On the set at Interweave in Loveland, Colorado, to film a Quilting Arts Workshop! (Who me?!!!!)

Can you believe it?  I’ve been to Loveland, Colorado, taped a Quilting Arts DVD Workshop, come home (exhausted but elated) and I can still barely believe it.  Yes, I have been “on the set” filming this week.   Due out in September as both a download and as an actual DVD (which is wonderful for us who live in the boonies with glacial internet), the working title is “Fused Collage and Thread-Coloring,”  a Quilting Arts Workshop from Interweave Press!

The project I used for the workshop is my Tomatoes, Basil and Garlic quilt (No. 1) [there will be 3 versions before I’m done], but the workshop is to teach you how to use your own photo to make an art quilt:

Tomatoes, Basil and Garlic, No. 1, the start of what I will call my Quilting the Good Life series!

Tomatoes, Basil and Garlic, No. 1, the start of what I will call my Quilting the Good Life series!

My trip to the airport was an omen–a good one–for how the trip was about to go.  I mean, look at the beginnings of sunrise as I crossed the driveway to the garage!

4:25 a.m., Tuesday:  leaving for the airport in Owl's Head (near Rockland, maine) just before dawn

4:25 a.m., Tuesday: leaving for the airport in Owl’s Head (near Rockland, maine) just before dawn

It got even more dramatic just over the ridge heading to the coast, at the intersection of Route 105 (the Camden Road) and High Street in Hope:

Can you believe that sky?  Makes me want to get to the dye pots!

Can you believe that sky? Makes me want to get to the dye pots!

The route in was equally stunning.  Here, mist rising off the Megunticook River in Camden.

The route in was equally stunning. Here, mist rising off the Megunticook River in Camden.

And ten minutes down the coast in Rockland:

And the sunrise over Rockland Harbor, en route to our little airport at Owl's Head.

And the sunrise over Rockland Harbor, en route to our little airport at Owl’s Head.

I flew Cape Air (maximum of 9 passengers) to Boston, then JetBlue (for the first but not the last time!) to Denver, where I caught the shuttle to Loveland directly to the Interweave studio where I met Helen Gregory and the filming crew.  There we set up my materials, hung the quilts, and went over my plans for filming the next day.  Congrats to Helen on her promotion to Vice President for Content, Interweave and Martha Pullen,  and upcoming move to Colorado!

My DVD will have five segments, so five trays to lay out my supplies which I prepped at home.

My DVD will have five segments, so five trays to lay out my supplies which I prepped at home.

And boy did I prep.  I had about a month (shorter than usual I think) between my contract and filming date, so I pretty much did nothing but make step-outs, more step-outs, refine, video (to get used to talking to a camera and to time myself), cut/edit, cut/edit/shorten more, etc.  For a month.  Non-stop.

Make-up, first thing Wednesday!

Make-up, first thing Wednesday!

Interweave has a make-up artist come do you up for camera, as there are special products that make you look right on camera under all those bright lights.  I shoulda shot a picture of me sitting at the table looking at the room…it was FULL of big tripods, cameras, and cables and cords EVERYWHERE.  Miraculously, I did not trip and break anything or anyone!

Reviewing my notes before getting changed for taping.

Reviewing my notes before getting changed for taping.

THANK YOU JANOME-America and Patty WInkelman of Quilter's Stash in WIndsor, Colorado, for arranging a Janome 8900--the machine I sew on at home--to use along with a Janome sewing table.  I'd never used the table and we were all impressed at how sturdy and stable and heavy it is.  Of course the 8900 sewed flawlessly!

THANK YOU JANOME-America and Patty WInkelman of Quilter’s Stash in WIndsor, Colorado, for arranging a Janome 8900–the machine I sew on at home–to use along with a Janome sewing table. I’d never used the table and we were all impressed at how sturdy and stable and heavy it is. Of course the 8900 sewed flawlessly!

Then it was time to get changed and start taping.  Then we mostly forgot to take still pictures!  But here are some….

Me on the left, Helen Greghory in the green top, and I think that is Laura (webinars guru) on the right, hidden mostly by one of the cameras.

Me on the left, Helen Greghory in the green top, and I think that is Laura (webinars guru) on the right, hidden mostly by one of the cameras. We were getting ready for the concluding segment I can tell by what is on the table.

At the end, I asked to have apicture of four of us:  L to R, Laura E. (webinars and more), Helen Gregory (new VP for Content), me, and Lauren our camerawoman extraordinaire.  Camera dude Nick was taking the photo, and camera dude Garrett had already run off to another "gotta be there" job.  Those lights were bright, but sure make things visible and looking good.

At the end, I asked to have apicture of four of us: L to R, Laura E. (webinars and more), Helen Gregory (new VP for Content), me, and Lauren our camerawoman extraordinaire. Camera dude Nick was taking the photo, and camera dude Garrett had already run off to another “gotta be there” job. Those lights were bright, but sure make things visible and looking good.

I never saw this view, but either Helen or Lauren kindly took this photo for me, which shows the jib camera shot of the table with my project and quilts on it:

The jib/overhead camera view.  If you look in the center just above the right corner of the screen view, you can see the overhead camera.

The jib/overhead camera view. If you look in the center just above the right corner of the screen view, you can see the overhead camera.  Also notice in the backgorund it looks like the quilts are on an angle.  They are–that is to offset the perspective angle that happens with the big camera lenses.  Fascinating!

Then it was time to go home.  Early.

Before I arrived, Colorado hit 80 degrees (F).  Wednesday, it SNOWED.  When I left the hotel at 3:58 a.m. for the shuttle to the Denver Airport, it looked like this!  Then by today it was supposed to be back in the 60s--that's more insane than our weather!

Before I arrived, Colorado hit 80 degrees (F). Wednesday, it SNOWED. When I left the hotel at 3:58 a.m. for the shuttle to the Denver Airport, it looked like this! Then by today it was supposed to be back in the 60s–that’s more insane than our weather!

I’ll spare you the tedium of a crowded plane from Denver to Philadelphia, a smaller more crowded plane from Philly to Boston, the utter hopelessness of Logan Airport (UGH UGH UGH), but flying home on Cape Air is always fun.  As we approach the mid-coast, first I’ll spot the Camden Hills:

There are two landmarks visible from the sky from a distance.  I was in the seat behind the co-pilot's seat (which is usually filled with a passenger).  The first are the Camden Hills:  Battie, Megunticcok, Maidencliff.

There are two landmarks visible from the sky from a distance. I was in the seat behind the co-pilot’s seat (which is usually filled with a passenger). The first are the Camden Hills: Battie, Megunticcok, Maidencliff.

Then

The second landmark is the big white tower at Dragon Cement, visible dead ahead in the middle of this photo.  I realized on this trip how massively huge the quarry is for this company.

The second landmark is the big white tower at Dragon Cement, visible dead ahead in the middle of this photo. I realized on this trip how massively huge the quarry is for this company.

As you near Dragon Cement, we turn right and head for Owl’s Head (Knox County, RKD) airport.  The lights of home!

LOVE being able to snap out all windows of these small planes.

LOVE being able to snap out all windows of these small planes.  Landing strip is visible just to the right of the bar up the center of the windshield.

Travel was the usual crowded insanity and waiting, but I was home 16 hours later to son, hubby, cats and dog.  Two of the seven are here:

Doggie love is GOOD!

Doggie love is GOOD!

In the past month, I’ve not only prepped this, but THREE articles (more on them when they are close to being published), have a quilt to make in a week, another article to write, then teaching in North Carolina in June and southern California in July, then a quilt to make by August 5.  Then I can collapse a few weeks before school begins (how will Eli be a SOPHOMORE already?) and fall teaching in Massachusetts and at International Quilt Festival in Houston.   So I HOPE to blog more often, but at this rate can’t promise.  I have so much to catch you all up on, pictures from teaching in Florida, Vermont, and Mass….but must be mom, wife, and author first. Stay tuned!