As I was setting up for my next online teaching gig, I thought it would be fun to share what it’s like totally upending your workspace to get ready to teach. Have fun watching this video. The sound varies (probably moved the phone farther away then closer), so with apologies, just adjust the volume as it goes along!
Two years ago I made my DIL Ashley a linen jacket for job interviews. It was a revelation! Working on another body (not mine) was SO EASY–I could see what needed fitting, figure out how to make changes, assess fit and lines. So I vowed to get a dress form. KaCHING! What I wanted was over $400! Nope. So I cast about for something less expensive. A local quilty friend had a friend with one to sell…done for $75. And it still mostly adjusted and wasn’t musty!
For your listening pleasure (you’ll need to read to the end to understand why), open this in a separate browser window.
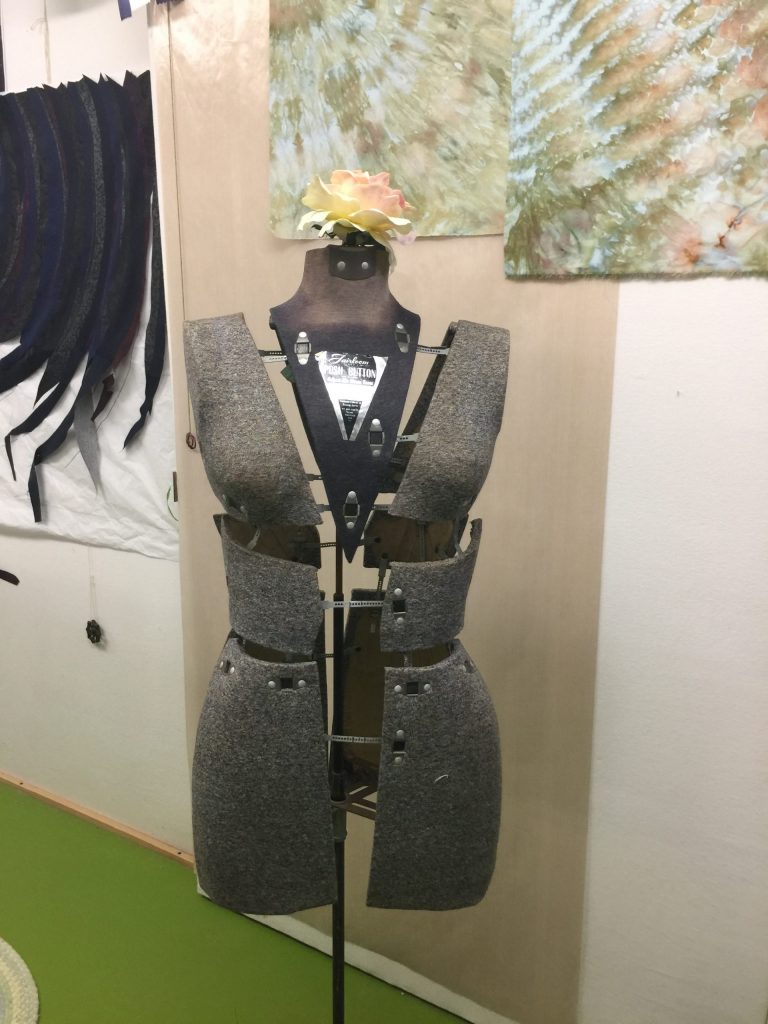
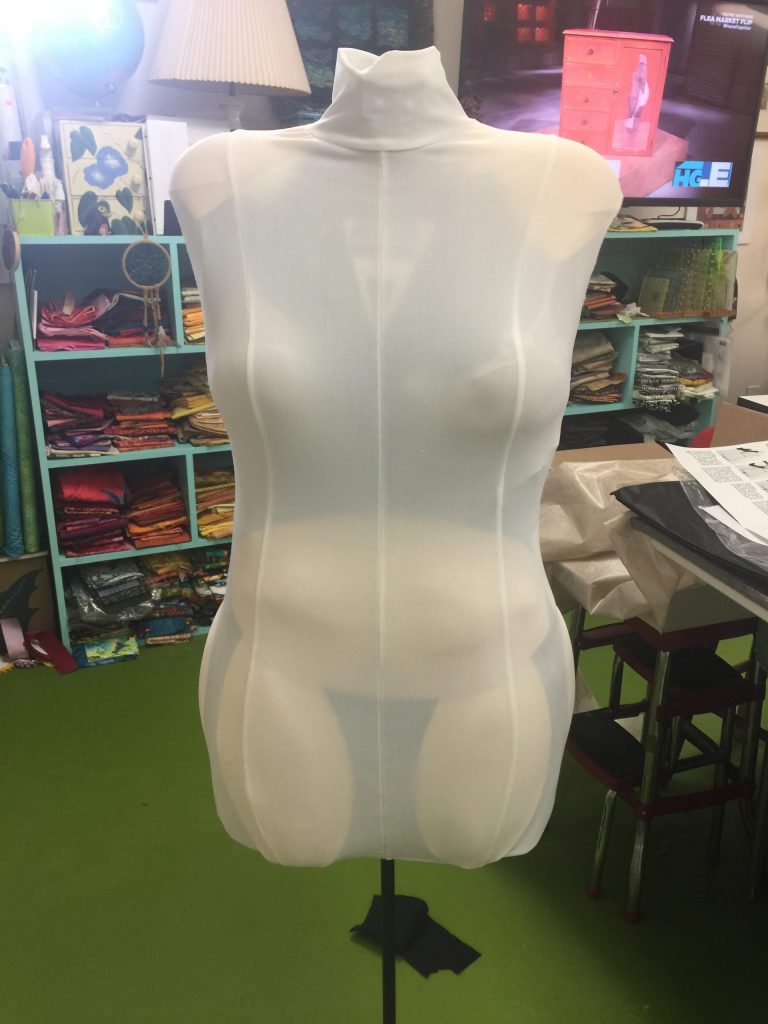
Front view: vintage dress form, not too rasty, sized out to replicate my measurements.
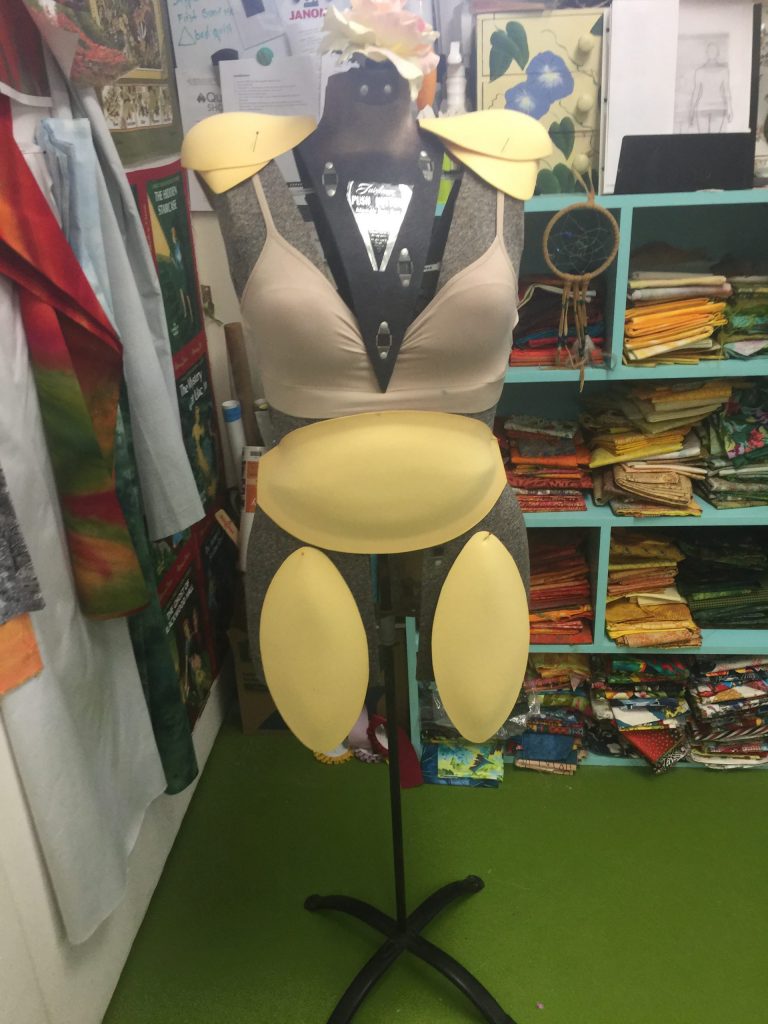
I began with taking my own measurements, adjusting the dress form to match, and then adding a bra to modify the shape of the bust to something resembling mine.First change: using an old bra to get the boobs into the right shape for me.
However, I discovered that the dress form and I were built on different molds. I honestly didn’t look as good as the dress form even though the measurements were correct. For starters, most dress forms start with a B-cup. The only time I was that large, I was nursing my sons! So I had to shrink in the torso to get a proper full bust measurement and shape, then pad out everything else to correct ribs, high bust, etc
But even that didn’t do it. Luckily I had long planned to get proper measurements done. Fiddlehead Artisan Supply (if you ever get to Belfast Maine, you MUST MUST MUST go there; quilt fabric, garment fabric, paint, art supplies of all sorts, crafting supplies….in other words, heaven!) has a classroom. Students can pay a VERY modest fee per hour for the teacher to come and help you. When I went, there was one student sewing and me getting measured. I figured I could try and explain to hubby what to do (but do I really want him to know my actual size? NO!) OR I could get someone who sews and would do it properly. Easy choice. The following is a chart I made to use at that session.
To prepare, I looked at patterns, sewing books and knitting books to figure out every conceivable measurement I might need, ever. And I put them into a chart. I have created this a PDF for you to use!
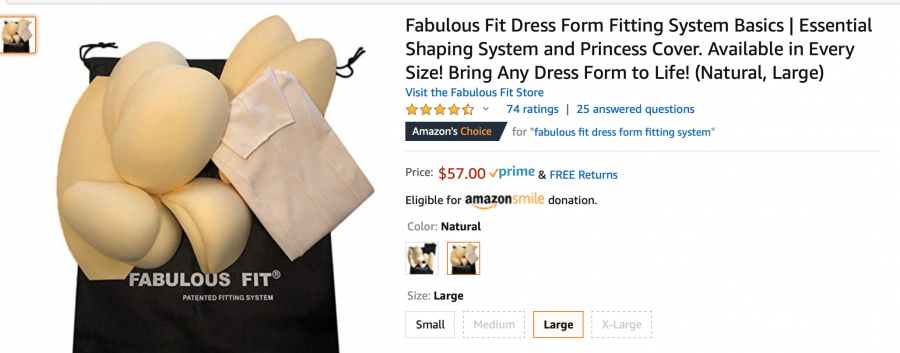
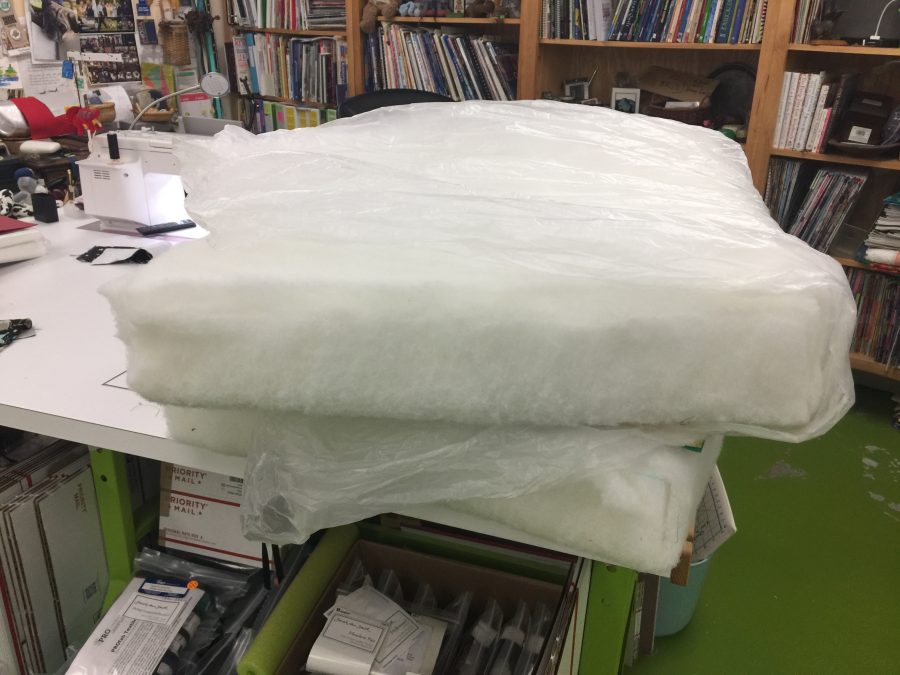
I tried using batting and whatnot, but decided to purchase this smaller set of Fabulous Fit Dress Form pads to make life easy AND give myself a surface that was more pinnable than the actual dress form which is a very dense molded paperboard covered in cloth. I didn’t understand why the slightly more expensive version of this set had TWO dress covers….I’ll explain below. Here they are on Amazon US.
Pads added, front
In having my measurements done, I discovered that not only were the bust shapes wrong for me, they were 2″ too close to the shoulders–I wasn’t that perky at even at 17! The fix for that (having surfed the internet to see how others modified dress forms) is to reduce the overall torso length until the apex of the breast is the right distance from the waist, then build up the shoulders. Revelation! Plus, that also meant I could make the shoulders wider and more square, like mine. However, there were still big gaps on the sides– hard to pin into those!
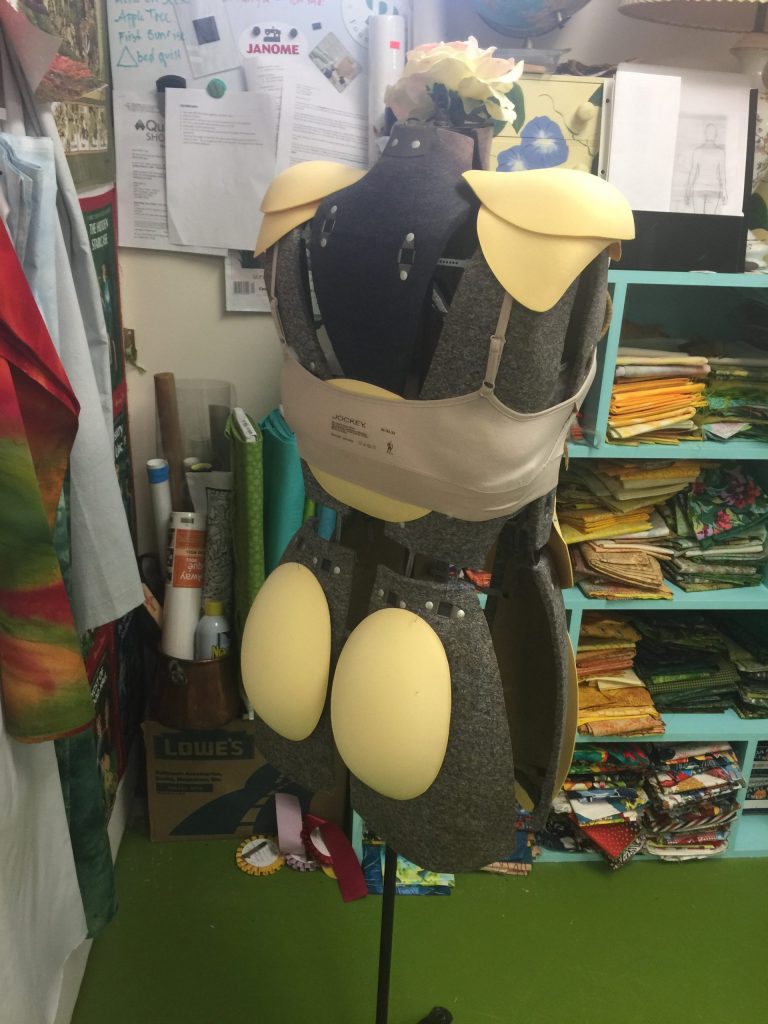
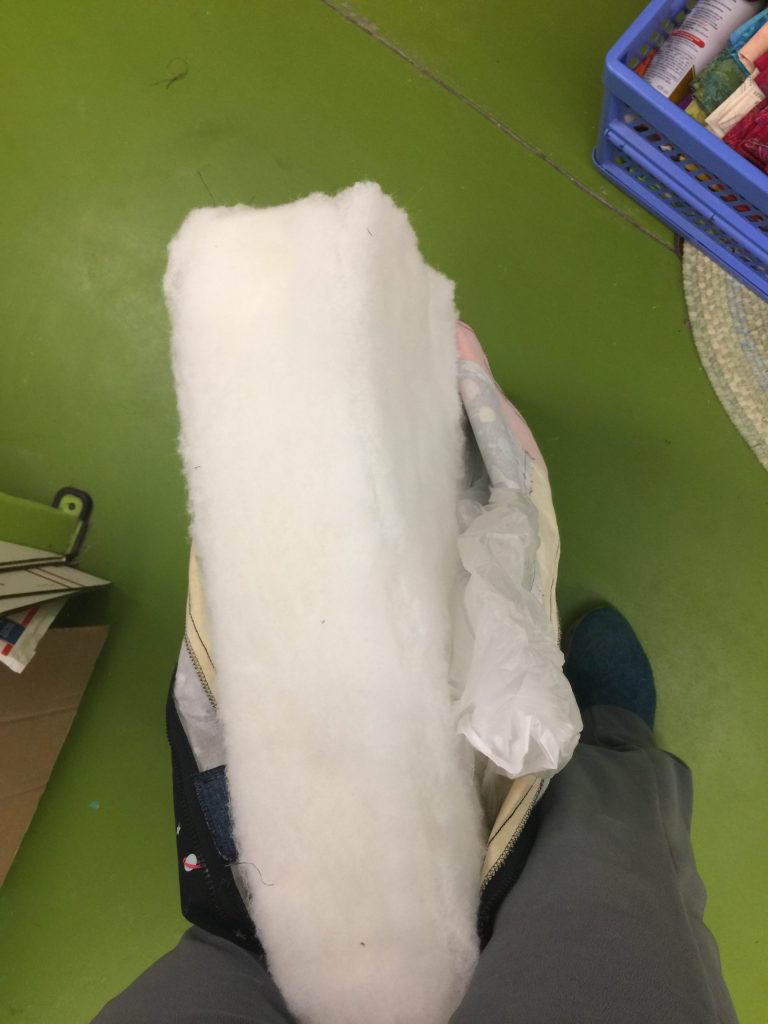
More pads added to the outer hip zone.
The second set of oval pads worked well to flesh out (hahahah) the hips. And because I needed the contract the torso to get the bust to work, I had to pad it back out to approximate my actual ribcage. If I ever get a modern dress form, I discovered there are “flat” dress forms for those with mastectomies or who are smaller than the industry standard patterns which are for B and C cups. Grump alert: Yet another blast from the fashion industry telling the smaller-busted amongst us that we are less than worthy (try finding an alluring bra in a small cup size–not!). Jerks. Anyway, at least I know that “flat” forms exist.
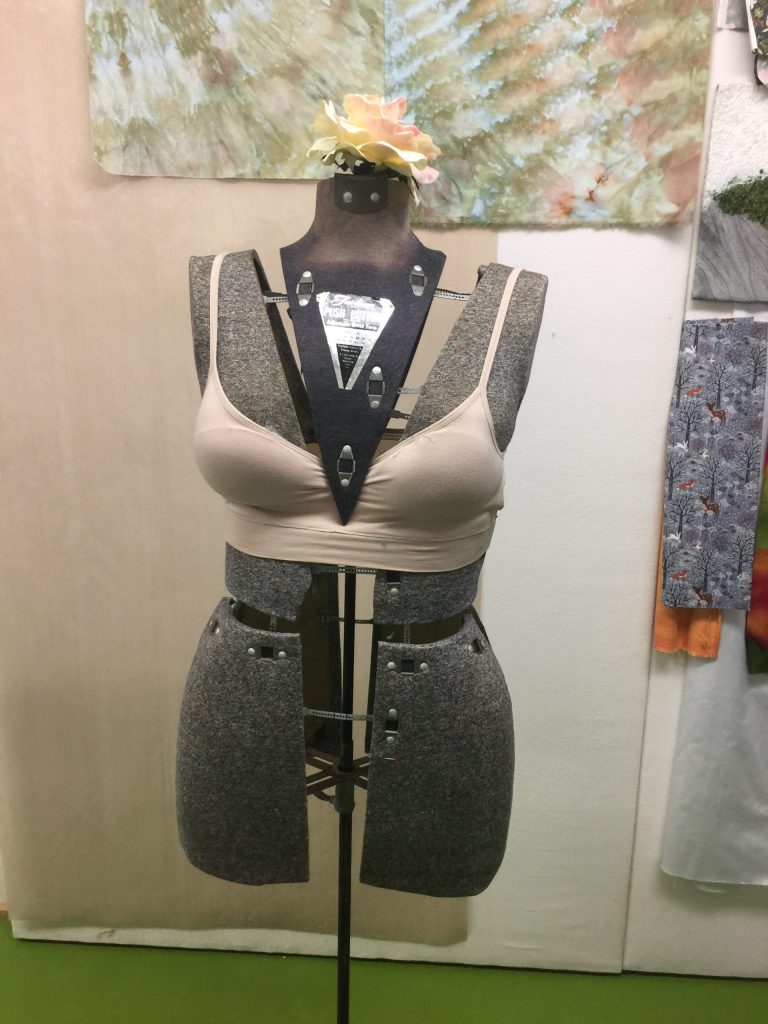
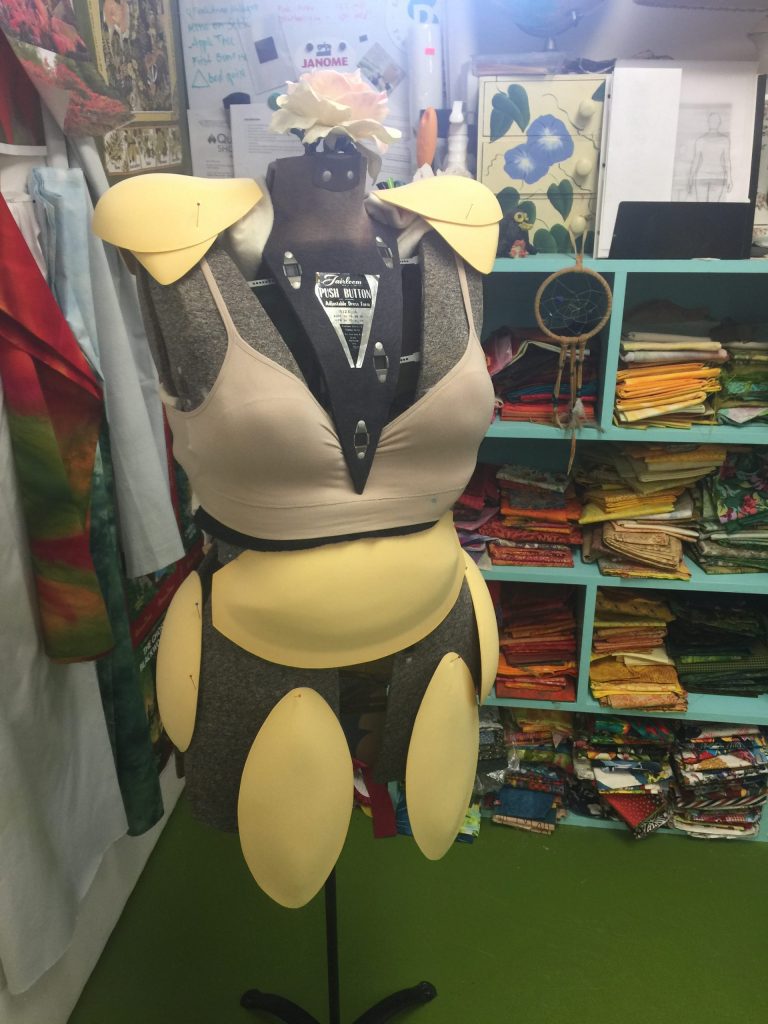
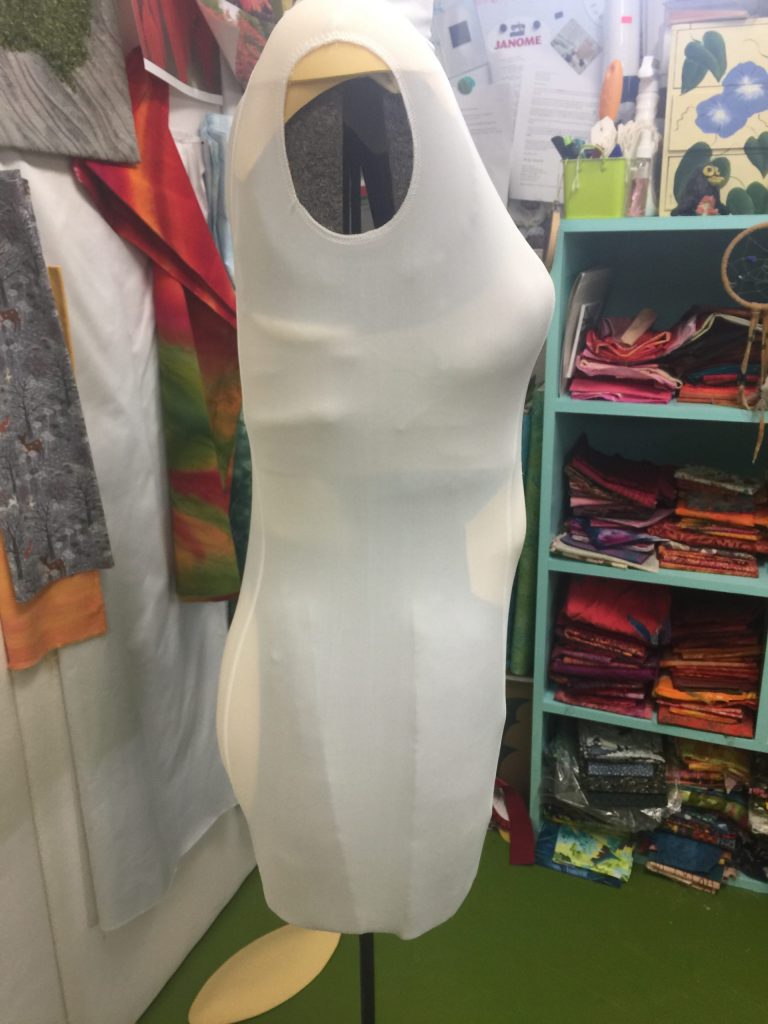
With the princess seam dress form cover added
This is pretty close to how I really look…definitely close enough to do fitting on a fitted garment and get it to work. The larger sized “kit” comes with two covers, and I couldn’t figure out why. Turns out you use the one with SIDE SEAMS as you “build” the pads–the lycra cover hold the pads in place and allows easy adjustments and fine tuning. Then you are supposed to put the princess seam cover on top of that for opacity. Having the seams, which you can feel under the fashion fabric, is a good thing. Next time I’ll purchase both covers so I can feel the side seams as well
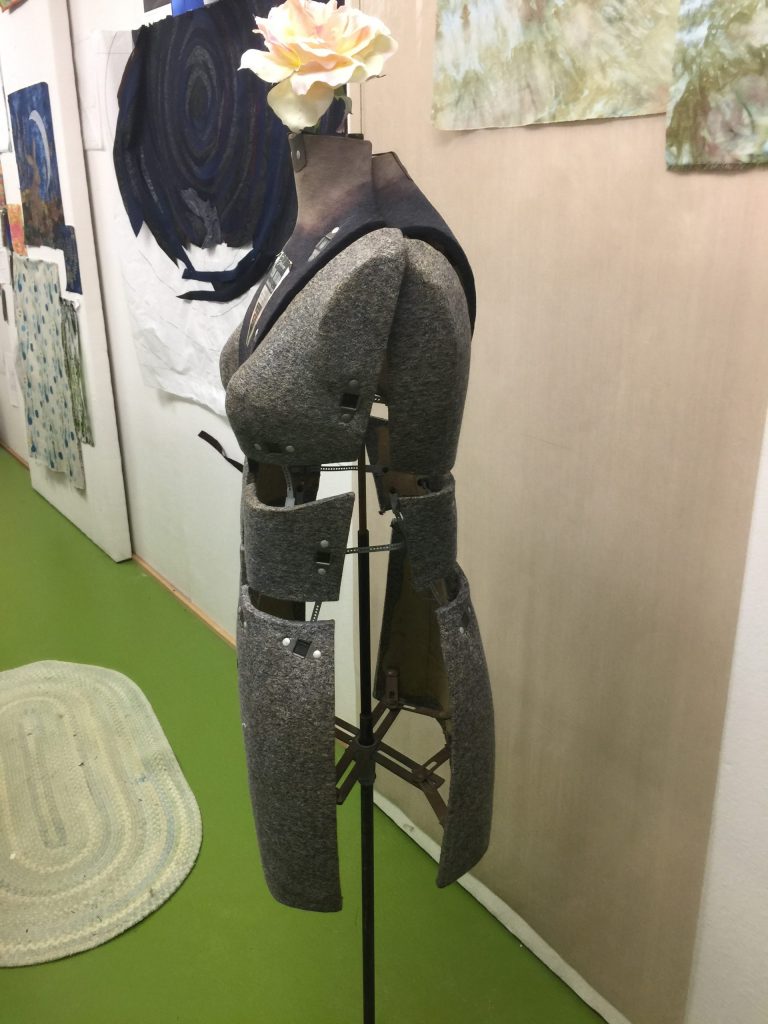
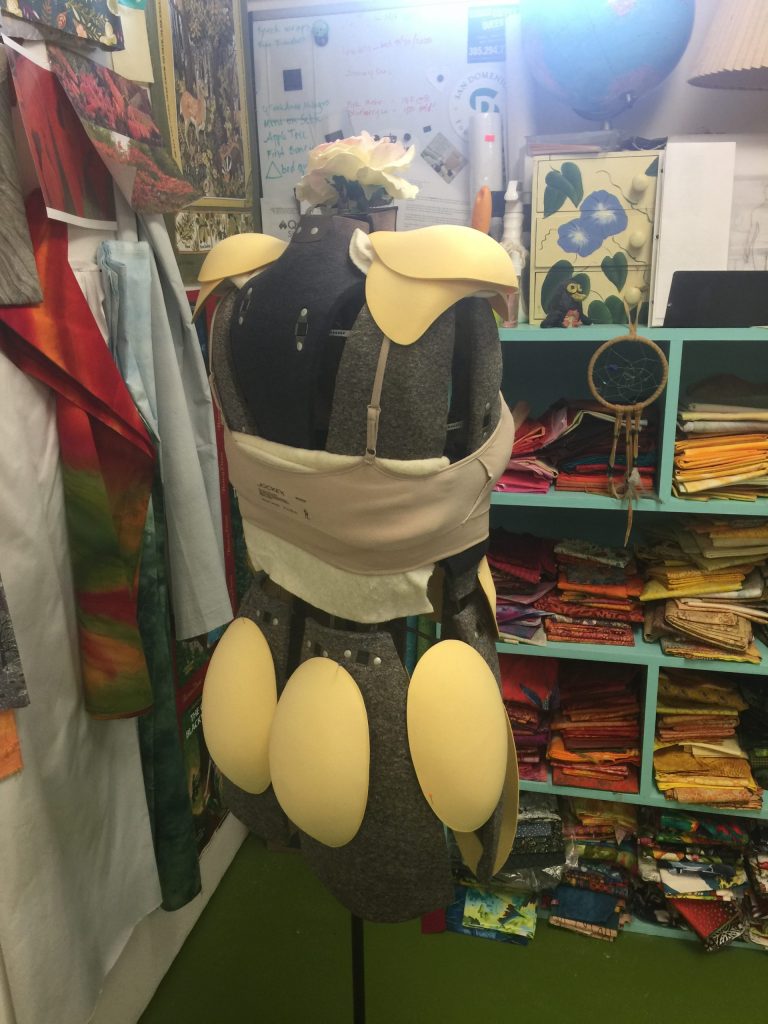
Side view before I got the hip and front thigh pads snugged in. Thankfully I am not as lumpy as the batting in the upper back.
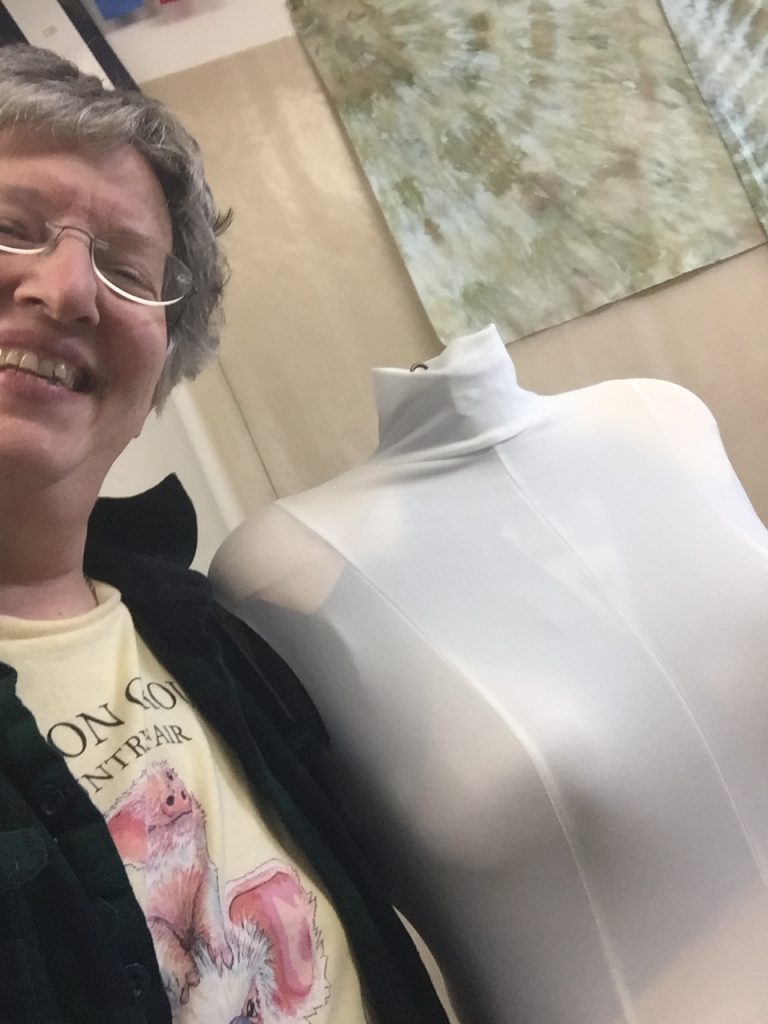
Me with Ailith Skye, my body double
I learned SO MUCH about the shape of my body in this process (and I’m fine with lumps…life is better with ice cream, although 10 pounds fewer lumps would be nice too….the 20 I need to lose ain’t gonna happen). And I learned about the pattern industry, the “blocks” (body shape bases they use) and fitting ease. I can now use my stand-by—measure a garment I have that fits the way I want and compare with what I measure on the pattern–along with the dress form and get a fit that I want!
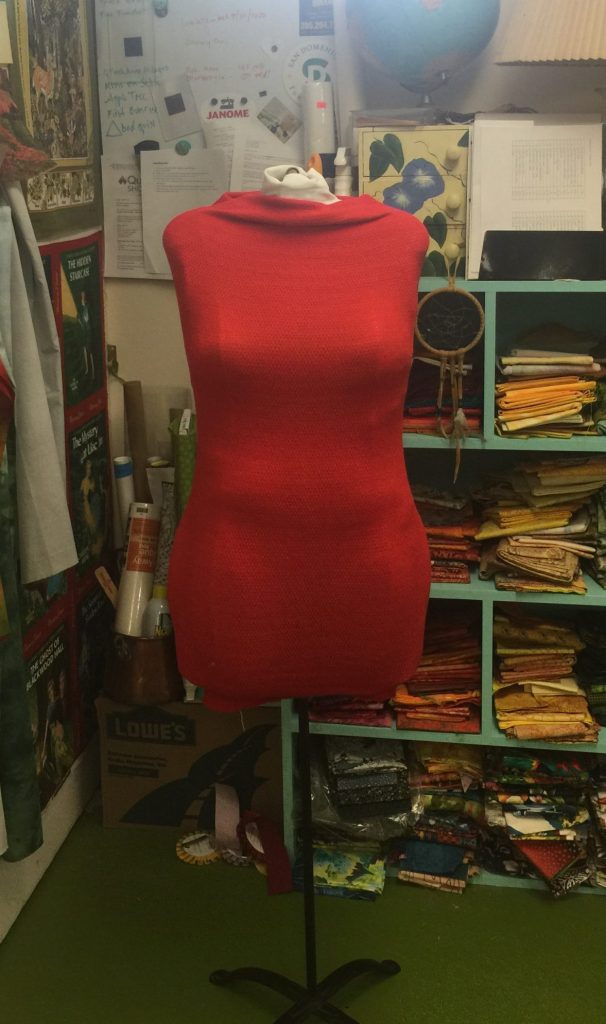
In the coming weeks I’ll have several garment making posts. I have made a top, a skirt, a tunic, leggings, have another pair of leggings on the cutting table, and a pinafore/jumper on the design wall. Ailith (traditional Scottish name meaning seasoned warrior–my paternal grandmother was Irish but born in Glasgow, I am named after her, so I liked Ailith) has been a great help already. Can’t wait to share. Oh…and why red dress?
Put on your red dress, girl, and have FUN! BIG thanks to Marty Ornish, who makes amazing art with old quilts and dress forms….check out her website, Marty-O, here. I asked her what she uses, and for some purposes she uses mannequins with stretchy fabric pulled over. She gave me a length, so now Ailith can put on her party shoes!
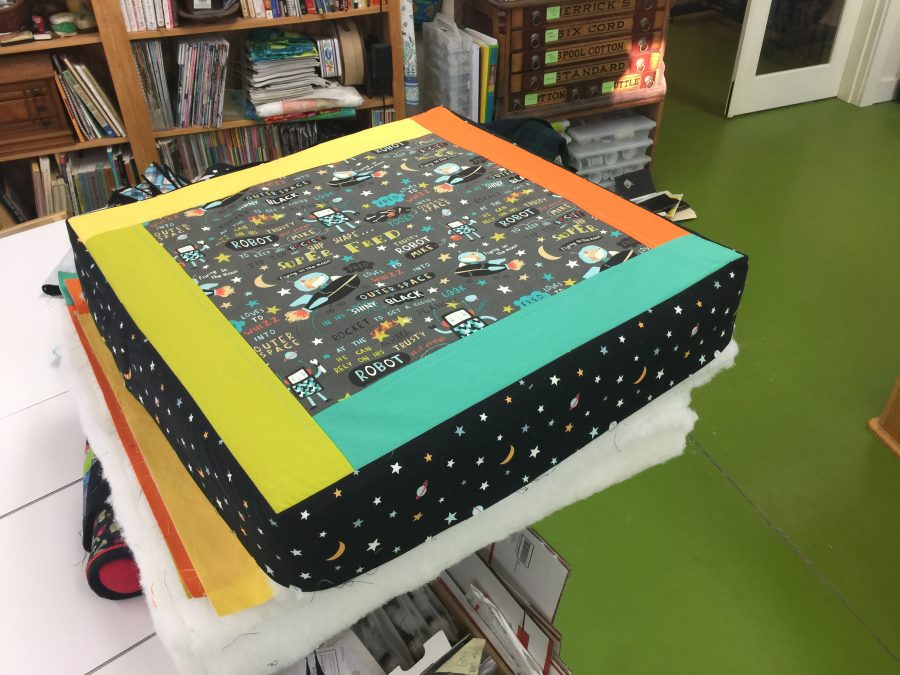
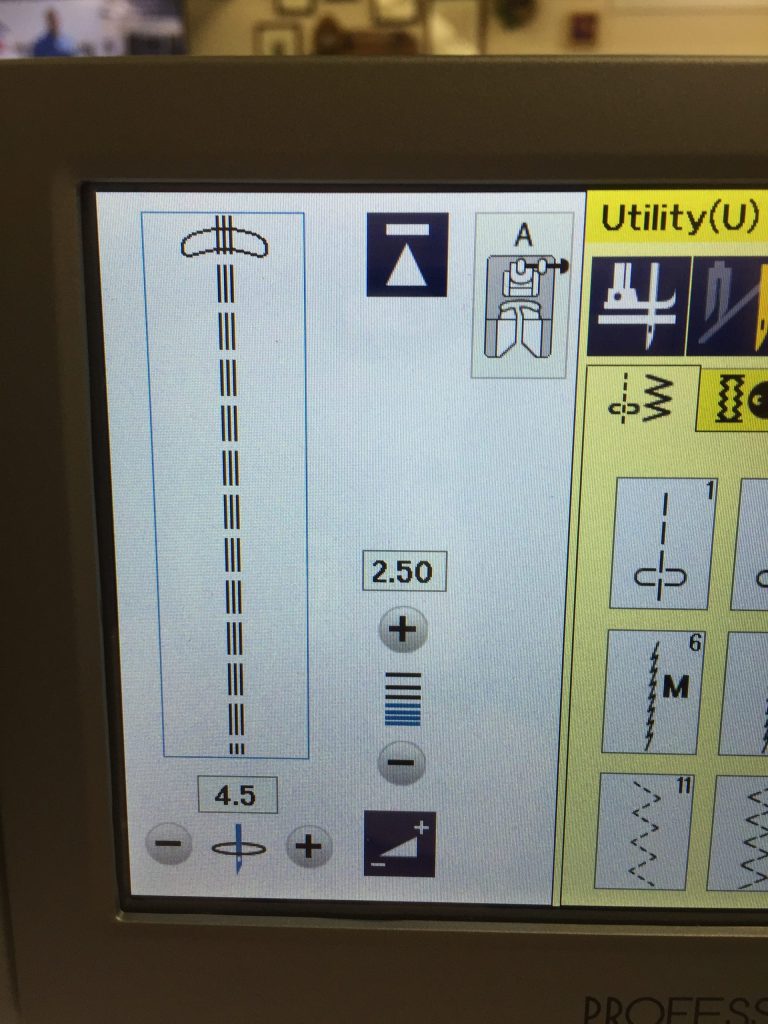
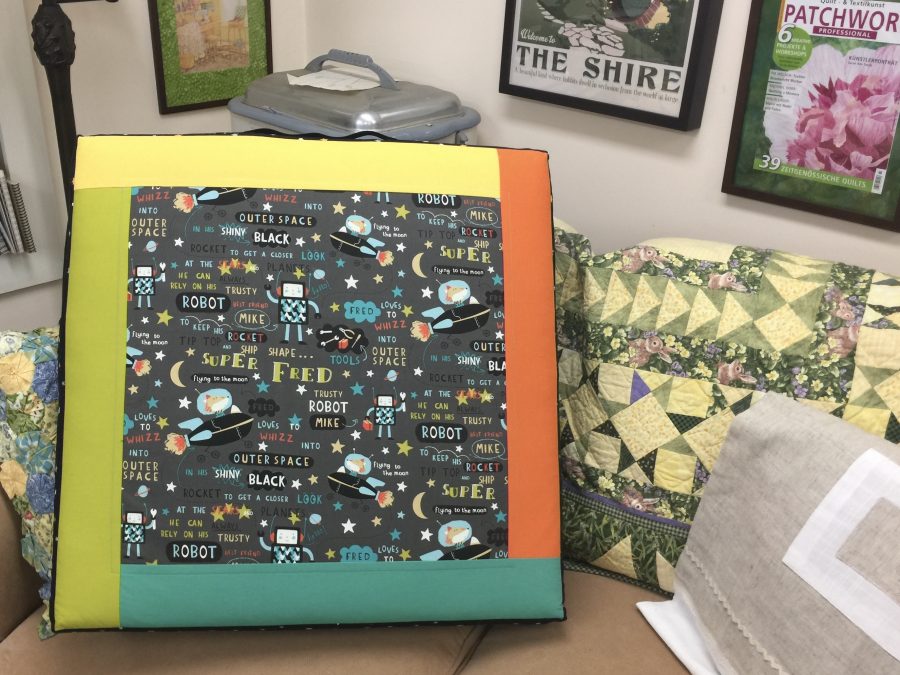
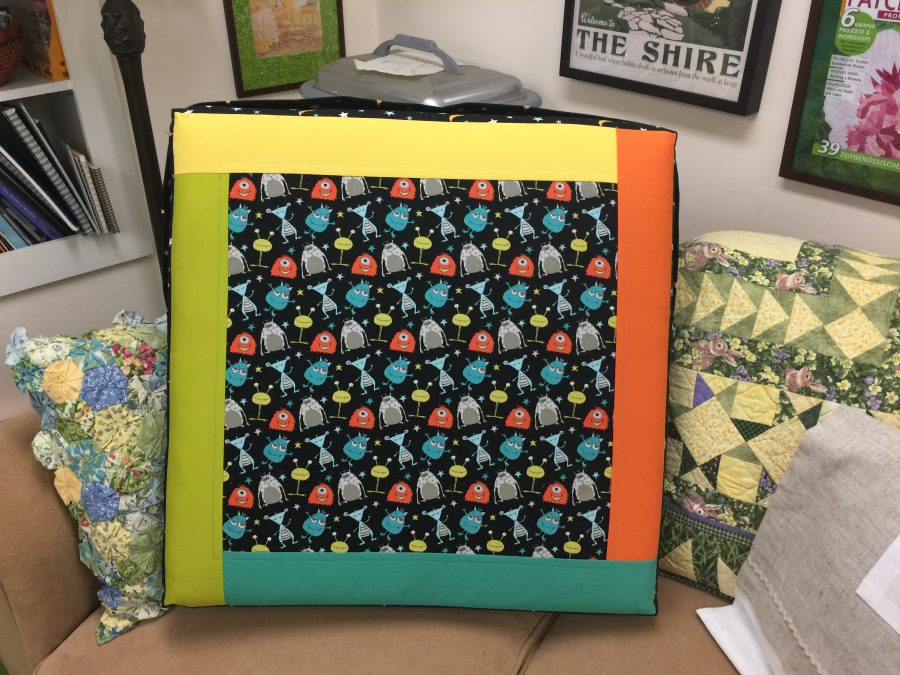
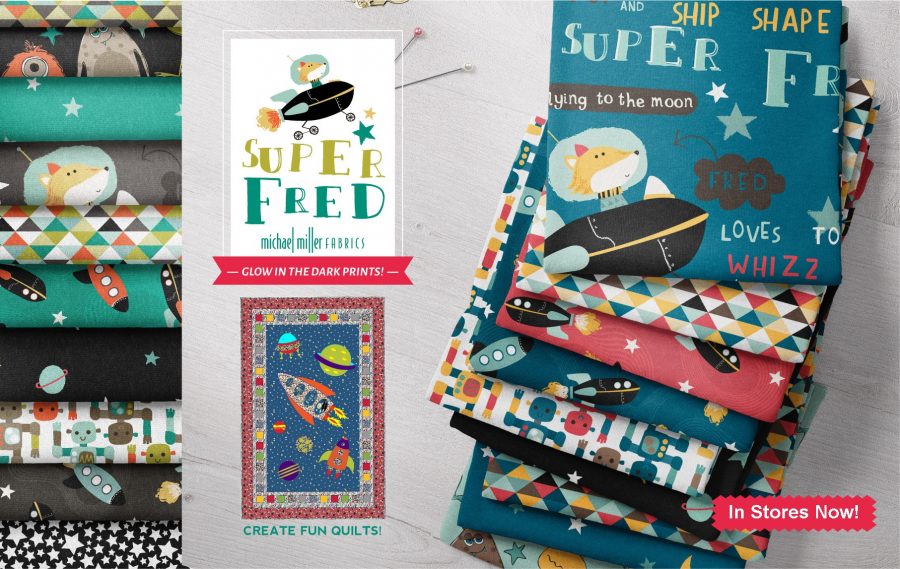
Today it’s time for part 2 of 2 in the “how to make cushions” tutorial! In this image, I’ve sewn the boxing strip–the bit on the edges/sides (black Galaxy fabric from Michael Miller Fabrics, Spring 2020) to one of the squares (top and bottom) to make sure I’ve got the fit right. Looks pretty good! The top on this one is the SuperFred fabric in gray (with this fun fox named Fred and a robot named Mike). Those glorious solids (SWOON) are part of the Cotton Couture collection. Colors are Acid (left), Yellow (top), Apricot (right), and Lilypad (bottom). Like I said, SWOON!
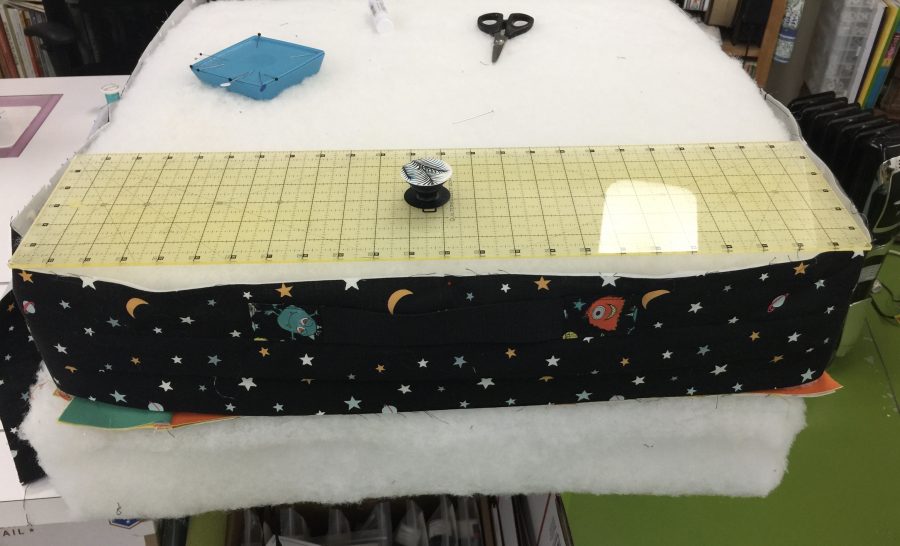
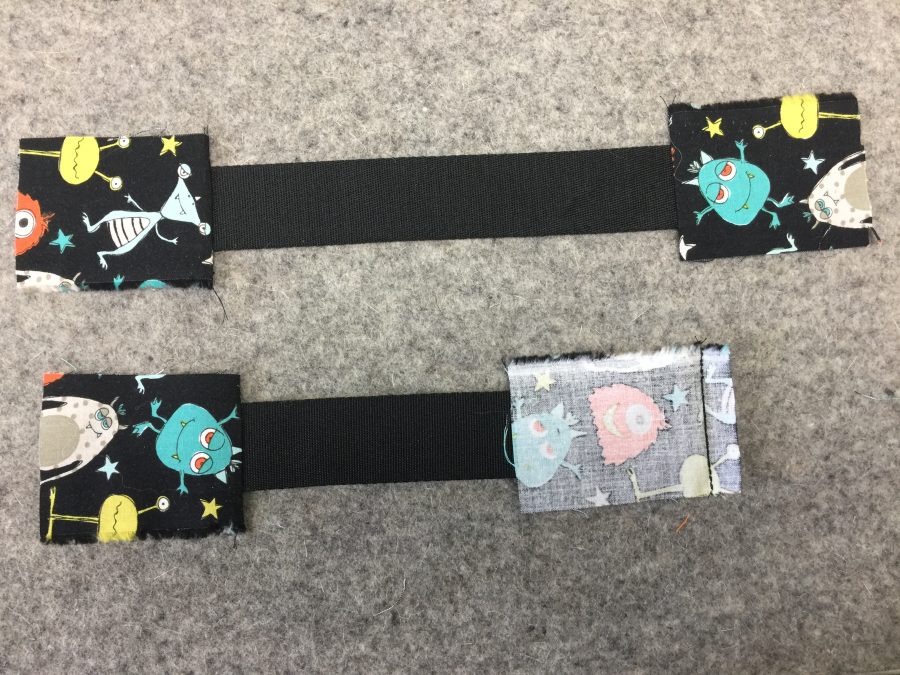
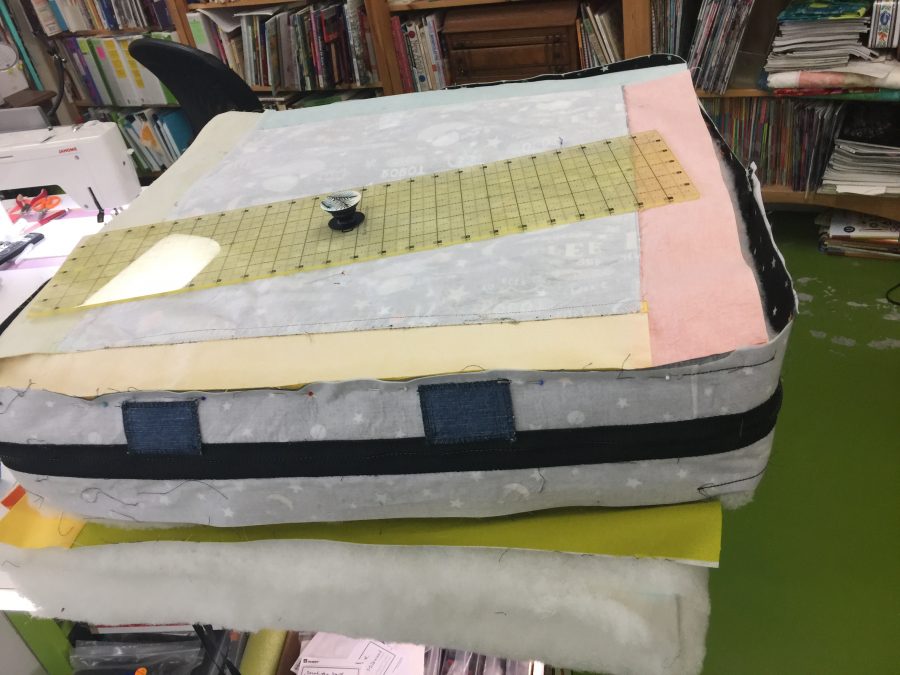
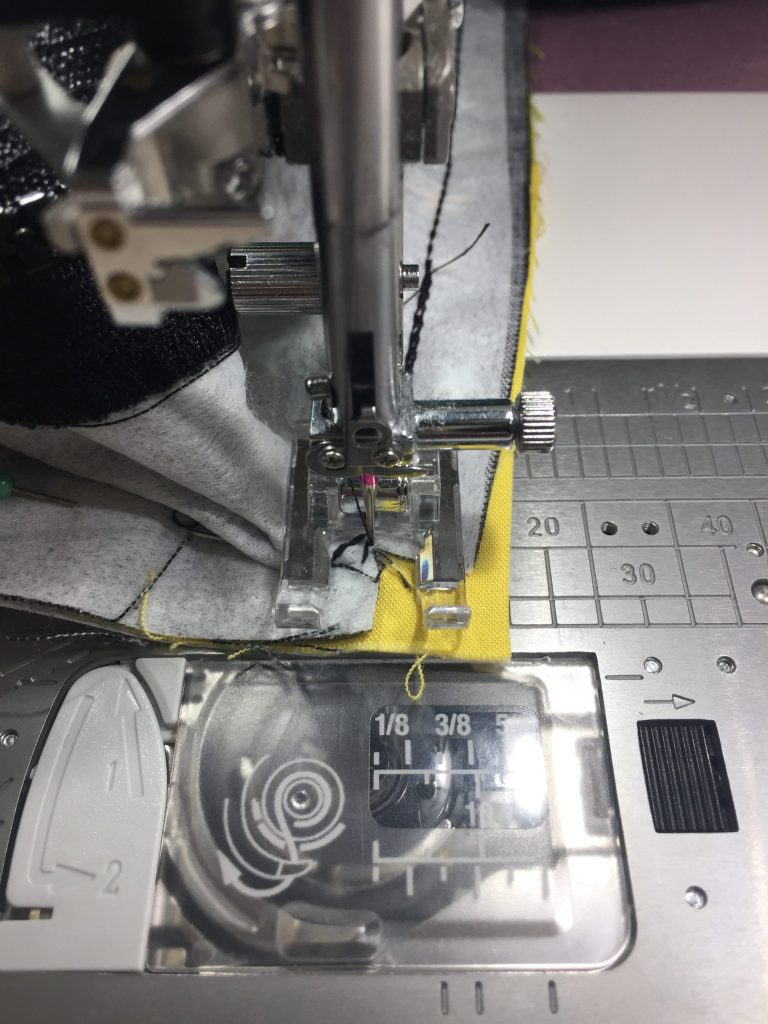
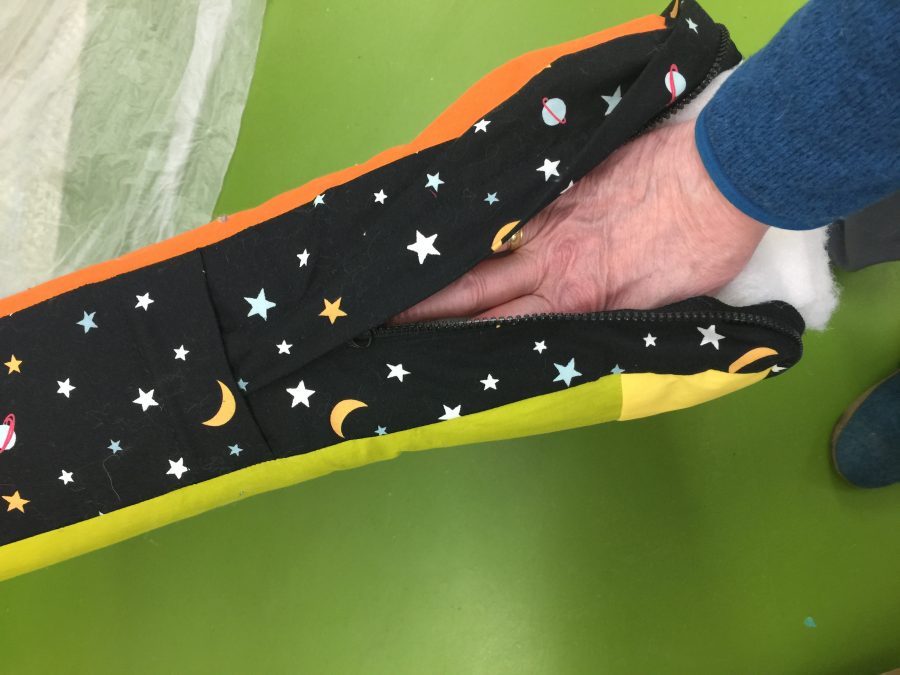
I shared this photo before, but didn’t point out the very hard to see black strapping handle which is in the center of the side facing us. If you look at the pop-socket on the ruler, come down to the cloth. Then look and you’ll see two Space Aliens, fussy cut from that fabric, at the ends.My dear DIL is a kindergarten teacher, and these cushions and pillows are headed to her classroom for wee people to flop upon and read. Or just flop upon! She’ll need to be able to move them about easily. As she is TINY, we need to make this easy (not a bear hug thing just to move a pillow). I cut some of the Space Pals fabric into rectangles, centering one of the Pals so it would show. Sew the rectangle to the end of some webbing. I could only find 1 1/2″ wide locally in rural Maine. It works but I think 1″ wide would be better if you can find it. Sew the rectangle to the end of the webbing, then fold and press the side edges in, turn under the remaining raw edge, and sew. I use–get ready for this–washable glue stick instead of pins. When doing your folding and pressing, use a swipe of glue. Presto. Stays put. When you fold things together into a nice little package, a little dab of glue will do ya! (Who else remembers Dippity Do?) Center the handle exactly over the zipper and sew. I put some squares of old denim on the inside to reinforce the fabric. See next photo.Next step: sew the boxing to one side. Start by finding the center of the zipper. Here, you can see those rectangles of denim (with overcast stitch to prevent raveling) I used to reinforce the handle which is on the right side of the fabric. Mark 12″ to the right and to the left of the zipper’s exact center. Then measure 24″ to mark the other corners on the boxing strip. I chose to put some reinforcing stitching (triple straight stitch–see below) at each corner–about an inch to either side of th marking pin. I sewed about 3/8″ from the edge. If your overall gusset/boxing length is a little off, you may need to remove the stitching for one of the zipper garages and adjust the overall circumference of the boxing strip/gusset so it is snug.
Put the boxing strip (now a loop) on the cushion inside out. It’s much easier to assemble and pin with the fabric held upright (and not floppy on the table)! Place the top fabric face down. If you use a print that is directional, as I did, I put the top of their heads on the zipper side of the cushion. Pin all the way around.
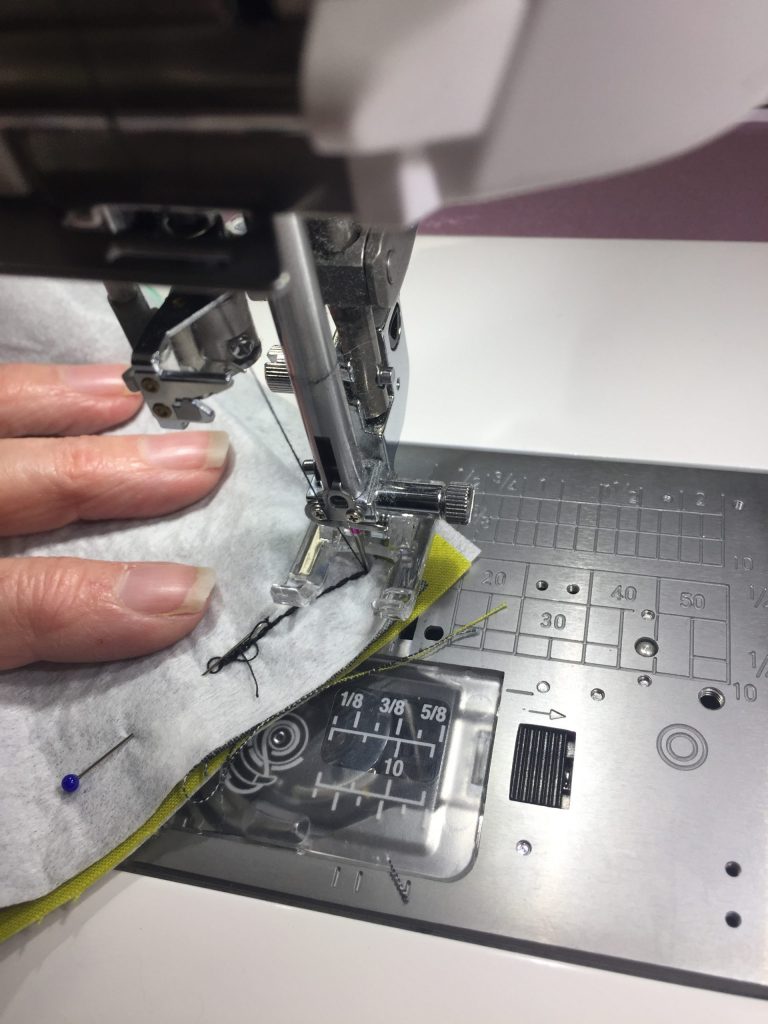
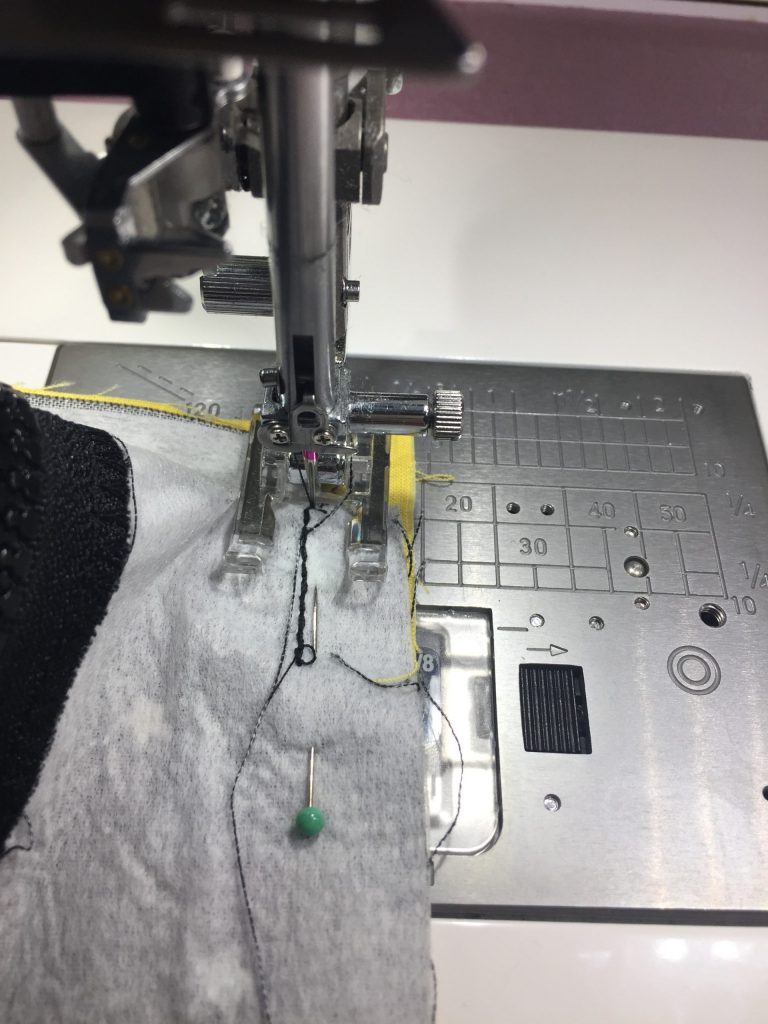
You’ll want to clip each corner about 3/8″–so to the reinforcing stitching / almost to the very seamline in each corner. I clip right before stitching. I like to use the triple-straight stitch when I need a strong seam with some flex. This is on my Janome M7 Continental, but almost all machines other than straight-stitch only have something similar. This is what I used to reinforce the corners AND sew the seams. Since the corners are clipped, this provides a little insurance against tears, especially in the cushion stuffing/wrestling stage. Or when anticipating wee people thumping their little bodies all over the place.With the top of the cushion on the bottom and the boxing/gusset on top, sew together with a 1/2″ seam. I sewed this with the triple straight stitch, again because I expect these cushions to see some enthusiastic use in a classroom. Sturdy is wise. Sew RIGHT UP to the CORNER and stop with the needle down. You can see some of the reinforcing stitching just to the left of the needle. You can also see that clipping has allowed the boxing strip to make a 90 degree turn at the corner, and that a bit of the boxing has folded over and is pushing into the next side to be stitched.With the needle still DOWN, lift the presser foot. Ease the boxing to the left to remove that little pushed bit you see in the photo above. Notice the reinforcing stitching that goes down to the pin. I will sew on or just a thread’s width to the left of that when I sew the seam. Make sure the raw edges are aligned–you’ll see a perfect little square of the fabric on the bottom as the boxing strip pivots around the corner/needle. Sew the next side. And here we are, corner turned, ready to roll. Or sew. Or have a something rewarding. Wine? Pina Colada? Nap? Chocolate? Anyway, Repeat until you have reached where you began!
Then do it again with the other side. REMEMBER to leave the ZIPPER OPEN just enough to reach your arm inside. Makes turning the cushion right side out a whole lot easier. Ahem. Yeah, didn’t do that when I first began working for that interior designer. I was able to fiddle the zipper pull and get it open. Trust me, gap is better. OMG–almost done!!!!! Most furniture cushions are foam wrapped with dacron (outdoor cushions are the exception). There are different grades of foam. Softer ones are generally used for seat backs, firmer foam for seat cushions. There is even this miraculous “outdoor” flow-through foam–instead of being sponge-like and holding water, it drains out. The foam is kinda very firm, but think about it…no mildew! Anyway…back to this program. Upholsterers then use a spray glue to adhere the Dacron wrap (like quilt batting but fluffier, scratchier, cheaper I think, I had leftover, only partly mouse-munched in the shed). I had a vintage can of the spray upholsterers use but I think an artist’s spray glue **might maybe** work–check the label to see if it says anything about eating/eroding foam. And test. You can also just hand baste the edges. When using spray glue, I just spray the surface, pat the one huge, long and wide-enough-to-cover-the-edges Dacron in place and then trim it to the edges.
Next: Stuffing the cushion cover you just lovingly made. In the above photo, notice that I have used a dry cleaner bag (a big leaf bag works too) that I wrapped around the bottom of the cushion to facilitate wrestling it into the cushion cover. Do NOT put the cushion inside the bag–wrap plastic-something around the bottom. You need to be able to remove the plastic bag easily, and trying to tear a bag off the innards while stuffed inside the cover is not workable.By having zippers that come halfway around the sides of the cushion, you have made this part–stuffing–a whole LOT easier. Place the cushion inside like you are putting a pillow inside a pillowcase. Then place the cushion on the floor, using your legs to hold it upright. Smooth and pull the cushion up the sides. Pull the plastic out, then slide your arm inside and coax the seam allowances toward to boxing on all sides. Tuck the corners of the foam on the top edge under the zipper, and zip closed . See next photo. Here I’ve got the cushion on its side…see the zipper garage on the left? Use one hand to squish the foam/dacron down, and pull the zipper up over your hand (prevents getting dacron in the zipper). Slide your hand back, repeat. When you get to the corner, nudge the innards into the corners and continue until done. Park the zipper pull in the zipper garage on the other end. You may wish to fine tune where the seams are–straighten them, etc. Wearing quilting gloves or rubbery kitchen gloves gives your fingers a bit of grip and allows you to ease the fabric into perfect position.
DRUM ROLL PLEASE!!!!!!!
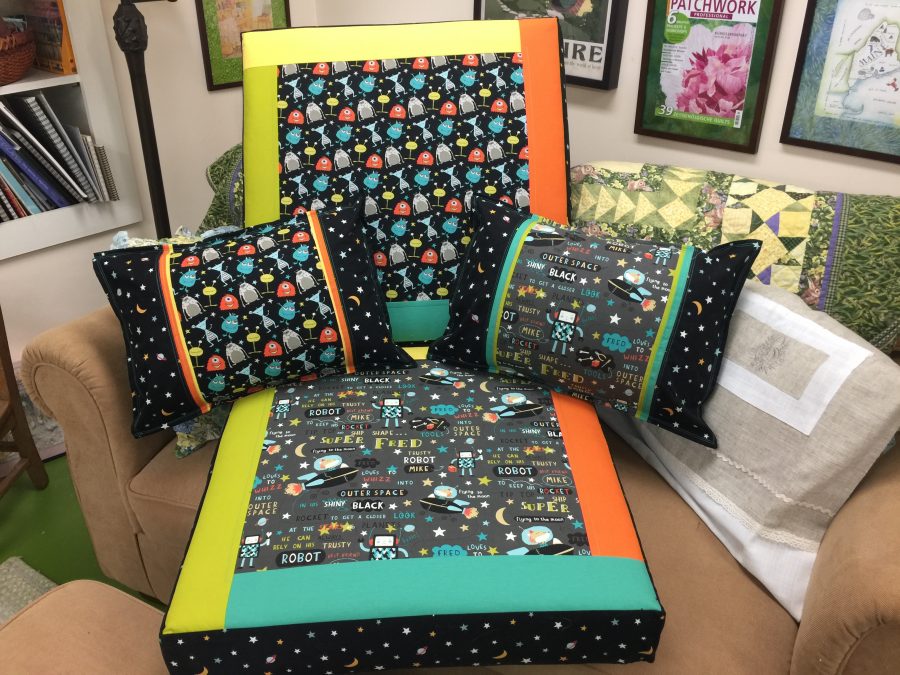
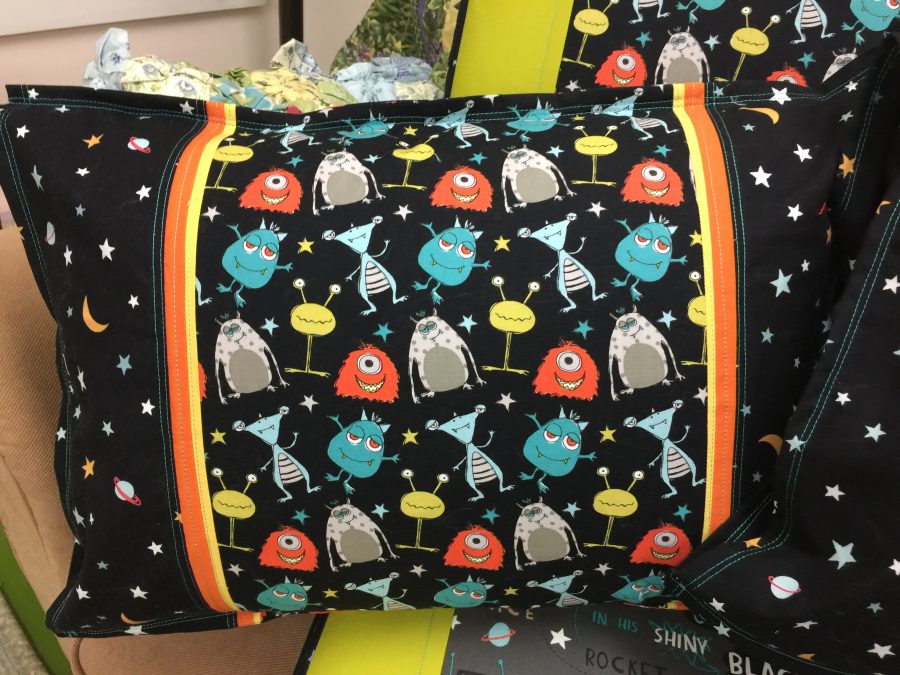
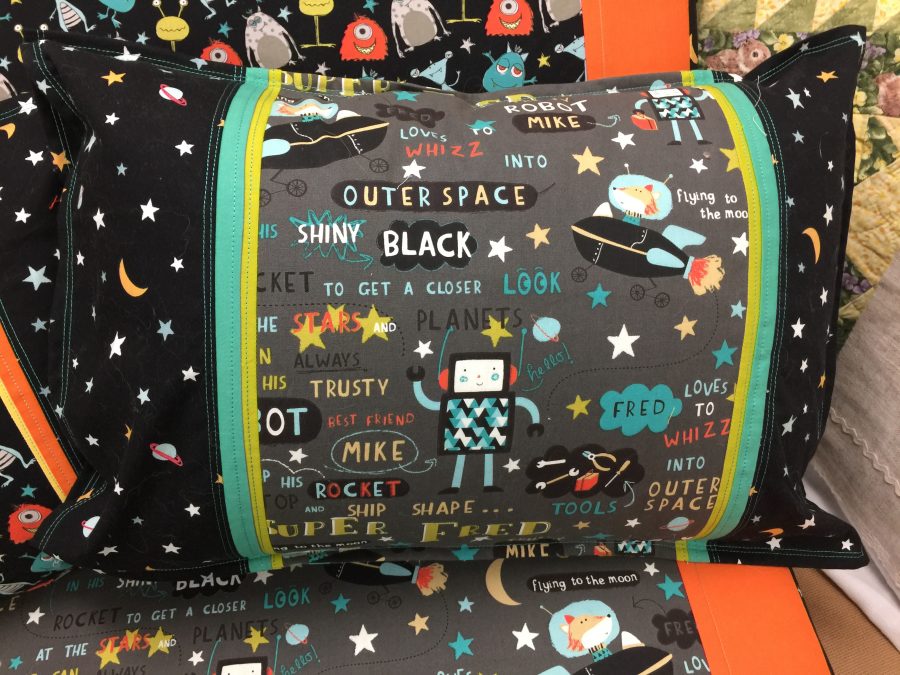
Ta DAAAAA! DONE! Celebrate! Feel a bit chuffed (great Aussie word meaning proud or pleased).The Space Pals in Gray side of the cushion. I put a different feature print on each side, so the kids can have Super Fred up on both cushions, or Space Aliens (next image), or one of each. Notice on the top of this one that black ripple? That’s the carry handle so the kids and DIL can tidy up! AND these cushions stand up on their edges, better for stashing in a crowded classroom. And yes, that’s my one and only (so far, I hope for another) magazine cover behind the love seat..my pink peony on Germany’s Patchwork magazine.Are those Space Pals in Black not the cutest things ever? I think some pillows made in their image need to happen…Close up of the Space Pals toss pillow. I got my pillow inserts from (Sigh…I go there sometimes…no one else within an hour’s drive has some of what they carry) WalMart for cheap. And Super Fred in gray. Adorable. Although I think we need some gender equality…It’s gonna be Super Freddie, short for Frederica! for me.
Thanks for sticking with me this long. I know these have been long and detailed posts, but sometimes when you’re essentially teaching a day-long workshop in two blogposts, that happens! I hope you’ve learned something and enjoyed the visit. THANK YOU!
Part of every new year should be learning new things…and I’m starting with the Accuquilt GO!
As part of the Michael Miller 2020 Brand Ambassador program, we received the Ready. Set. GO! Ultimate Fabric Cutting System from Accuquilt. It includes an AccuquiltGO! plus the 8″ Qube (a set of dies to cut shapes often used in piecing 8″ blocks) and a ginormous die to cut my own 2 1/2″ strips. I’ve never seen one of these used in person, let alone done it myself. They are supposed to be lots faster than traditional rotary cutting and more accurate to boot. That makes two things where I need improvement–grin!
Lookit those amazing colors…don’t you want to dive in face first?
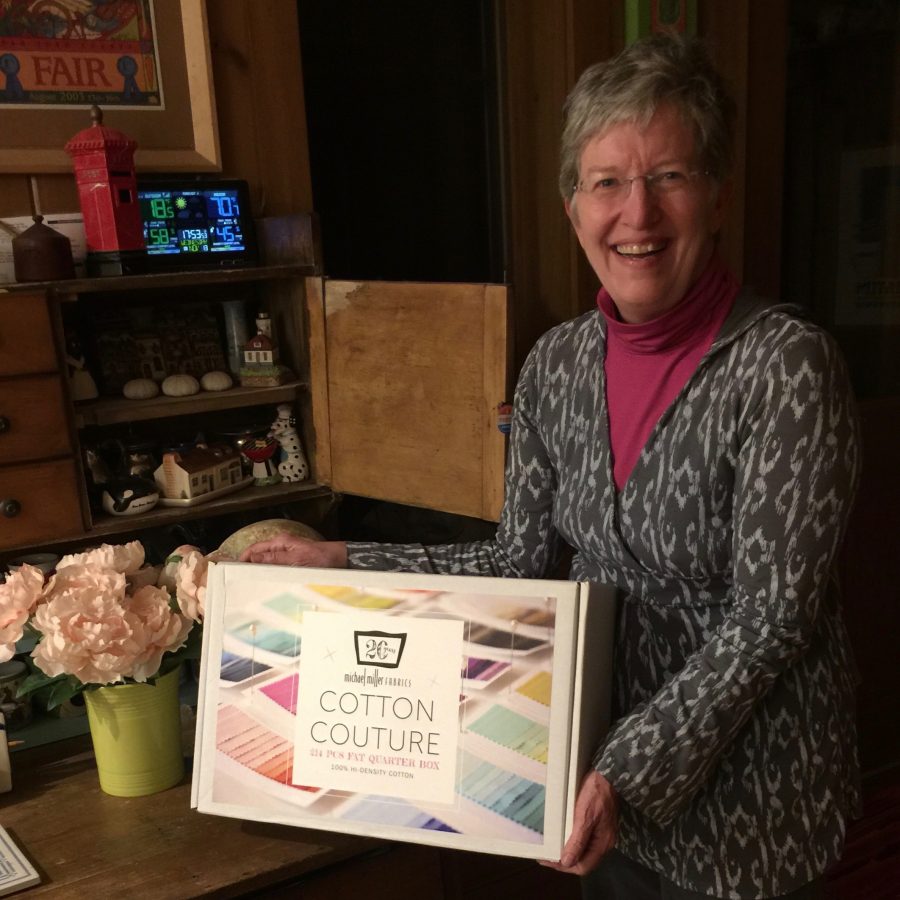
A while back, I was deliriously delighted to learn I had WON all 214 colors (above and below) of Michel Miller’s Cotton Couture (this was before I even applied for the Brand Ambassador program). I’ve been wanting to make a quilt I shall call “214.” As I’ve been waiting to upload this post, I realized that I can use the AccuquiltGO! to do the majority of the cutting, even the sashing! If I use the die for 2 1/2″ strips, I can then manually cut those in half vertically to get the 3/4″ finished strips I want to use for sashing. And then (!!!) I can use the die to cut 4 1/2″ squares (4″ finished) — if I am careful — to subcut the strips into 4 1/2″ lengths to match the size of squares I’m going to use in the quilt! Stay tuned…guess what I’m going to do today!
So, with that I am going to sign off and go play with my new fabric and toys!
What a BEAST! I think this machine may be able to do everything but cook and do the dishes (Janome: hint hint LOL!). While visiting with Janome America staff (Regena, that’d be you) at International Quilt Market in Houston, I was thrilled to learn that Janome wanted me to take this beauty for a test drive, blog and share and sew on it for the next year! THANK YOU JANOME, and yes indeed-y I am shouting! I’ve been beyond lucky to be a Janome Artisan since 2003–don’t ask me how I’ve lasted this long, I’m not sure, but I’m just really proud to be affiliated with them (I’m not an employee but all opinions are honest and unvarnished).
Today I’ll share a quick video of the unboxing. Then I have Christmas gifts to make, so I will share various things and features that I have found. So far I know I’m going to miss the flip-up chart of the stitches, but there are so many other beyond **amazing** features that I can cope–and photocopy the pages in the manual for ready reference! I’ll get to learn about the new AcuSpark phone app that one can use for tutorials and tips using the on-screen QR codes on how to use the machine, and I am in love before even turning it on with the new built in antenna thread stand, the fact that the antenna collapses so I can actually USE the COVER on the machine easily, not to mention the massive harp space. One bit of advice: you may need help hoisting this machine onto your table!
This box is so big that *I* could fit inside it! Widgeon is so impressed (and deaf and nearly blind) that he doesn’t realize he has a cookie on the floor in front of him!
As for the name: the Janome 7700, from some years ago, was the most beautiful ruby red on the front. I’m not much of a red fan but boy do I miss that face plate! So, as a fan of the Harry Potter books, I named that beastie Rubeus Hagrid (the gamekeeper). When I had the 15000 top of the line on loan, of course it had to be Albus Dumbledore, the greatest wizard of all time. Later, the silver-faced 9400 (and its heir the 9450) became Gandalf the Grey, because we love the Lord of the Rings, too.
BUT, I decided it was time for a POWERFUL WOMAN, so I have named her Minerva McGonagall, headmistress of Gryfindor and one of the bravest, stronger, most powerful and wise witches of all time. Here’s to Minerva!