email Youtube

Home
Galleries
Blog
Workshops & Calendar
Store
Resources
About
Contact

Archive for the ‘Piecing’ Category

Joshua’s quilt

Saturday, December 21st, 2013

ALERT:  Joshua, if by chance you are reading this, STOP and GO AWAY!  <grin!>  Ashley, if YOU are reading this you may, but please don’t share pics with Joshua!

Please

scroll

down

Yes, I am

trying to keep

the photo

below the screen line!

It’s worth scrolling….

Yes, I am trying to get the photo below the screen line LOL!  In a small miracle, I have made some headway on Joshua’s quilt!  He graduated and got his GED in late Spring.  I started on it in late winter and hoped to have the top done by graduation.  Then I got the chance to make my video workshop (here) and was delayed.  Then I had hoped to have all of Autumn to work on it–but offers of articles and two bloghops to promote the now-out DVD intervened.  But I did get the diamonds made.  Yesterday I FINALLY got to put them up on the design wall, and I AM HAPPY!   If Joshua doesn’t like it (I’m sure he will), I’d love to sleep under this.

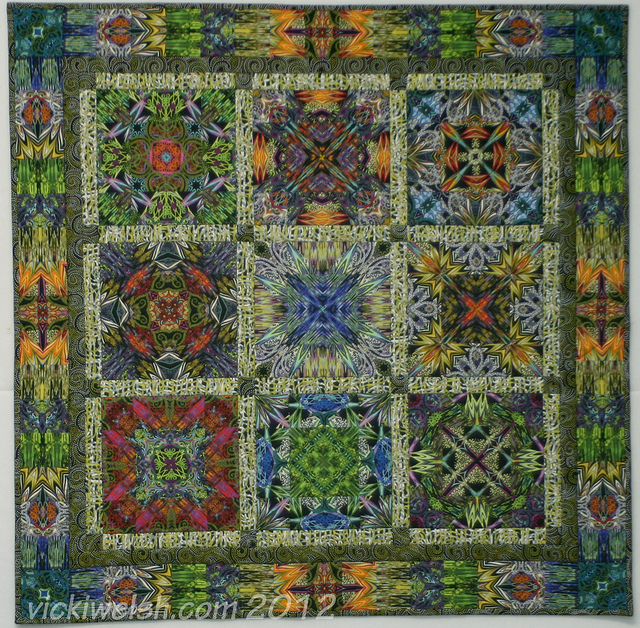
Clearly the quilt was inspired by Kaffe Fassett’s quilts.  I actually prefer the Philip Jacobs and Martha Negley prints to Kaffe’s, but had a lovely stash.  There was one print in particular that Joshua liked, so there are ten diamonds in that one, plus I plan to do a pieced “quilt modern-ish” back so the quilt will be two sided.  I think the quilt will be about 87 x 95 when done.  Yesterday I got the pieces up on the design wall (and partly on the floor):

Inspired by Kaffe Fassett's diamonds quilts.  I used the diamond template I had, then cut strips to make 1 inch (finished) sashing/borders for each diamond.  There are not two pairings the same in the entire quilt.  Doesn't the color just make you happy?  Now to get it pieced without messing up the order!

Inspired by Kaffe Fassett’s diamonds quilts. I used the diamond template I had, then cut strips to make 1 inch (finished) sashing/borders for each diamond. There are not two pairings the same in the entire quilt. Doesn’t the color just make you happy? Now to get it pieced without messing up the order!

As I was stitching the edges onto the diamonds, I started popping them up on the wall.  What a muddle!  Wasn’t happy.  So I tried grouping them by center color (large prints) and, when that wasn’t so great, by border color (smaller scale designs/prints).  That worked much better, so I chose a simple rainbow flow:  reds to orange-ish/yellow to green to blues.  When I got to the bottom of the number of rows I needed, I had lots of blues, so used them to fill in the triangles on the tope and sides and really like how the darker strips help contain the quilt.  I’ll use a dark-ish blue for a simple binding.

Now I need to upload a few photos to a transfer site in the cloud for my next article for Machine Quilting Unlimited!  WOOT!


Bloghop-Giveaway with Vicki Welsh

Tuesday, September 24th, 2013

Today, I’d like to introduce you to Vicki Welsh (blog) and thank her for participating in my bloghop and giveaway to celebrate the release of my video workshop, Art Quilt Design From Photo to Threadwork (available for pre-order here or as a download and pre-order here).  Please pop over to Vicki’s blog and leave a comment there to be entered in Vicki’s part of the giveaway!

DVDAQDesignPhotoThrdwrk125 copyAlthough I’m mostly about art quilts, from time to time I’ve blogged about the fact that I love ALL Quilts and Quilting—traditional, contemporary, modern, art, you name it!   Like me, Vicki crosses the lines but in a very different way:  she is all about dyeing fabric and surface design, worked into more traditionally piece quilts.

Vicki Welsh’s blog is aptly called “Field Trips in Fiber” and her Etsy shop of hand-dyes is a Visa Accident waiting to happen!  So much fun! Vicki’s quilts are clearly inspired by tradition, but they are definitely a contemporary take on the traditional.  One of her quilts that makes my heart go thumpity thump is Illuminated Blocks…all I can say is it’s a good thing I live far away because I could SO be tempted into a little larceny!

Illuminated Blocks by Vicki Welsh.  WOW...just WOW.  Her blogpost is here.

Illuminated Blocks by Vicki Welsh. WOW…just WOW. Her blogpost is here. Right click for a larger look!

This quilt, made from Paula Nadelstern’s printed fabrics, has me wondering:  what if you dyed fabric in mandalas and shibori style, using a coordinated palette of colors.   How would it look to piece an Ohio Star, as in this quilt (look carefully but also go visit her blogpost about it, link in caption), but using one’s own hand-dyed fabrics?

Two of Vicki’s recent tops are Grandmother’s Choice Shibori top (read more about it here):

Vicki Welsh's Grandmother's Choice quilt using her shibori and hand-dyed fabrics.  Her Etsy shop is here.

Vicki Welsh’s Grandmother’s Choice quilt using her shibori and hand-dyed fabrics. Her Etsy shop is here.

And another recent top fascinates me–I’m usually all about the color, but I love the muted tones and kaleidescope effect in this quilt top, her Grandmother’s Choice Symmetry:

Vicki Welsh's Grandmother's Choice Symmetry quilt top.  Read more about it here.

Vicki Welsh’s Grandmother’s Choice Symmetry quilt top. Read more about it here.

I love the play of patterns, the secondary designs.   I feel a traditional phase coming on thanks to her inspiration!
Thank you, Vicki, for being a part of my bloghop!   Here’s to meeting you in PERSON one of these days!  In the meantime, we can all go visit her on the web.

Another Free-Motion class sample

Tuesday, December 14th, 2010

detail from the most recent free motion sampler--should be clickable for a larger view in most browsers

In my previous post, I shared The Ginormous Quilt (I may have to actually NAME it that!) inspired by Jenny Bowker’s quilt sampler and my variation on her theme.   I was able to see Jenny at Quilt Festival in Houston, have supper with her and Aussie friend Lisa Walton (of the gorgeous hand-dyed fabrics, here), and Jenny invited me up to her class one morning before the class began to see her other samples.  I thought I should try a few variations on the theme myself but, unlike Jenny’s samples in Houston, introduce some curves into the process.  Here’s my original variation on Jenny’s idea:

And here is the most recent one–and yes, *I* actually *pieced* that!  What’s become of me?

Free-motion sampler, before washing

Since I have the Ginormous thing, I wanted to test out various battings before spending a bundle to have it basted on a longarm.  The good news is that wool batting does not alter the whiteness of the sashing enough to be noticed, so if I want to I can use a wool or wool-blend batting. In this sample, I used Hobbs Heirloom Wool, which is quite puffy.  To use a Pamela Allen (if you’re not familiar with her work, click on her name to visit her website and prepare to spend a good long while being inspired!)  word, I like the “puffosity” of it.  The bad news is that you need to baste MORE with wool batting than with cotton or  you get some slippage and bubbling.  Ahem.  Basting is NOT my strong suit!

Since the Ginormous Quilt is to be a used bed quilt, with cats sleeping on top of it and getting it seriously hairy, I need something that will wash up nicely and easily without fuss.  So I tossed the sample into the washer and dryer with the regular washing.  As you might gather, I’m not a fusspot about some things.  This is what it looked like straight out of the dryer….gulp!

After machine washing and drying, wool batting (shrinkage expected!)

I took it upstairs, misted it with water and pulled it out a tad—here are back and front before ironing:

After machine wash and drying. Misted with water and pulled out a little.

Back view, after washing, drying, and a light mist of water prior to ironing

After ironing, it is much better and an inch smaller than before washing/drying:

After washing, drying, misting and ironing. Notice the ripply straight grain bindings. This is why I ALWAYS make bias! This was as a sample of why I don't like straight grain....

I REALLY dislike straight grain bindings, but given how little of the fabric I had left, I decided to do a straight grain binding.  This sampler is a perfect example of why:  ripples.  UGH.  The teaching part of this section of the quilt is “why I don’t do it this way”.  Ahem.

The bottom line:  despite the apparently horrible crumpliness of the quilt straight out of the dryer, I think this soft, light, drapeable wool batting (Hobbs) could work.  I would simply tumble dry to “damp” instead of “dry”, then let it air dry the rest of the way.  Of course, there is the question of whether or not it would fit in a home dryer! My sample was just under 18 inches before quilting.  It was, after squaring up after quilting, 17 inches with binding.  After washing, it is 16 x 16  inches.  This shrinkage was expected and planned for in constructing the top, which I made oversized so that when hubby and the cats hog the covers I will still have enough quilt  left.  Smile!

I have at least one other wool batting sample, by Pellon, and plan on also making a comparable size  with the Quilters Dream Wool and another with their cotton batting, which is one of my favorite cottons.  All samples will be machine washed and dried…I am absolutely NOT going to fussy-wash a quilt that is nine square yards huge! When I get them all done (probably in about a year…sigh…) I’ll share the final comparisons.

The GINORMOUS quilt top

Friday, December 10th, 2010

OK...draped over the double-sized antique canopy bed...read on!

So, you might ask, does Sarah EVER make quilts any more?  Art quilts?  Bed quilts?  Lap Quilts?  ANYthing?  Some days it feels like the answer is no, there is so much life happening that I can barely manage to get myself dressed and stumble through a day!  But I have managed a few new class samples and a few other things.  A while back, I wrote about Jenny Bowker’s totally awesome idea (seen in her blogpost,  here) and my riff on the subject here and here.

Well, I had been collecting tropical colored big prints (Kaffe Fassett, Martha Negley, Phillip Jacobs and the other designers from the Westminster Fabrics crowd) for a possible project for a possible (in a couple years) new book.  Well, I had (still have) this totally cool idea, but decided it was probably too complicated for a simple book project and, honestly, was more piecing work that I wanted to do.  Then I made my sample a la Jenny, and had a brainstorm!  A QUILT made with bright squares and simple sashing.  PRESTO–fabrics re-directed to new project.  So I got out my graph paper and charted out sizes for a BIG new bed quilt for us!

I decided to use squares of the tropical prints cut 8 1/2 inches, which meant I could get four pieces plus some leftover from a fat quarter (usually about 18 x 22 inches or thereabouts) of fabric.  A sashing that finished at 3 inches would look good.

Blocks cut, order set out on wall, vertical sashing on first six rows...

I was VERY careful cutting, and used my AccuFeed foot on my new Janome Horizon 7700.  I even went to the extent of cutting the strips on the non-stretchy lengthwise grain of the fabric because I wanted this to be perfect.  Drat!  It wasn’t!  The white pieces, on the bottom, were coming out 1/8″ too short, and I KNOW (and triple checked) they were cut to the same length.  Luckily, I am on this great Yahoo group for 7700 owners and another one for 6500/6600/7700 owners (a lot of us on the first list are also on the second one, which was the mother list).  Someone (and boy do I wish I could remember who so I can say THANK YOU) mentioned the button on the right of the machine and some instructions in the manual (yes, I had read it, but just didn’t remember this part!).  If your fabric isn’t coming out even, you can turn the knob to fine-tune the dual feed!  PRESTO! Problem piecing solved.  I told the little red guy with forked tail and spear on my shoulder making rude noises at me to go away, that it wasn’t MY piecing at all…I just needed to learn how to be smarter than and adjust my machine!

Here’s what it looked like as I was chain piecing lots of blocks and strips:

Adding the horizontal sashing(Notice the lovely “Lemon Grass” Fiesta Ware mug amidst all those lovely prints!)

Here’s the quilt top a bit farther along,

Then I measured.  SHRIEK!  adjust border plans to smaller!  Eliminate the white what *was* going to go all around the center blocks and go straight to the pieced (from leftover bits) border of all colorful prints!  Here it is as I am ironing…. under the top is an ironing board with a 60″ wide Big Board PLUS a 39″ (one metre) wide table….and it drapes over the ends!

Aren’t those colors awesome??????

Trying to get a picture of the enormity of this thing was beyond a do-it-yourself photo shoot, so you’ll have to put up with me!  The finished top is 107″ square!

It's too big to fit...this shot, before all the borders are on, shows only 6 1/2 of the 9 color squares going across and up...so it's about 2/3 of the quilt!

That would lead to some questions:

Q1:  Is Sarah sane?   Answer:  obviously not

Q2:  How do you plan to baste this?  Answer:  I don’t; bless Doris and Debbie at Quilt Divas (great quilt shop in Rockland, Maine), they will baste it for me with water soluble thread on their longarm.  I don’t care what it costs.  I am NOT basting it.  Answer, part 2:  re Q1, perhaps she’s not as far gone as we thought

Q3:  What about the quilting?  Answer:  Yes, I plan to do it, but NOT for a while.  And at least the worst part, the basting, will be done by checking account!  Also, my big treat once we get moved in late January and next year’s teaching is done, is to buy myself an HQ sitdown model for working on very large projects.  I think a quilt 3 yards by 3 yards square qualifies.  Answer to Q3, part 2: ummm…OK, Sarah is clearly certifiable; either that or she has no life

Q4:  What quilting design will you use?  Answer:  I’ll do something similar to the sample I did  up in the links posted above.  When I shared an in  progress picture with a friend, she was concerned that the white is TOO bright.  I agree, it is!  But once it is quilted the starkness will be toned down and I think it will be a lovely summer quilt.

Q5:  Is Sarah insane?  Answer:  Ayuh!

Blue Batik, continued…..

Tuesday, November 9th, 2010

This blogpost continues my work on a quilt inspired by Kathy Schmidt’s Cell Block Blues pattern from her bestselling Rule-Breaking Quilts book.  (Check here for my book review.) At first I thought all my blocks (and I had no idea how many I would make or how large this quilt might be) would have bright hand-dyeds (all made by me!) as the stems and veins.  As the quilt took shape, though, I decided a bit of subtle would be a good think and make a good transition to the outer edges of the quilt which, in my mind, would be the remaining squares and rectangles from the original ten fat quarters of batik.

Another set of blocks, adding some blues to the bright mix

At this point, the design wall was getting crowded, so I removed the other “stuff” so I could spread out my blocks into what might become the final quilt.  It is fairly unusual for me not to have a final image inside my head before I begin, so I was enjoying working this way for a change.  It definitely won’t become my “new favorite” way, but I sure had fun with this one.  You’ll notice in the photo above that there are blobs of white-white fabric and dark-dark, and it got tricky getting the direction of the stems correct and preventing same-fabric from touching the same-fabric in another block! In this case, contrast is good.

The quilt grew and grew; finally, I decided I had enough blocks.

By this point, I had as many blocks as I thought I needed.  My design wall is 6 feet wide at the widest point, and I had just about reached that size, which I decided was plenty large.  As the blocks went up, I scattered the colors and the direction of the blocks as if they were swirling upwards in an autumn gust.  The bright colors are clustered in the center with the blue-vein blocks on the edges.  Now it was time to fill in the pieces.  To my dismay, I didn’t take in-process photos until after the whole thing was sewn together.

Filling it in to become a rectangle

The top is now about 40×60 inches.  This is what is left of the initial ten fat quarters, with a 6×12 inch ruler for scale:

what's left out of 2 1/2 yards of fabric (ten fat quarters)

Not much!   Seven of the ten original fabrics are pictured here.  The rest is totally used!  The white one on the right and the dark blue on the left were purchased for value-range (i.e. light-light and dark-dark) and were essential, but they really grab your eye almost too much so I stuck to the medium-dark to medium to medium-light fabrics for most of the work.

When I went to the Batiks by Design website it appeared some of the fabrics I used were sold out, so I called the store and thankfully they still had some of them, so my outer border and binding will not have to feature prints not used in the center.  I’m so glad they were willing to custom cut some pieces for me to match what I already had. Here’s to good quilty service…thanks ladies!  I’m planning on a narrow inner border of the bright colors all the way around the top shown above (probably a finished 3/8 or 1/2″ wide multicolored strip), with a wider (3-5 inches?) of squares and rectangles of the blues, with a slightly darker blue batik for the binding.  What do you think?  Suggestions?  I’m thinking maybe some of those larger rectangles on the outer edge need to get sliced up with some of the medium-value pieces set into them.  Maybe with some angles? Let me know what you think!