Earlier in the year I shared that Michael Miller Fabrics is doing a Block of the Month called Peek Into Batiks. It all began here. That post has links to each month as the new block goes live. Well, June is my turn! I’ve got still photos and (gasp) a video! And, drum roll here is the link to the JUNE Pattern and instructions.
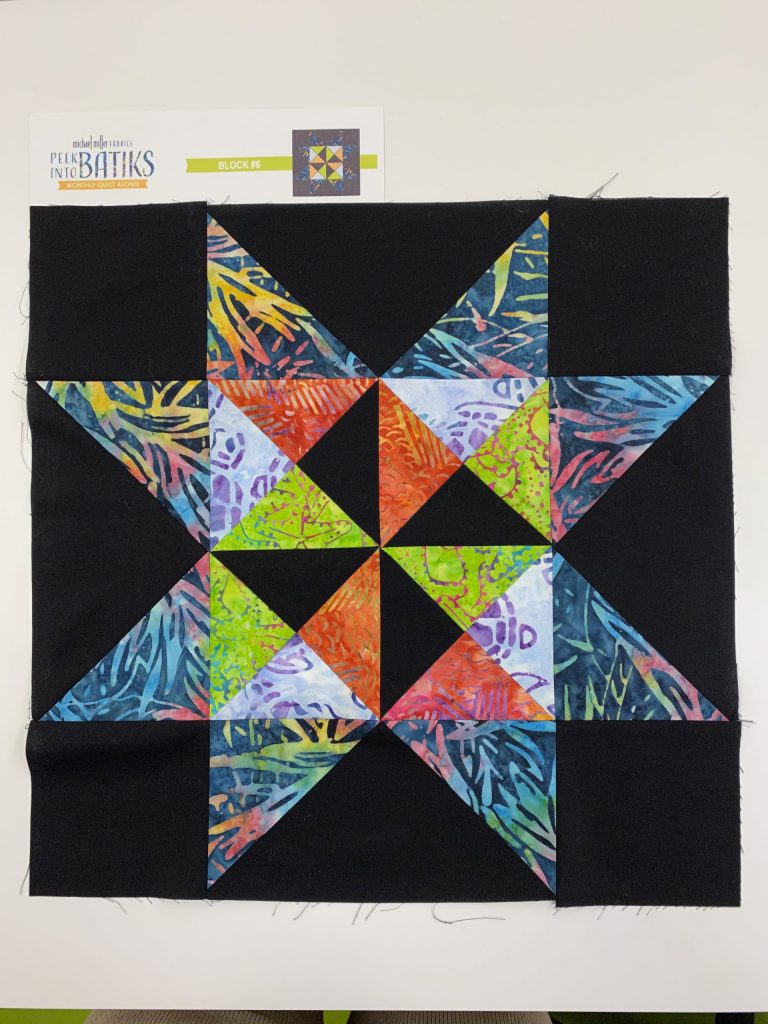
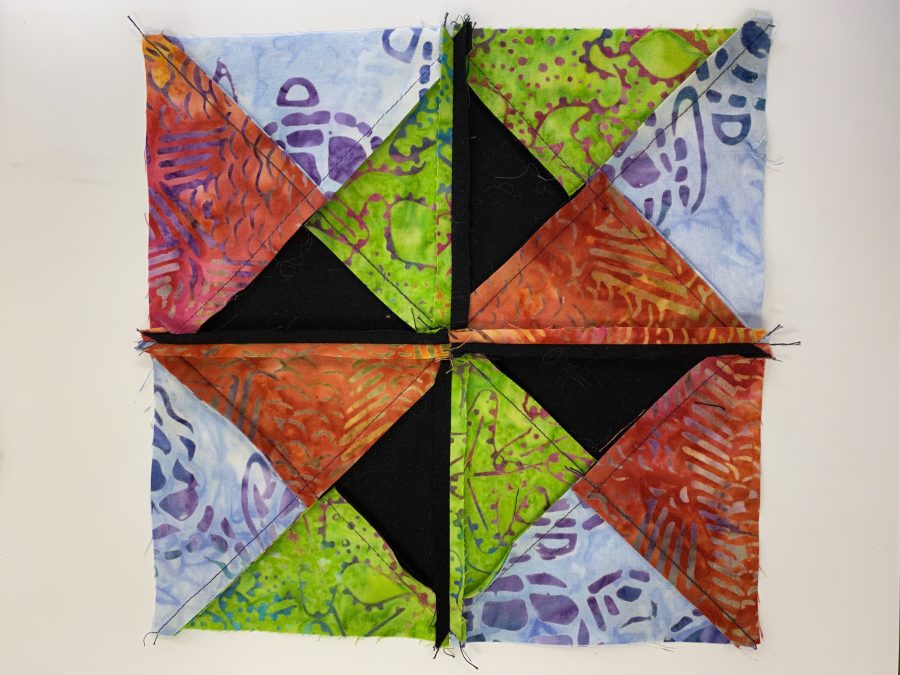
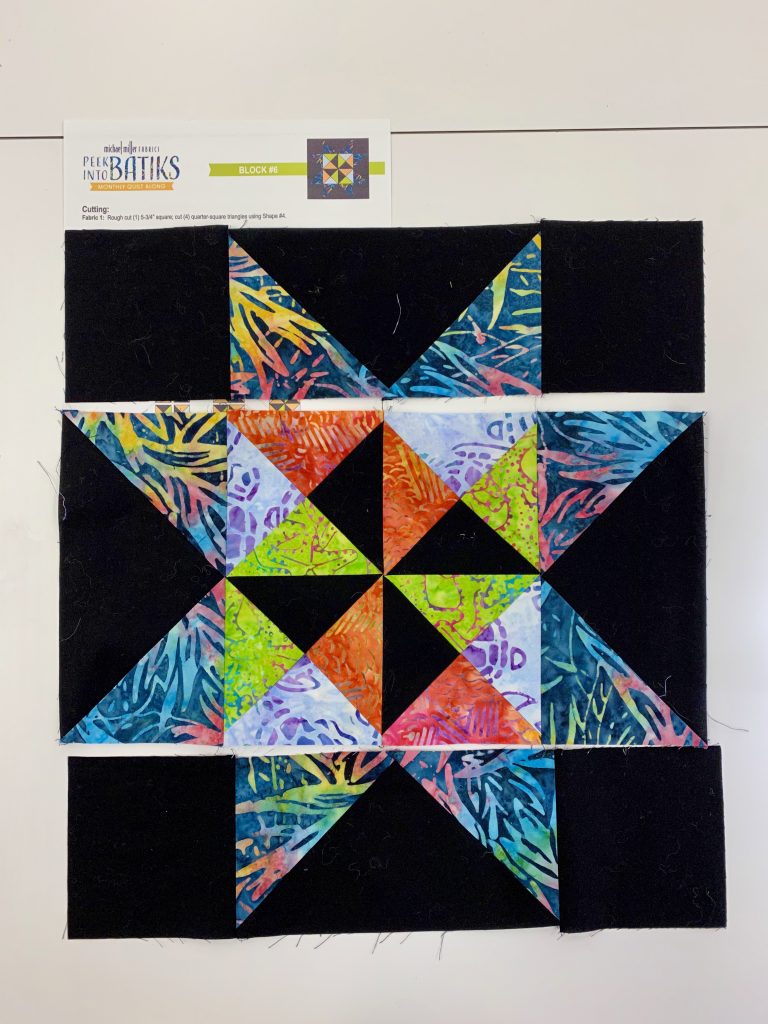
Here’s the finished block! Read on for step by step instructions.
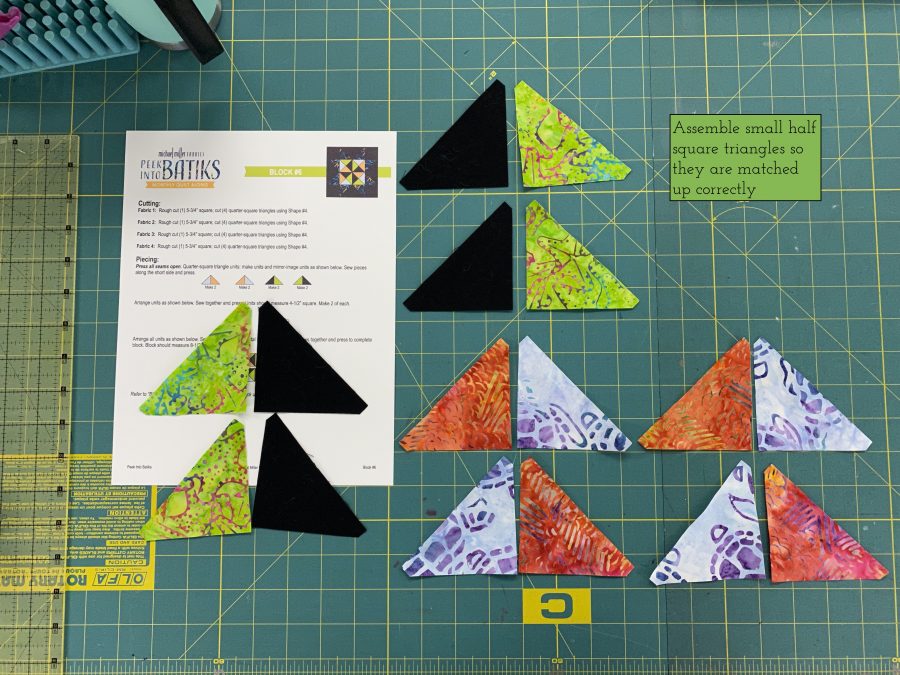
First, of course, you need to cut your fabrics. I used a hybrid method using the AccuQuiltGo! for everything except the large black triangles on the border. First, let me show you how fast it went cutting the components on my AccuQuiltGO! in this video. The video isn’t perfect–I’m improving in my editing skills. I need to mark what is within camera view though! Next video will be even better…I’m learning! When I was playing, it stopped a couple times so just click play again to continue–keep an eye on where the progress bar is. Dunno what’s up with that…another learning curve LOL!
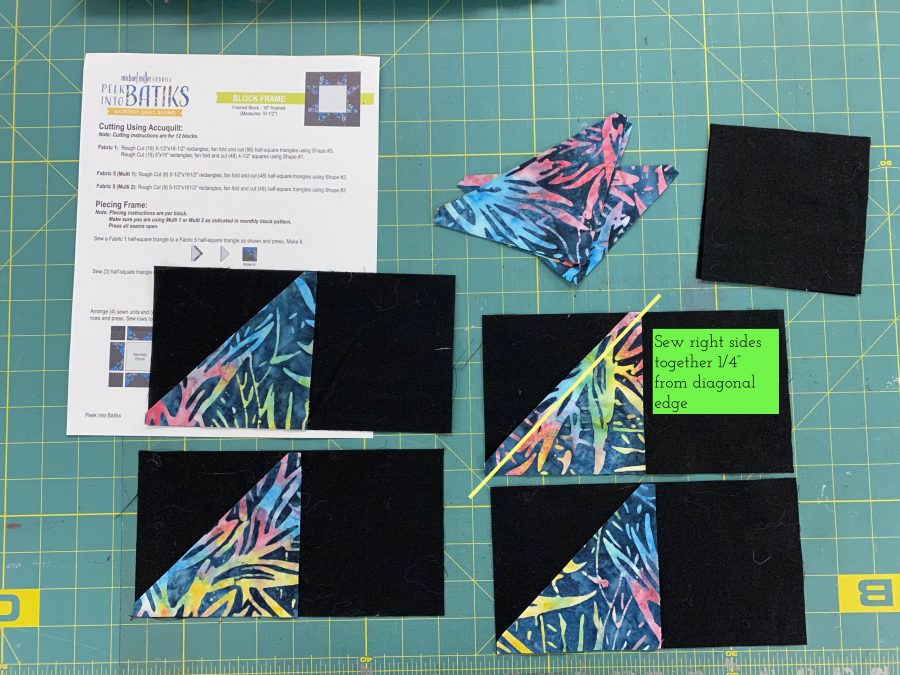
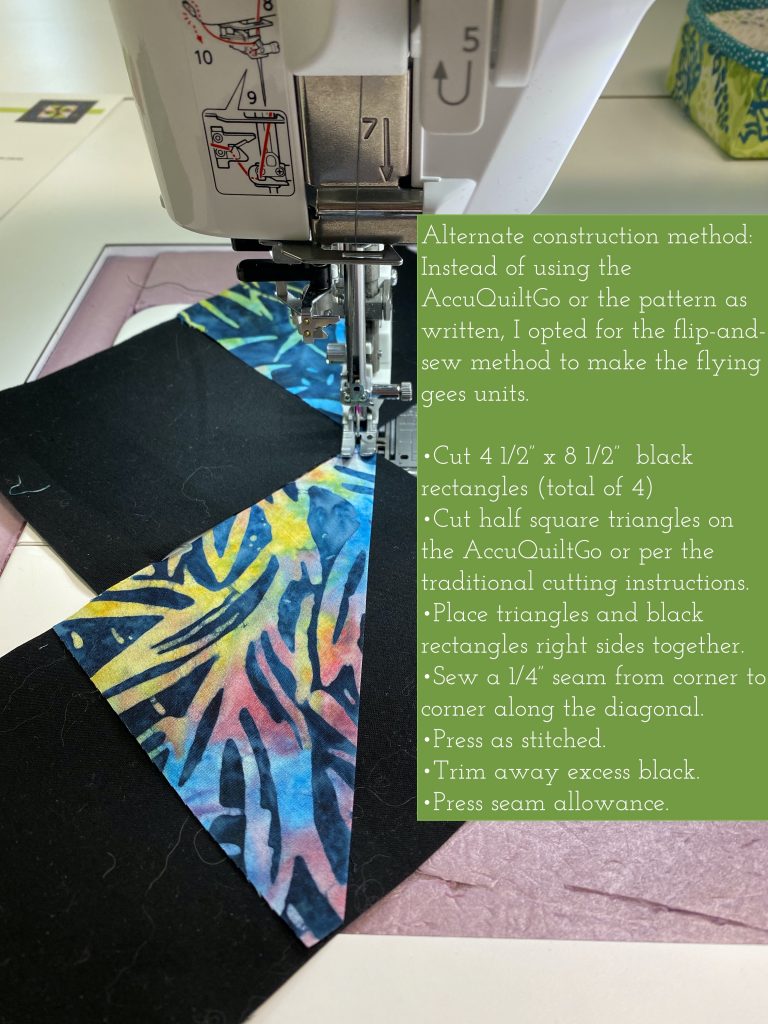
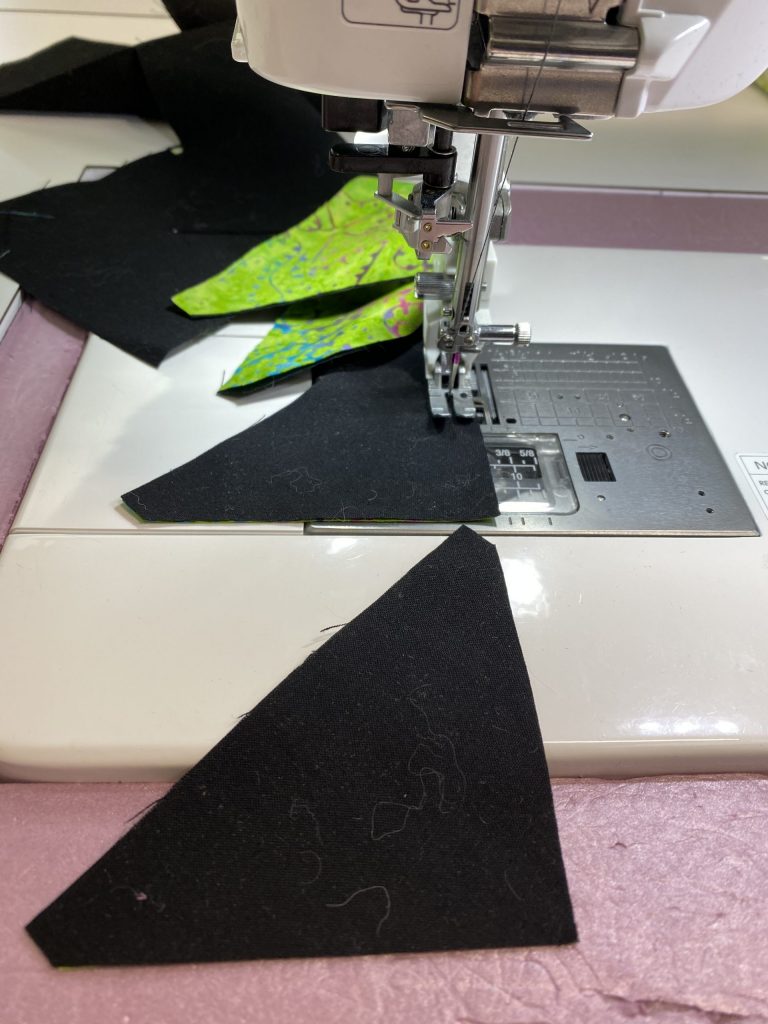
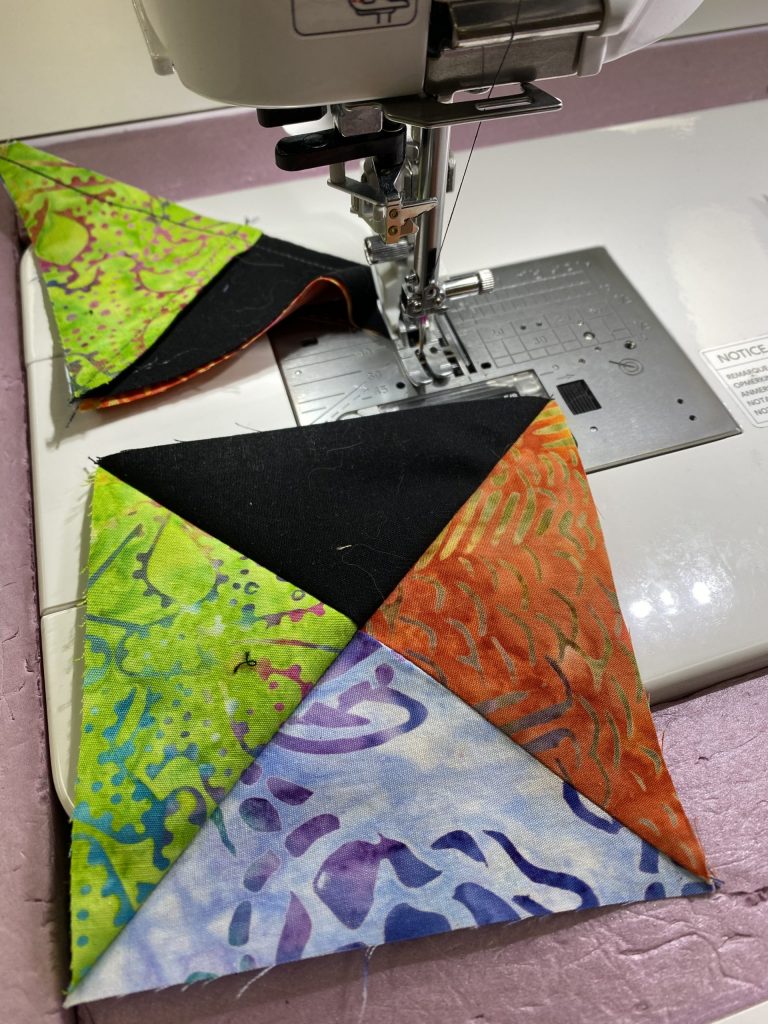
Wasn’t that amazing? Wait until you see the Winding Ways quilt I have in progress for later this year! For now, let’s stick to Peek Into Batiks! This step is where I veer from the instructions (of course, it’s me… who follows instructions EVER completely? Not me…) In the interest of fewer seams, I chose to use the flip-and-sew method for the Flying Geese Units.
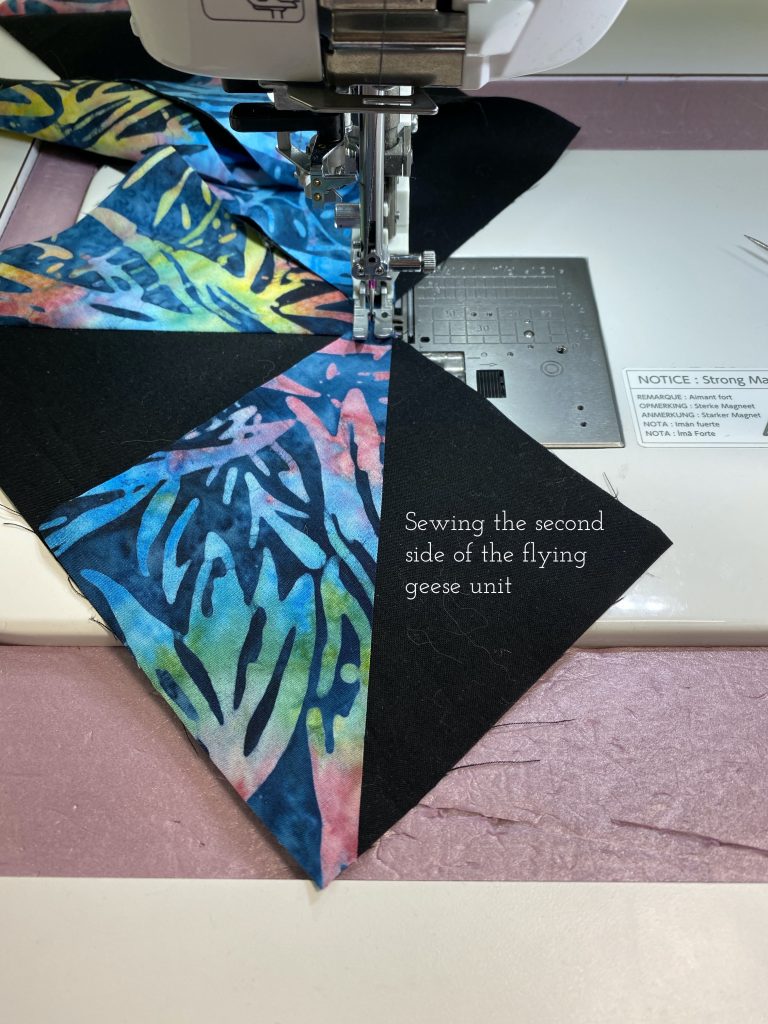
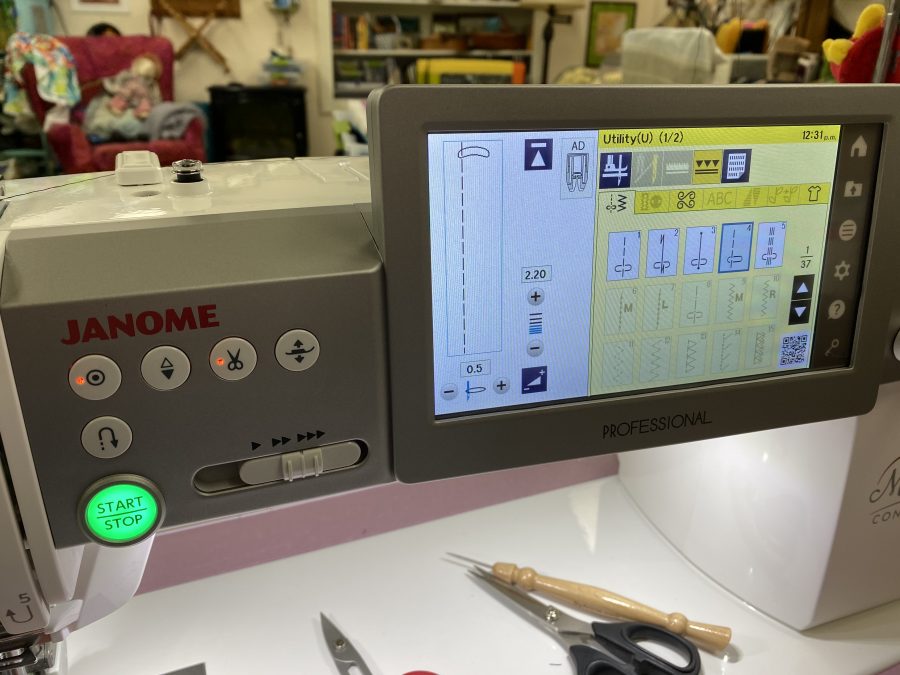
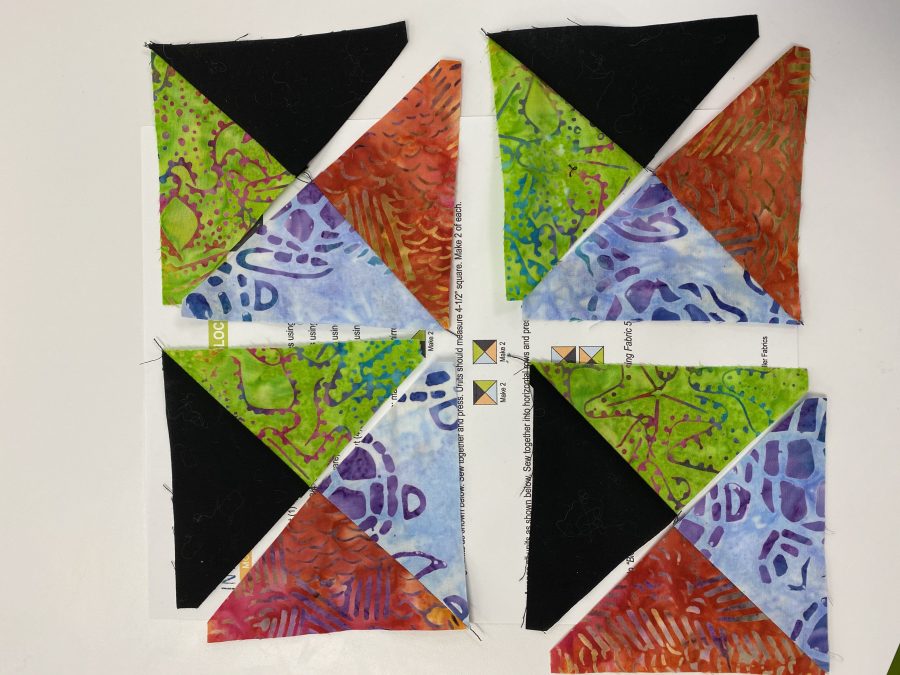
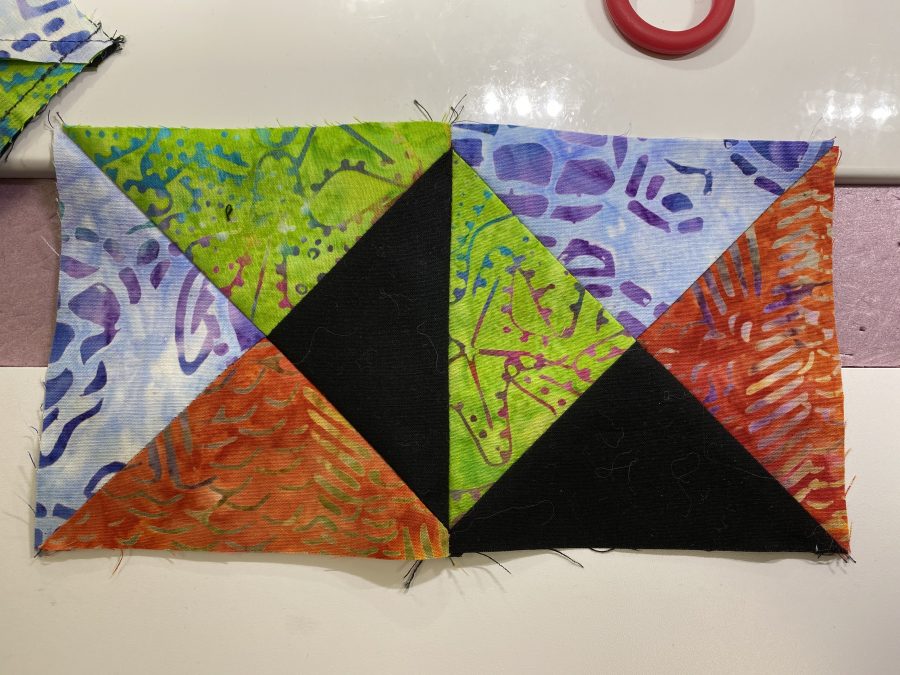
I’ve set out the large rectangles and half square triangles to make the frame for the block.Then I chain pieced the first side of the large Flying Geese.For the second side of the Flying Geese, same process, just make sure you get the triangles doing in the correct direction. Sew, trim, press.And the actual sewing bit…In the interest of not ripping out seams, it really helps to lay these out so you have theirs organized correctly.Next up, piecing the quarter-squares for the center. First, sew two triangles together. The Janome M7 Continental lets me piece SO accurately. Between the M7 and AccuQuilt, even *I* can be precise! I paired up the two-triangle units to make sure I didn’t mix them up while sewing.Then, sewing the pairs together. Using the M7’s HP foot and throat plate meant PERFECT piecing. See next pic!And two of the quarter-squares sewn together. I can’t believe I pieced that perfectly!Here’s the back of the block. Notice that some seams are pressed to one side, but the main seams joining the four squares are pressed open. This helped keep everything nice and tidy and perfect on the front.Once the center unit was ready, I set up the “frame” for the block.I sewed the sections together in three rows. Notice the only imperfection is down where *I* used rotary cutting…sigh……..Here’s the finished block again!
Remember, go here or HERE for all the links to the six blocks so far and to check in for the rest of the year. The finished quilt is beautiful!
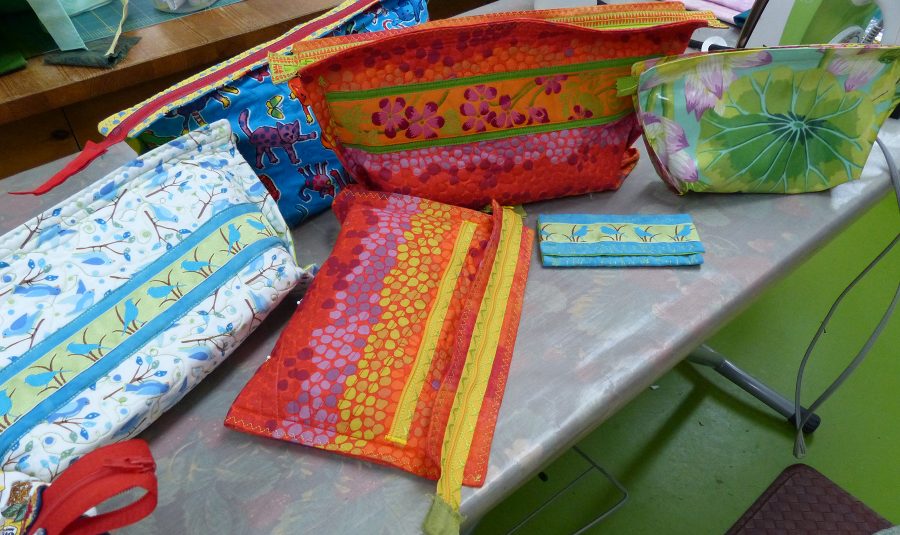
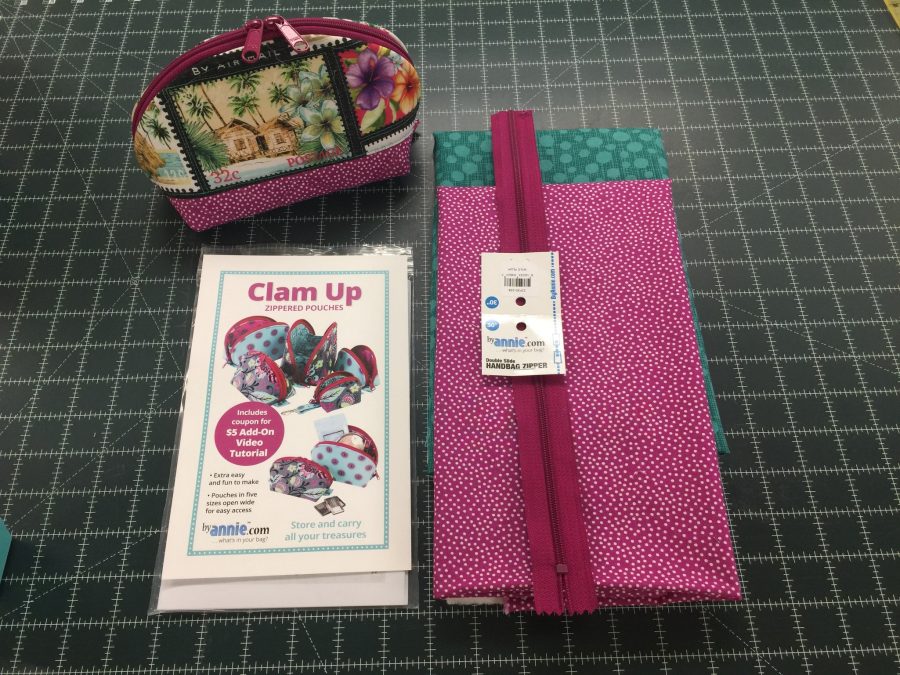
In my last post I shared the Clam Up bag from byAnnie.com, and earlier I shared my AWESOME Running With Scissors bag made for her patterns. I love bags and baskets and boxes and things to organize. One of my favorite classes to teach is my Easy-Peasy Inside-Out Bag, which makes a great 3 hours quickie class for a bag (or two if you are fast) or full day class where you can learn more details and extras. I decided to try Annie’s Soft ‘n Stable stabilizer instead of batting to see how it would work in MY bags, which are quick quick quick and FUN! (Like potato chips, you can’t make just one!)
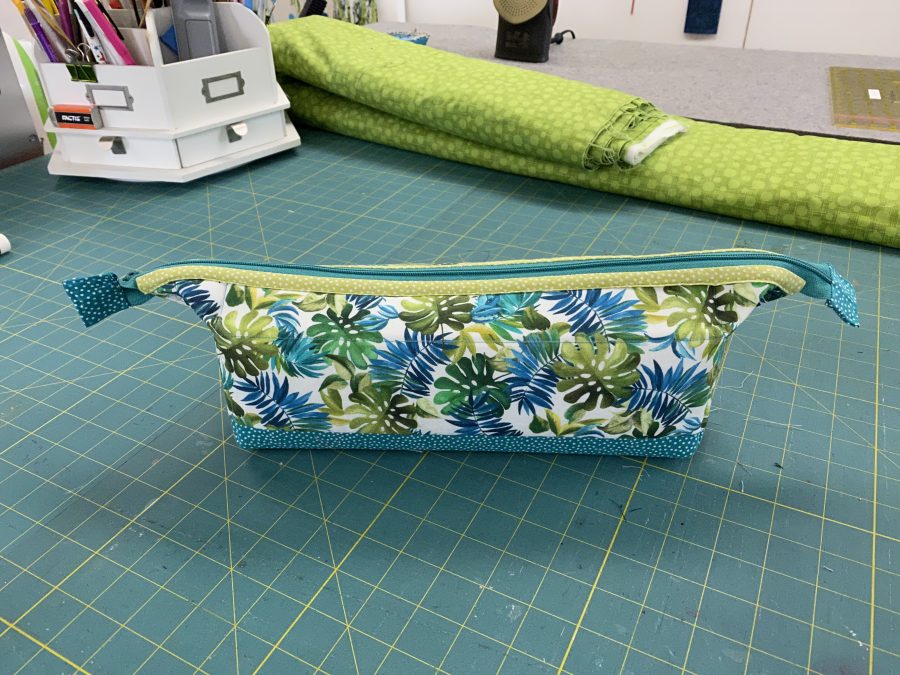
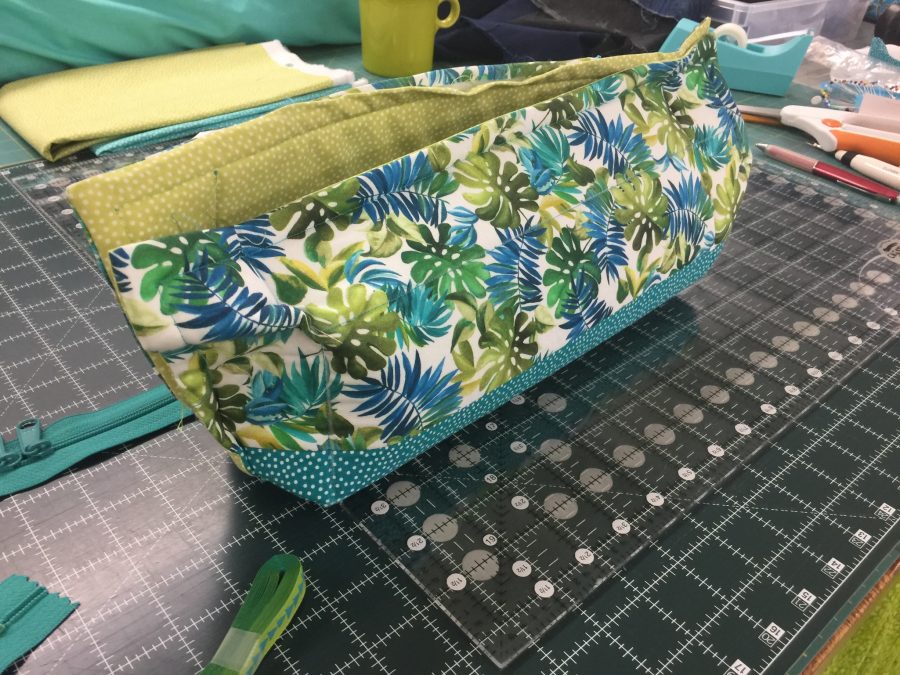
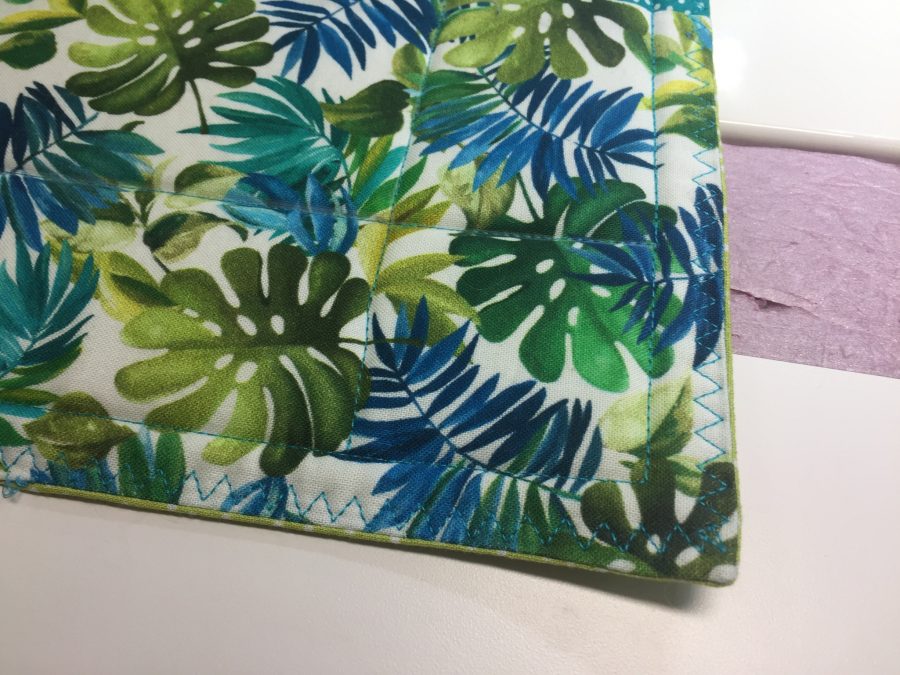
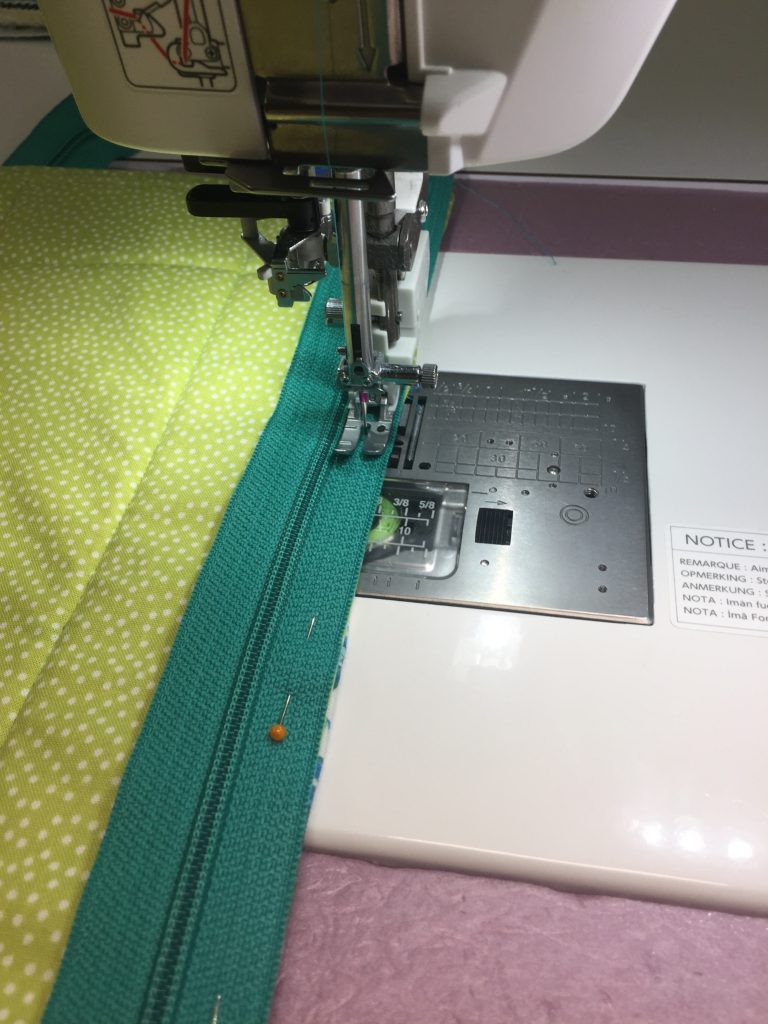
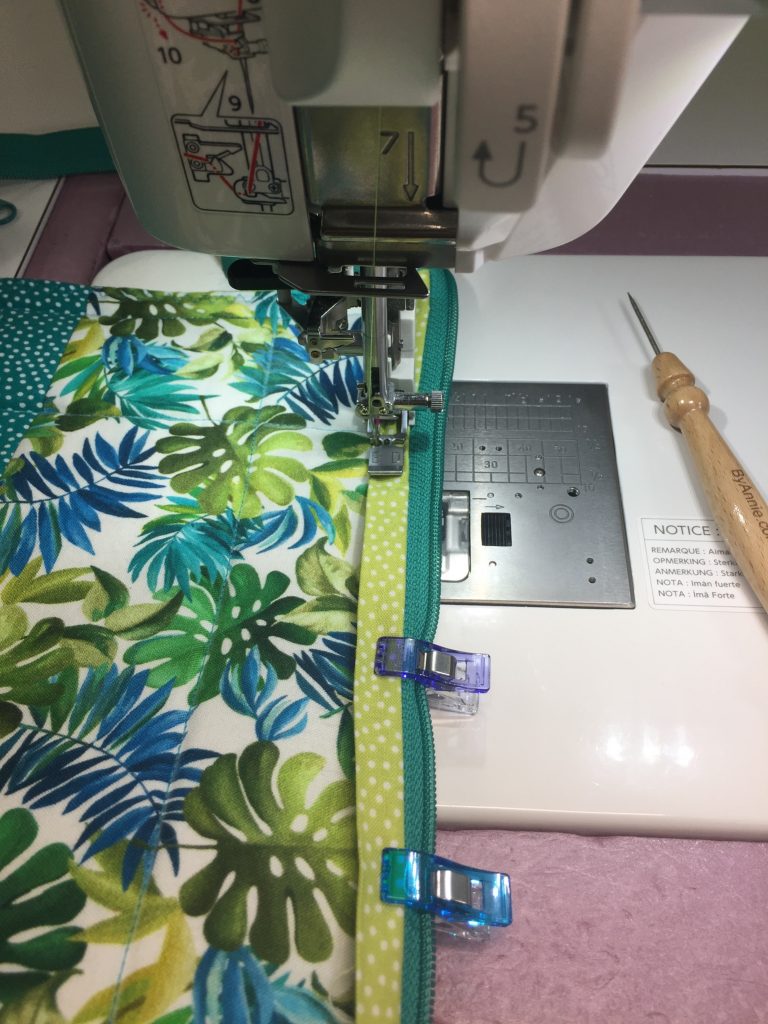
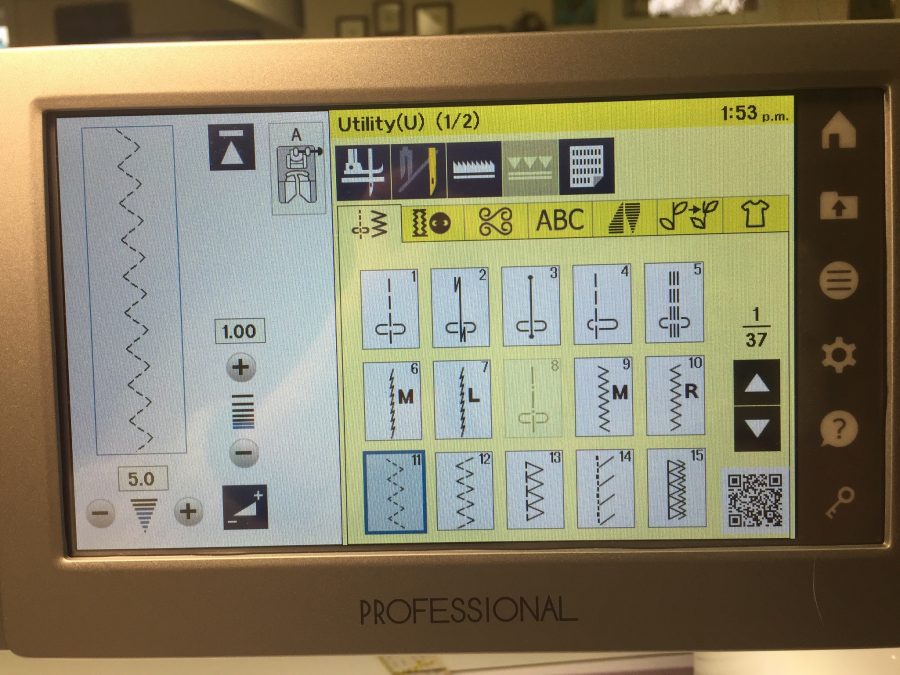
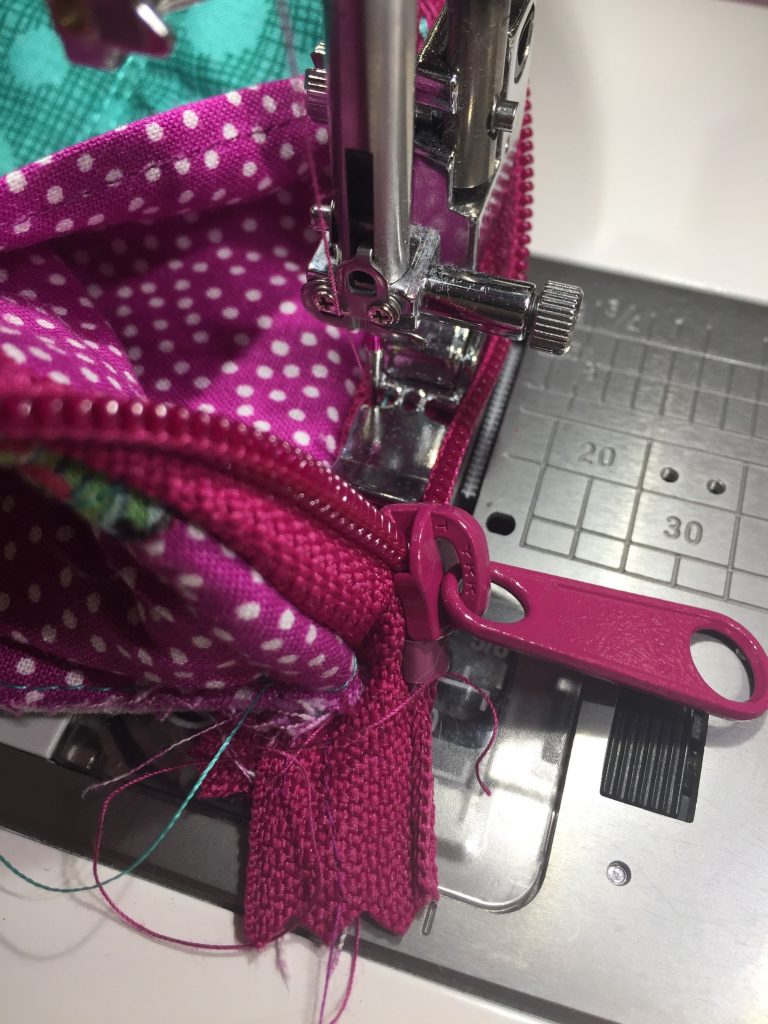
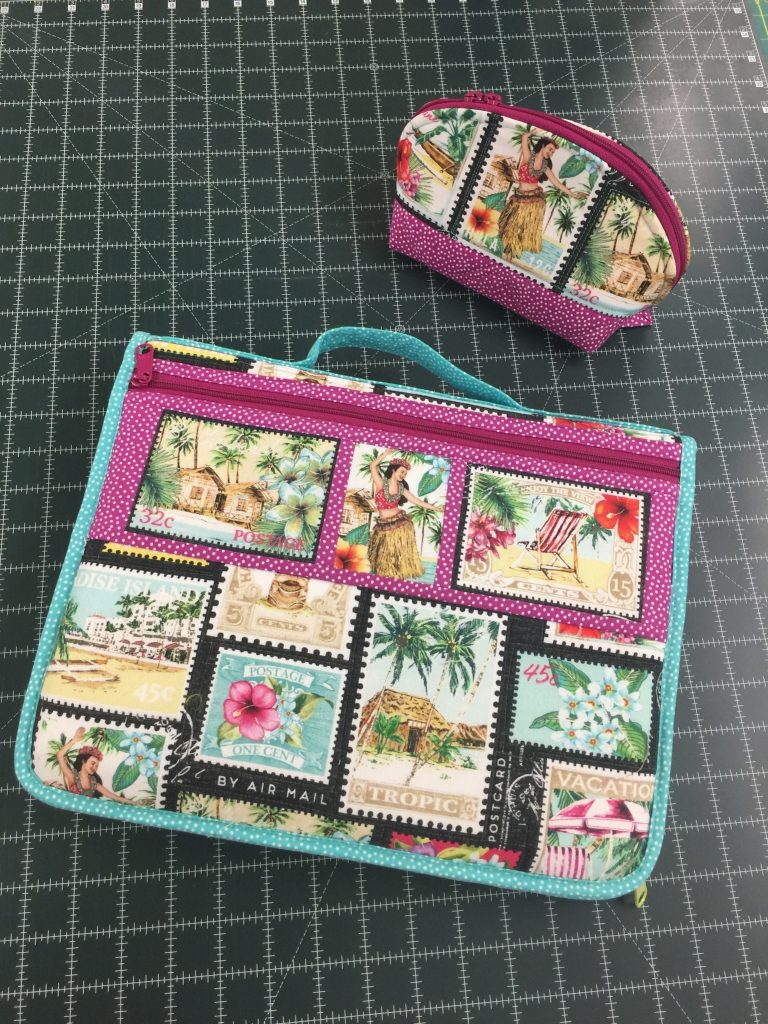
Here it is: the Easy Peasy process using Soft ‘n Stable and accenting the zipper with “binding” the way Annie Unrein teaches in her patterns at byAnnie.com The fabric used is courtesy of Michael Miller Fabrics–the main fabric is from the Lost in Paradise collection (shipped May 2020) and the other fabrics are the Garden Pindot collection on the outside and the inside (and that’s Hash Dots on the backing of the quilt you see awaiting quilting on the back of the table). This is a sampling of the fun bags I teach inthe Easy-Peasy Inside-Out Class…. if you think you’d like me to teach this for your guild–including LIVE ONLINE workshops, leave me a comment! They are fast and fun and can be customized so many ways.This shows the Clam Up bag and my Easy-Peasy next to it. I made this bag long enough to hold my large Fiskars flat on the bottom. Frankly, it is large enough it could hold a small knitting project or paper piecing supplies! One thing I will do differently next time is FUSE the lining to the back side of the Soft ‘n Stable. I didn’t use the walking foot and it shows. Oh well…lesson learned!Before installing the zipper and sewing the seams, I pinned it together to check size and how I wanted to finish it. Most of my Easy Peasy bags leave the boxed corner triangles on the outside (see that photo above with the many colorful bags made with batting). Leaving the triangles outside acts to stabilize the bag and keep it upright. With the Soft ‘n Stable doing that job, I chose to tuck the “corners” inside for this bag.Next, before boxing the bag into shape, I used the 3-stitch zigzag to secure and tidy up the edges. The narrow accufeed foot on my Janome M7 makes it a breeze to sew zippers to a quilted, puffy base without distortion. Here I’m adding a decorative element to the zippers. Gotta love wonder clips!On my Janome M7, I the three-stitch zigzag looks like this, but it is available on all but the most basic machines as a standard utility stitch. The M7 allows me great flexibility in both stitch width and length–not all machines do!
My Easy-Peasy Inside-Out process is fun, fast, and infinitely adaptable. I’ll be making a new version of my notebook cover–I’ve also got an iPad case, a business card case, and a few other goodies up my sleeve. Maybe I’ll self-publish a book of patterns and variations on the theme…what do you think?
Next up, I’ll share a basket pattern that again modifies what I’ve learned from the byAnnie.com patterns! Stay tuned!
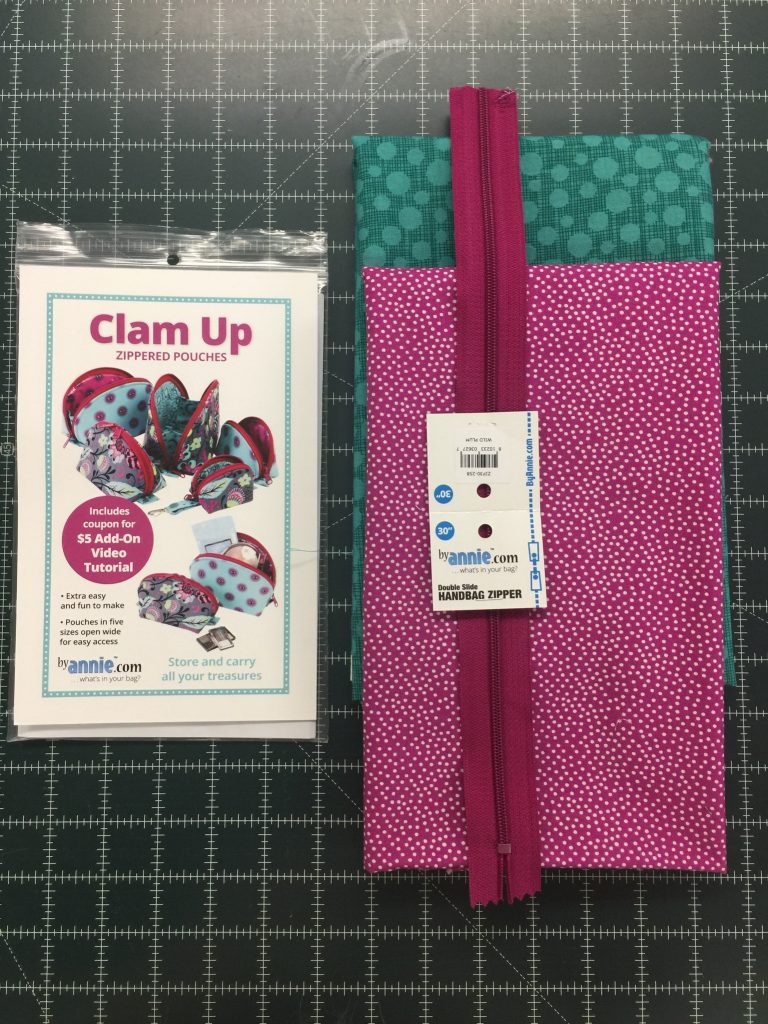
OK, that’s a bit punny…. I’ve used some of the fun Michael Miller Fabrics Lost in Paradise fabric to make a byAnnie.com pattern called Clam Up. Before COVID hit, I was thinking about my travel teaching, and I made the Running With Scissors tote and blogged about it, here. I wanted a companion bag for bulky stuff I needs to schlep with me. Both of these bags are good for use in your sewing space, retreats or a whole bunch of other things!
The Clam Up bag pattern allows you to select various sizes. I chose a Large to use for travel teaching. I used the Lost in Paradise print as well as the Garden Pindots (the magenta) and Hash Dot in an aqua color way. A quick google showed lots of the Lost in Paradise prints available on Etsy–the collection came out in May 2020.
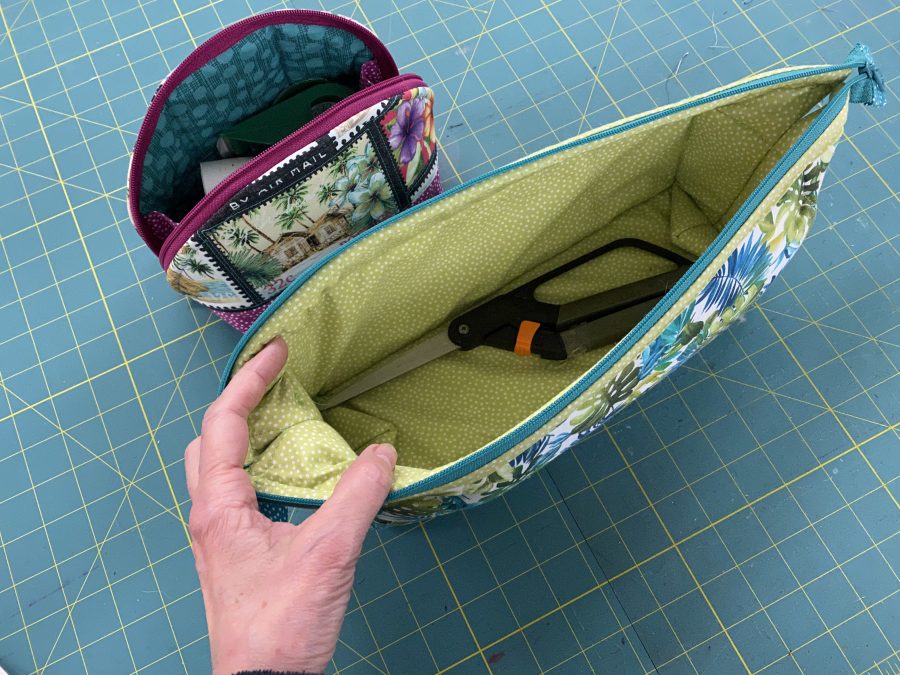
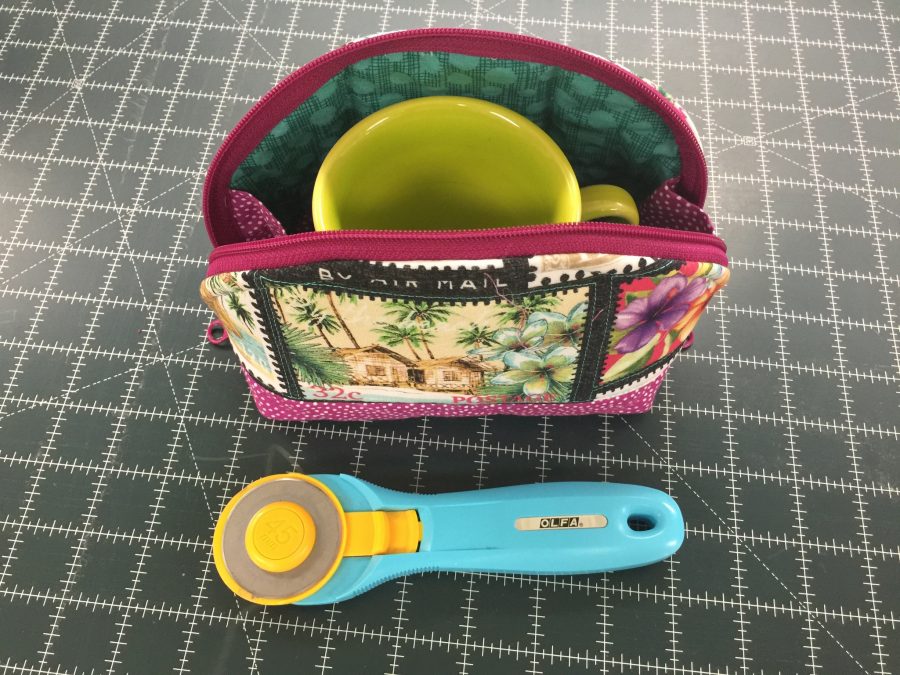
I really like bags that open up wide, where I don’t have to root around–I can just open ‘er up and SEE what I need to grab. The large was big enough to set my mug inside…at least unzipped.
The Large bag is large enough to fit a 45mm rotary cutter on the bottom (flat) and in this photo shows my MUG inside! The gussets on the side allow the bag to open up (like a clam, get it?!) wide so you can see what is in the bag, but prevents stuff from falling out.
Annie Unrein and her staff suggest quilting up your fabrics, using her Soft n Stable instead of batting. The Soft n Stable is a foam with a soft, grippy fabric on the outsides. I love that it stands up and holds it shape, the cotton doesn’t slip ‘n slide around, and doesn’t require a ton of quilting to look good in the finished project.
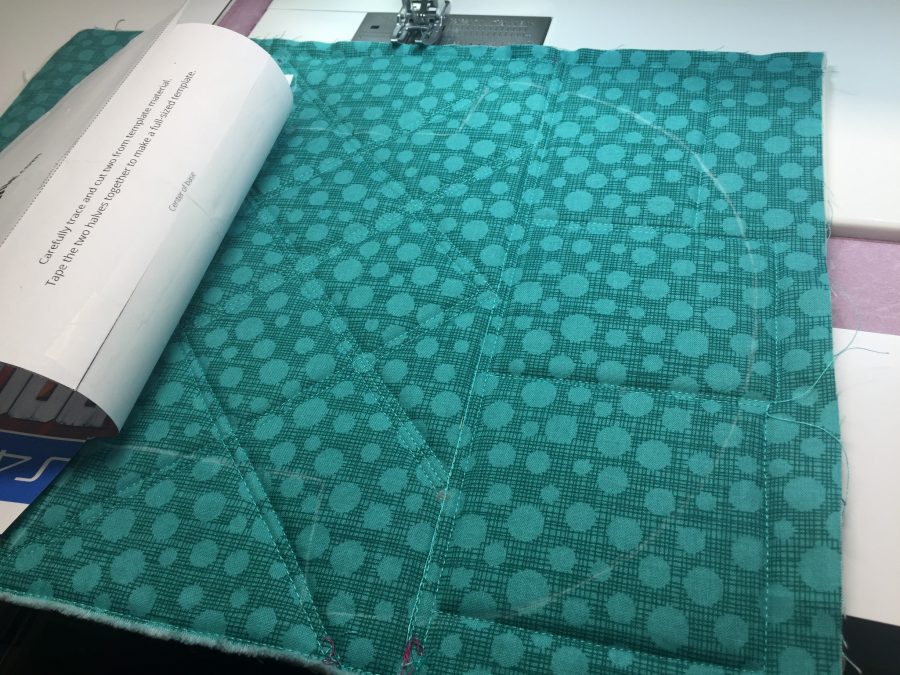
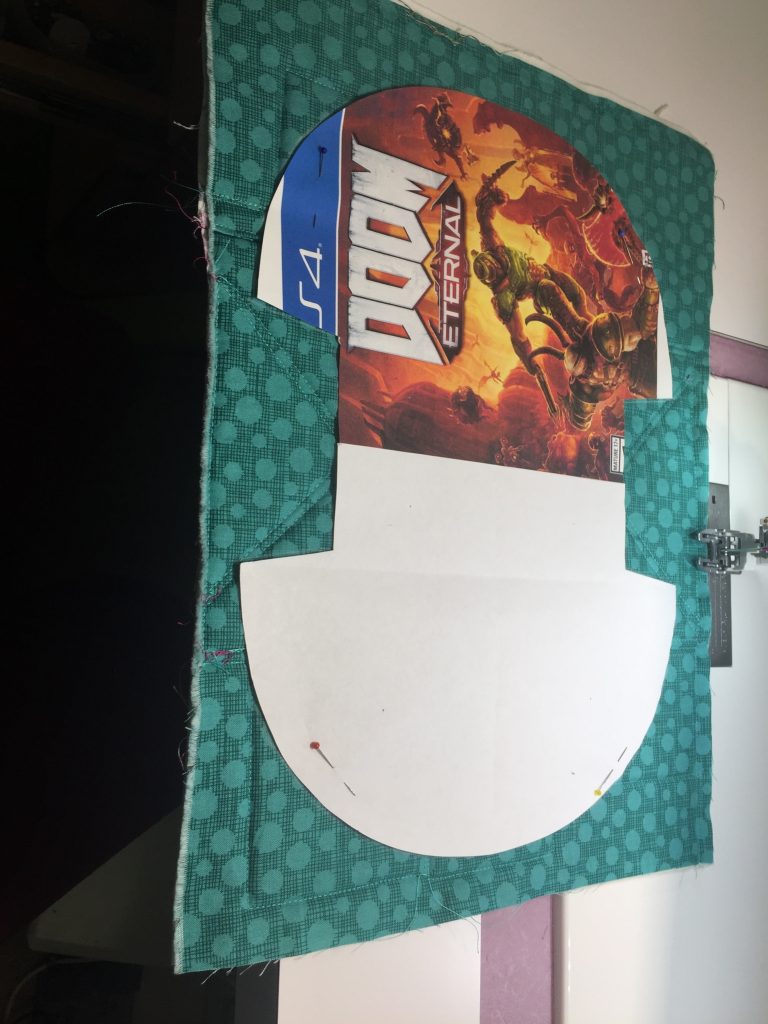
Here I have quilted the sandwich of inside and outside fabrics. I chose to piece the outside so it would have the magenta on the bottom, feature the print, and use a coordinating magenta/fuchsia bag zipper (wider zipper tape) from byAnnie. You can see I’ve used the walking foot for simple outlining for the feature fabric and a simple grid on the base.Here, I’ve used paper from the recycling bin to create a full-size pattern. Son had asked me to print the video game he was giving his brother as a gift…definitely not my game LOL! Now it is time to cut out the bag.Annie has some great tips about sewing zippers, and has started doing “add-on” videos to help teach you how to make her bags to perfection. I’ve been sewing 50 years and am pretty adept, and I’m picking up great tips. I am also developing a great fondness for the Garden Pindot (the magenta) and the Hash Dot fabrics…they are really great blenders. Have been adding to my stash!LOOK at all that can fit inside here: rotary cutter, roll of package tape (for when I need to ship a box home from a venue), and large spools of thread. I often let students borrow tools to try them out (sometimes I sell them, too, but always tell them to try mine out to see if they like the tool before purchasing it). Now I can set this bag out as a “ok for students to use stuff” and keep my things that I need at the teacher table to use in the Running with Scissors bag.Originally this was designed as a travel-teacher duo. Don’t know when I will be able to travel teach again, but these are great in the studio and for guild sewing days and retreats, too. And a whole lot of other things. Here’s the link to the blogpost again for the Running With Scissors bag. I have quite honestly kept that bag out as what now appears to be a permanent addition to my cutting workspace!And here’s a closer look at the pattern, the blender fabrics (always available from Michael Miller), and the zipper from byAnnie.com . I LOVE being able to get coordinated components from byAnnie–the mesh, elastic, zippers, all the colors match or coordinate for tons of fun! I must have about a dozen (or more) of her zippers and a stash of bag-making components now!
Next up: inspired by Annie’s construction techniques and materials, I made one of my Easy-Peasy-Inside-Out bags merging my process and her materials. Check back soon!
Note: for this post, the fabric, pattern and zipper are courtesy of Michael Miller Fabrics and byAnnie.com–THANK YOU! But I love the stuff so much I have spent a goodly chunk of my own hard-earned money buying more of the fabrics and notions.
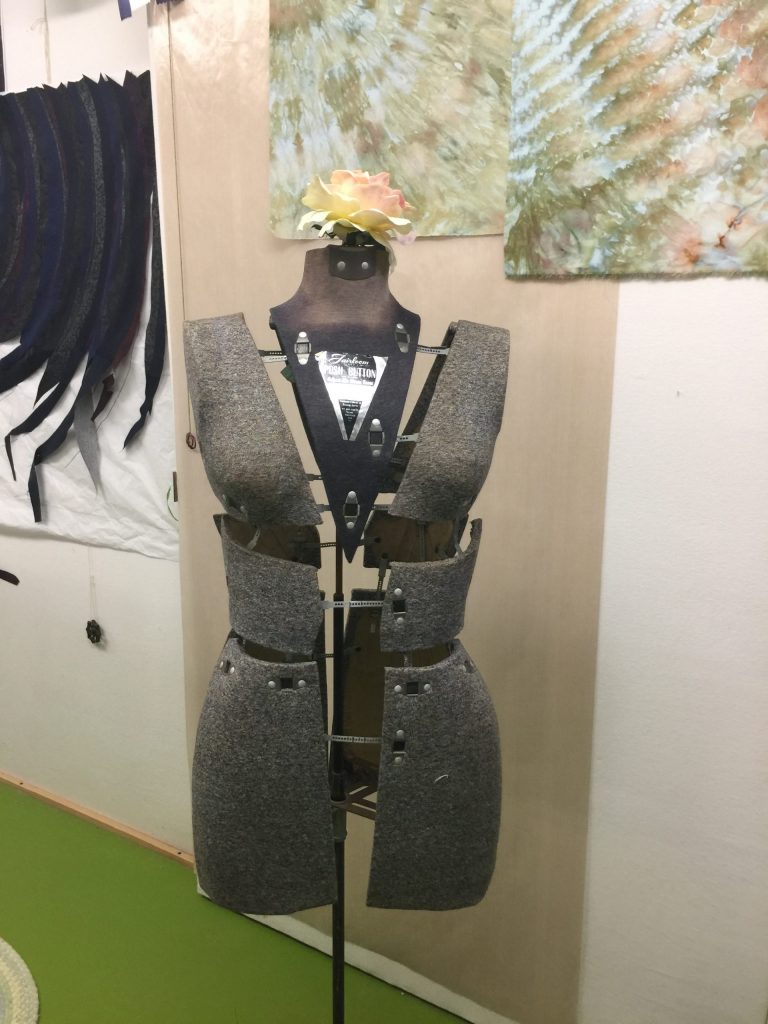
Two years ago I made my DIL Ashley a linen jacket for job interviews. It was a revelation! Working on another body (not mine) was SO EASY–I could see what needed fitting, figure out how to make changes, assess fit and lines. So I vowed to get a dress form. KaCHING! What I wanted was over $400! Nope. So I cast about for something less expensive. A local quilty friend had a friend with one to sell…done for $75. And it still mostly adjusted and wasn’t musty!
For your listening pleasure (you’ll need to read to the end to understand why), open this in a separate browser window.
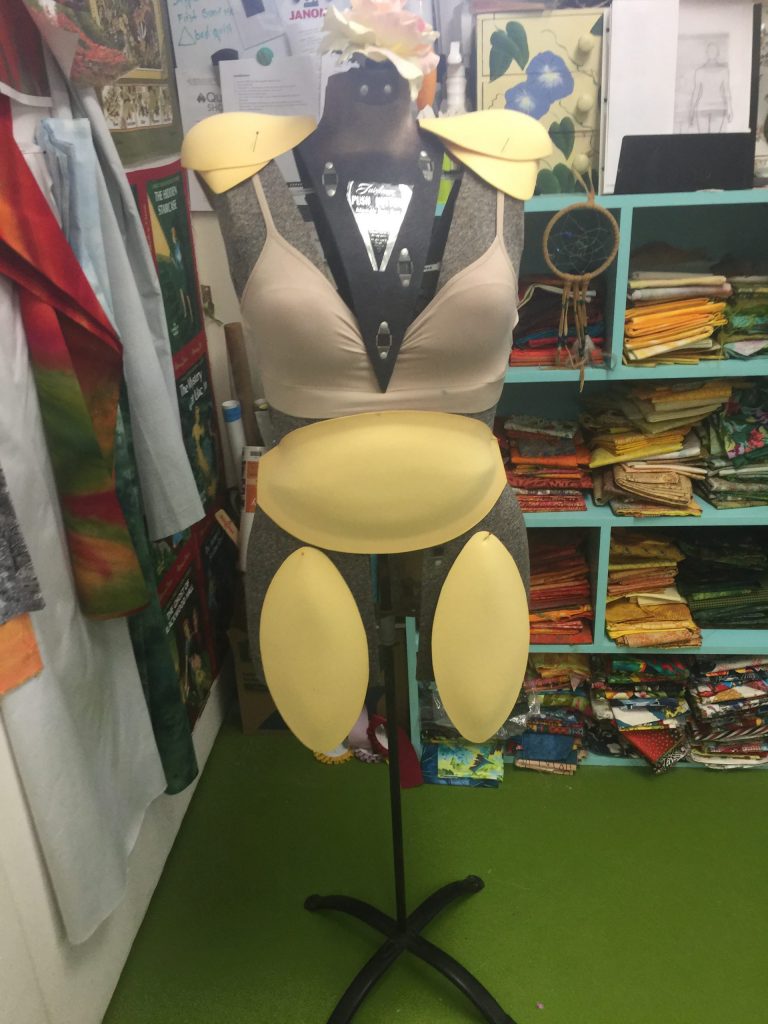
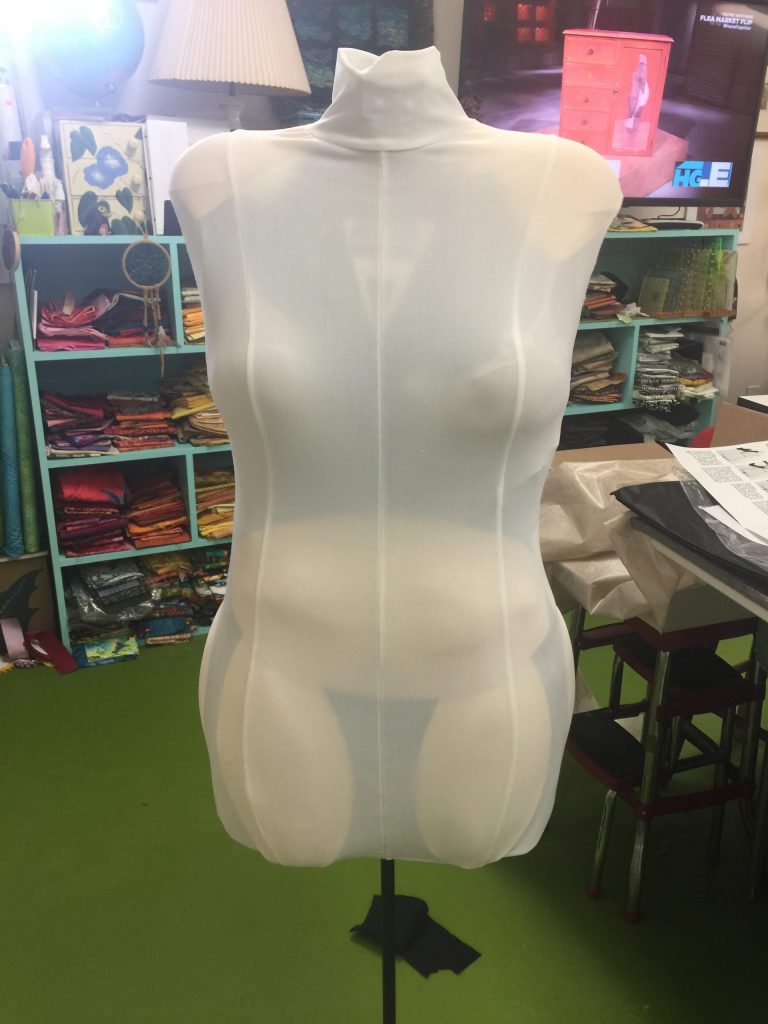
Front view: vintage dress form, not too rasty, sized out to replicate my measurements.
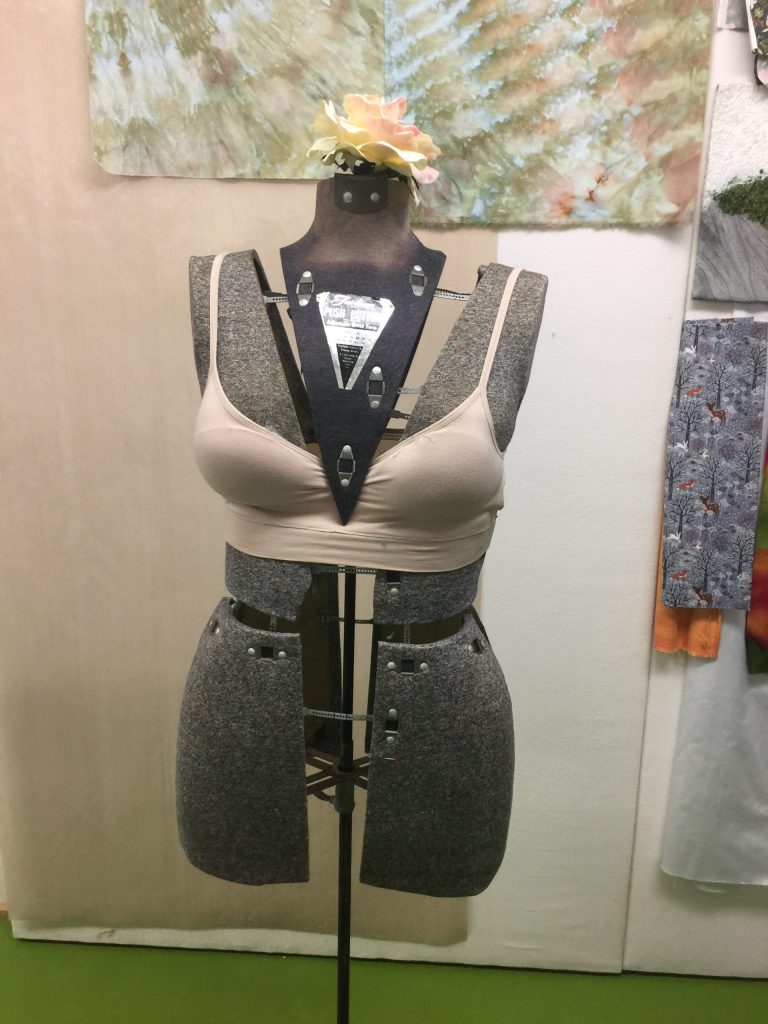
I began with taking my own measurements, adjusting the dress form to match, and then adding a bra to modify the shape of the bust to something resembling mine.First change: using an old bra to get the boobs into the right shape for me.
However, I discovered that the dress form and I were built on different molds. I honestly didn’t look as good as the dress form even though the measurements were correct. For starters, most dress forms start with a B-cup. The only time I was that large, I was nursing my sons! So I had to shrink in the torso to get a proper full bust measurement and shape, then pad out everything else to correct ribs, high bust, etc
But even that didn’t do it. Luckily I had long planned to get proper measurements done. Fiddlehead Artisan Supply (if you ever get to Belfast Maine, you MUST MUST MUST go there; quilt fabric, garment fabric, paint, art supplies of all sorts, crafting supplies….in other words, heaven!) has a classroom. Students can pay a VERY modest fee per hour for the teacher to come and help you. When I went, there was one student sewing and me getting measured. I figured I could try and explain to hubby what to do (but do I really want him to know my actual size? NO!) OR I could get someone who sews and would do it properly. Easy choice. The following is a chart I made to use at that session.
To prepare, I looked at patterns, sewing books and knitting books to figure out every conceivable measurement I might need, ever. And I put them into a chart. I have created this a PDF for you to use!
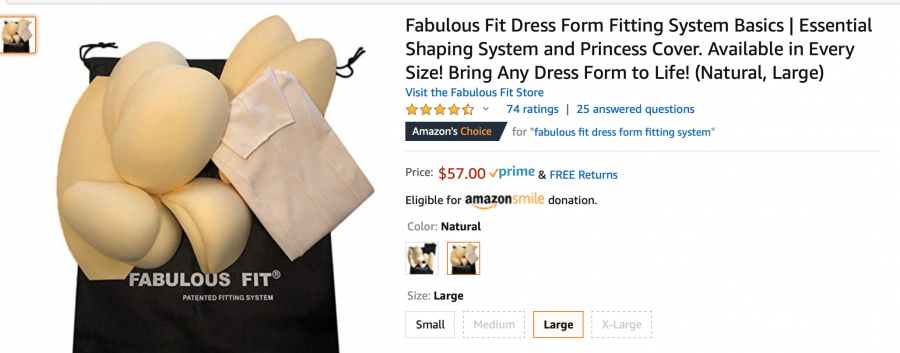
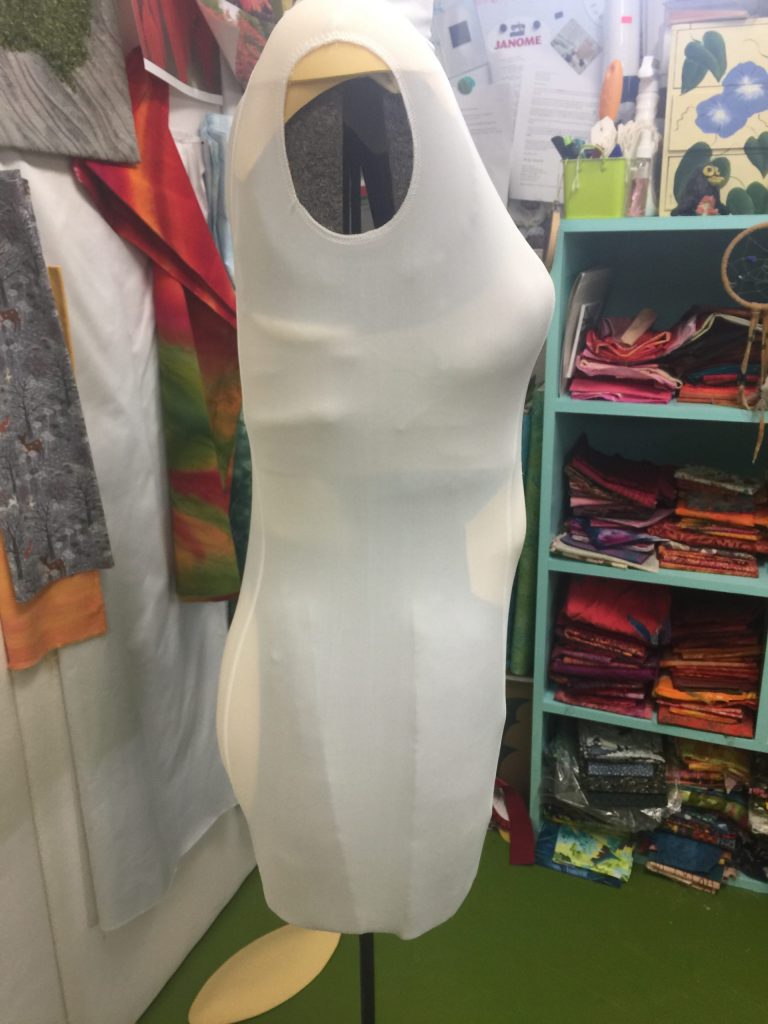
I tried using batting and whatnot, but decided to purchase this smaller set of Fabulous Fit Dress Form pads to make life easy AND give myself a surface that was more pinnable than the actual dress form which is a very dense molded paperboard covered in cloth. I didn’t understand why the slightly more expensive version of this set had TWO dress covers….I’ll explain below. Here they are on Amazon US.
Pads added, front
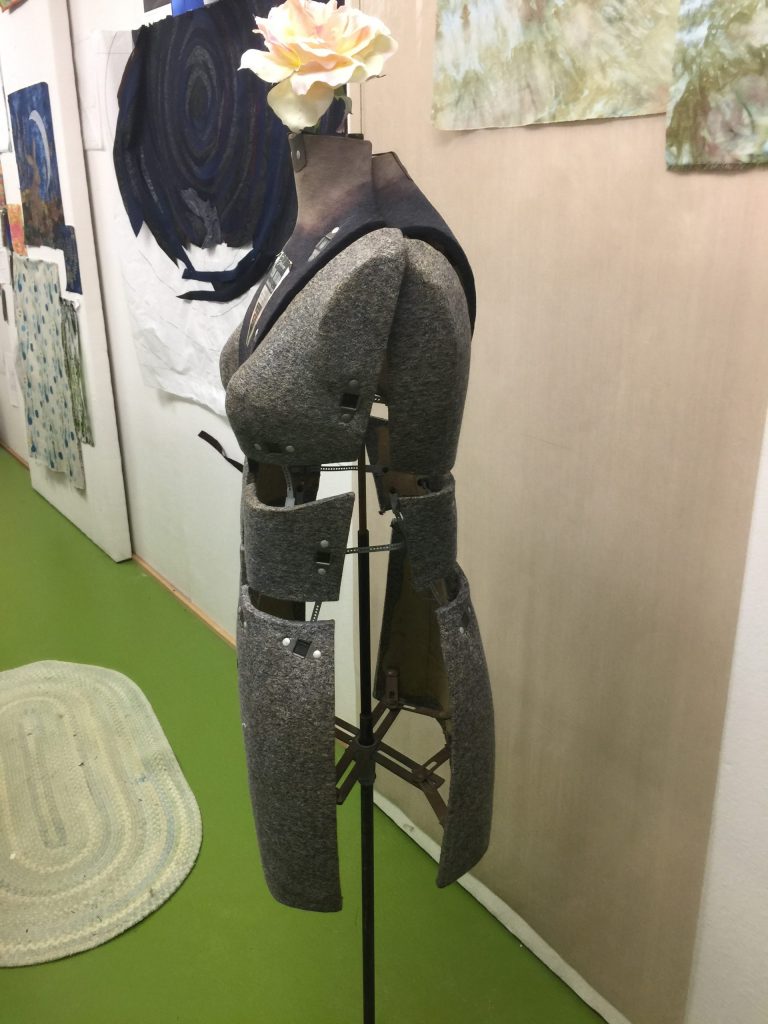
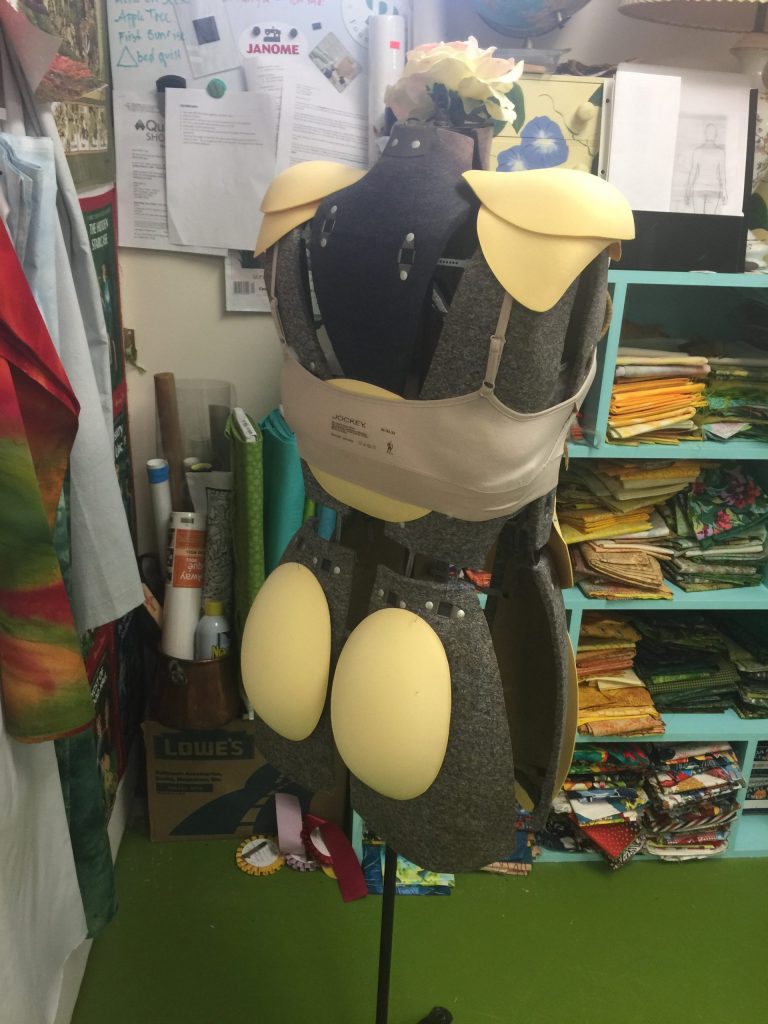
In having my measurements done, I discovered that not only were the bust shapes wrong for me, they were 2″ too close to the shoulders–I wasn’t that perky at even at 17! The fix for that (having surfed the internet to see how others modified dress forms) is to reduce the overall torso length until the apex of the breast is the right distance from the waist, then build up the shoulders. Revelation! Plus, that also meant I could make the shoulders wider and more square, like mine. However, there were still big gaps on the sides– hard to pin into those!
More pads added to the outer hip zone.
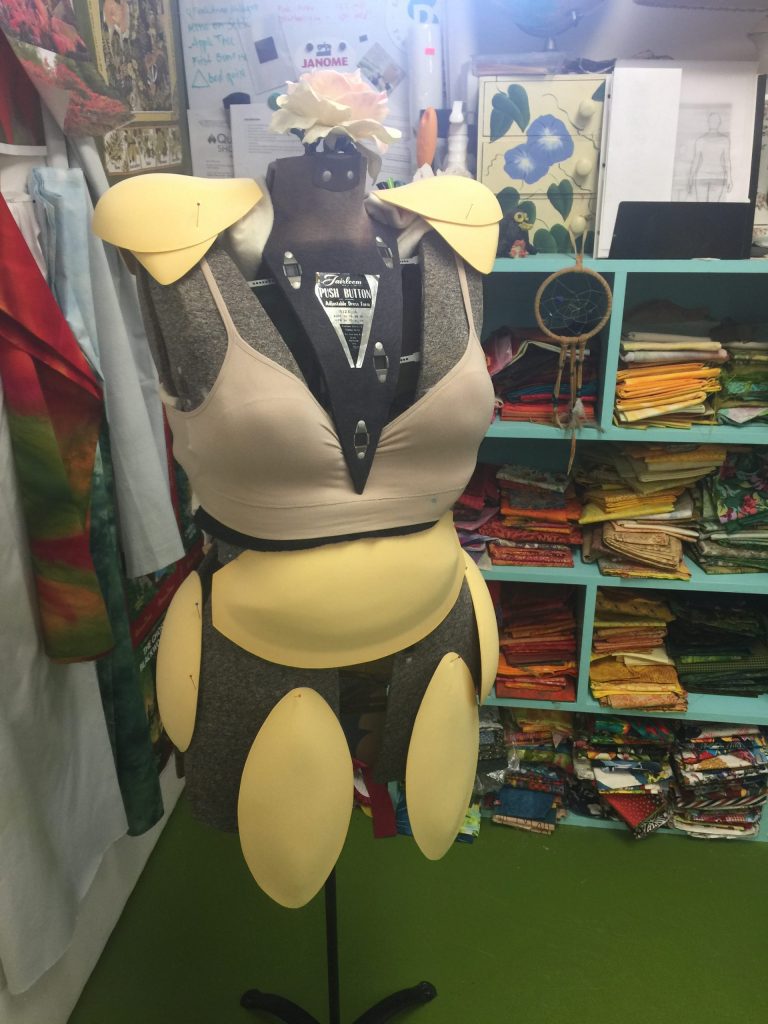
The second set of oval pads worked well to flesh out (hahahah) the hips. And because I needed the contract the torso to get the bust to work, I had to pad it back out to approximate my actual ribcage. If I ever get a modern dress form, I discovered there are “flat” dress forms for those with mastectomies or who are smaller than the industry standard patterns which are for B and C cups. Grump alert: Yet another blast from the fashion industry telling the smaller-busted amongst us that we are less than worthy (try finding an alluring bra in a small cup size–not!). Jerks. Anyway, at least I know that “flat” forms exist.
With the princess seam dress form cover added
This is pretty close to how I really look…definitely close enough to do fitting on a fitted garment and get it to work. The larger sized “kit” comes with two covers, and I couldn’t figure out why. Turns out you use the one with SIDE SEAMS as you “build” the pads–the lycra cover hold the pads in place and allows easy adjustments and fine tuning. Then you are supposed to put the princess seam cover on top of that for opacity. Having the seams, which you can feel under the fashion fabric, is a good thing. Next time I’ll purchase both covers so I can feel the side seams as well
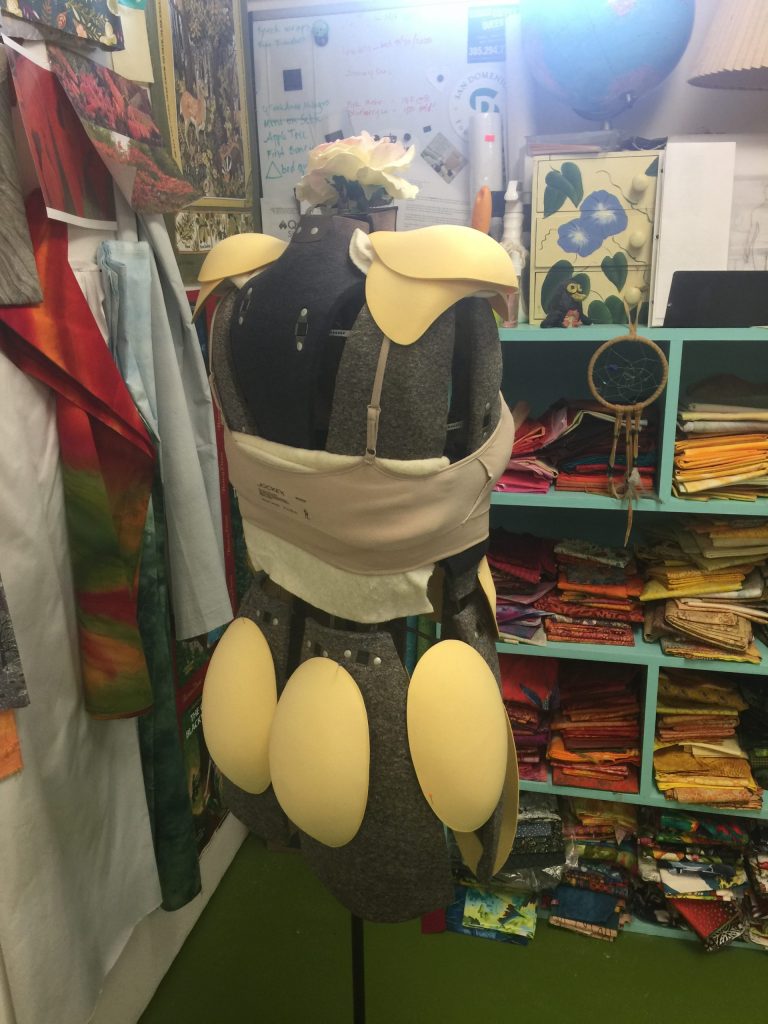
Side view before I got the hip and front thigh pads snugged in. Thankfully I am not as lumpy as the batting in the upper back.
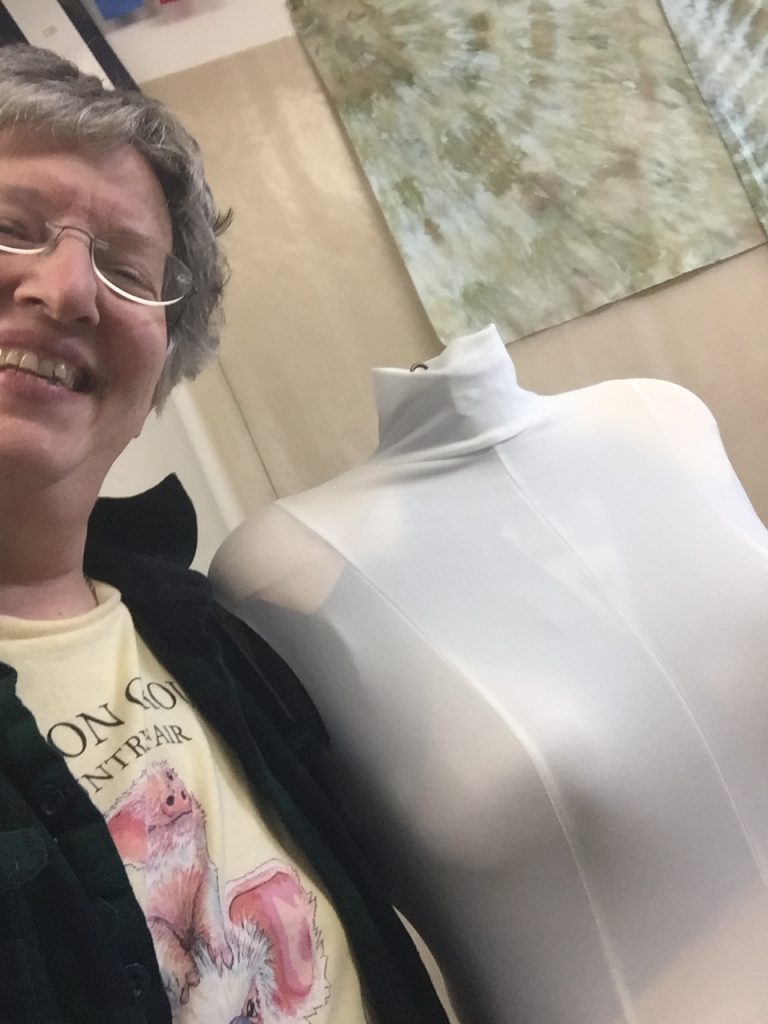
Me with Ailith Skye, my body double
I learned SO MUCH about the shape of my body in this process (and I’m fine with lumps…life is better with ice cream, although 10 pounds fewer lumps would be nice too….the 20 I need to lose ain’t gonna happen). And I learned about the pattern industry, the “blocks” (body shape bases they use) and fitting ease. I can now use my stand-by—measure a garment I have that fits the way I want and compare with what I measure on the pattern–along with the dress form and get a fit that I want!
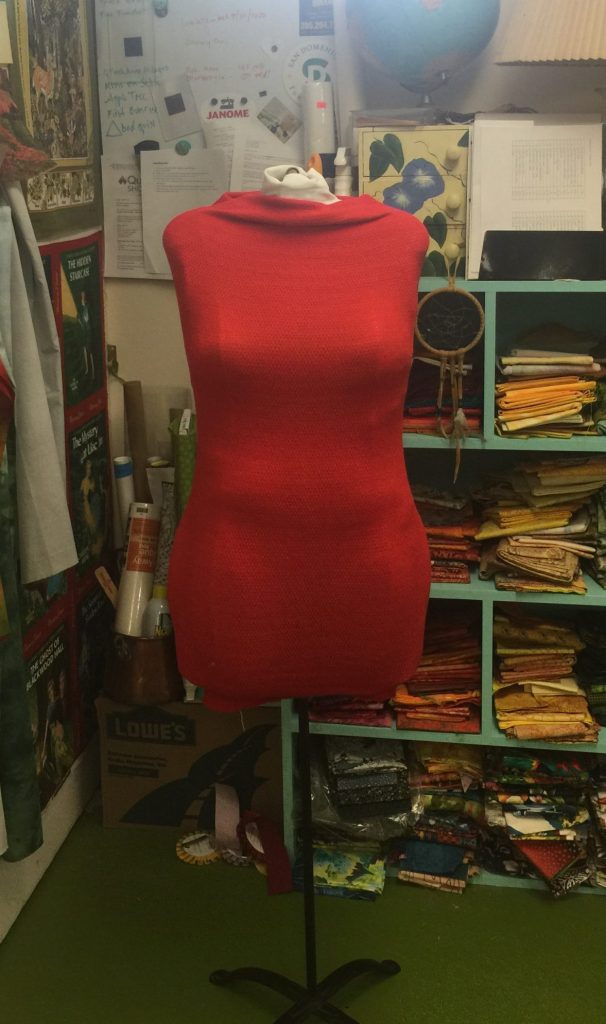
In the coming weeks I’ll have several garment making posts. I have made a top, a skirt, a tunic, leggings, have another pair of leggings on the cutting table, and a pinafore/jumper on the design wall. Ailith (traditional Scottish name meaning seasoned warrior–my paternal grandmother was Irish but born in Glasgow, I am named after her, so I liked Ailith) has been a great help already. Can’t wait to share. Oh…and why red dress?
Put on your red dress, girl, and have FUN! BIG thanks to Marty Ornish, who makes amazing art with old quilts and dress forms….check out her website, Marty-O, here. I asked her what she uses, and for some purposes she uses mannequins with stretchy fabric pulled over. She gave me a length, so now Ailith can put on her party shoes!
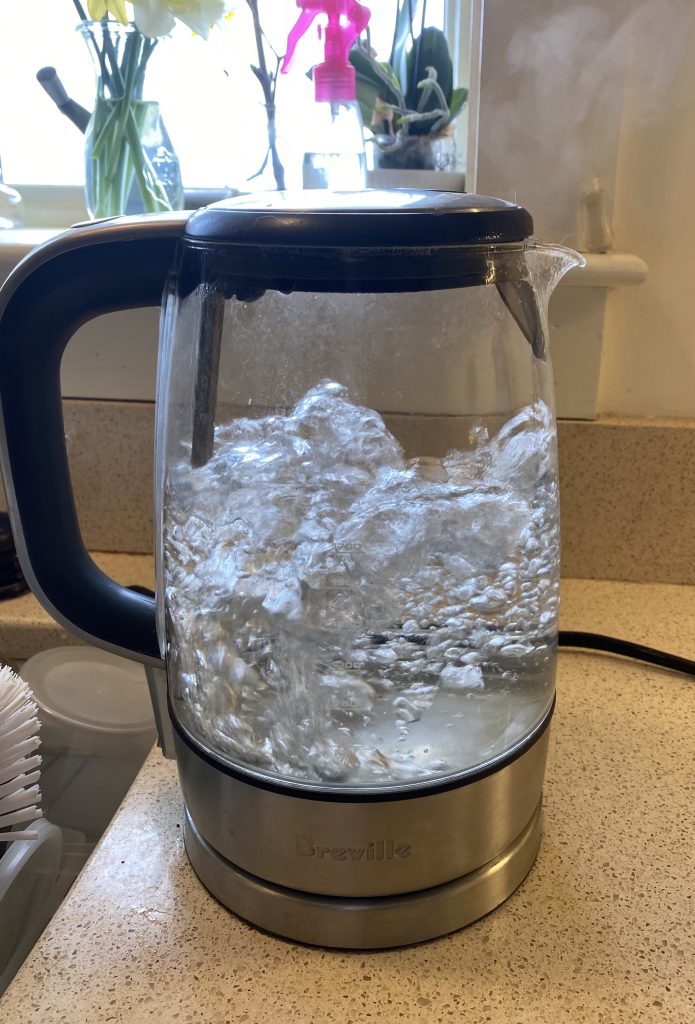
Sometimes it is the little things, that turn out to be not-so-little, that make the difference in life. In my life, watching the bubbles form and the water boil gives me joy…what can I say, I live a rural life LOL! Another one is tools that make my sewing life easier like the Janome M7’s HP Presser Foot and throat plate, which are available on select other Janome models. It also turns out, you can teach someone who has been sewing for about 57 years new tricks!
Yes, I like to watch water boil! No, I am not chanting “bubble, bubble, toil and trouble” over the cauldron! (chortle…..)
I have never been precise at piecing like my friends Krispi Staude on San Juan Island or Joan Herrick, Tori Manzi and Karen Miller here in Maine. I try, but I just never quite get it perfect. And I am Type A enough that it Really Bugs Me. Either go totally improv OR Get It Right. A couple things introduced into my life recently have helped a lot. The Janome M7 Continental (I’m a Janome Artisan, get to borrow this machine for extended periods for free, but I’d say all this good stuff if I paid full MSRP!) is one of them. I’ll share another next week or so. I’m also trying to improve my skills and learn to shoot and edit videos, so I’m practicing on these short clips.
Here I’m showing and explaining Janome’s HP system, which I think must mean Heavenly Perfection. I need to get better at holding the phone and zooming, but with each video I improve. Lookit the titles and comments I was able to add! AND I did TWO transitions! Maybe by summer I’ll be adept enough to consider online classes.
Anyway, the automatic / magnetic throat plate is one of those “little” things that make my life easier. So yeah, it’s the not-so-little things that make life good! Thank you, Janome! Here’s the video…if for any reason it cuts out part way through, click on it to go watch on my YouTube Channel.
The HP foot can be used for piecing, garment construction and quilting. I’ve just finished a somewhat “quilt Modern” top–about 34″ square–that I’ll share over the next couple of months. Next week, I’ll share a video with me actually piecing! Who me? FUN… a total and much needed mental break in the Time of Covid-19!