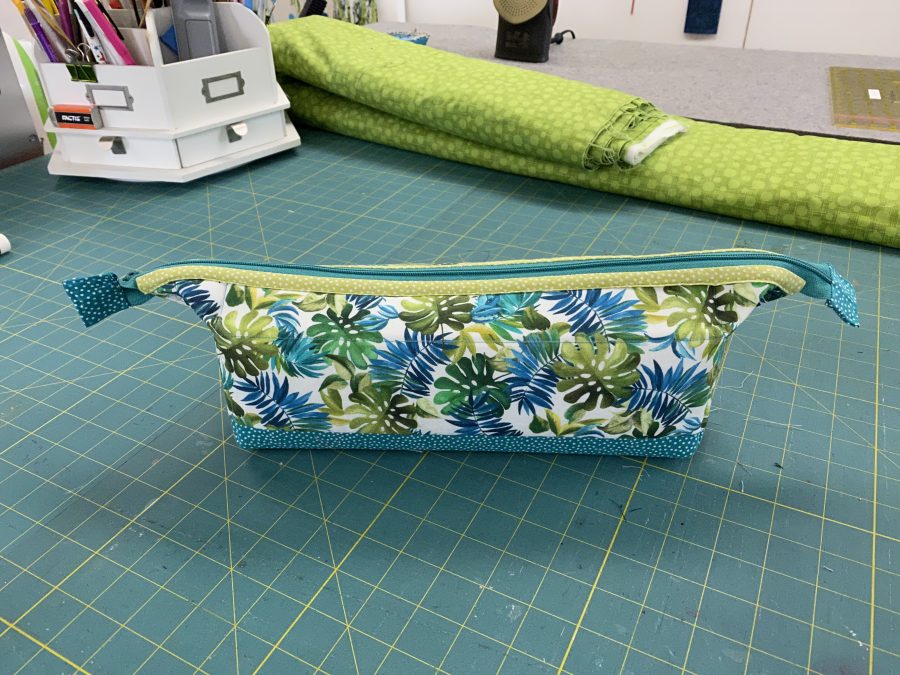
In my last post I shared the Clam Up bag from byAnnie.com, and earlier I shared my AWESOME Running With Scissors bag made for her patterns. I love bags and baskets and boxes and things to organize. One of my favorite classes to teach is my Easy-Peasy Inside-Out Bag, which makes a great 3 hours quickie class for a bag (or two if you are fast) or full day class where you can learn more details and extras. I decided to try Annie’s Soft ‘n Stable stabilizer instead of batting to see how it would work in MY bags, which are quick quick quick and FUN! (Like potato chips, you can’t make just one!)
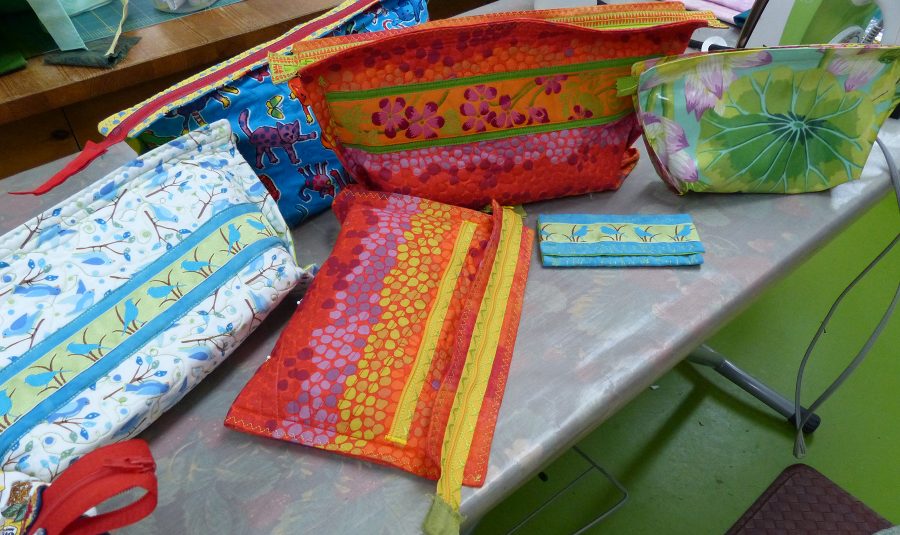
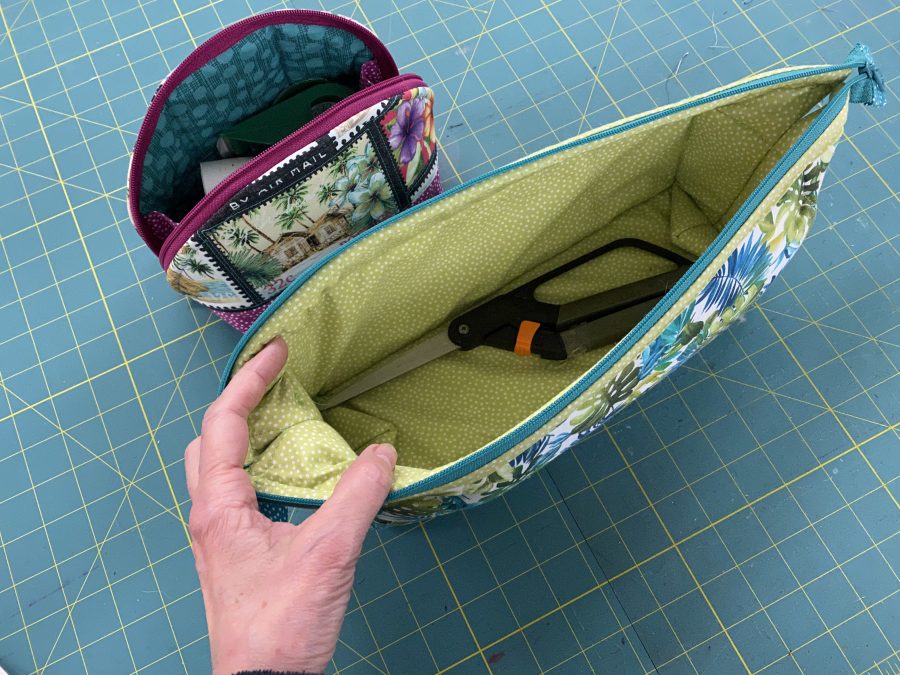
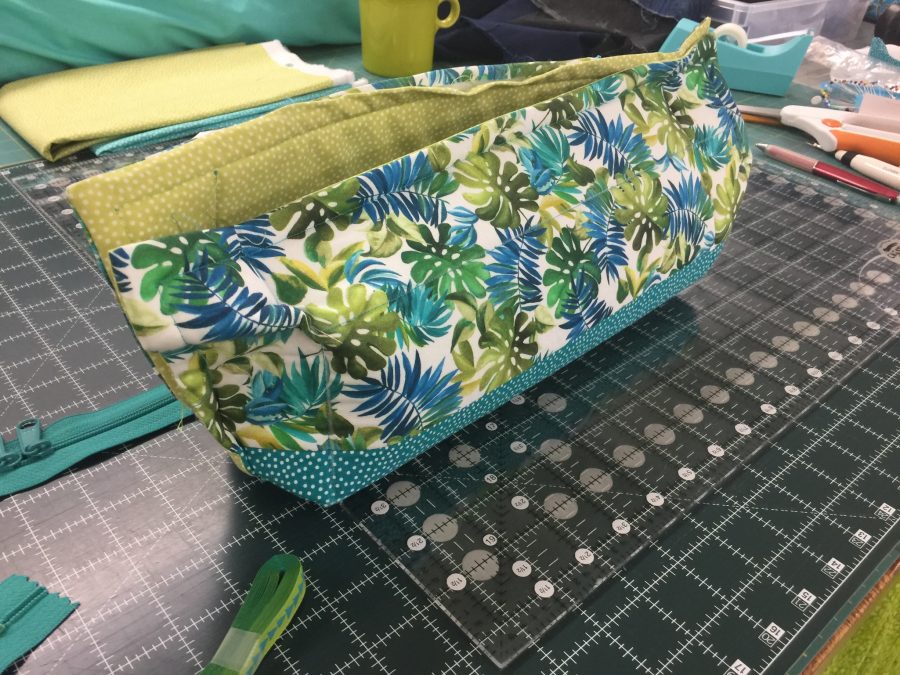
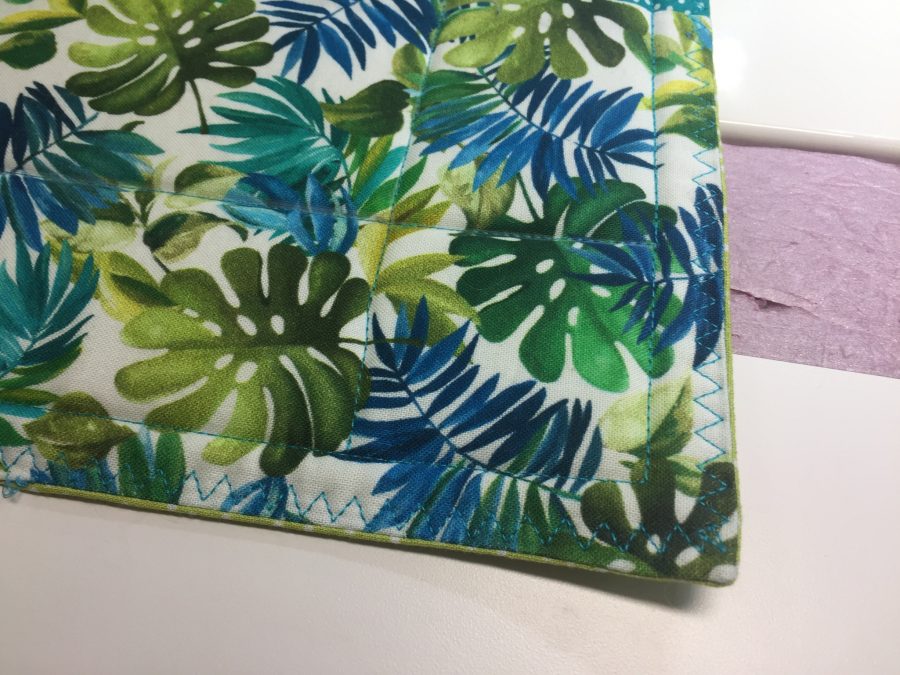
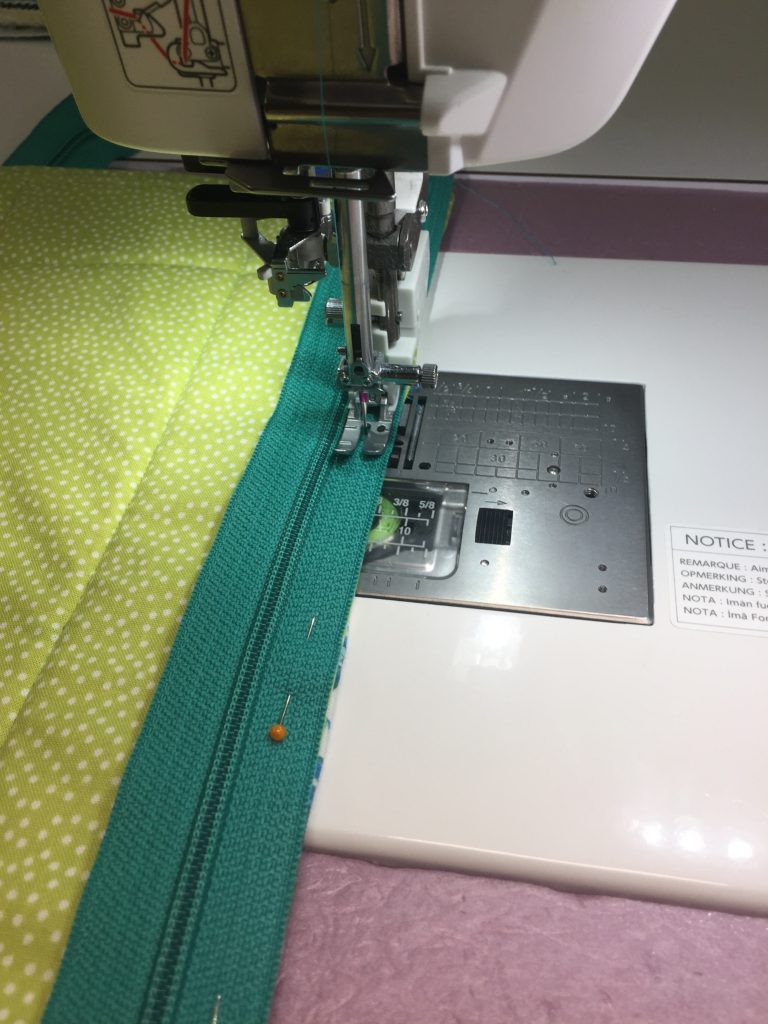
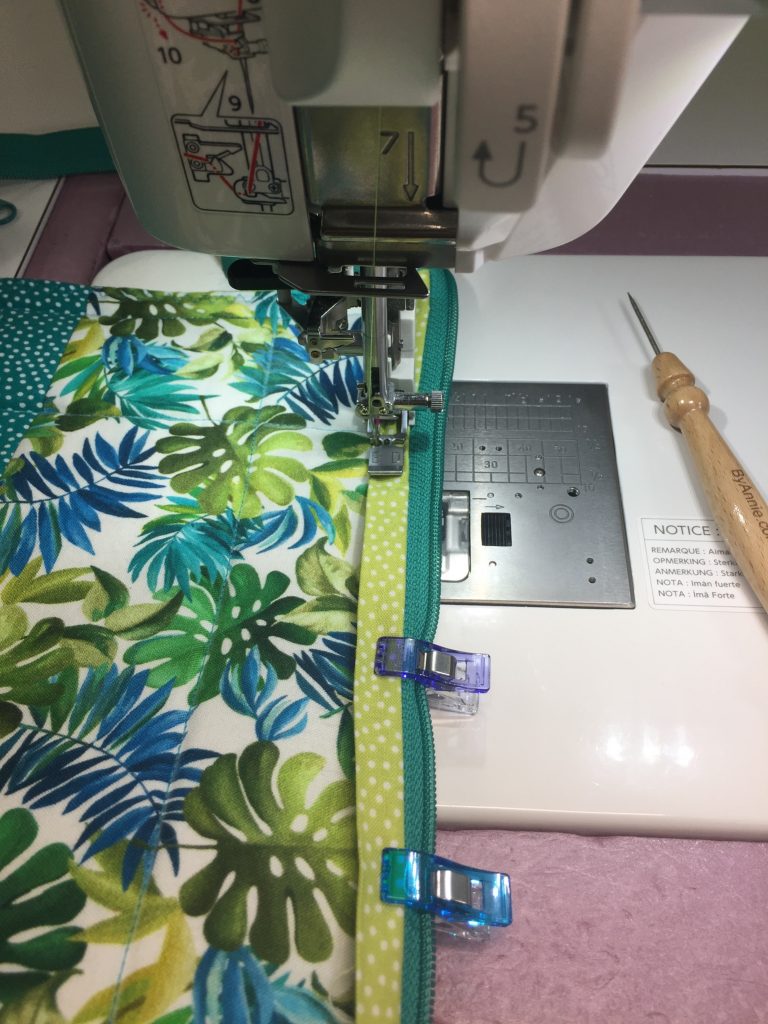
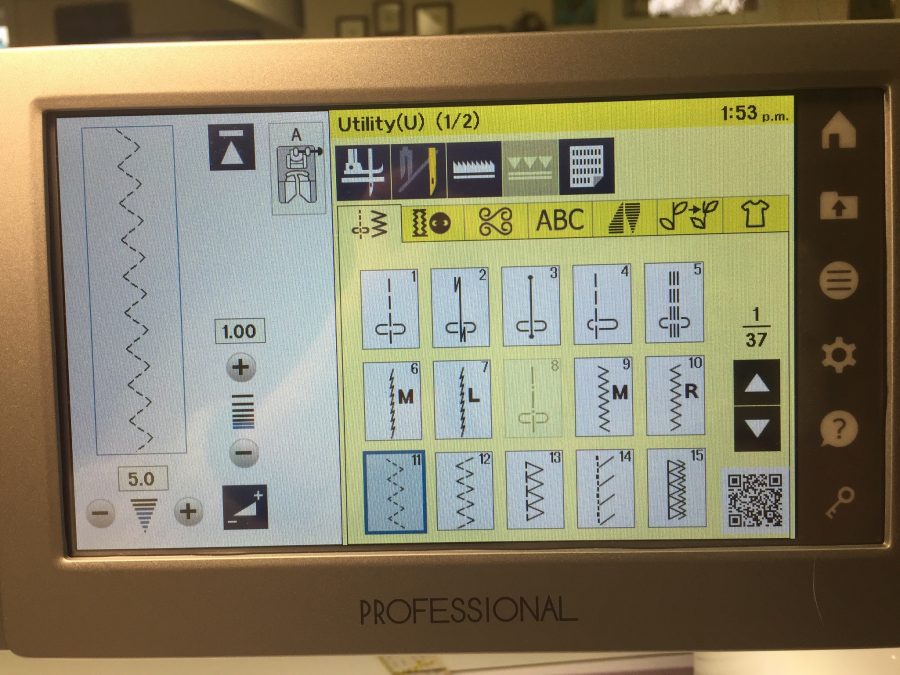
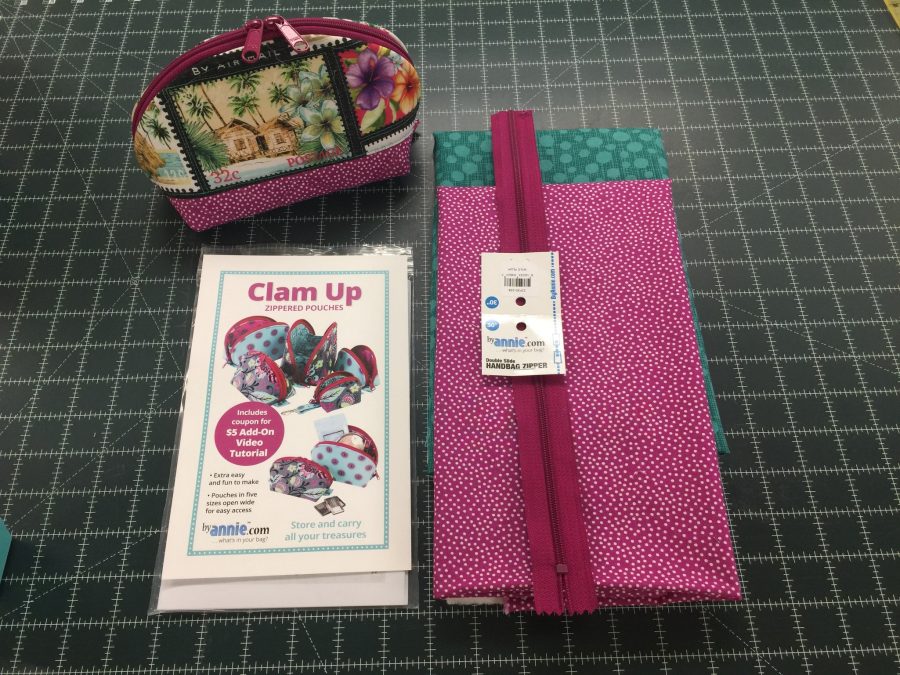
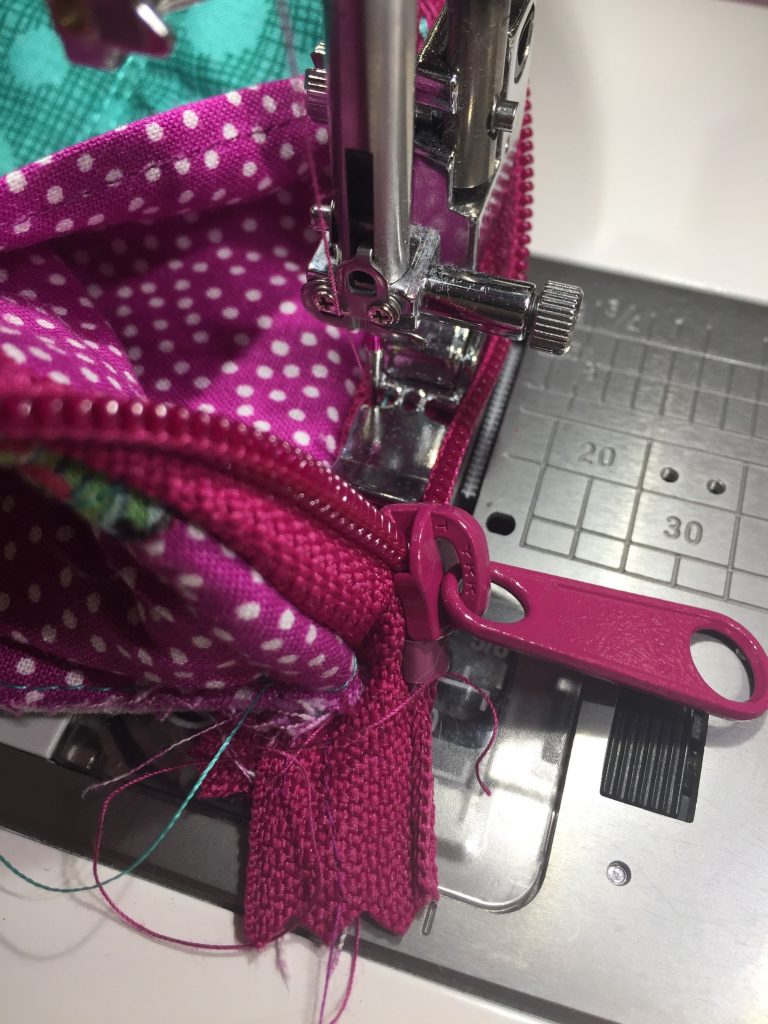
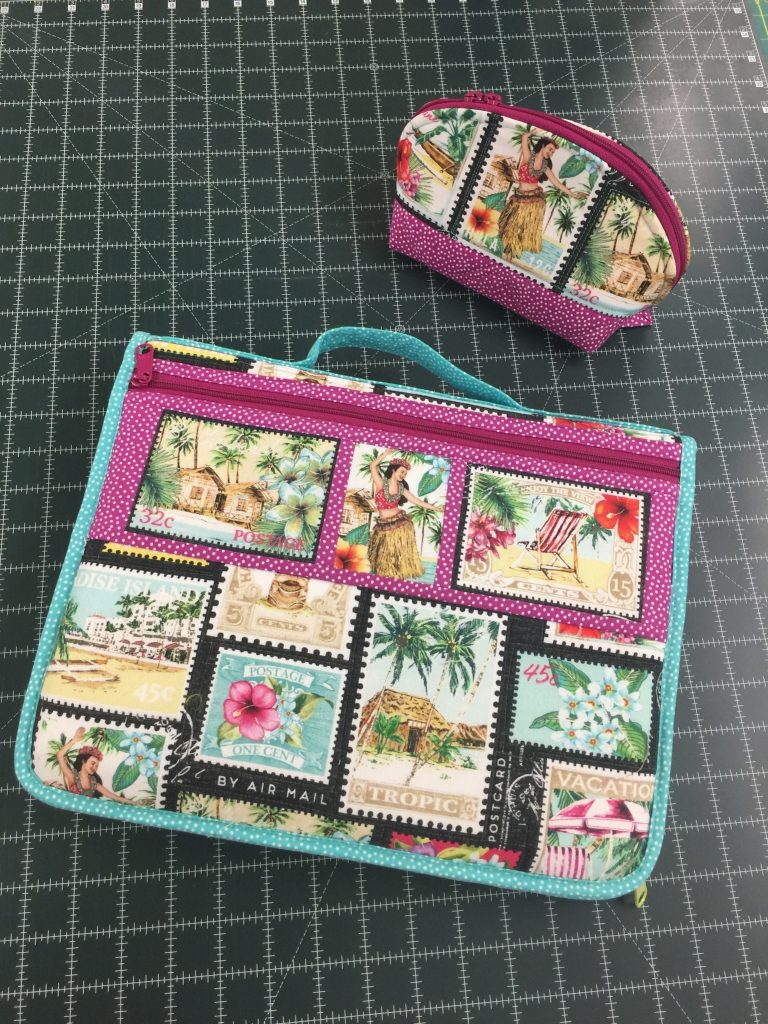
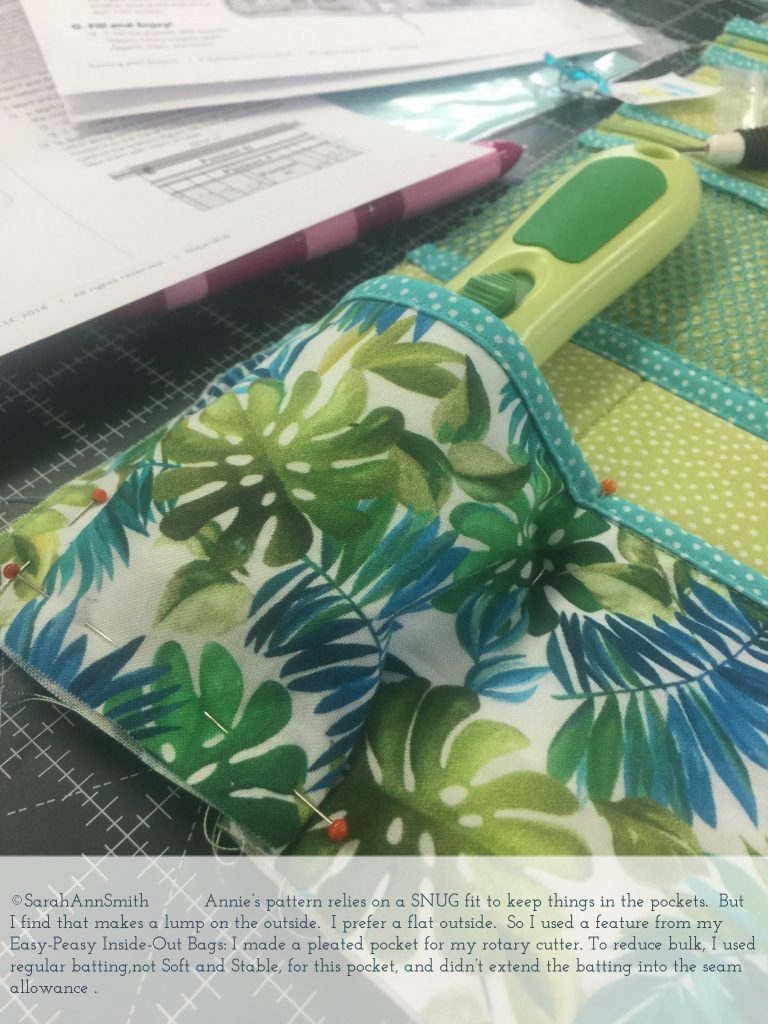
Here it is: the Easy Peasy process using Soft ‘n Stable and accenting the zipper with “binding” the way Annie Unrein teaches in her patterns at byAnnie.com The fabric used is courtesy of Michael Miller Fabrics–the main fabric is from the Lost in Paradise collection (shipped May 2020) and the other fabrics are the Garden Pindot collection on the outside and the inside (and that’s Hash Dots on the backing of the quilt you see awaiting quilting on the back of the table). This is a sampling of the fun bags I teach inthe Easy-Peasy Inside-Out Class…. if you think you’d like me to teach this for your guild–including LIVE ONLINE workshops, leave me a comment! They are fast and fun and can be customized so many ways.This shows the Clam Up bag and my Easy-Peasy next to it. I made this bag long enough to hold my large Fiskars flat on the bottom. Frankly, it is large enough it could hold a small knitting project or paper piecing supplies! One thing I will do differently next time is FUSE the lining to the back side of the Soft ‘n Stable. I didn’t use the walking foot and it shows. Oh well…lesson learned!Before installing the zipper and sewing the seams, I pinned it together to check size and how I wanted to finish it. Most of my Easy Peasy bags leave the boxed corner triangles on the outside (see that photo above with the many colorful bags made with batting). Leaving the triangles outside acts to stabilize the bag and keep it upright. With the Soft ‘n Stable doing that job, I chose to tuck the “corners” inside for this bag.Next, before boxing the bag into shape, I used the 3-stitch zigzag to secure and tidy up the edges. The narrow accufeed foot on my Janome M7 makes it a breeze to sew zippers to a quilted, puffy base without distortion. Here I’m adding a decorative element to the zippers. Gotta love wonder clips!On my Janome M7, I the three-stitch zigzag looks like this, but it is available on all but the most basic machines as a standard utility stitch. The M7 allows me great flexibility in both stitch width and length–not all machines do!
My Easy-Peasy Inside-Out process is fun, fast, and infinitely adaptable. I’ll be making a new version of my notebook cover–I’ve also got an iPad case, a business card case, and a few other goodies up my sleeve. Maybe I’ll self-publish a book of patterns and variations on the theme…what do you think?
Next up, I’ll share a basket pattern that again modifies what I’ve learned from the byAnnie.com patterns! Stay tuned!
OK, that’s a bit punny…. I’ve used some of the fun Michael Miller Fabrics Lost in Paradise fabric to make a byAnnie.com pattern called Clam Up. Before COVID hit, I was thinking about my travel teaching, and I made the Running With Scissors tote and blogged about it, here. I wanted a companion bag for bulky stuff I needs to schlep with me. Both of these bags are good for use in your sewing space, retreats or a whole bunch of other things!
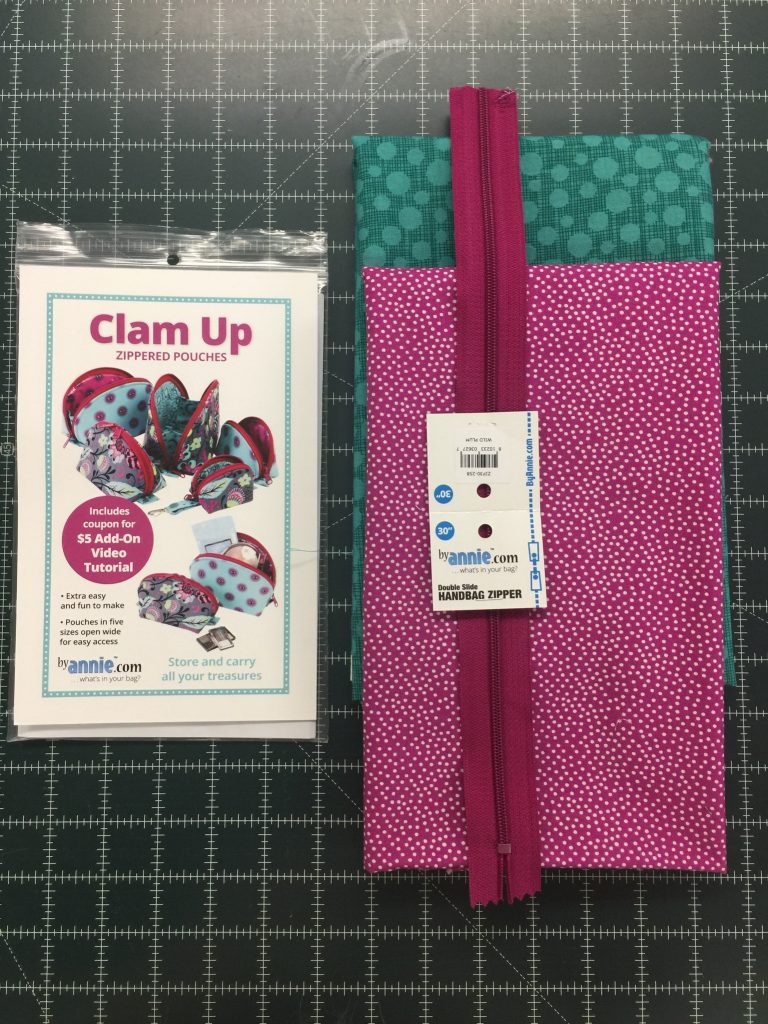
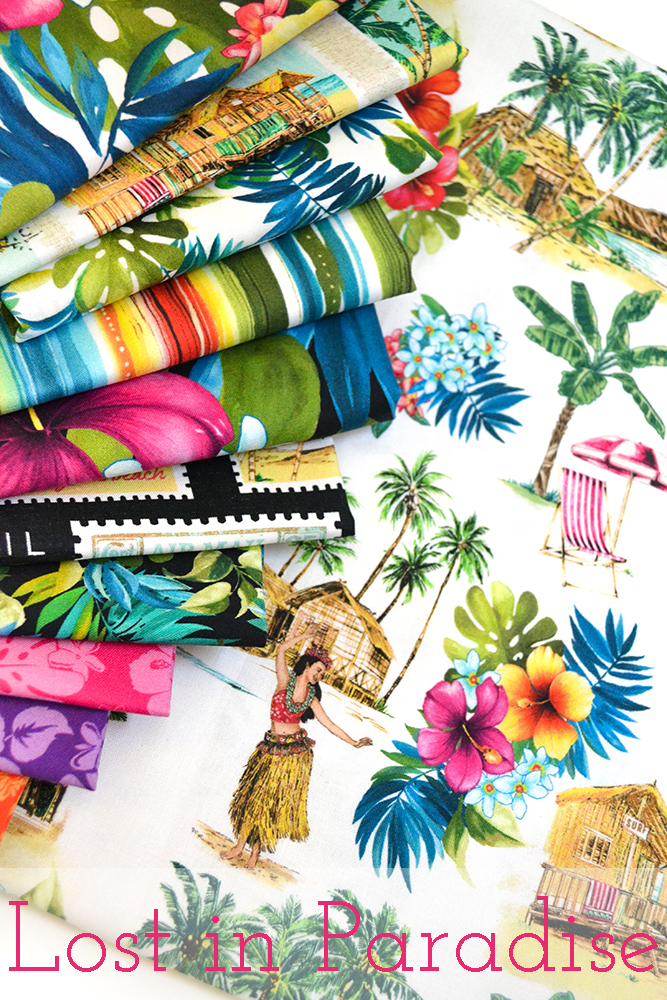
The Clam Up bag pattern allows you to select various sizes. I chose a Large to use for travel teaching. I used the Lost in Paradise print as well as the Garden Pindots (the magenta) and Hash Dot in an aqua color way. A quick google showed lots of the Lost in Paradise prints available on Etsy–the collection came out in May 2020.
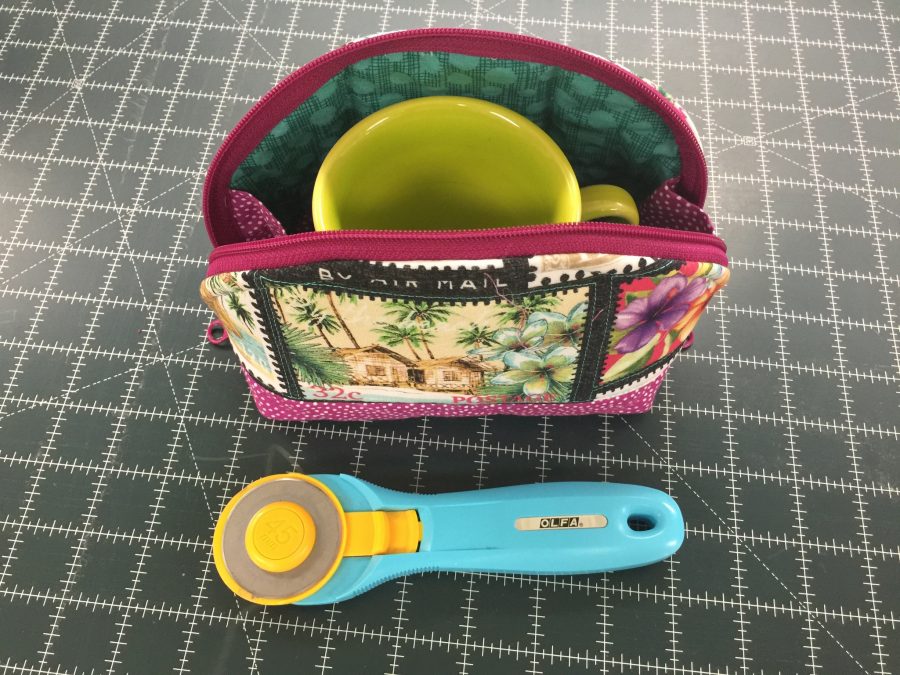
I really like bags that open up wide, where I don’t have to root around–I can just open ‘er up and SEE what I need to grab. The large was big enough to set my mug inside…at least unzipped.
The Large bag is large enough to fit a 45mm rotary cutter on the bottom (flat) and in this photo shows my MUG inside! The gussets on the side allow the bag to open up (like a clam, get it?!) wide so you can see what is in the bag, but prevents stuff from falling out.
Annie Unrein and her staff suggest quilting up your fabrics, using her Soft n Stable instead of batting. The Soft n Stable is a foam with a soft, grippy fabric on the outsides. I love that it stands up and holds it shape, the cotton doesn’t slip ‘n slide around, and doesn’t require a ton of quilting to look good in the finished project.
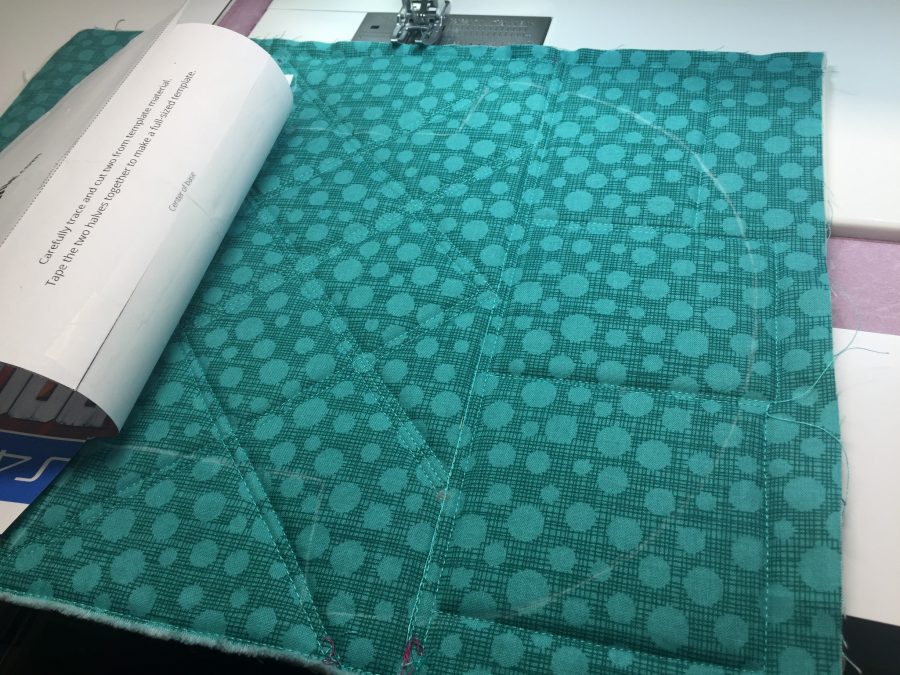
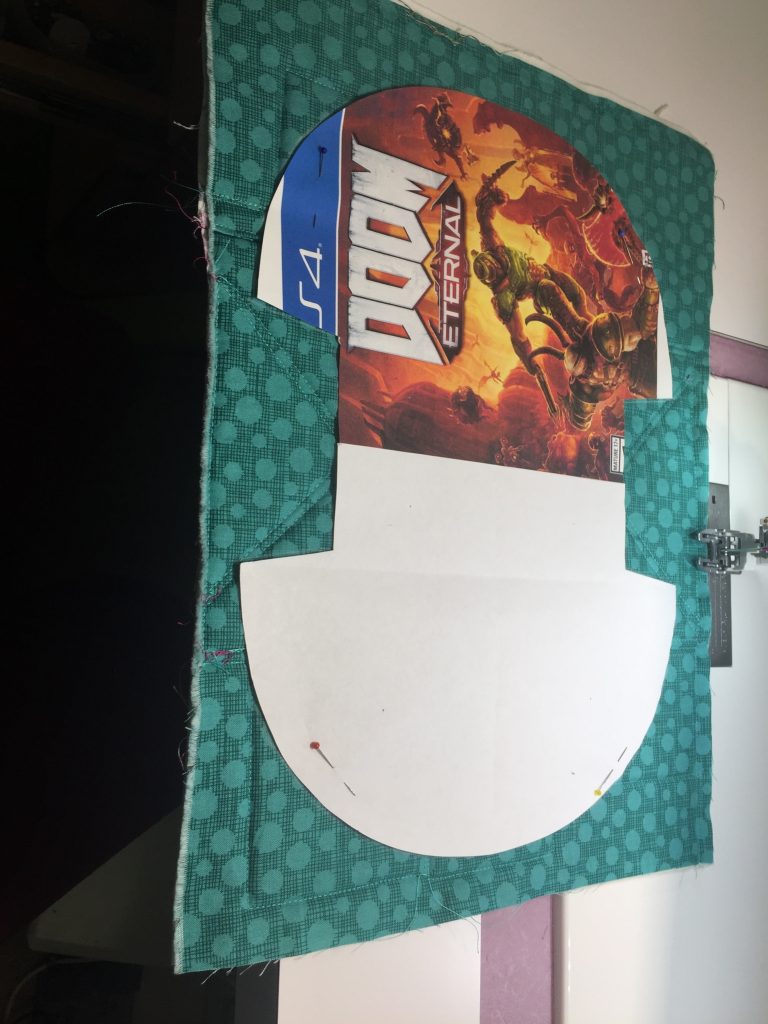
Here I have quilted the sandwich of inside and outside fabrics. I chose to piece the outside so it would have the magenta on the bottom, feature the print, and use a coordinating magenta/fuchsia bag zipper (wider zipper tape) from byAnnie. You can see I’ve used the walking foot for simple outlining for the feature fabric and a simple grid on the base.Here, I’ve used paper from the recycling bin to create a full-size pattern. Son had asked me to print the video game he was giving his brother as a gift…definitely not my game LOL! Now it is time to cut out the bag.Annie has some great tips about sewing zippers, and has started doing “add-on” videos to help teach you how to make her bags to perfection. I’ve been sewing 50 years and am pretty adept, and I’m picking up great tips. I am also developing a great fondness for the Garden Pindot (the magenta) and the Hash Dot fabrics…they are really great blenders. Have been adding to my stash!LOOK at all that can fit inside here: rotary cutter, roll of package tape (for when I need to ship a box home from a venue), and large spools of thread. I often let students borrow tools to try them out (sometimes I sell them, too, but always tell them to try mine out to see if they like the tool before purchasing it). Now I can set this bag out as a “ok for students to use stuff” and keep my things that I need at the teacher table to use in the Running with Scissors bag.Originally this was designed as a travel-teacher duo. Don’t know when I will be able to travel teach again, but these are great in the studio and for guild sewing days and retreats, too. And a whole lot of other things. Here’s the link to the blogpost again for the Running With Scissors bag. I have quite honestly kept that bag out as what now appears to be a permanent addition to my cutting workspace!And here’s a closer look at the pattern, the blender fabrics (always available from Michael Miller), and the zipper from byAnnie.com . I LOVE being able to get coordinated components from byAnnie–the mesh, elastic, zippers, all the colors match or coordinate for tons of fun! I must have about a dozen (or more) of her zippers and a stash of bag-making components now!
Next up: inspired by Annie’s construction techniques and materials, I made one of my Easy-Peasy-Inside-Out bags merging my process and her materials. Check back soon!
Note: for this post, the fabric, pattern and zipper are courtesy of Michael Miller Fabrics and byAnnie.com–THANK YOU! But I love the stuff so much I have spent a goodly chunk of my own hard-earned money buying more of the fabrics and notions.
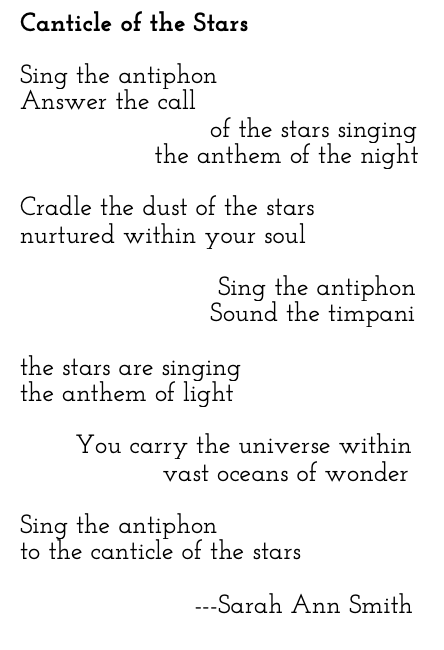
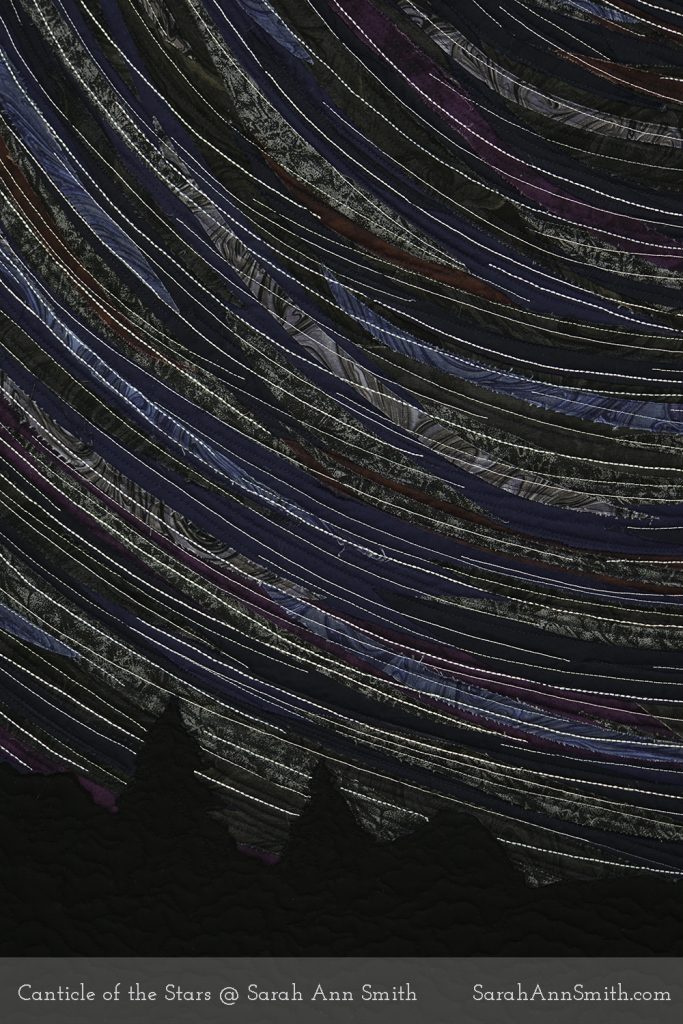
Canticle of the Stars, or should I call it Anthem of Light? Chime in! Completed May 2020, 36 tall x 46.5 wide.
There is a thing called star trails photography (just google it…it’s really cool). The earth rotates on its axis. The North Star is static in our northern skies. If you take time lapse photos and then “stack” (merge) them, you get star trails….images that describe the lines created by the light of the stars. Did you know that starlight comes in different colors??? It does… I love the feeling of the vastness of space. When I went to college, I comforted myself knowing that my then-boyfriend and I could both look up at the constellation Orion in the sky even though we would be 3000 miles apart. I love wondering what is out there, and feeling snug and at home in my own world. The universe is Out There and it is Within Us. I love the resulting art quilt. While trying to figure out the title (star trails was too boring), I wrote a poem to go with this quilt:
As many of you know by now, I was selected to be a Michael Miller Brand Ambassador this year. At the start (last December) we received a box STUFFED with goodies (post here). I decided to challenge myself, using items ONLY from this box to make an art quilt in my style, but using fabrics that are totally not in my usual wheel house: commercial solids, prints, and bling. I love the result…in trying to figure out the title (star trails was too boring), I wrote a poem above. Help me decide should the title be Canticle of the Stars? or Anthem of Light? Leave comments and thoughts!
So, how do you make an image that is DARK work successfully as an artwork? In this case, the answer is a lot of quilting with light thread in seven shades from pink to peach to green to blues! Here are the fabrics I used:
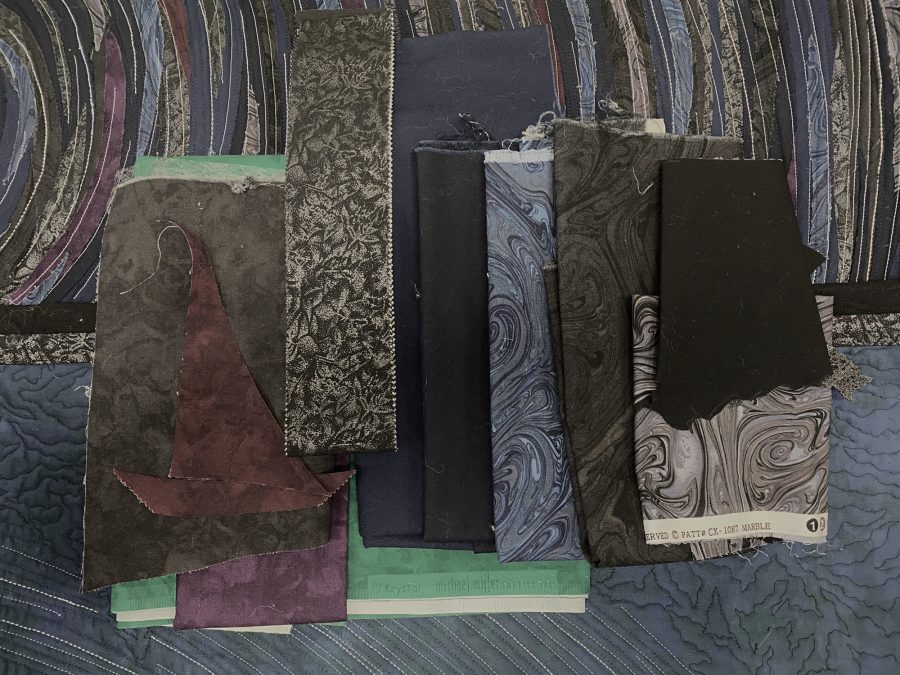
The quilt is under the fabrics, with the top visible in the upper half and the backing below. The Michael Miller Fabrics are from left to right: Michael Miller Krystal in Aubergine 1278, Wine 2248, Coal 1302 and 1257 Evergreen. Fairy Frost in Black. Cotton Couture SC5333 in Midnite and Ink. Marble CX1087 in Stone, graphite (or onyx) and night (I think on the denim blue). Michael Miller Jet Black which is part of the Cotton Couture line. I overdyed the green with a navy dye to use as the backing.
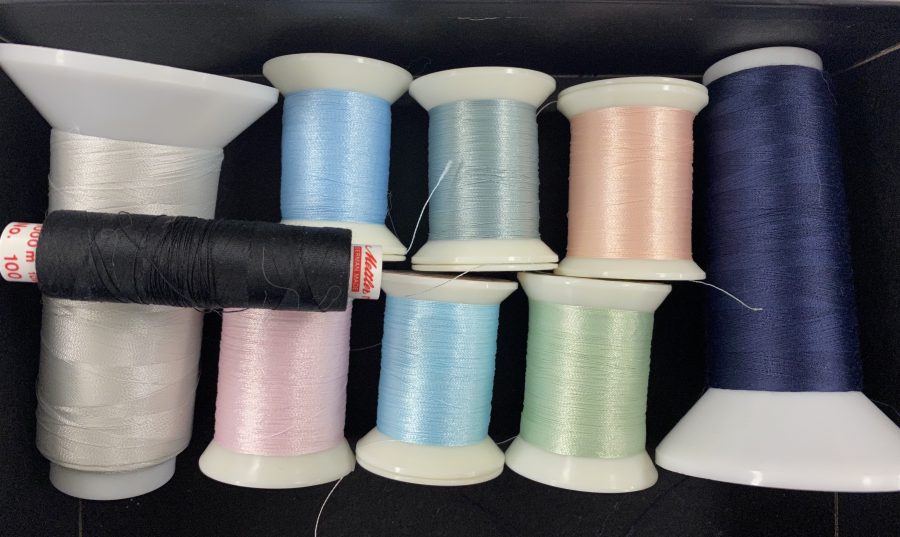
The quilting was done entirely on my Janome M7 Continental. The sky was done with the walking foot and the trees was free-motion quilted. It has been eons since I did walking foot quilting…I may do more of it soon! And the threads I used:
It is VERY rare for me to use a walking foot for quilting, but for the sky on this one I did. I used the dark blue So Fine to help hold down the Mistyfused pieces (cut curved, but on the bias so I could adapt their arc) and solid black (I can’t remember if it was the Mettler or So Fine) for the treelike silhouette. The six colors are the star trails in the sky. I used both regular straight stitch and the triple-straight stitch with the walking foot.
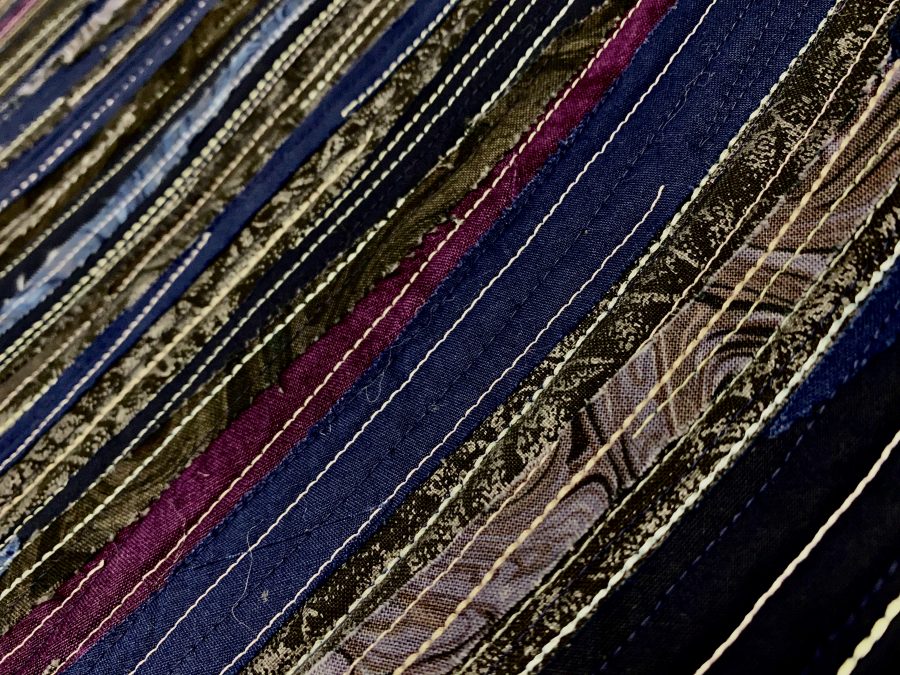
Detail, Canticle of the Stars. The edges of the print fabrics are definitely rougher than I am used to with the batiks and hand-dyes I use due to the different thread count, but I think they work because the light edges become another star trail.
And a very close up of the raw edges, some wool lint (sigh…do you know how many times I vacuumed and lint roller this quilt??????) from my pressing surface, and the quilting. The pale green turned into that creamy yellow color when quilted. It’s amazing what thread will do!
I hope you’ve enjoyed this journey to the stars, and back to home on Earth.
I’ll be teaching at the Mancuso quilt shows later this year and next! They asked teachers to do a brief 1-minute video. To no one’s surprise, my first attempt ran long…at least it was only 3 minutes and not 10 LOL! But I decided to upload the longer version here. I hope you’ll enjoy this peek at what I’ve been doing and maybe take a workshop with me at one of the Mancuso shows–I’ll be in Massachusetts in August of 2020–or at International Quilt Festival Houston in Fall.
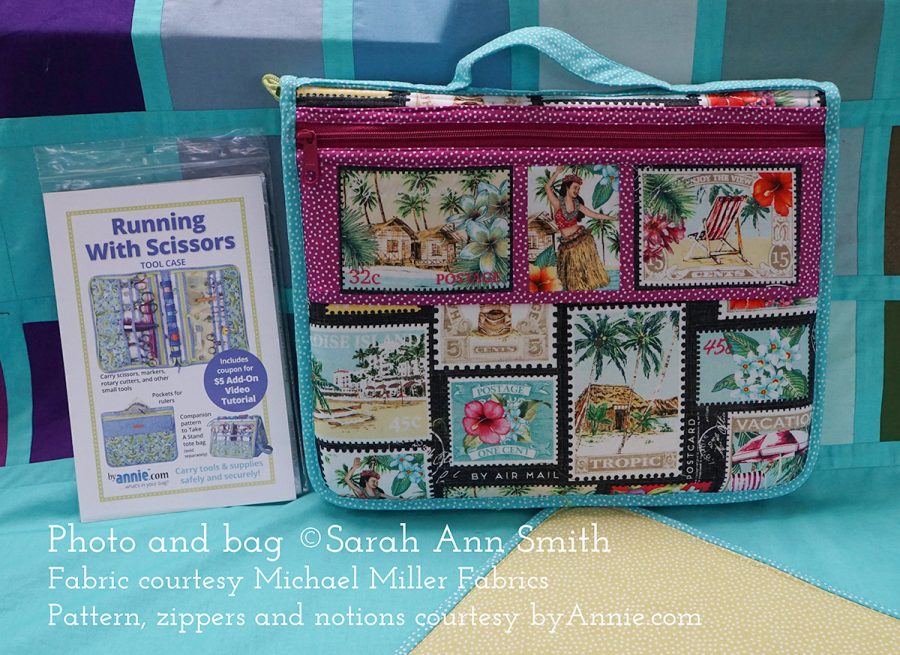
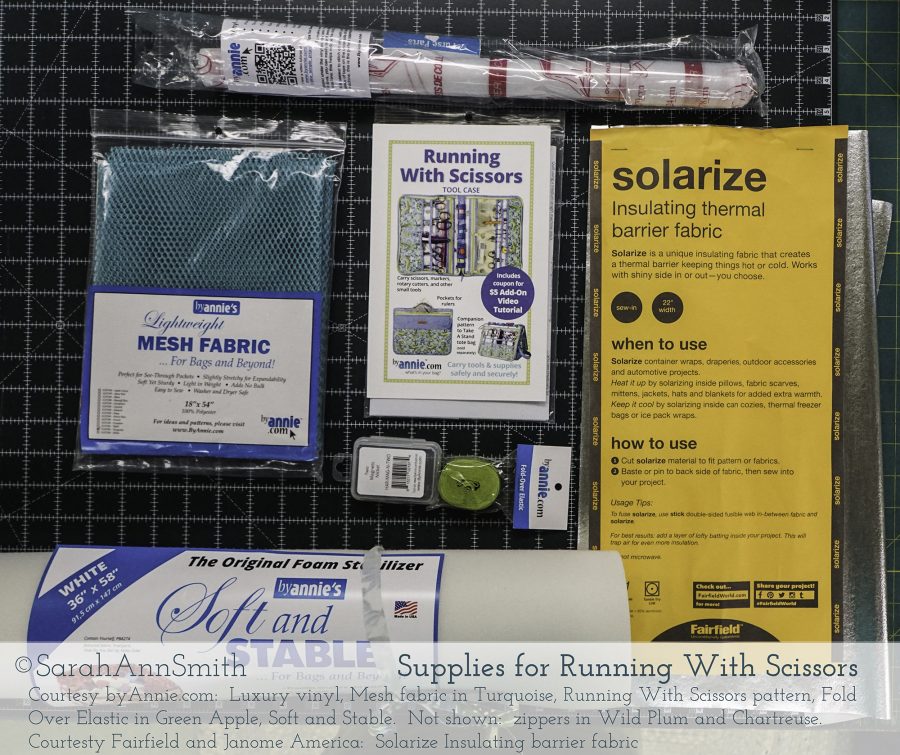
Today’s blogpost is my Michael Miller Brand Ambassador project for April. I was fortunate to receive my fabrics and things just before everything shut down! I knew I wanted to make up the Running With Scissors pattern from byAnnie.com, so I wrote to ask permission. To my utter delight they not only said yes, but what do you need and we will send you supplies! So thank you also go byAnnie.com for the mesh, vinyl, stretchy elastic stuff, Soft & Stable foam “batting” and scissors. I actually placed a wholesale order with my regular wholesaler for about $95 more of byAnnie goodies — I have been buying her patterns for a couple years and this is the perfect year to make them in conjunction with Michael Miller Fabrics.
Here is part of the collection. I used the Postage Stamp fabric in charcoal/black background for the outside of the bag, and the Tropical Leaves on white on the inside.
When I selected this fun line of fabric for one of my second quarter projects as a Michael Miller Brand Ambassador, a global pandemic wasn’t even a blip on most of our radars. But who wouldn’t love to be on a beach with a balmy sea breeze, enjoying the turquoise waters and lush green foliage of a tropical splendor. Well, now that COVID-19 and hunkering down at home are the order of the day, a virtual escape is even MORE fun.
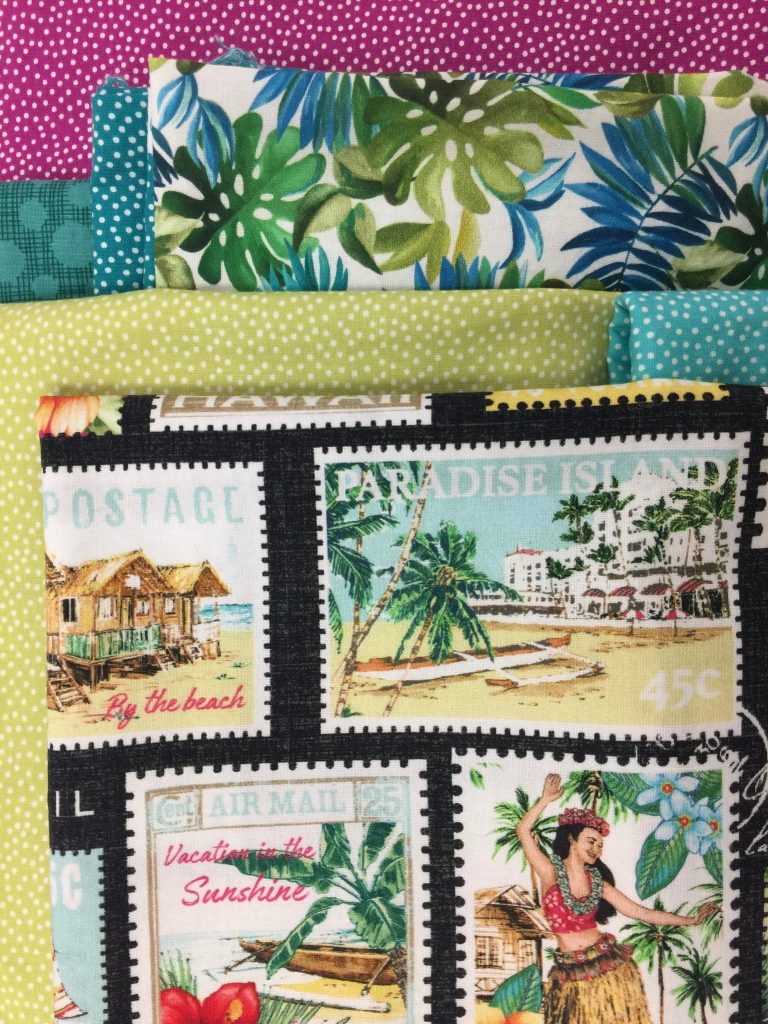
Fabrics are from top to bottom: Garden Pindots in Raspberry, Lavish Leaves in white, Garden Pindots in Marine, Hash Dot, Garden Pindots in Fern and , and Tropical Getaway in black, the feature fabric with “stamps.” The Garden Pindots and Hash Dot fabrics are Michael Miller Basics and always available, while the two prints are from the Lost in Paradise line that should be shipping to stores in April/May, though we now know that all previously planned schedules are now subject to change!
For some time now, I have been “collecting” patterns from byAnnie.com. I decided now was the perfect time to try at least one of them out.
These are the items I used for my project. I made a few changes (small) to the pattern and the supplies. Two of those are the magnets from byAnnie.com (little box to the left of the green elastic) and using the thermal barrier fabric we were given at the Janome Education Summit nearly two years ago.
I had only done one byAnnie.com pattern before, a freebie for the Petit Four box/basket. Annie is one smart and organized lady–and with a pattern with as many parts as this case, that’s a very good thing. If you are a linear thinker, you will ADORE her methodical step-by-step approach. If you are a global thinker, like me, and need to see the big picture I suggest that if you make this project skim the first 7 pages of the pattern. Then read Pages 8-9 CLOSELY so you can understand where the component parts go. Then go back to page 1 and go through it closely step by step. I don’t do well when I am being led to an end without knowing the overall picture (literally as well as figuratively) or where “pocket D” goes! Once I got the overall picture, having Annie’s very careful process and step by step approach was brilliant for me, too.
Annie’s attention to detail and fine craftsmanship also sets my heart aflutter–I am a stickler for fine workmanship and beautiful results. You can learn a lot from her patterns, so I encourage you to go ahead and dive in no matter how complex because the instructions will guide you at every step. The Add-On videos that now come with some of the patterns are also extremely helpful. You get a “just for you” code with a pattern that allows you to access extensive information on the byAnnie.com website.
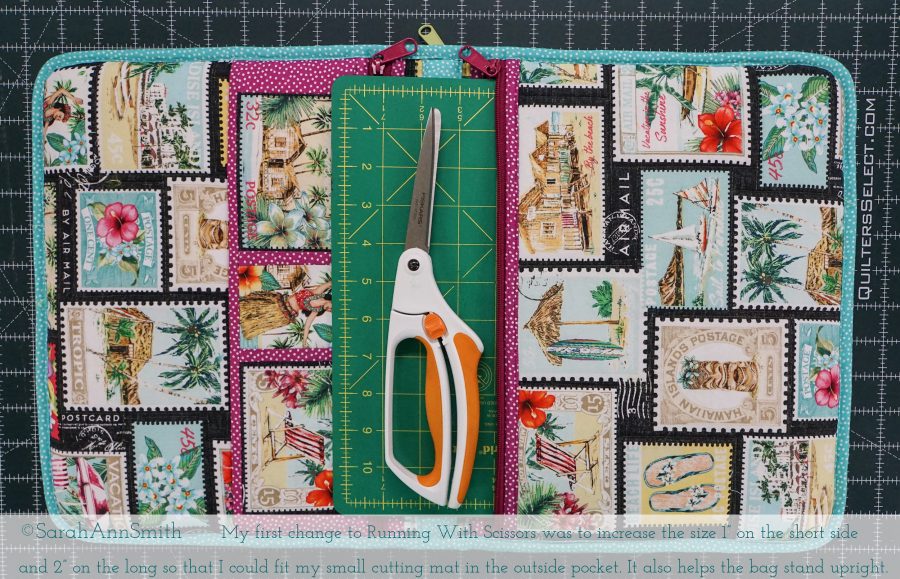
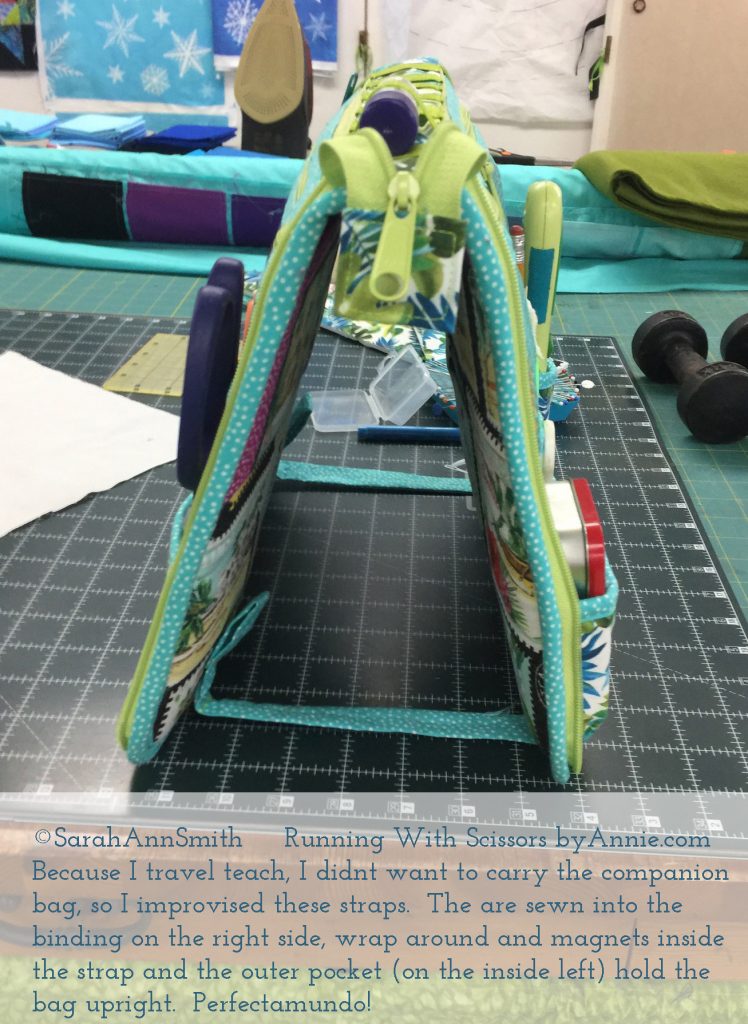
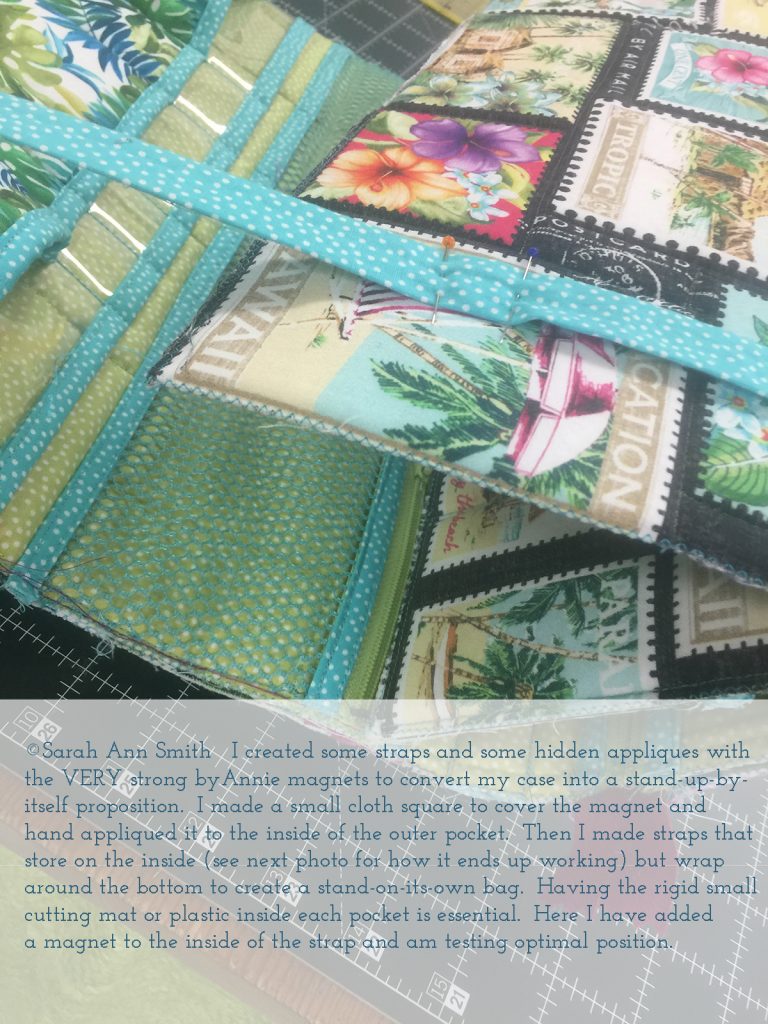
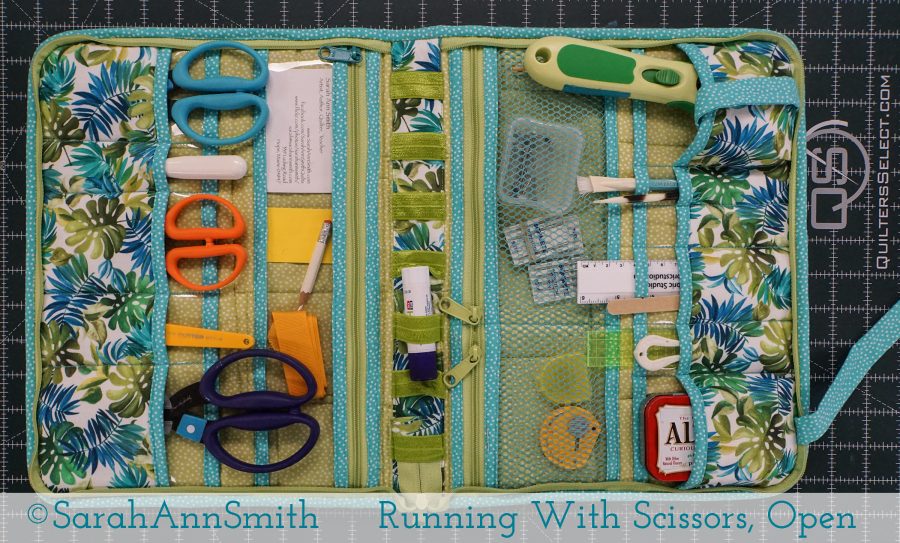
By making a very small change to the overall dimensions–1″ each way when zipped closed–I was able to fit my cutting mat in an outside pocket as well as my long scissors. There is a companion pattern, the Take a Stand bag, that serves as an “easel” for this bag. Since I travel teach and my suitcase usually weighs 49.8 pounds (.2 under the limit), I knew I wouldn’t want to carry the extra case. BUT I wanted this bag to stand up for me. I have the mat on one side, some rigid plastic on the other, and added some straps (see below) so I can still use it upright on my teacher’s table! My changes meant I needed to remember to adjust the sizes of the pockets to make each item 1″ wider and, for the outside pockets a bit longer. Luckily, the 40″ zipper to close the entire case was still plenty long.
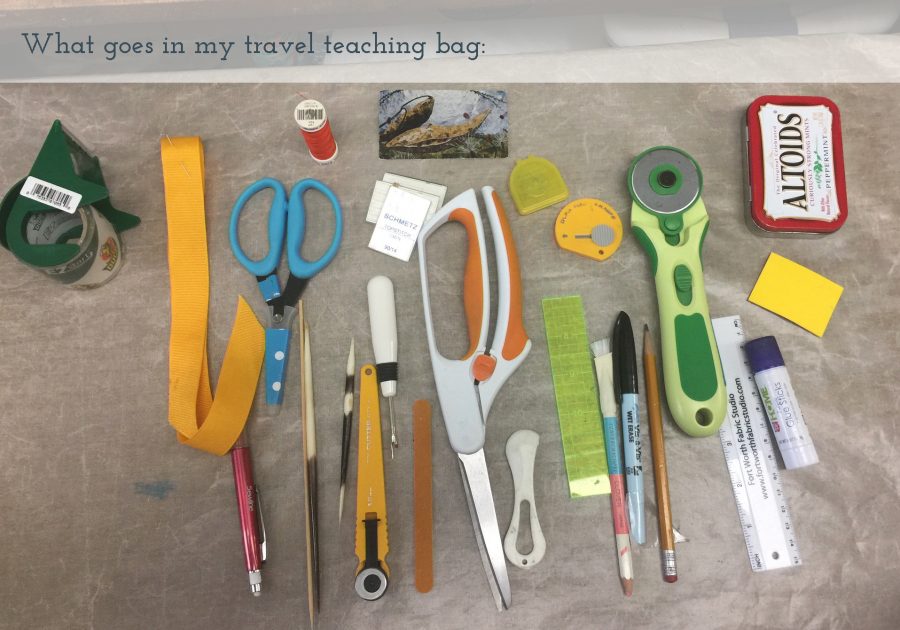
One of the first things you want to do is take an inventory of what you want to put in the case. Here is what is in my “toss it all in” bag for teaching:
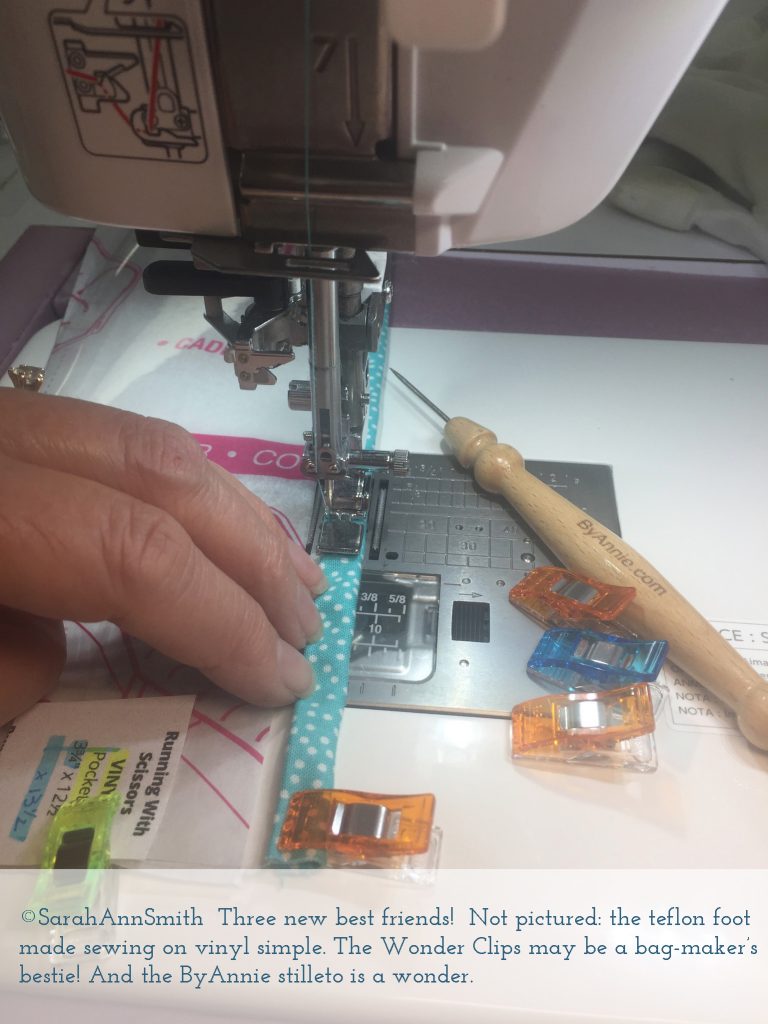
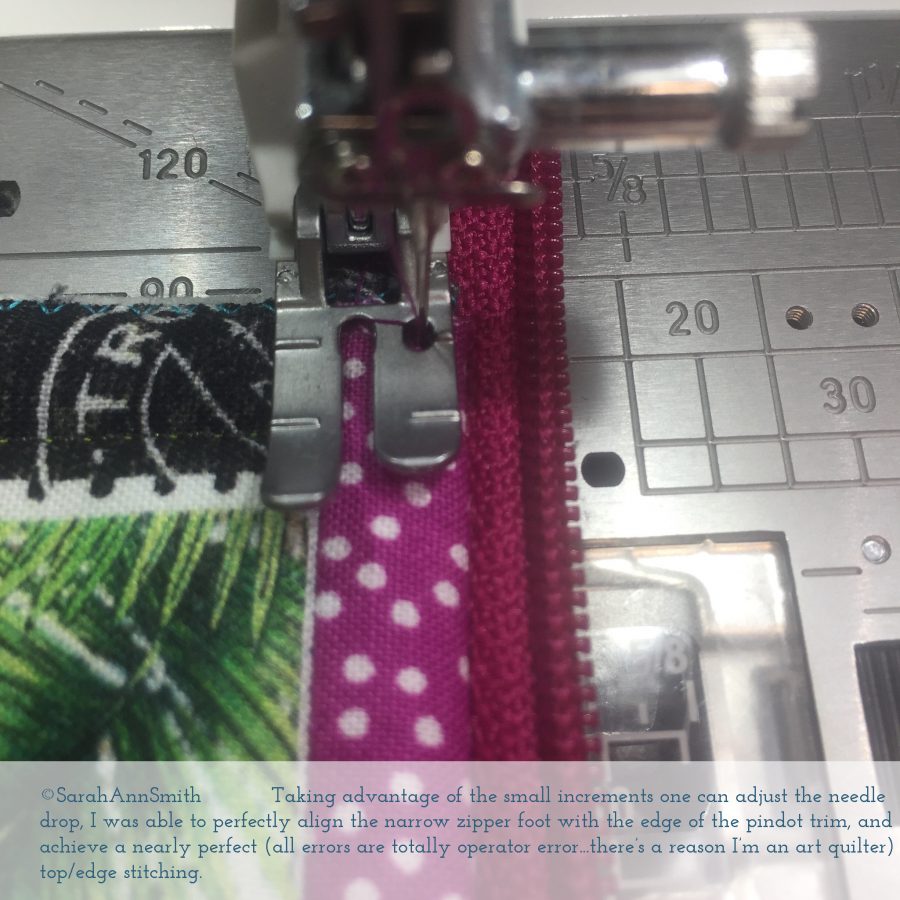
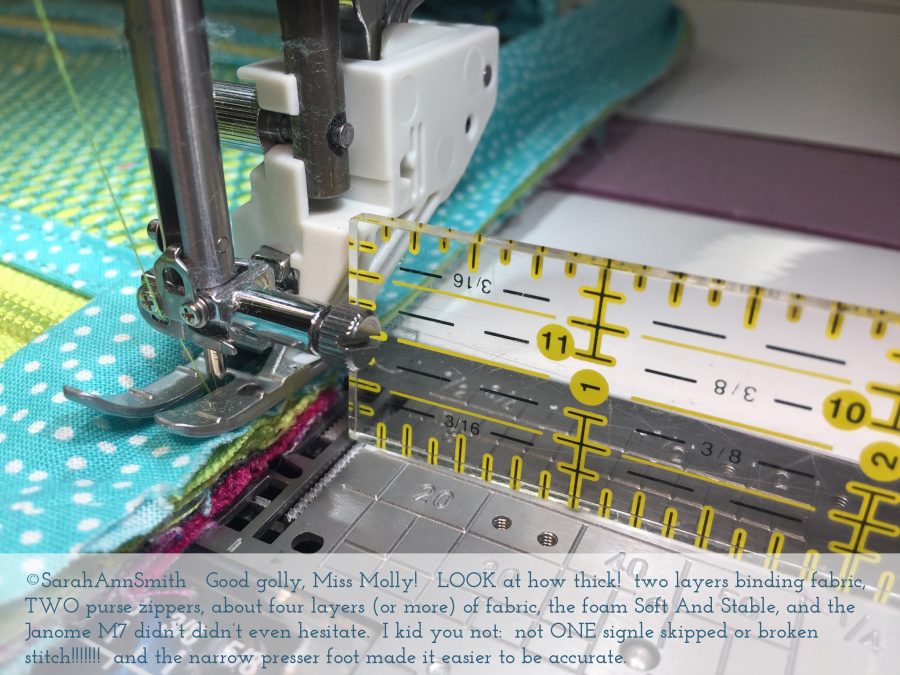
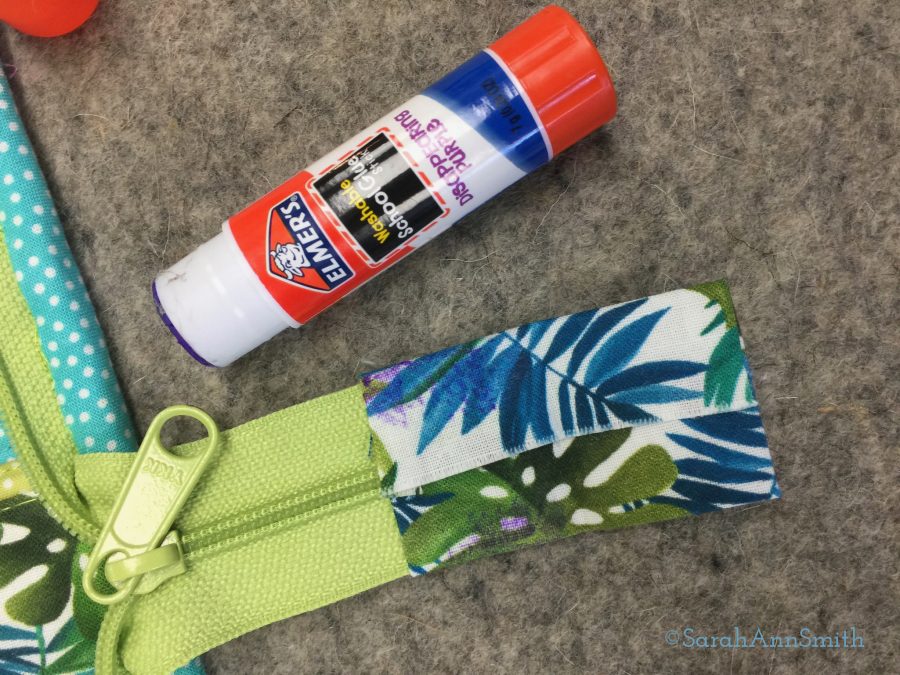
I managed to fit everything except the roll of tape, plus a few extras.As usual, I need to customize things. My pleated pockets hold my rotary cutter on one end and my breath mints (truth: you teach and don’t hydrate enough because you don’t want to need to leave the classroom to run down the hall, but that can lead to lunch-breath! Ick! So I always have Altoids!).Sewing with tissue or paper under the vinyl prevented sticking to the machine bed. I was impressed by the thickness and flexibility of the byAnnie vinyl–the best I’ve come across. I received one of Annie’s stilettos in the teacher goodie bag at Houston years ago but hadn’t really used it, preferring to use a bamboo skewer or something less hazardous if I hit it with the needle. I am a convert to using this tool for many (though not all) purposes. I took a 90 minute lecture/demo class with Annie Unrein at Houston during Market last year, and learned that the tip isn’t smooth but kinda grippy. What a difference that makes! And the flat back end “presses” seams open at the sewing machine. The fact that you can also “spear” the fabric or zipper tape with the tip makes wrangling the multiple layers easy.Those new BFF Wonder Clips also make it easy to control the bulk without bending pins! And now I want to go have a pina colada on a beach somewhere….Annie has a pretty nifty way to create beautifully finished edges. Using the ability to fine-tune where the needle drops combined with the accufeed (walking) foot meant I was able to do a nice job with the topstitching which keeps the zipper tape from misbehaving while in use.I’ve been impressed by the M7 ever since Janome America (THANK YOU AGAIN for 16+ years of sponsorship!) sent me a loaner. I continue to be astounded at how well it works. I mean–a quarter of an inch thick through dense zipper tapes (TWO of them), foam batting, multiple layers of fabric, and not a fuss! If I were just traveling by car, I would TOTALLY make Annie’s Take a Stand bag, the companion to the Running with Scissors pattern. You just drape this case over the top of the Stand bag, and presto. I improvised by creating straps cut from 1 1/2″ x 12″ strips of fabric. I appliquéd magnets to the inside of the outside pockets (testing to make sure they would grab, and indeed they are plenty strong). The photo below shows the testing stage.The other minor fiddle to the pattern… I did the tabs my way. I sew a square or rectangle to the end of the zipper. Then I use my beloved glue stick (which is dynamite for sewing bindings by machine for washable things like placemats) to hold things in place before sewing. And here is my finished bag on the inside… I LOVE IT! It’s SO PRETTY!!!!! On the right you can see how the magnet-strap tucks into the pocket (top, with green rotary cutter) and pulled out next to the Altoids tin. At first I wasn’t going to make the optional pressing mat. The idea of it is to protect your tools: set it in the center of the case and when closed the tools won’t rub on each other or scratch. I thought–don’t need the bulk. But then I thought why not…I can take it or leave it at home as needed. But I was worried about plastic tables at guilds if I were to use the Soft and Stable foam insulation. Instead, I used a layer of print fabric, a layer of pure cotton batting, a layer of the solarize insulating material, then two layers of wool felt. I didn’t quilt them…just sewed them together around the edges. It works!
PS: that quilt top in the background is going to be called “214,” for the 214 colors of Cotton Couture solids made by Michael Miller. Stay tuned for that quilted later in the year!
I only did one thing I wish I had done differently: I didn’t quite get the measurements correct when handling the zipper on the tab end because I had modified the sizes. I expect the zipper would be easier to open if I had heeded the precise measurements, but working from the center out instead of the edge to the center. I have learned: trust Annie’s patterns (and I’m not usually one to go by someone else’s rules).
I LOVE THIS BAG SO MUCH–the Michael Miller fabrics just make me happy–those are SO my colors! I actually have not put it away, and reorganized my work table so I can keep it opened / standing up right near where I work. Stay tuned for my own take on bags and baskets in May and at least one other byAnnie pattern later this year!