My video about my online and in person teaching debuted this evening at Global Quilt Connection, an amazing resource that allows you to meet the teachers. I hope you’ll enjoy it and think of having me teach for you, online and in person. There are five sessions, and the day following each of the five, ALL of the presentations are available to view at your convenience. Find the links here.
Full details on my workshops are available here, and a sample contract with price info is there too.
I am in awe of the teachers who presented tonight at Global Quilt Connection. I’m thrilled that so many teachers have moved online because now *I* can take classes that have heretofore not been available to me. Hope you enjoy my video! Do write if you are interested… I can customize classes, break a full day into to half-day sessions and more.
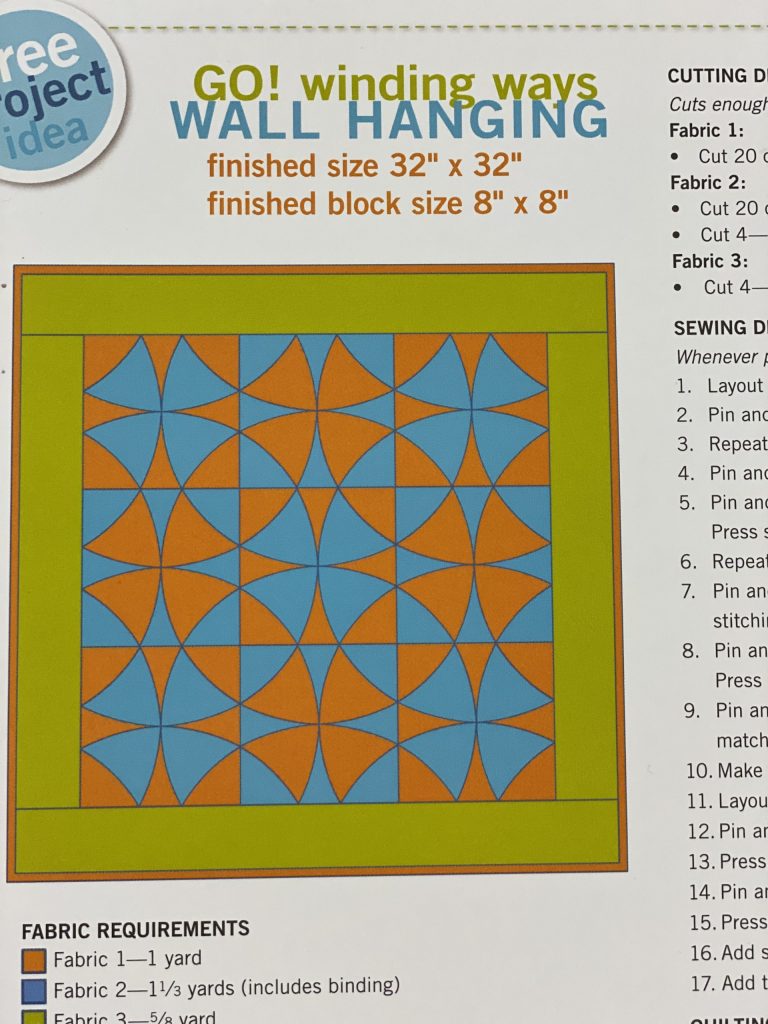
Good tools (AccuQuiltGO!), good fabric (Michael Miller Fabrics), good thread (Aurifil), good machine (Janome Continental M7), and some experience, and you can do a lot! This return to my quilty roots just makes me happy!
Over the course of the year I’ve shared progress on this quilt:
First, there was learning to use the AccuQuiltGO! which I blogged about here. It was a different block, but the easy applies.
Then there is the PIECING of CURVES: see the blogpost here or go directly to the video on my YouTube Channel here.
Now there is the quilting video (that covers a couple other things), embedded below and share-able on my YouTube Channel here.
Full disclosure: I have proudly been a Janome Artisan since 2003, and this year am a Michael Miller Fabrics Brand Ambassador for 2020. MMF provided the fabric and we were given, as part of being a brand ambassador, an AccuQuiltGo and several dies. To my surprise I enjoyed the process so much I have purchased both the Winding Ways and Crossed Canoe dies. Stay tuned for more!
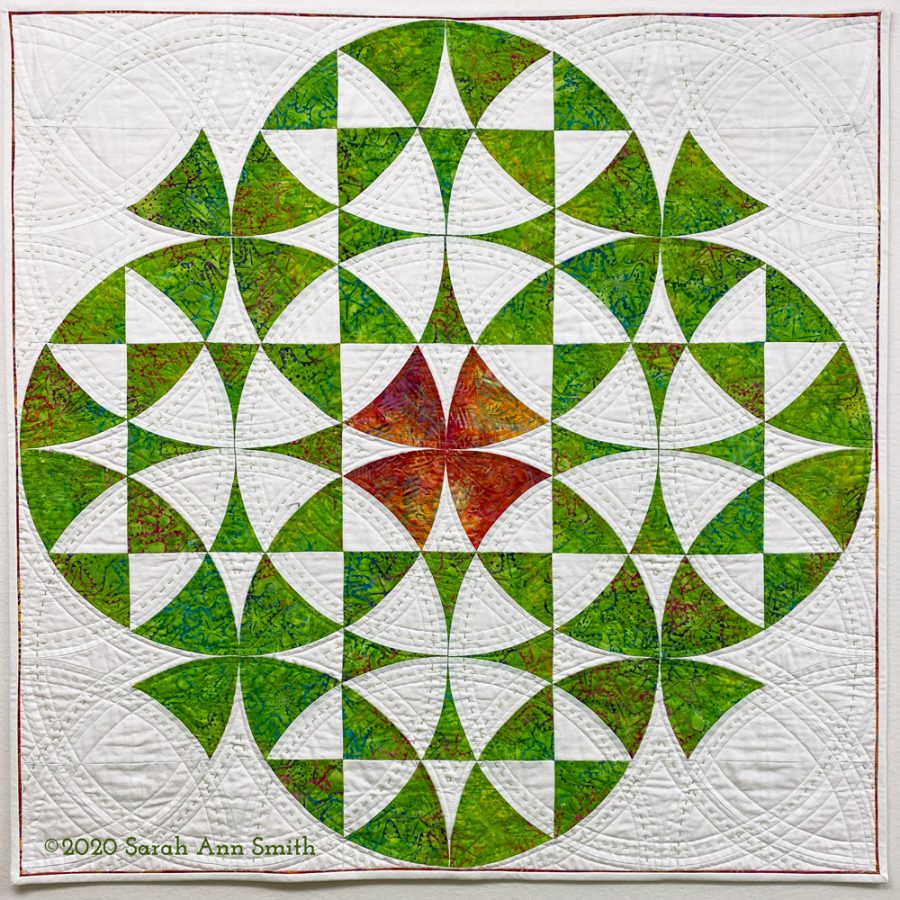
This is the die that I purchased to make the Winding Ways, which has always been one of my favorite traditional blocks. Click this link to see a blogpost of using the AccuQuiltGO (for another block, but it’s the exact same process) including a video.I found this design somewhere on the internet and printed it out to mess around with a design for a future quilt! Stay tuned for a WANDERING Winding Ways! Using a grid like this can help you plan out fun color fades and settings.
Next came machine quilting. I worked on that a while back–I did end up teaching for the Mancuso Online Quiltfest in August and will do a Threadcoloring the Garden workshop in October! More info on that soon! In this video I’m practicing making a video, demonstrating at the machine, and it just happens to be walking foot quilting (fast! easy!) on my beloved Janome M7. Even if I had paid full price instead of being a Janome Artisan I’d rave about this machine’s wonderfulness! Their new slogan, Reliability by Design, is really true!
Then, the hand quilting and the finishing!
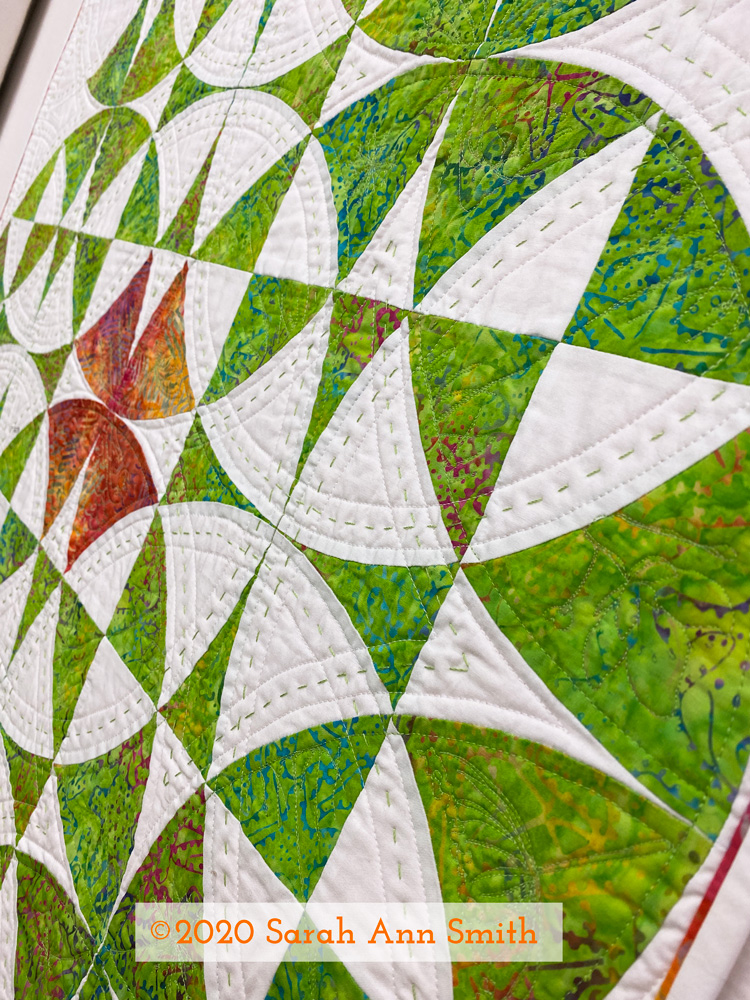
I haven’t done any hand stitching in a thousand years, but nearly two years ago I bought matching green thread from aurifil in piecing/light quilting weight and a heavier 12-wt that is about the size of a light perle cotton or 6-strands of floss. I LOVE IT…and it went so fast! I can remember clearly sitting on the porch in early summer, something to watch on the iPad, stitching away.
I just love how an angled shot shows the texture and dimension. I was surprised at how quickly the hand stitching went. I used the same green color of thread on the green parts for machine quilting as the green in the heavyweight Aurifil thread.
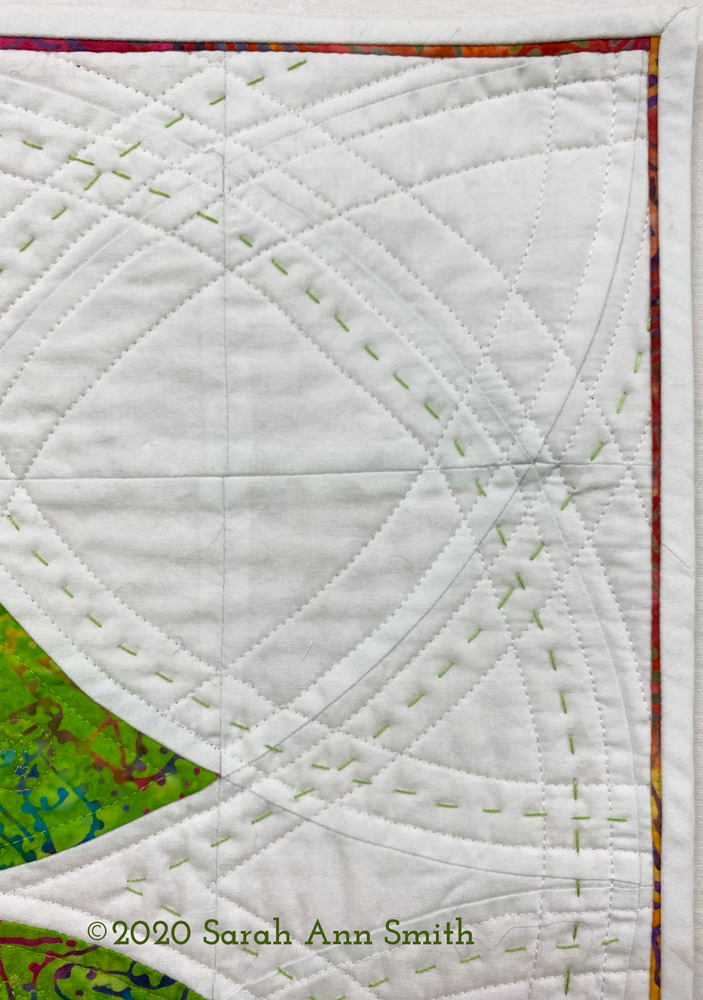
I wanted to repeat the orange batik in the center on the edges, but using it as the binding was too much. I instead inserted a tiny stitched down “reveal” that is a scant 1/8″ just inside the white binding. Can I also put in a plug for Michael Miller’s Cotton Couture solids? The quality of the base cloth is SO GOOD! And the consistency in color / dye lots over the years is really amazing. I dye fabric and know how hard it is to get perfect matches from batch to batch and it does.
Last but not least, those skinny inserts and perfect corners.
I taught the half day version of my bindings workshop at the Mancuso Online Quiltfest in June and may do so again in the new year. I am scheduled to teach and have an exhibit of my work at the Mid-Atlantic Quiltfest in Virginia in February, but at this point who knows if it will be in person or online! I promise I will teach the bindings (full or half day) again in the new year online, just need to figure out when. My students in June had GREAT results online so it works online too!
Anyway, I hope you’ve enjoyed my 2020 detour back to my quilty roots. Coming soon, a new art quilt!
As I was setting up for my next online teaching gig, I thought it would be fun to share what it’s like totally upending your workspace to get ready to teach. Have fun watching this video. The sound varies (probably moved the phone farther away then closer), so with apologies, just adjust the volume as it goes along!
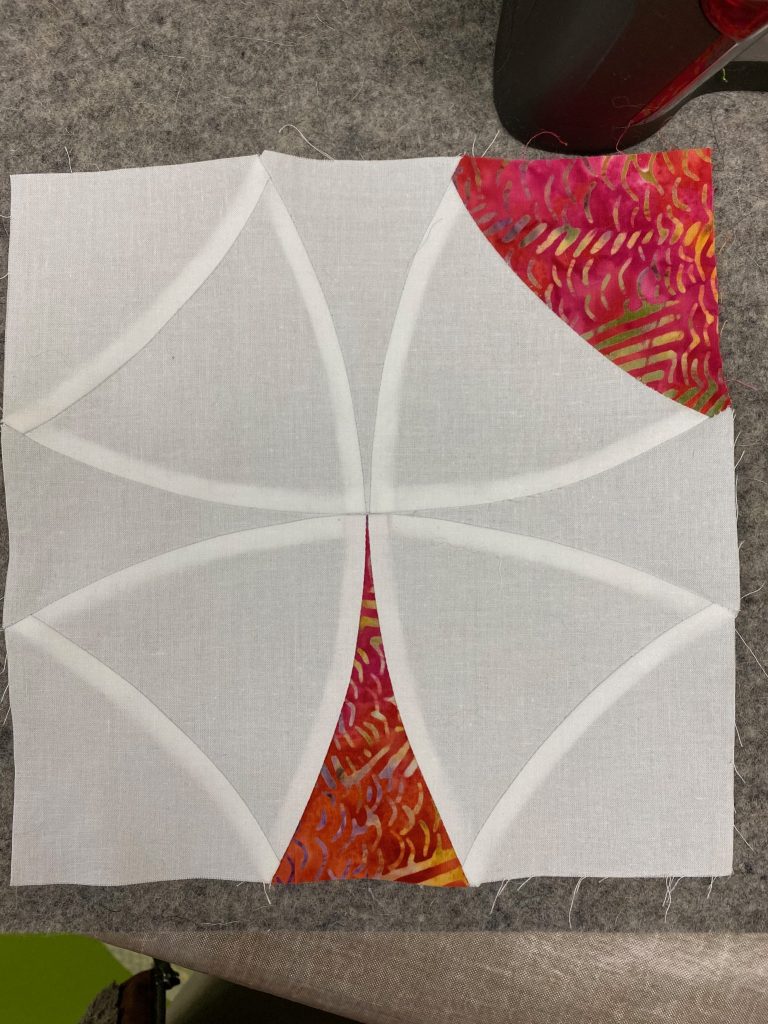
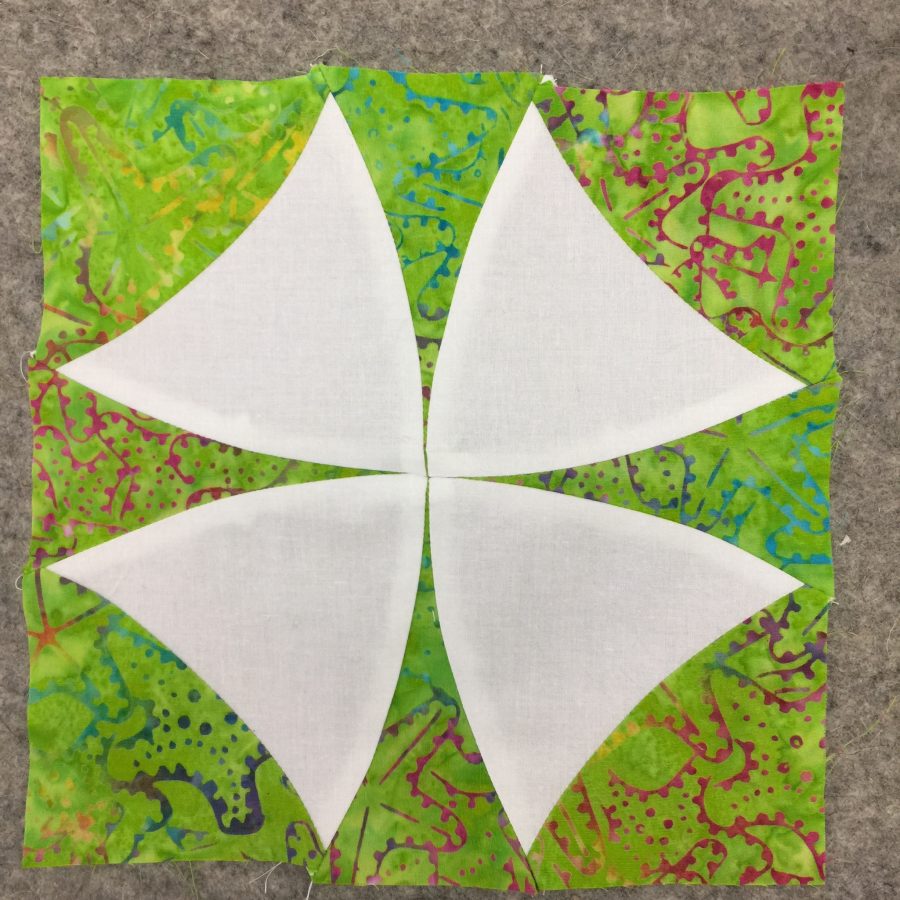
Whoo-eeeee! Lookit those perfect seams… this was my second block, and I think it looks pretty durn good for someone who doesn’t really piece a lot! There are a few MINOR things I can fuss at (like the seam allowance on the center top spike is a skosh wide and the upper left corner edge isn’t perfect, but still! Fabrics are batiks and Bright White Cotton Couture from Michael Miller Fabrics.
Precision piecing has never been my strong suit, but I am — like Michaelangelo at age 80 — still learning. One of the things I’ve learned is that it is OK to use specialty tools like the AccuQuiltGO! and byAnnie’s stiletto. Thank you to Michael Miller, for whom I am a Brand Ambassador this year) and Janome America for having me as an Artisan. For me, careful cutting for squares, rectangles and triangles isn’t too TOO challenging (as long as I’m paying attention which is never to be take for granted LOL). But CURVES? Not so much.
Back in May, I shared a video that tells yo about the amazing (Heavenly Perfection?) HP presser foot and throat plate, herhttps://www.sarahannsmith.com/weblog/?p=13206e. If you have a Janome with this option and haven’t tried it out, DO! Go watch the video… it’s a brief but I hope helpful mini tutorial. The video is also on my YouTube channel, here. I’ve been doing a bit more with brief videos…looks like about one a month. I’ll have another later this month about using the blind hem stitch for some slacks I made–you can subscribe to the channel.
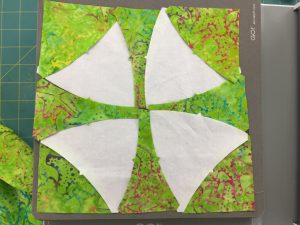
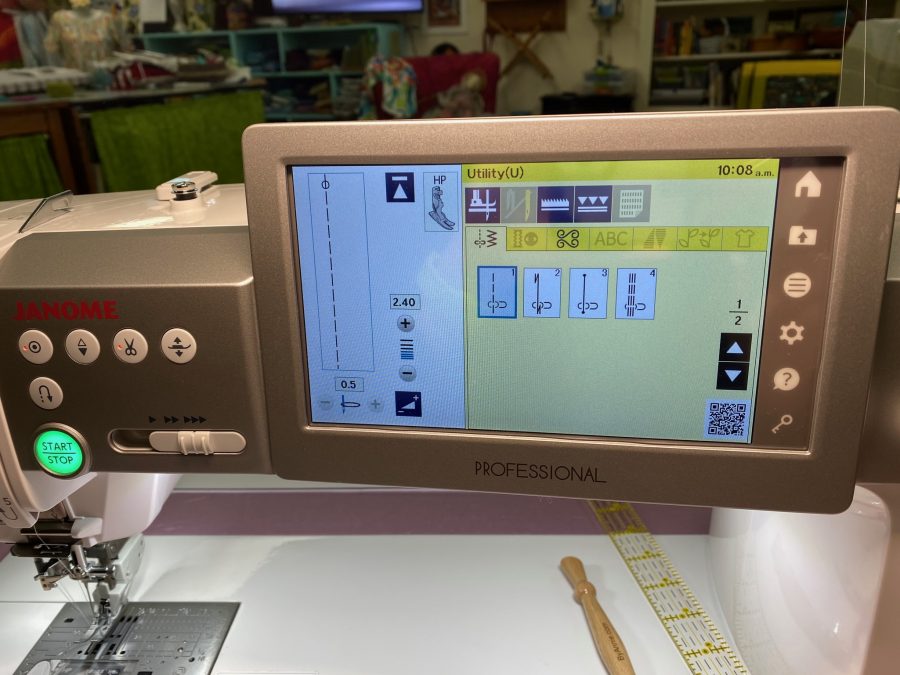
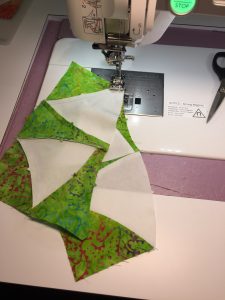
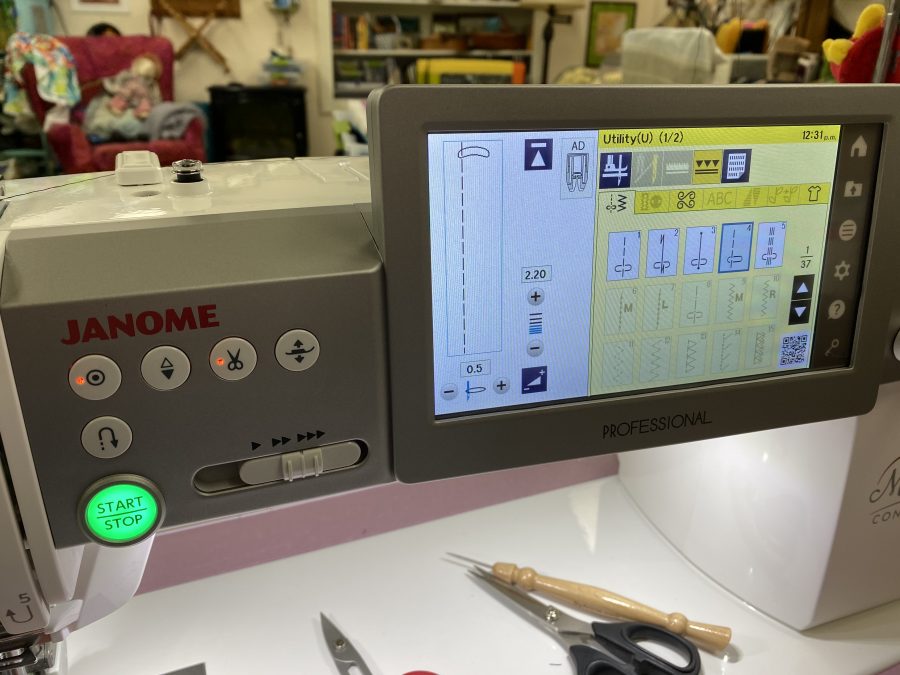
After cutting using the Winding Ways die (requires the AccuQuiltGo or similar cutter, too), I laid out the blocks to see how they looked (and to make sure I had enough of each shape).Here are the settings on my M7 for the HP foot which helped me get such amazing accuracy and careful piecing. Slowing down helps, too. Ahem.First, I cut and assembled segments.
Here’s a quick video of me using the oh-so-wonderful HP accufeed foot and throat plate from Janome, on my M7. Thanks to Kimberly Einmo who shared her love of this accessory at the 2018 Janome Education Summit! Like I said…there is ALWAYS more to enjoy learning.
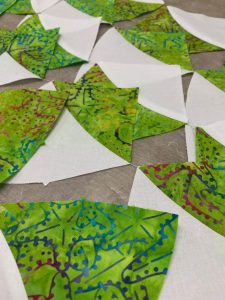
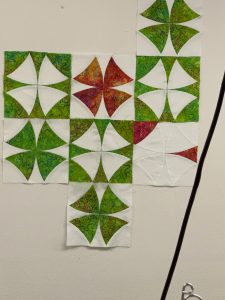
Sub-units createdFollowing the assembly instructions that come with the Winding Ways die, you press seams in specific directions and create and assemble sub-units in a specific order. Then you get as close to perfection as I am ever going to get! There is still some fine tuning I need to do (meaning the dreaded P-word: PRACTICE) to get the outside edges straight, but I mean really, look! Here’s my Winding Ways on the design wall, considering various settings. I ended up going fairly traditional…I’ll share “done” in a week or two.
Hope you’ve enjoyed my detour from art quilting. I’ve actually needed a break to recharge myself, and this has been DELIGHTFUL. I’m thrilled with the finished quilt… will post it in about a week or so.
Full disclosure: I’ve been a Janome Artisan for 16 years, and am forever grateful for their support and machines. I’m a Michael Miller Fabrics (MMF) Brand Ambassador for 2020; the batiks and white fabric were donated as part of that ambassadorship. The AccuQuiltGO! was a GIFT (!!!!) as part of the MMF thing, and I purchased the Winding Ways die once I realized that wow, I could USE this machine! Whooda thunk it? Well, I should have. Having FUN! And lastly, thanks to byAnnie.com; their donations to the Teacher Goodie Bags in Houston one year netted me that awesome (and not expensive) Stiletto!
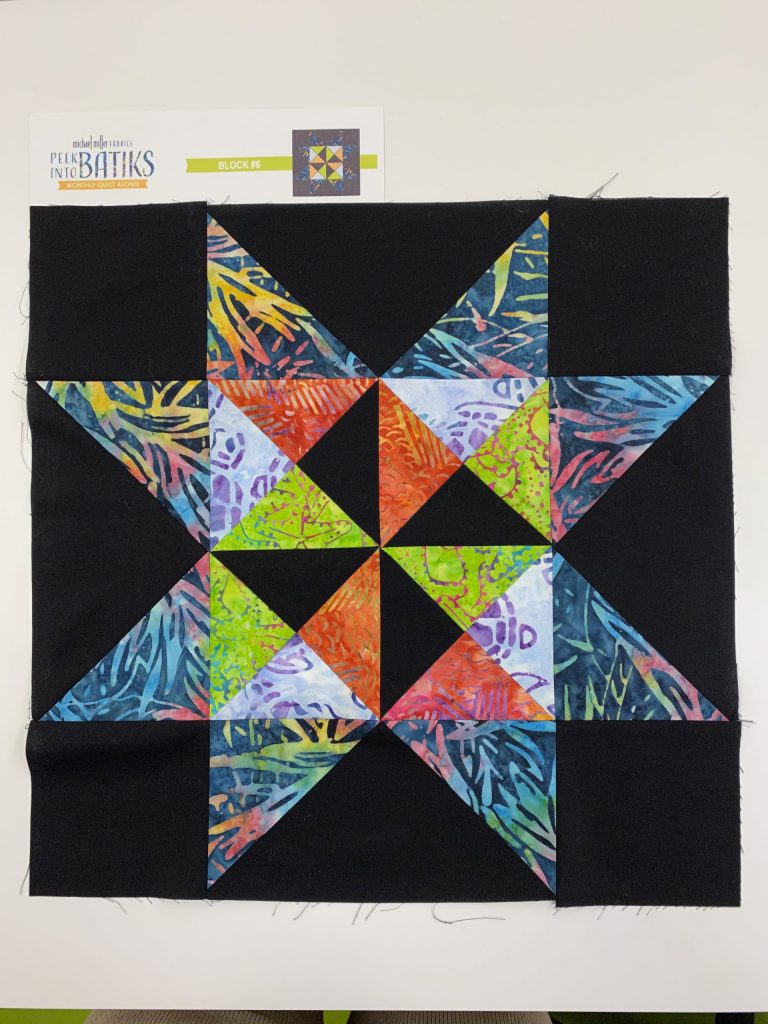
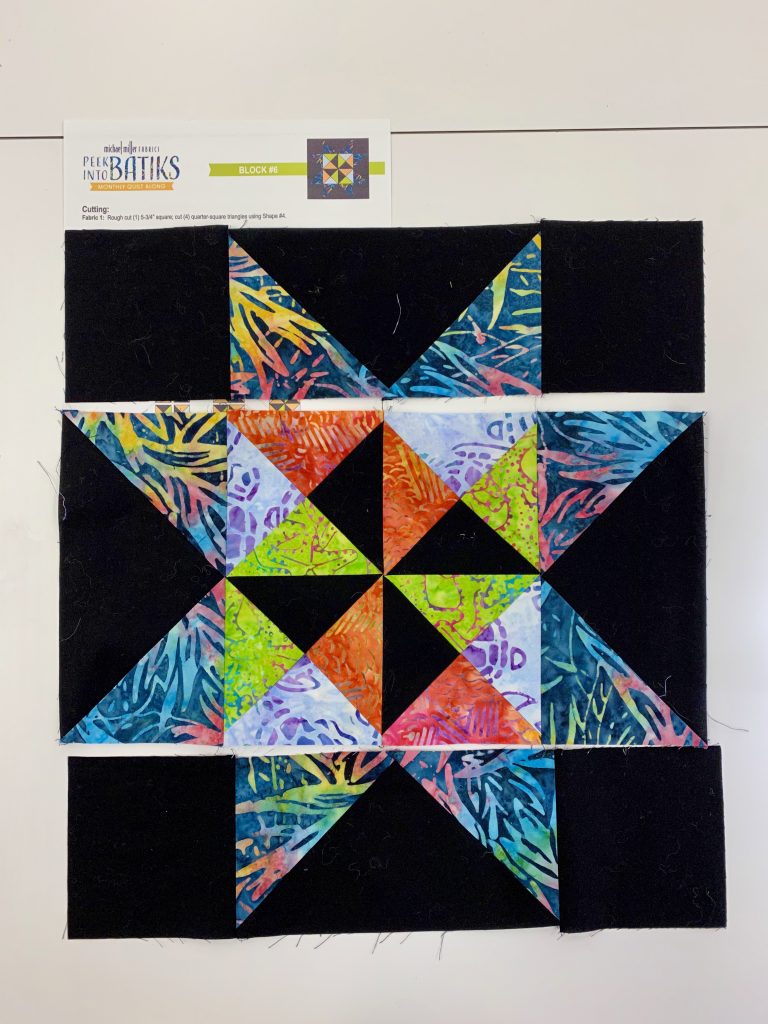
Earlier in the year I shared that Michael Miller Fabrics is doing a Block of the Month called Peek Into Batiks. It all began here. That post has links to each month as the new block goes live. Well, June is my turn! I’ve got still photos and (gasp) a video! And, drum roll here is the link to the JUNE Pattern and instructions.
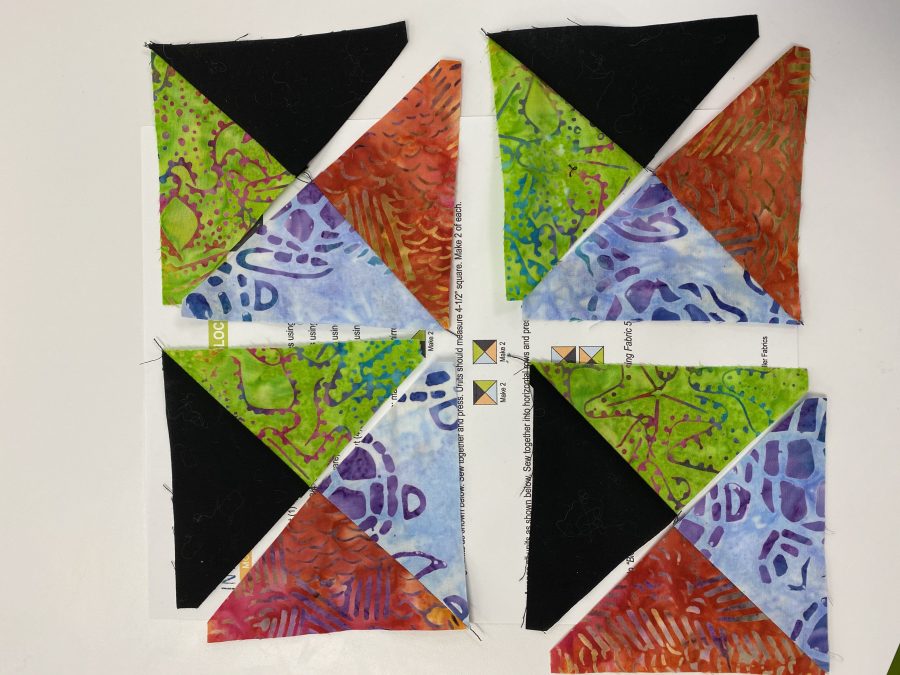
Here’s the finished block! Read on for step by step instructions.
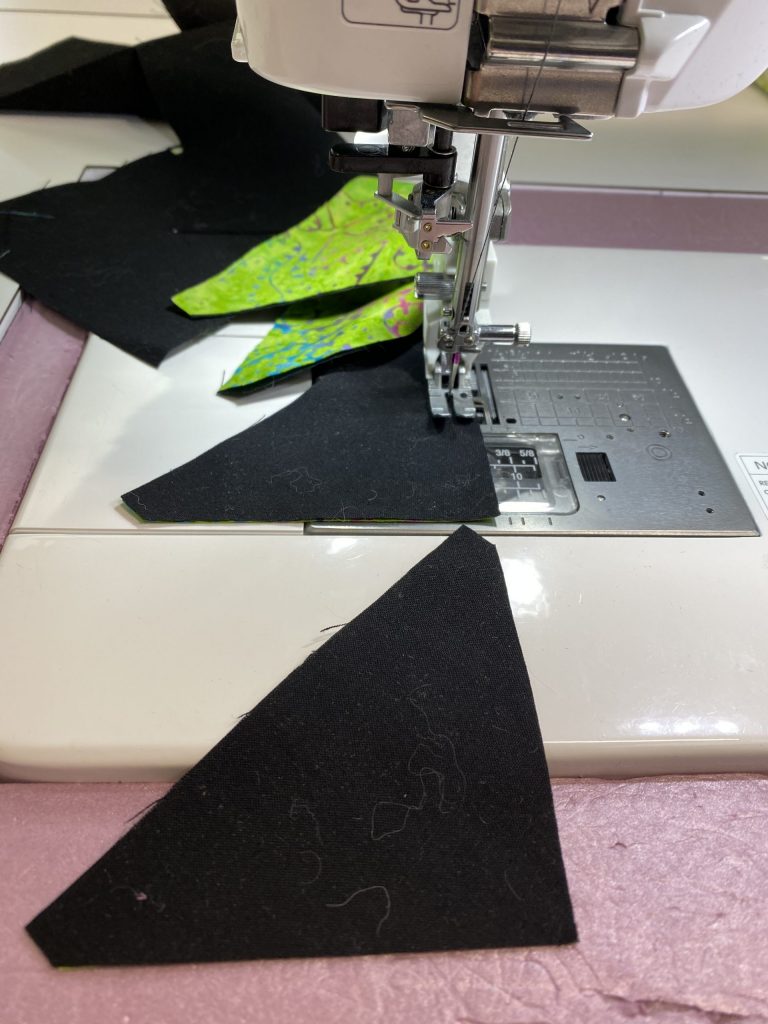
First, of course, you need to cut your fabrics. I used a hybrid method using the AccuQuiltGo! for everything except the large black triangles on the border. First, let me show you how fast it went cutting the components on my AccuQuiltGO! in this video. The video isn’t perfect–I’m improving in my editing skills. I need to mark what is within camera view though! Next video will be even better…I’m learning! When I was playing, it stopped a couple times so just click play again to continue–keep an eye on where the progress bar is. Dunno what’s up with that…another learning curve LOL!
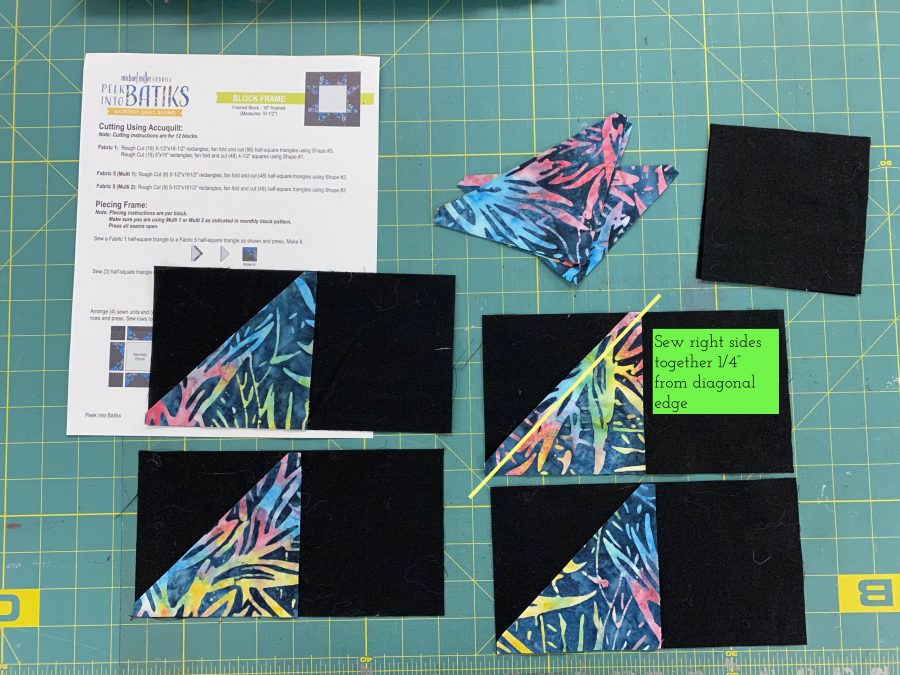
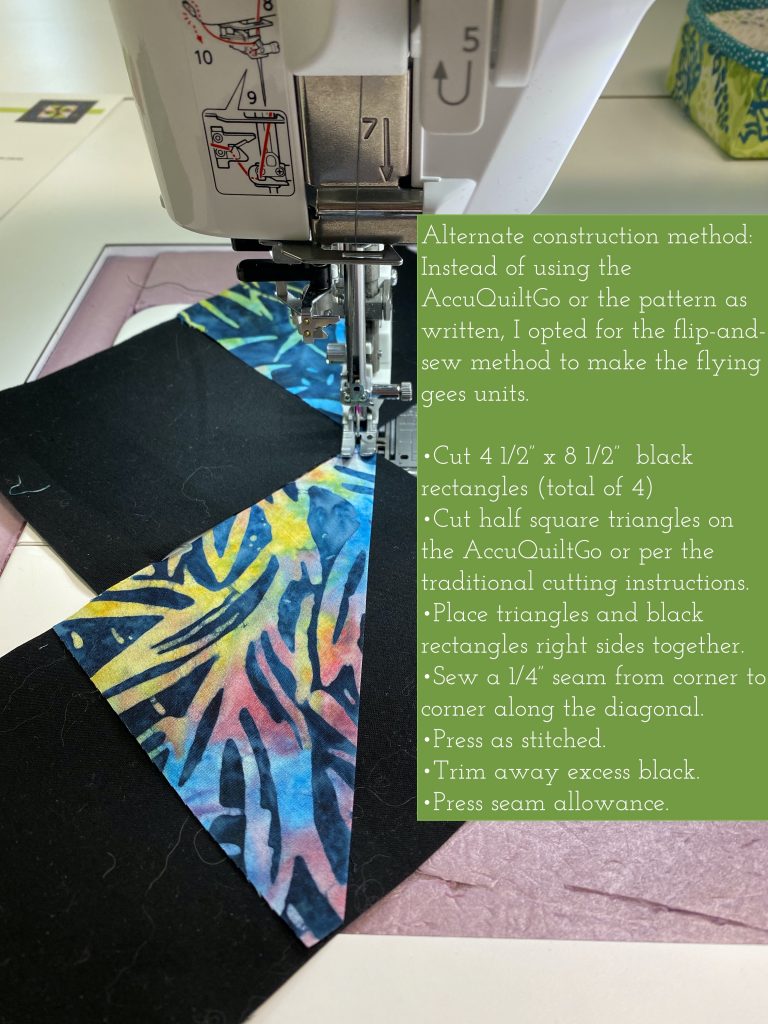
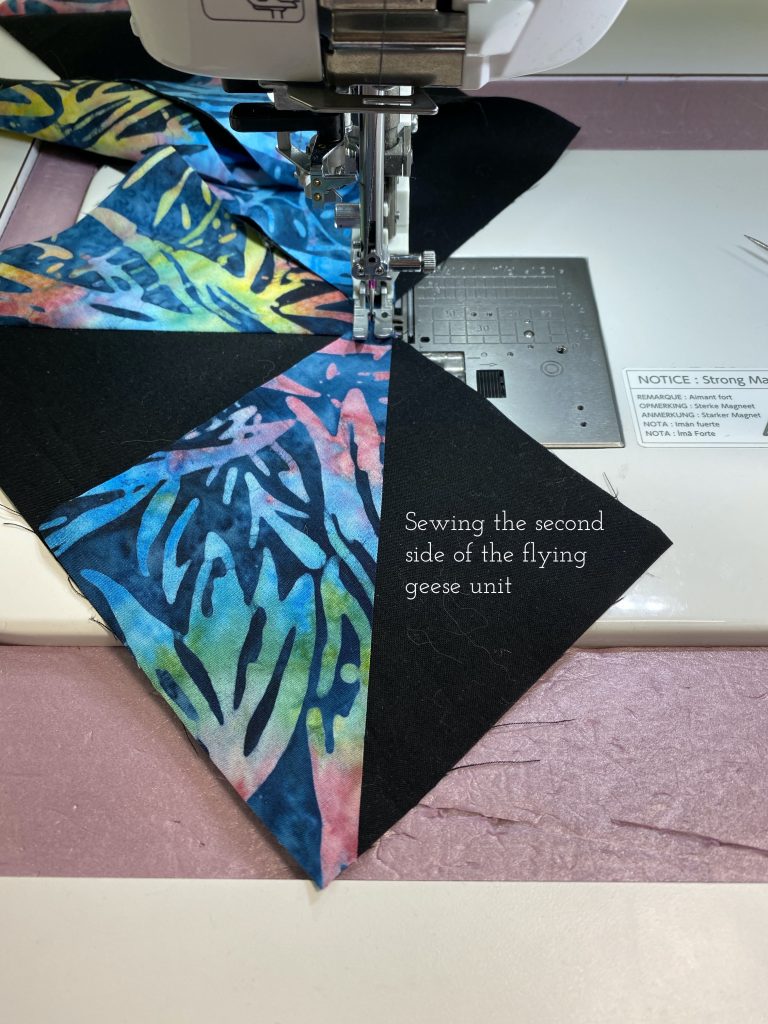
Wasn’t that amazing? Wait until you see the Winding Ways quilt I have in progress for later this year! For now, let’s stick to Peek Into Batiks! This step is where I veer from the instructions (of course, it’s me… who follows instructions EVER completely? Not me…) In the interest of fewer seams, I chose to use the flip-and-sew method for the Flying Geese Units.
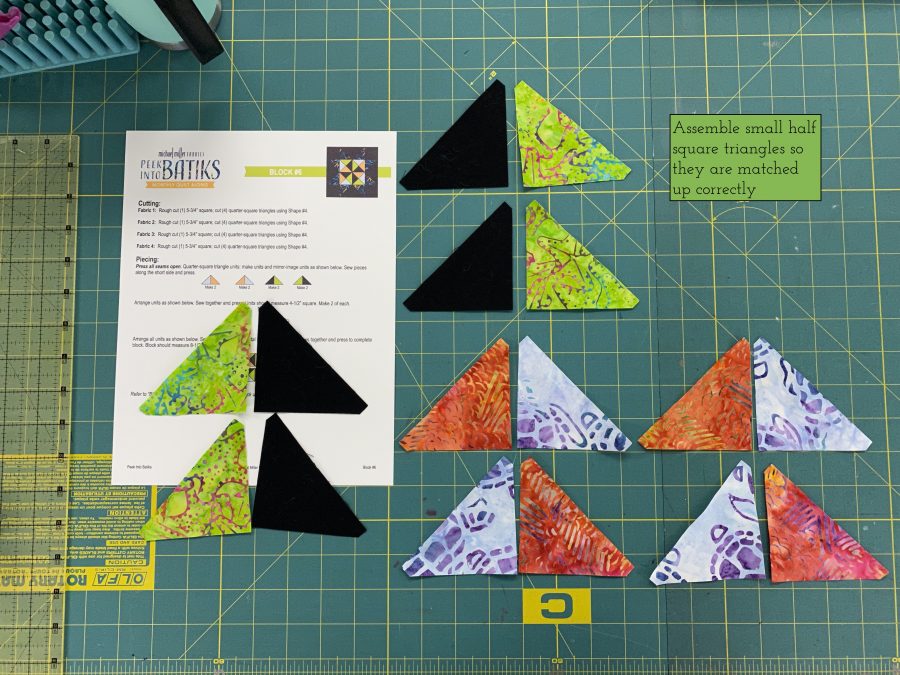
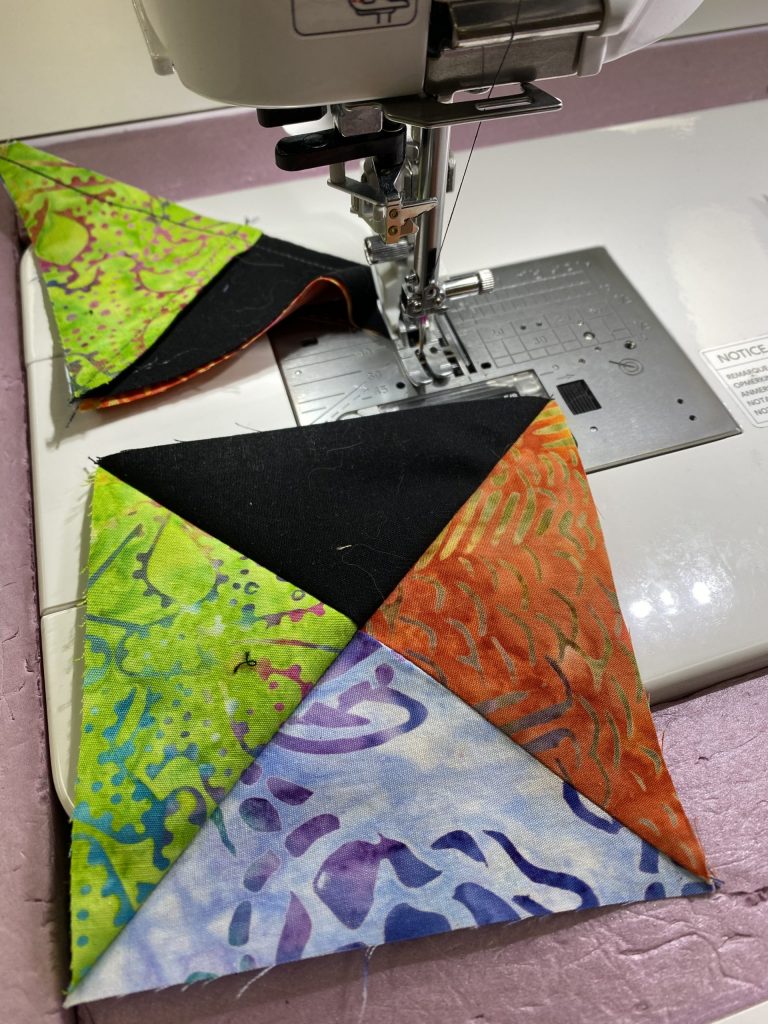
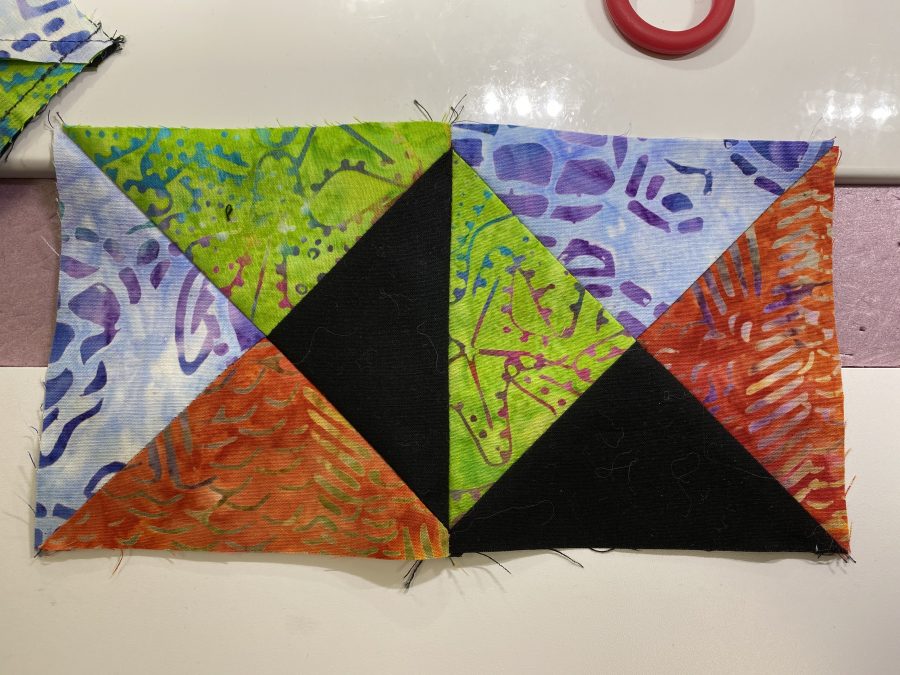
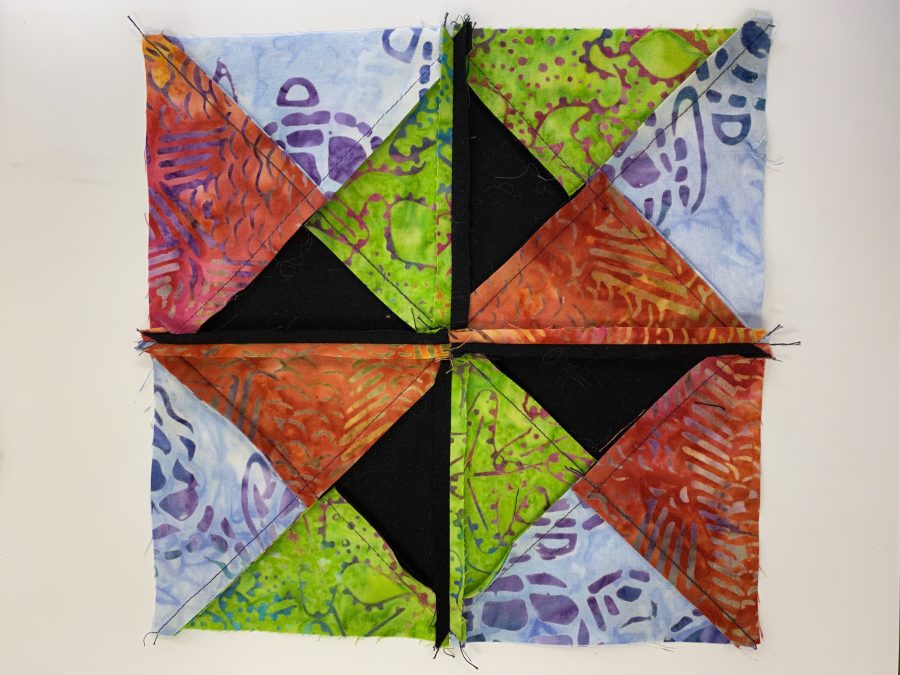
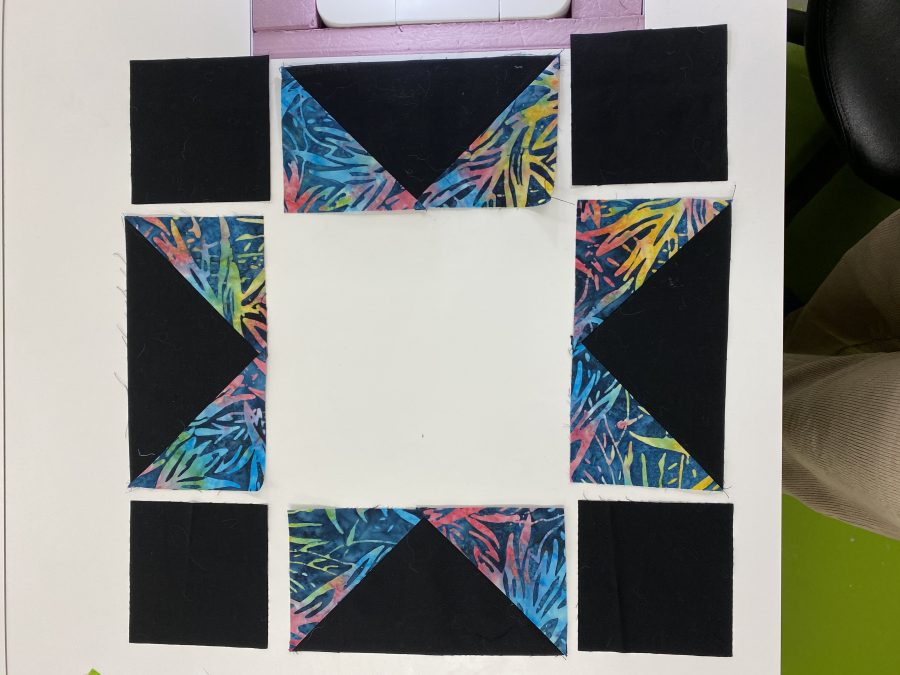
I’ve set out the large rectangles and half square triangles to make the frame for the block.Then I chain pieced the first side of the large Flying Geese.For the second side of the Flying Geese, same process, just make sure you get the triangles doing in the correct direction. Sew, trim, press.And the actual sewing bit…In the interest of not ripping out seams, it really helps to lay these out so you have theirs organized correctly.Next up, piecing the quarter-squares for the center. First, sew two triangles together. The Janome M7 Continental lets me piece SO accurately. Between the M7 and AccuQuilt, even *I* can be precise! I paired up the two-triangle units to make sure I didn’t mix them up while sewing.Then, sewing the pairs together. Using the M7’s HP foot and throat plate meant PERFECT piecing. See next pic!And two of the quarter-squares sewn together. I can’t believe I pieced that perfectly!Here’s the back of the block. Notice that some seams are pressed to one side, but the main seams joining the four squares are pressed open. This helped keep everything nice and tidy and perfect on the front.Once the center unit was ready, I set up the “frame” for the block.I sewed the sections together in three rows. Notice the only imperfection is down where *I* used rotary cutting…sigh……..Here’s the finished block again!
Remember, go here or HERE for all the links to the six blocks so far and to check in for the rest of the year. The finished quilt is beautiful!