So those of you who follow me on Facebook know that I’ve been doing a fair bit of knitting this past two years. A while back while browsing in Pinterest, I saw an ad asking for beta testers for a new knitting app by Bellish. I signed up, made a sweater, LOVE the app and as of today! it is available in the App stores, and is currently free (but will probably go to paid at some point). I have been telling local friends and shops about it because it is amazing.
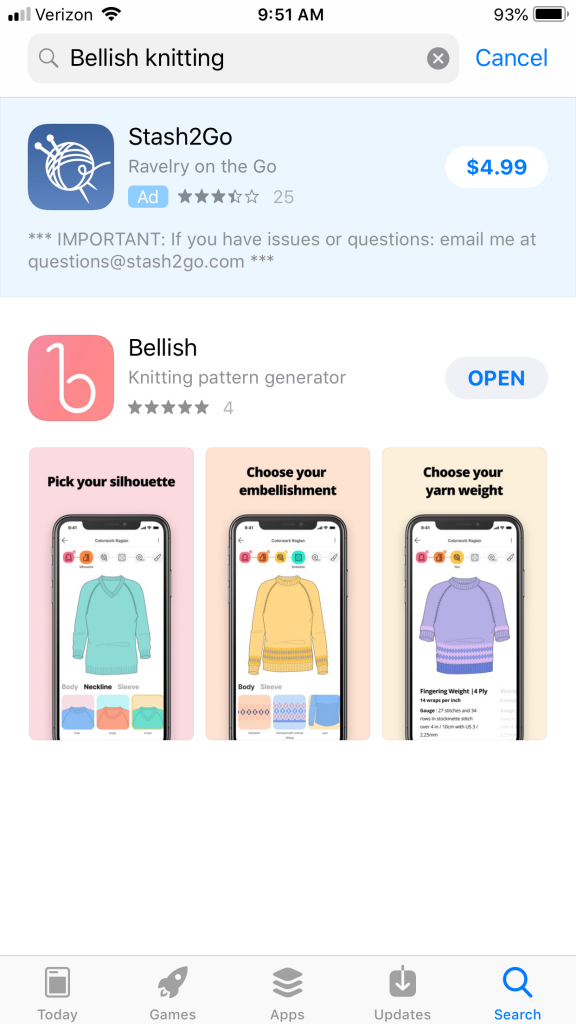
Go to your device’s app store and type in Bellish knitting. The name of the app is Bellish, but because it just went public today other weird stuff pops up if you use only the name of the app, so be sure to add knitting to your search.
As an intermediate, perhaps advanced, knitter, this app lets me do what I’ve always wanted: customize a design for my taste and figure, and it is EASY. I signed up as a beta tester when only one base design was available. I was easily able to turn a crew neck pullover into a cardigan with lace panels on either side of the button band and down the back, add waist shaping, and it fits **perfectly.**
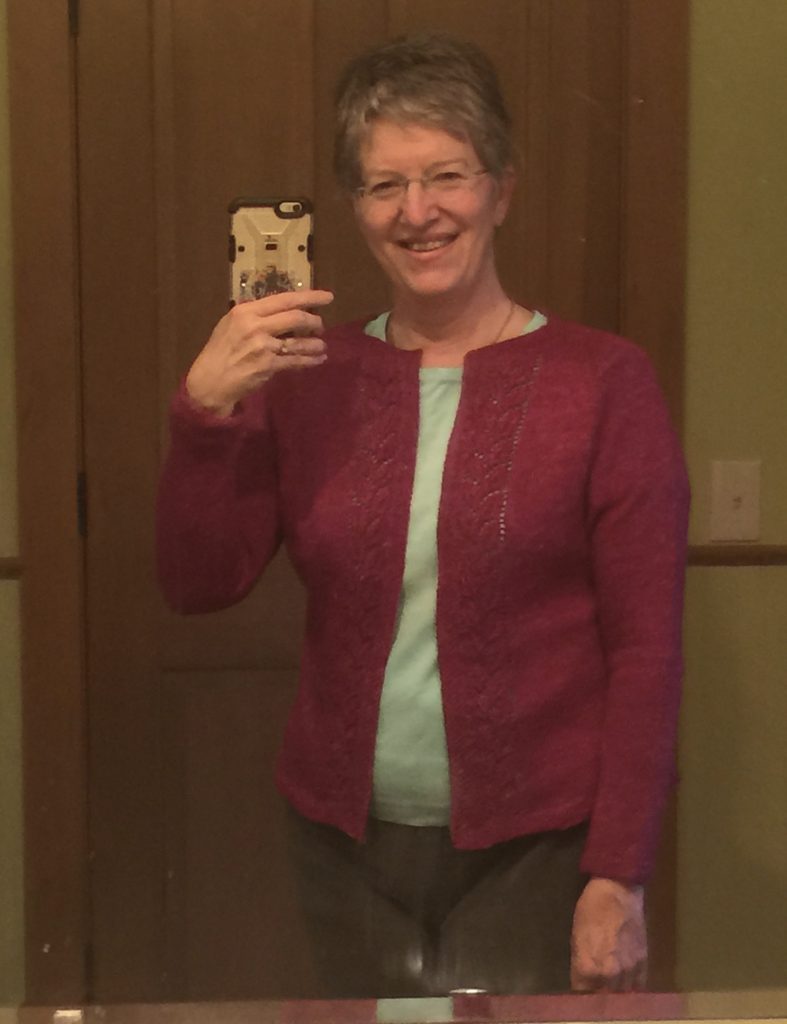
This is the “Cosmos” cardigan I made in fingering/lace weight yarn using the pullover pattern. Splitting in the center is easy, of course, and I added waist shaping so the sweater was more fitted and less boxy (check out Amy Herzog’s Knit to Fit book for tips on fitting). Yarn is Meadow by the Fibre Co. in Cosmos.
The row counters are so easy to use—keep the phone by your chair—and keep you on track. So does being able to check off a section done and using the Checkpoints to make sure you have the correct number of stitches. I’m looking forward to even more base patterns. I’ve recommended this app to friends and in knit shops whenever I can. Imagine being in a shop, falling in love with a yarn, and right there in moments generate a pattern that tells you how much yarn to buy! LOVE it!
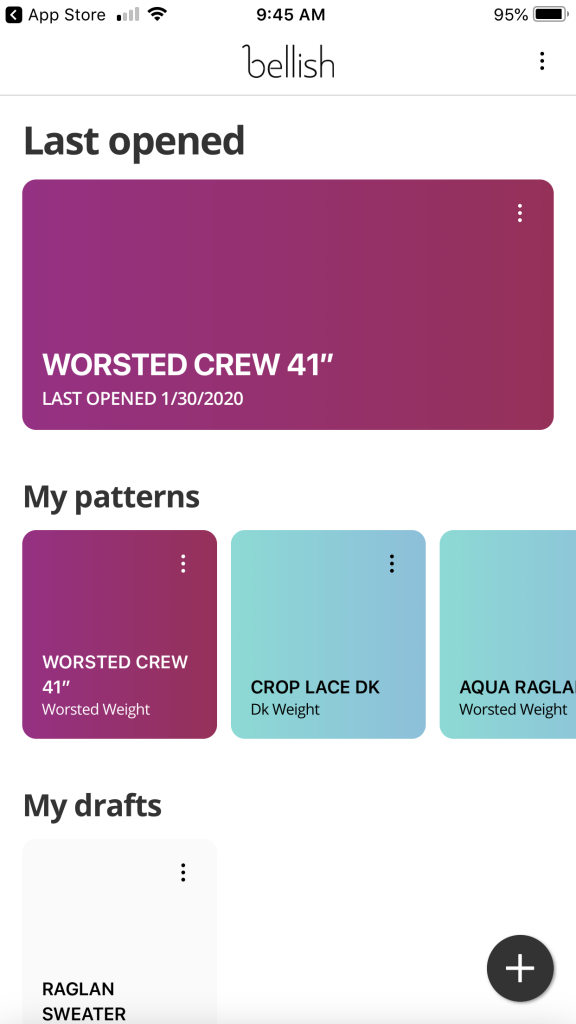
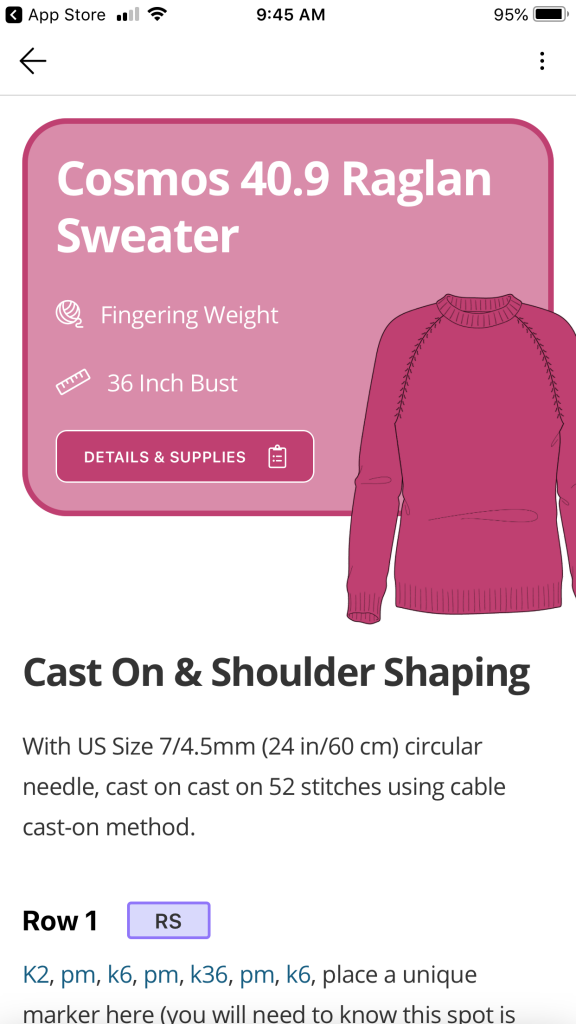
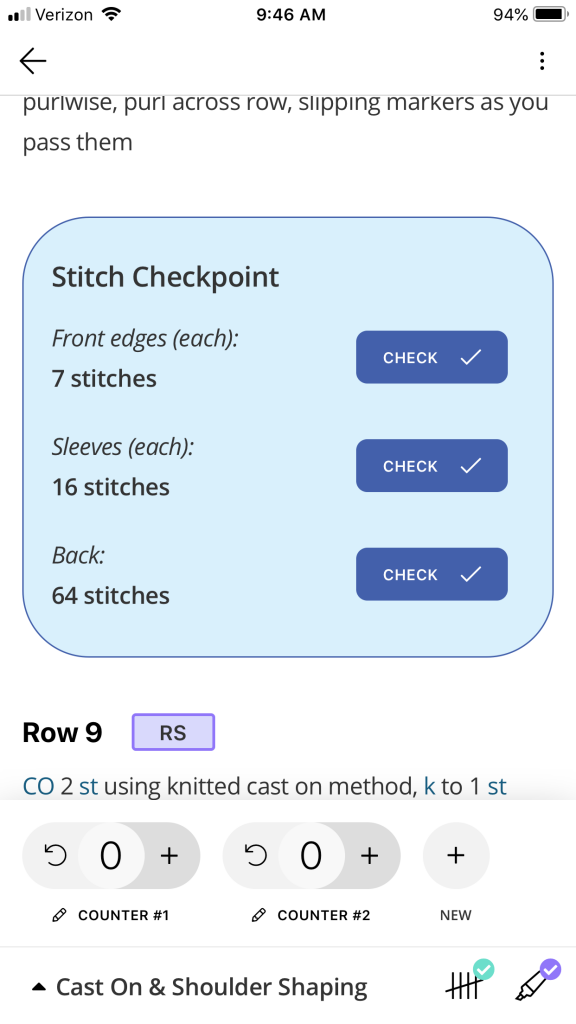
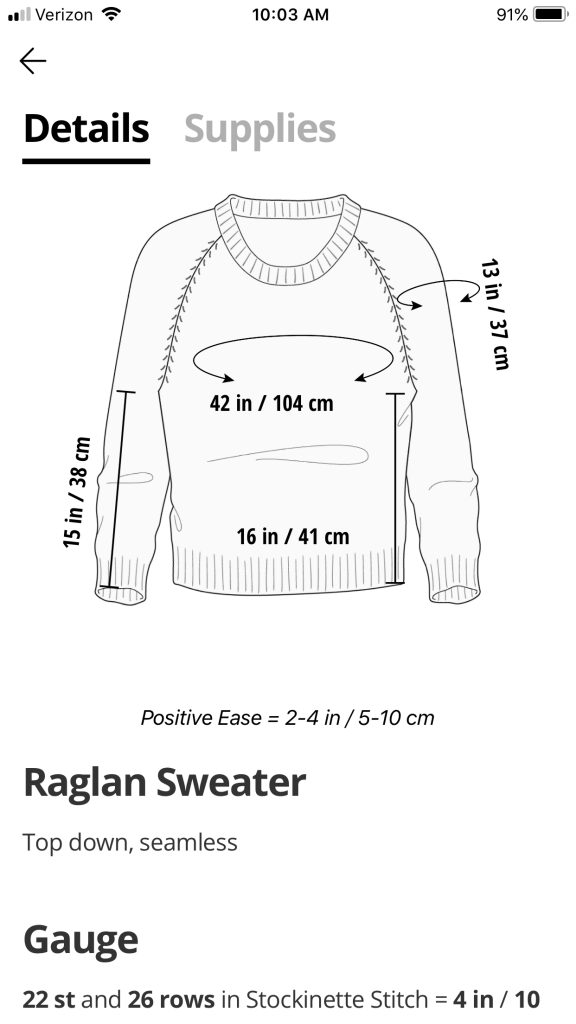
This is what your app looks like when you open it–at least once you have created a couple designs.This is the pattern I used for my cardigan, above. I was able to open up the color picker and select the exact color of my yarn. This is particularly helpful when using the option to create a stranded colorwork design. Notice that I titled it 40.9″ even though it is created for a 36″ bush–that is the wearing ease. Using a smaller-than-I-am pattern let me get the more fitted look I wanted.The app has Stitch Checkpoints every so often so you can double check that you have the correct number of stitches. It also shows the row counters. I used these and loved having multiple counters: you can use one for overall length, the other for a pattern such as the lace that I inserted. You can see that there is also a highlighter, so you can mark where you leave off at the end of a knitting session. Who doesn’t forget exactly where they were in the pattern…this makes it easy, and no big pieces of paper falling all over the place. This screen shot shows the schematic. I’d love it if they would add even more dimensions, such as width of neck, distance from top of shoulder to underarm seam, and (as someone who is broad-shouldered) width from shoulder point to shoulder point, but all things in time. OH, and another thing. I didn’t want the Cosmos sweater above with as much wearing ease as the pattern, but fitted. So I used the schematic with the finished measurements to see which pattern would yield the FINISHED dimensions I wanted. Alas, I am not a 36″ bust, but that size gave me the finished size I wanted. It worked!
SO, if you like to knit, open up your App Store (both Android and Apple/ iOS) and download this currently-free app! Yuppers, it’s five stars from me. I’m a happy sweater-wearing camper! I’m waiting for top-down cardigan with set in sleeves as a base…fingers crossed 🙂
Over the past week to two weeks, I have been working on ….sit down and prepare yourselves for this… a **pieced** quilt. Yes, me. A very simple pieced quilt, but nonetheless.
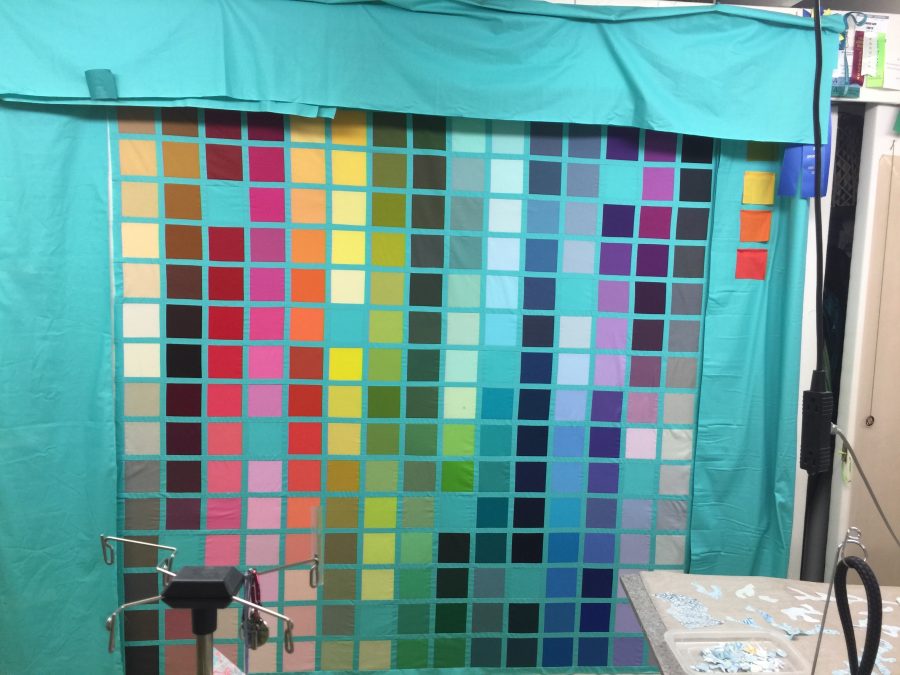
Eye-candy…my 214 colors, test-driving super wide borders with possible squares or rectangles. I’m going with nothing to distract from that glorious grid of color. Hopefully the quilting will make the wide borders look good. Want them that big so they will fit on a king size bed–we’ve got a queen but the pug takes up a ridiculous amount of room for such a small dog! The center is 72″ and overall I’m hoping for about 100″ square.
I’ve also been experimenting with the AccuQuiltGO! that was given to this year’s crop of Michael Miller Fabrics Brand Ambassadors. To my distress my block was not perfect–too small! I KNEW it had to be something on my end (it was), so I triple checked my seams (perfect to scant). I checked the size of the fabric cut on the dies: perfect. I checked that I used the correct dies: I did. Then I noticed something. After ironing, the block seemed off. Look at what I discovered:
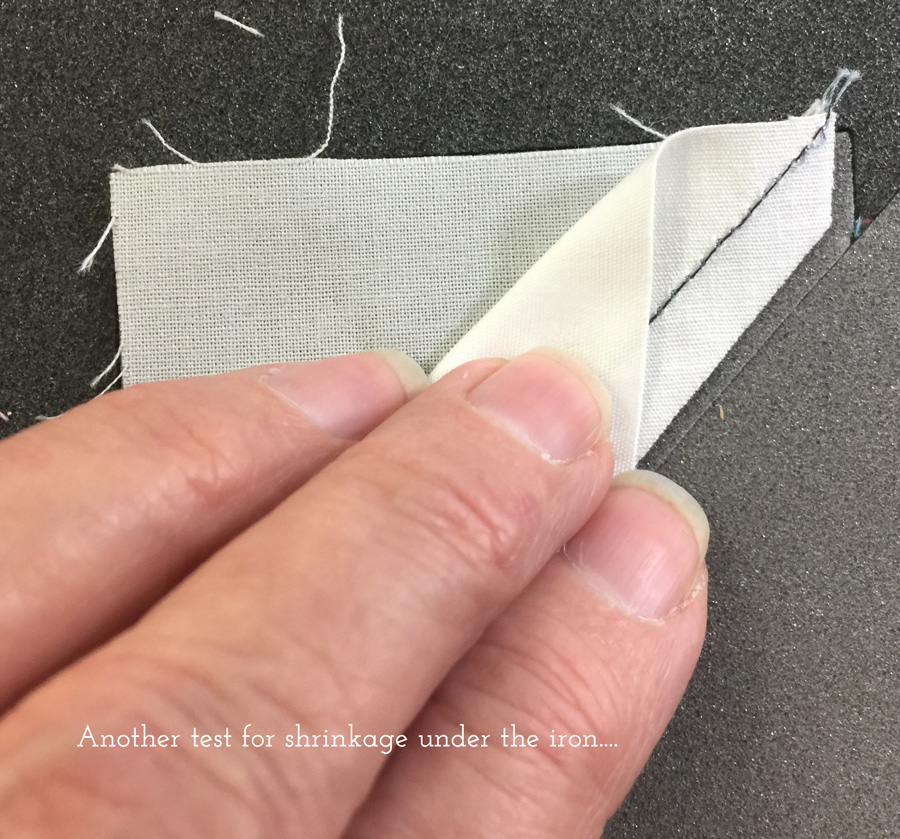
First I placed my half square triangles on the dies, and look how much smaller the pieces are after sewing and ironing! So then I checked the start of the square-in-a-square center of the block. Same thing: after steam ironing/pressing, a unit that finishes at 2″ and one that finishes at 3 1/4″ are each 1/16-1/8″ smaller!
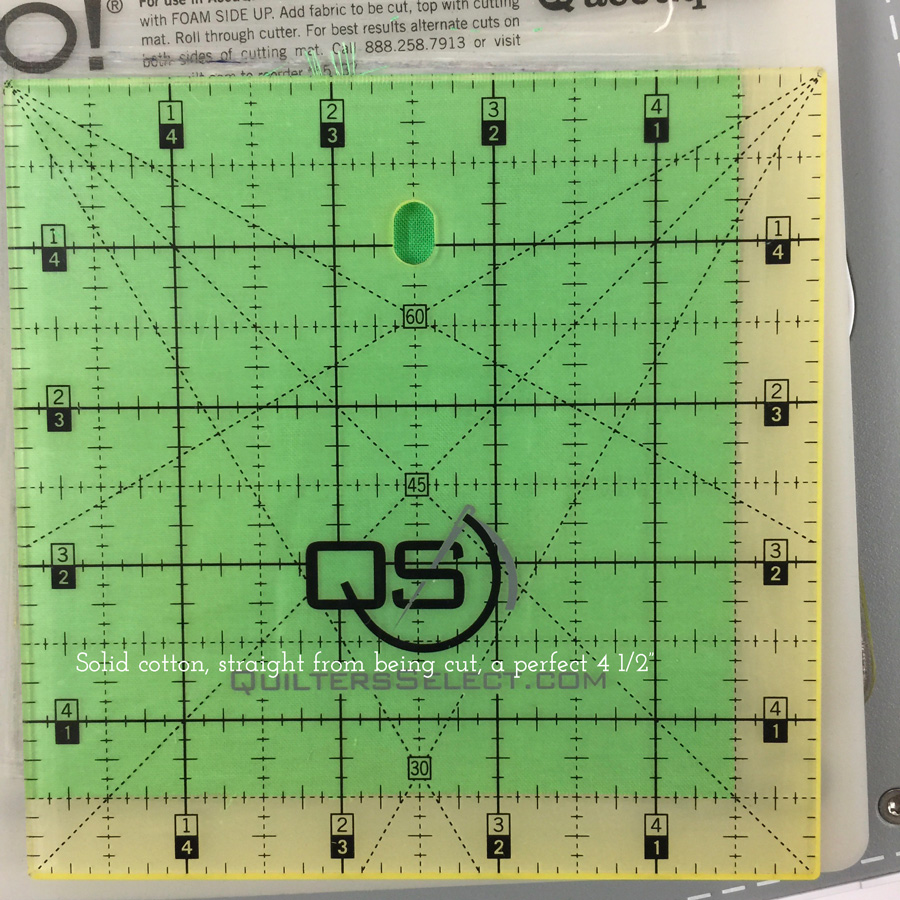
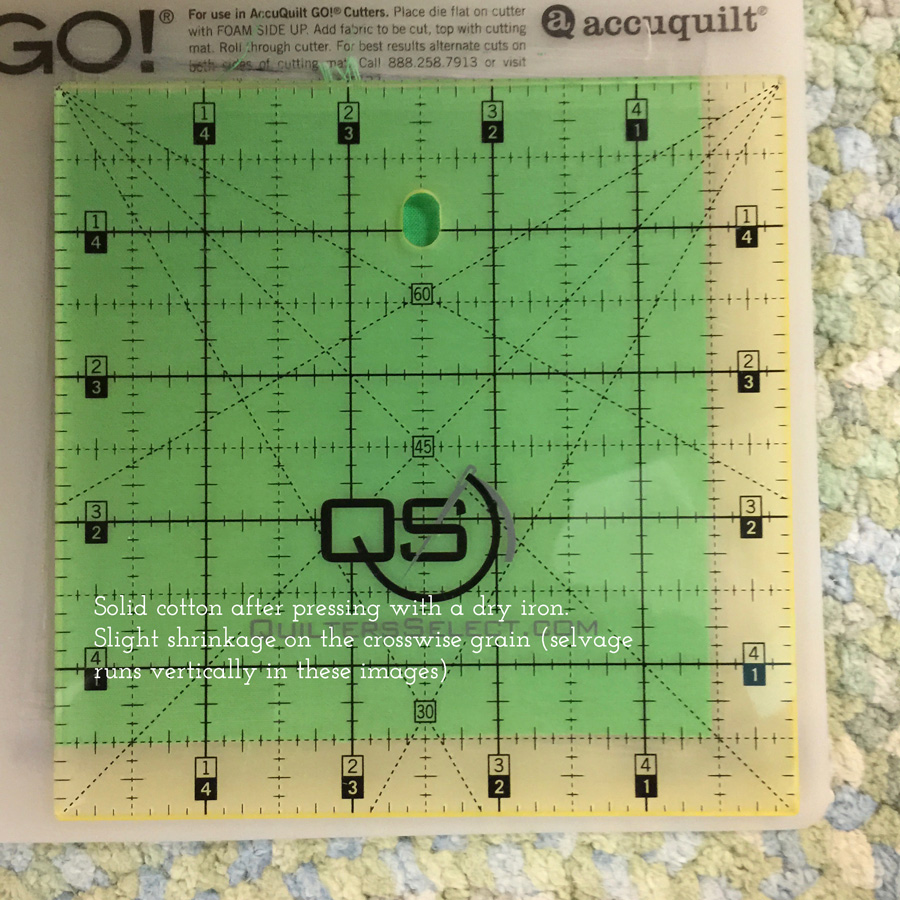
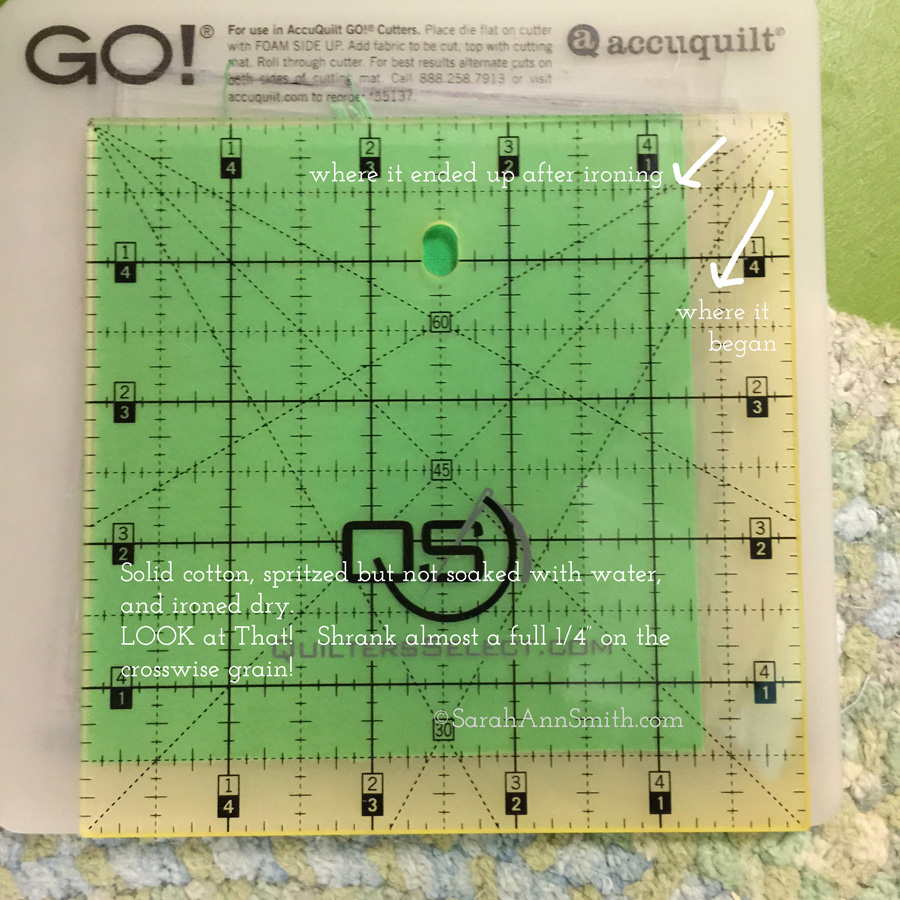
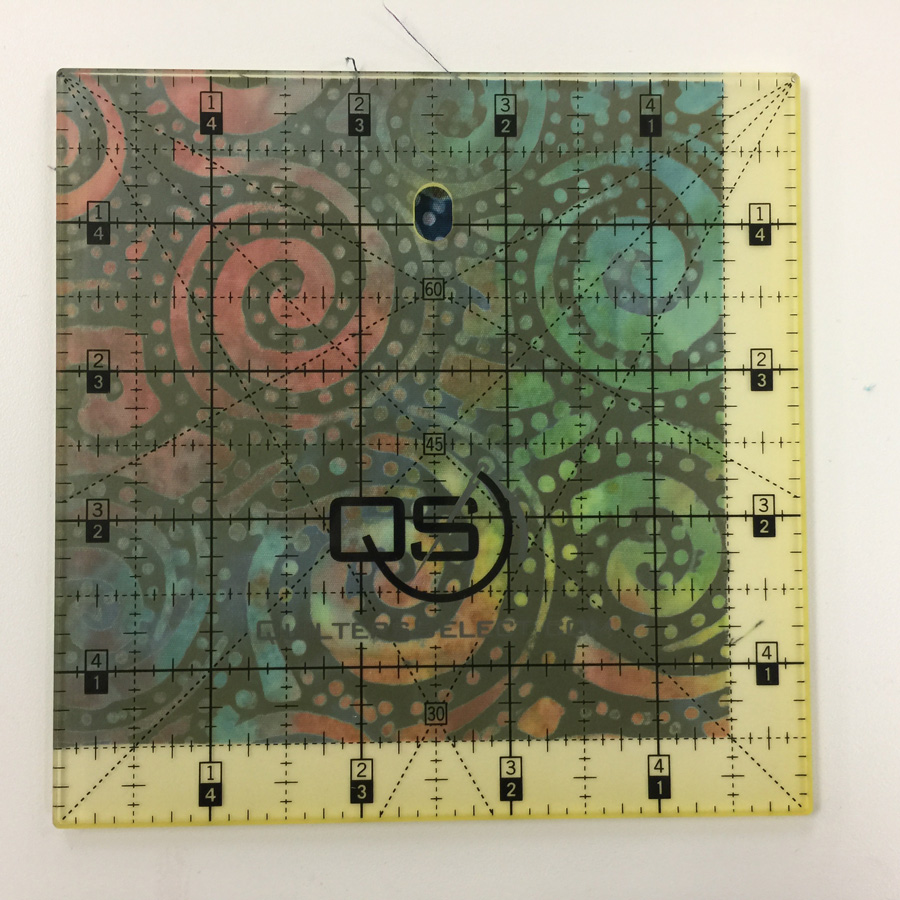
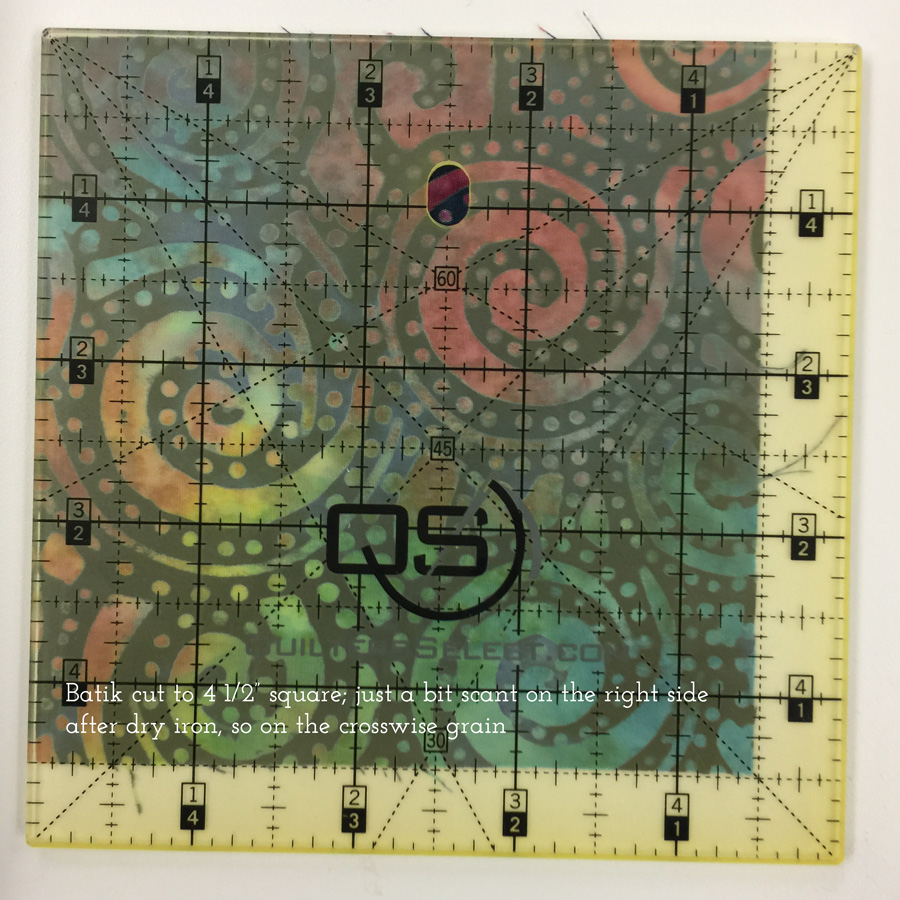
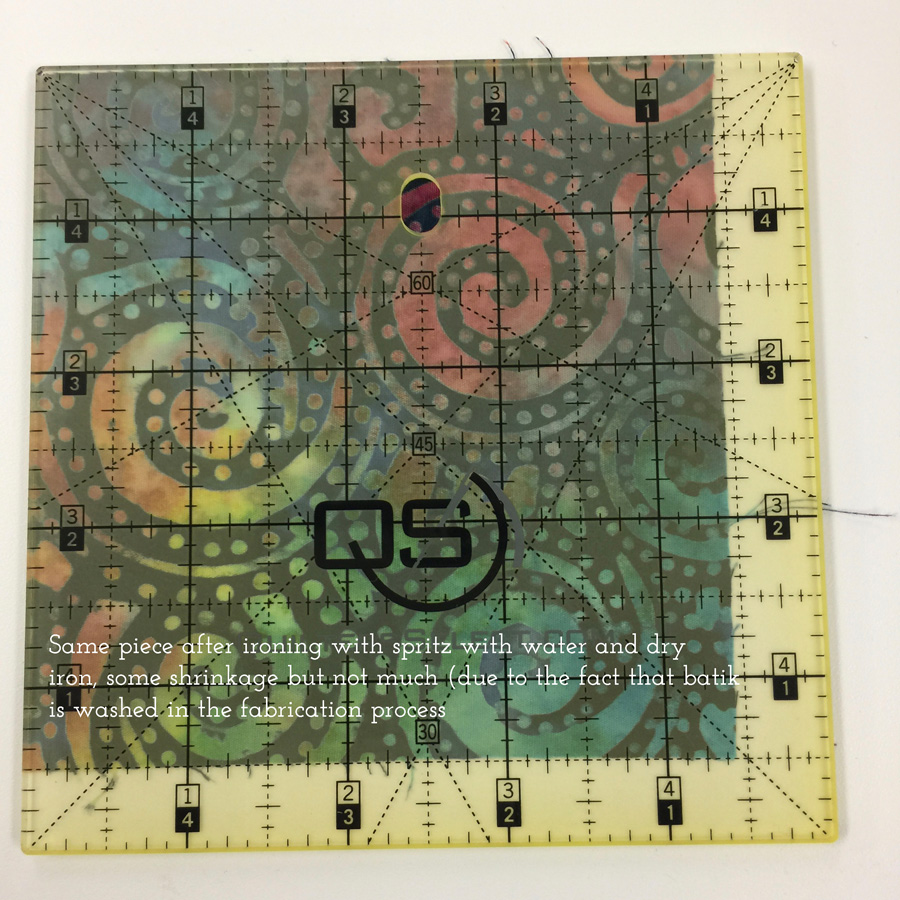
I decided to get a bit more scientific about it: Cut, measure, dry iron, measure, steam iron, measure. Here is what happened with the Cotton Couture, a delightful solid with a glorious feel in the hand:
Batiks are made using hand-dyeing processes that include a resist being applied (usually wax of some sort), then the wax is washed out, more dye applied, and so on. This means some of the shrinkage should already have happened.
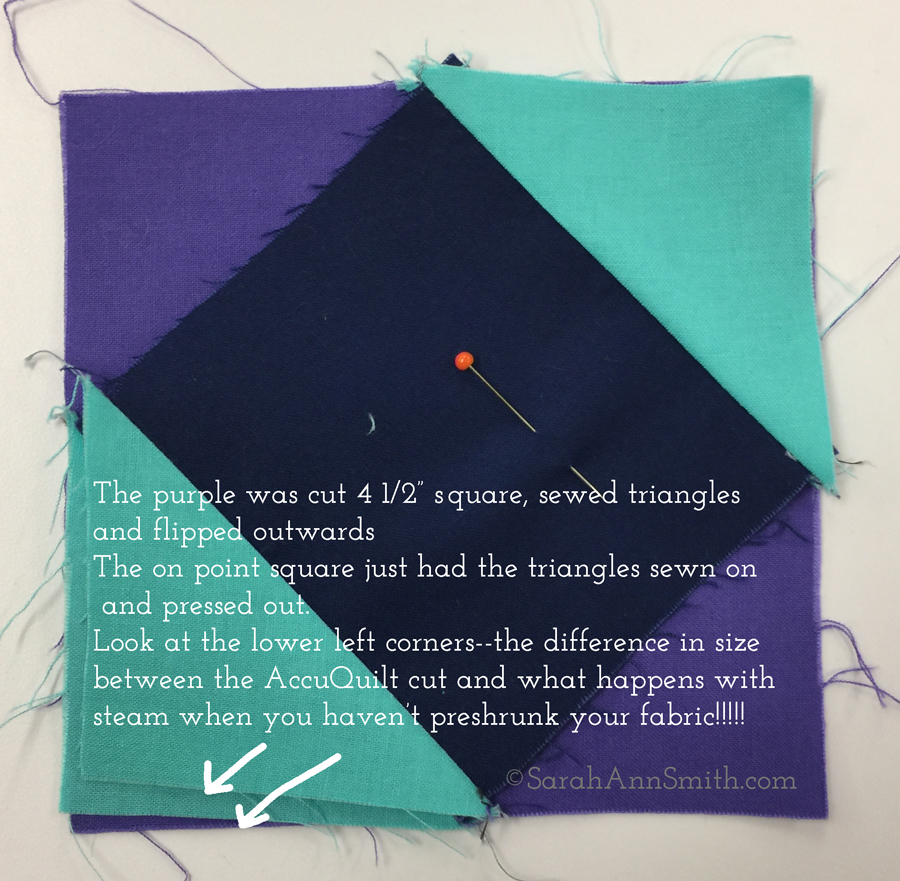
As cut with the AccuQuiltGO! Perfect 4 1/2″One last image: Here I created the center square-in-a-square for a pieced block. I cut the purple fabric to 4 1/2″ thinking that might help my accuracy, and sewed on two half square triangles. I then used navy for the central square and piled on identical half square triangles. All are cut with the lengthwise grain as suggested by Accuquilt for accuracy. LOOK at how much smaller due to more pressing and moisture from the iron. ERK!
So my lesson is, when I am not fusing things up, I really need to either pre-steam-iron everything, or prewash and mostly-dry it and then iron dry and smooth. I can now use the perfection of the AccuquiltGO and actually achieve as close to perfect as I will ever get! Now, off to order backing fabric for my BIG quilt.
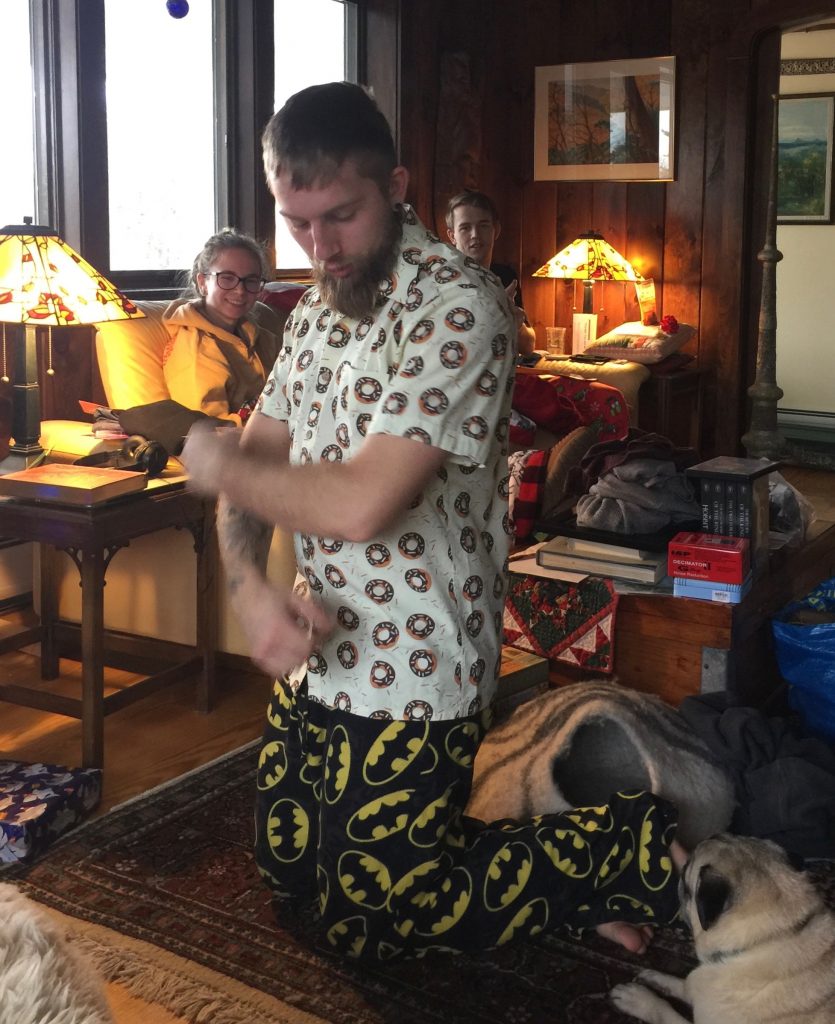
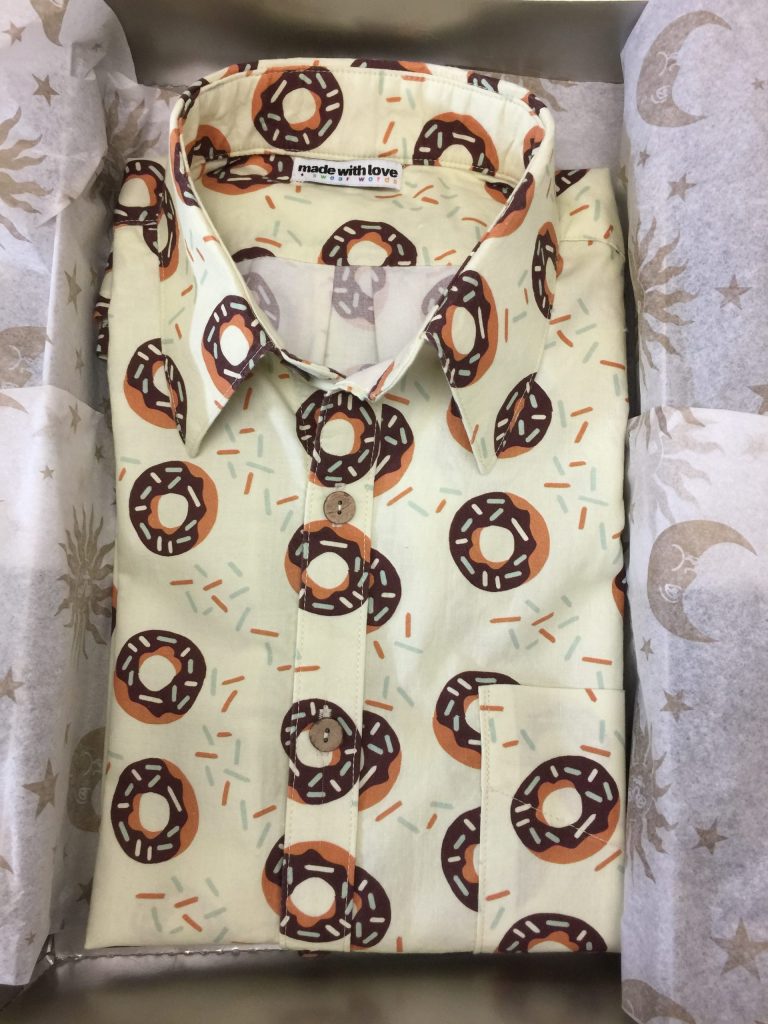
As soon as it came out of the box it went on…fit perfectly (thanks to borrowing one of his existing shirts!)
The first thing I made on the splendid new M7 Continental from Janome was something I haven’t made in decades: a button down tailored shirt! Anyone who knows Joshua knows that he is all about good food, perhaps starting with donuts. In fact, Joshua and Ashley’s wedding cake was a tower Joshua made of donut holes from Willow Bakery in Rockport! He also loves shirts with a sense of humor: sushi rolls, watermelon, lobsters. So I decided I wanted to make him a shirt for Christmas. And I succeeded beyond my wildest expectations in part due to the excellent sewing of the M7. There’s even a video below of making a buttonhole!
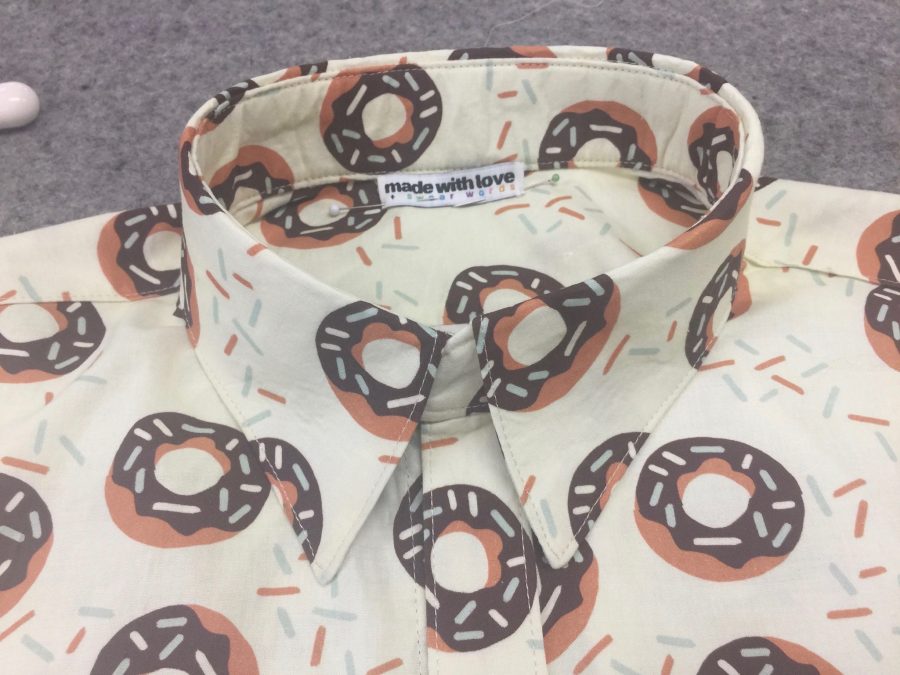
In the box ready for going under the tree, and looking professionally made if I do say so myself! The label was purchased at Fancy Tiger Crafts in Denver–when I was taping for The Quilt Show I had a day to play and met friend Sandra Wheeler (hullo SandyAngel!) who took me out and about. The label reads “made with love {and swear words},” which I figured correctly would make Joshua laugh.
I used the Men’s All Day Shirt Pattern from Liesl + Co patterns. It was my first time using a downloadable pattern where you print and then tape together the pieces. If you download the free Adobe Acrobat software (not just your built in PDF reader) you can turn off the “all sizes” so it prints ONLY the size or sizes you want so you don’t have to navigate all those lines that end up nearly on top of each other. By measuring Joshua’s existing shirt, I was able to figure out which size would be best (Medium) but with the Large collar/neck stand. My only issue was when I combined the sizes. I should have printed the neck line of both patterns SEPARATELY (instead of on the same sheet), then traced the size large and lined it up properly. It took a while, with astounding and much appreciated personal replies from both Liesl and her husband Todd with troubleshooting suggestions, before I figured out what I was doing wrong. Kudos for the service as well as the pattern!
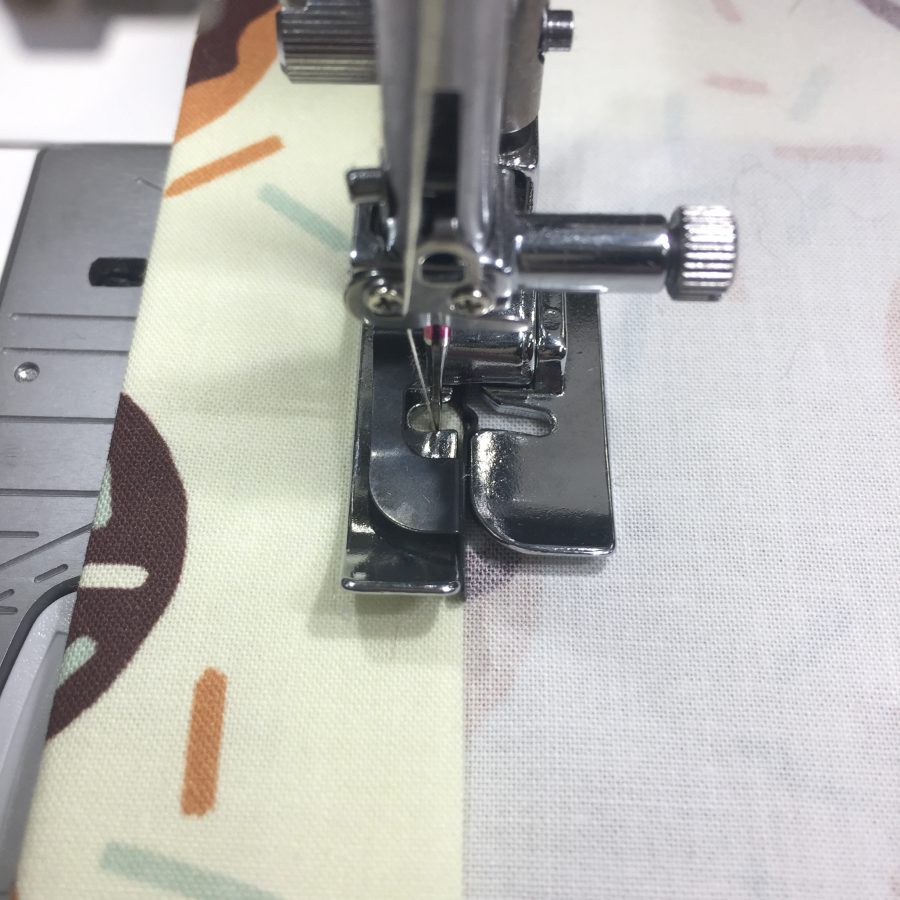
Sewing down the underneath side of the front, where the buttons will go
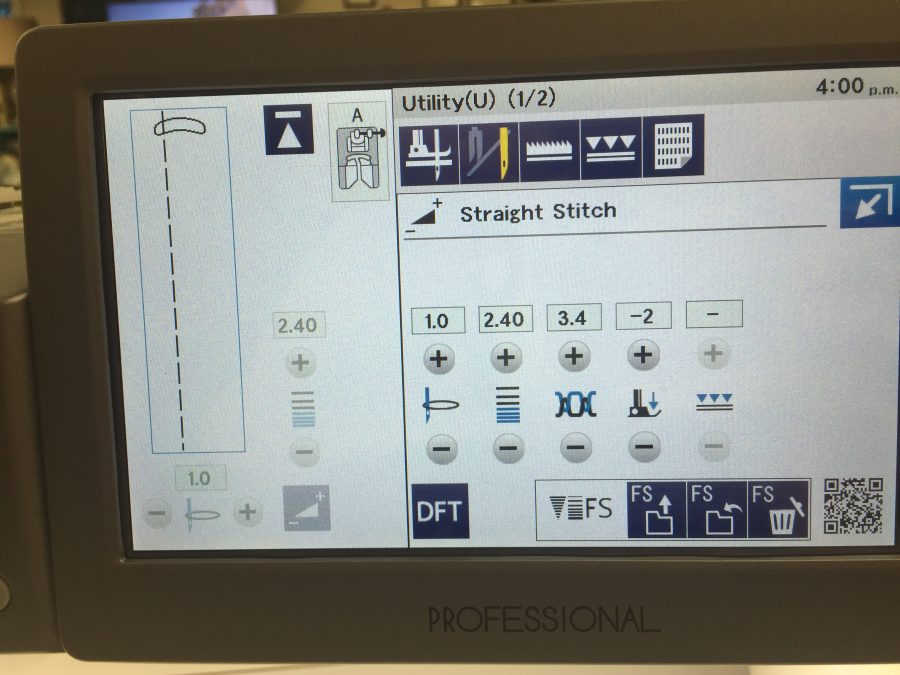
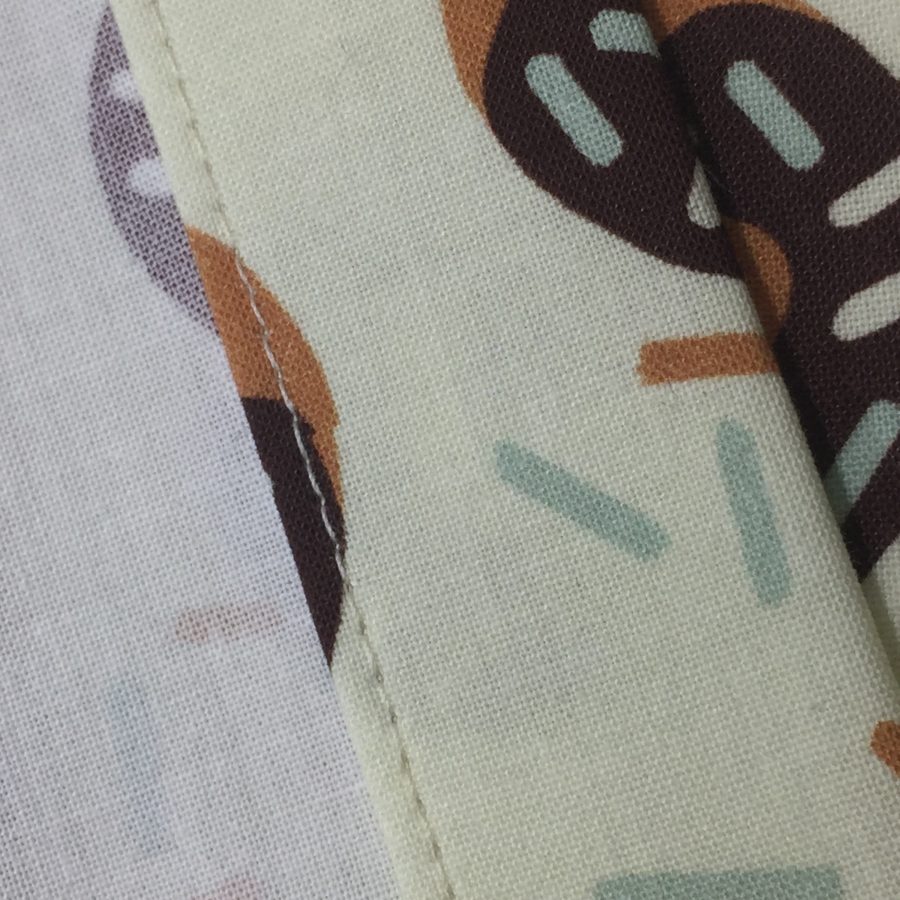
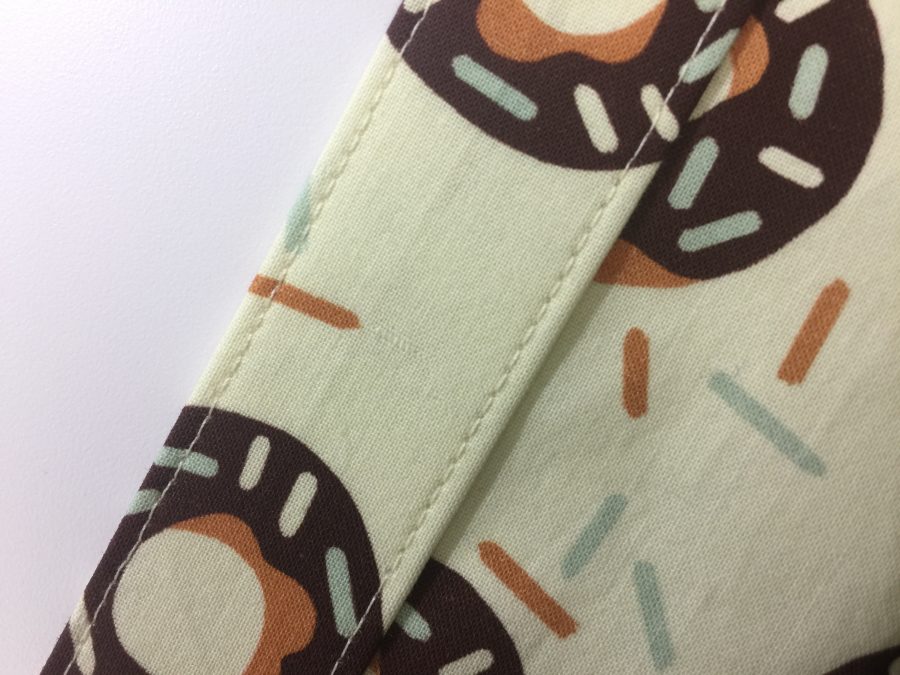
Needle moved to the far left.the stitched fold-back, the buttons will go on the other side.Look at how perfect that stitching is! It sure helps to have a machine that is so precise.
Using the included edge stitch foot, I was able to get absopositively perfect stitching. The first of the four photos above shows the underneath side of the shirt opening, using the edge stitch foot to sew down the turn-under. The second image shows the Janome M7 Continental screen (other Janome machines work similarly) with the needle set to the left. Because of the tiny increments in needle placement, I could get the stitches to form the exact distance I wanted from the edge. Third photo (top right) is a detail of that stitching. And the large image is the button band, stitched. I can’t believe it looks so good! There’s a video just below these still photos.
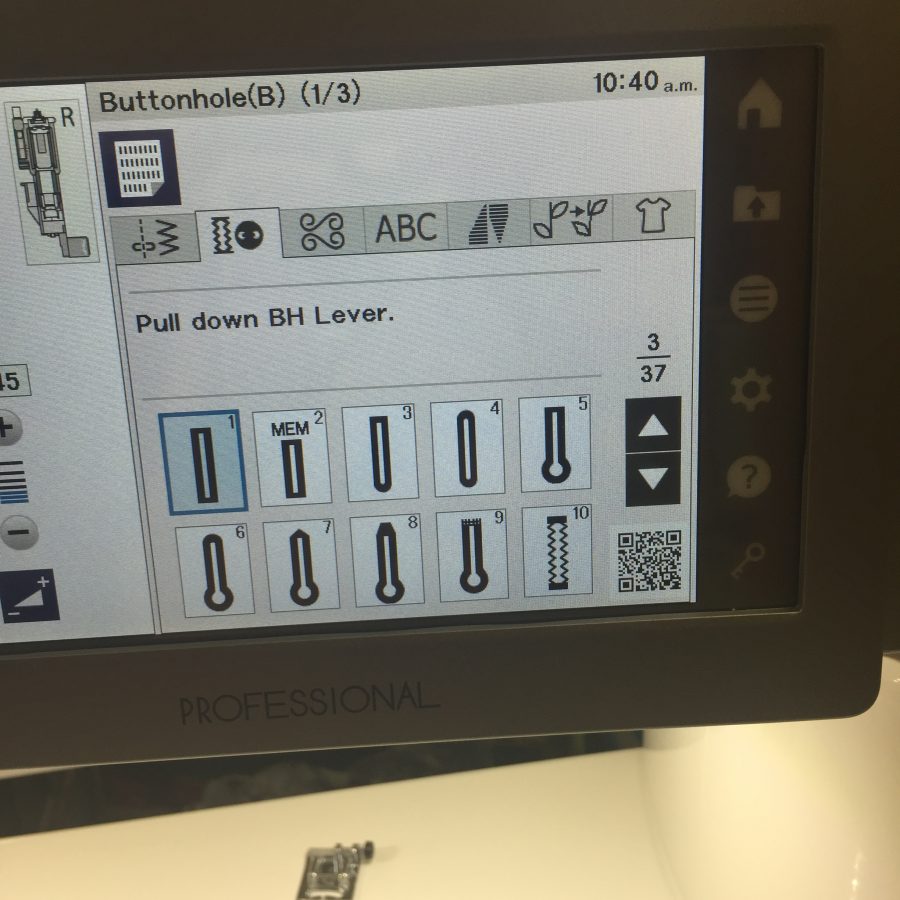
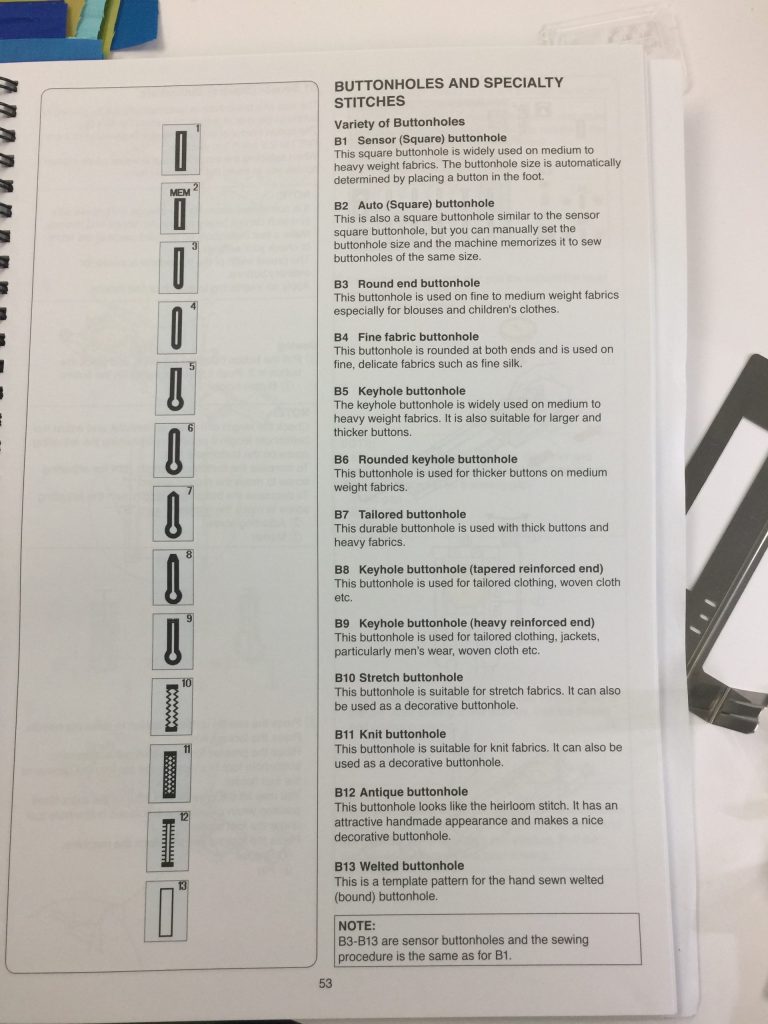
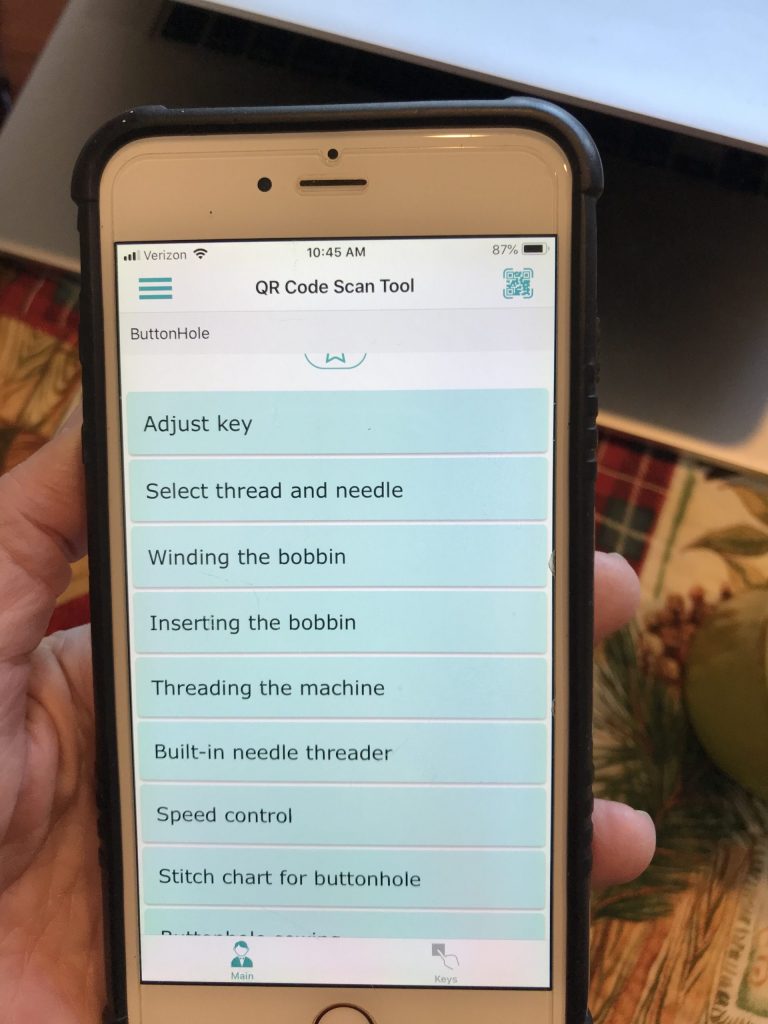
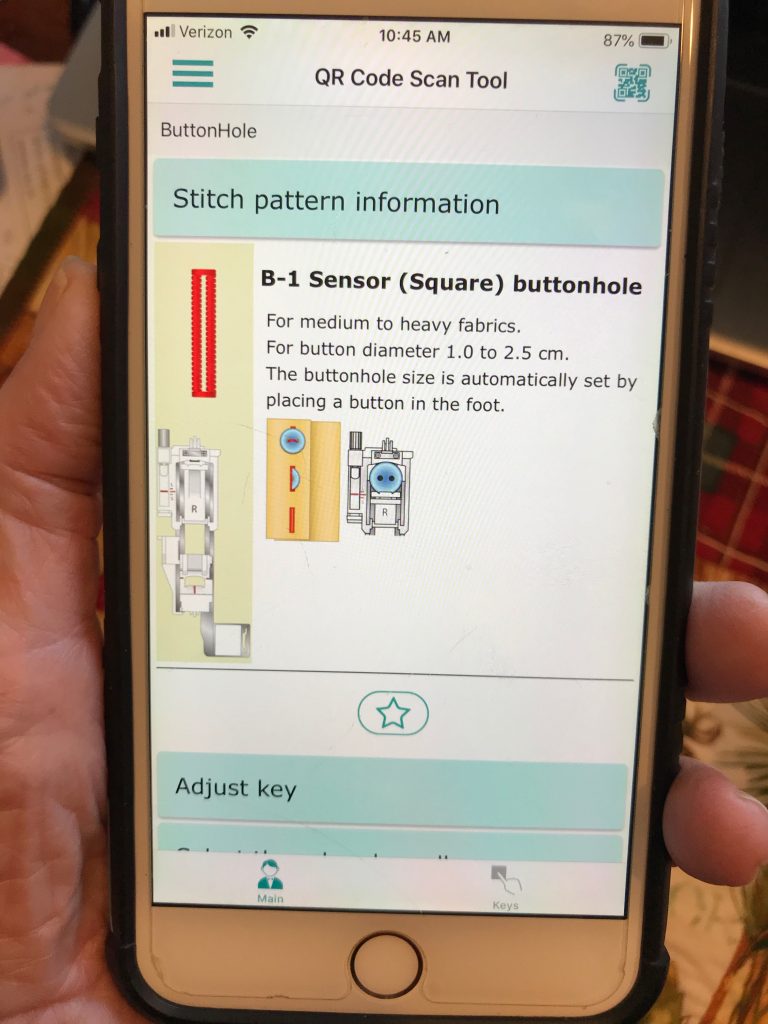
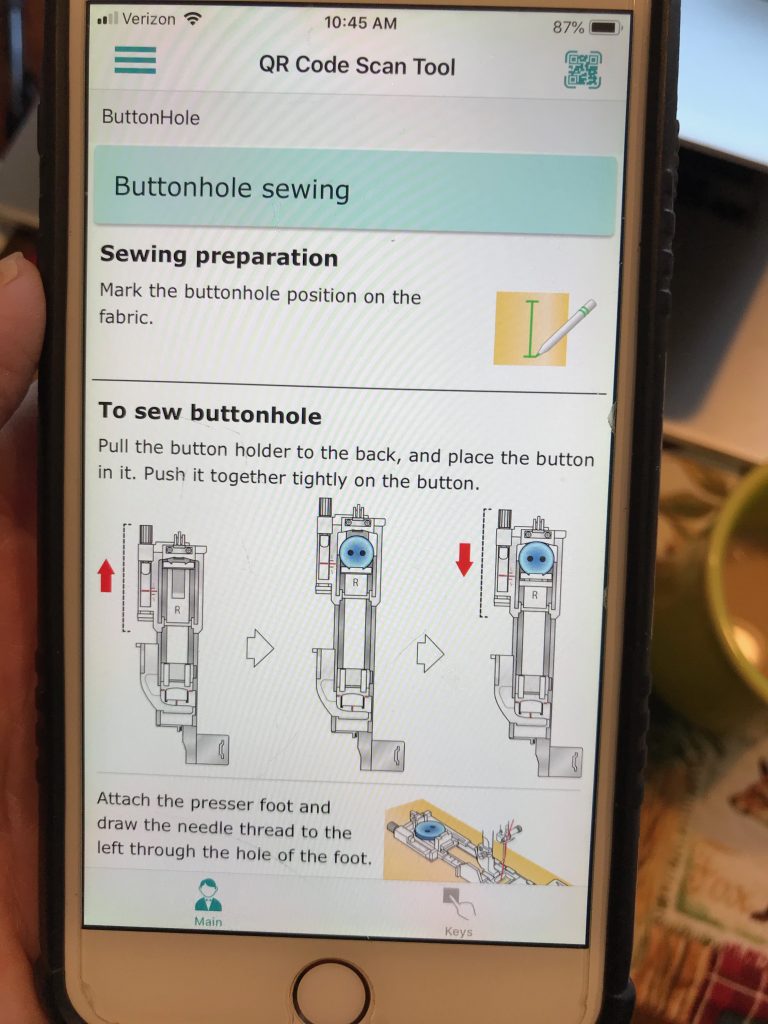
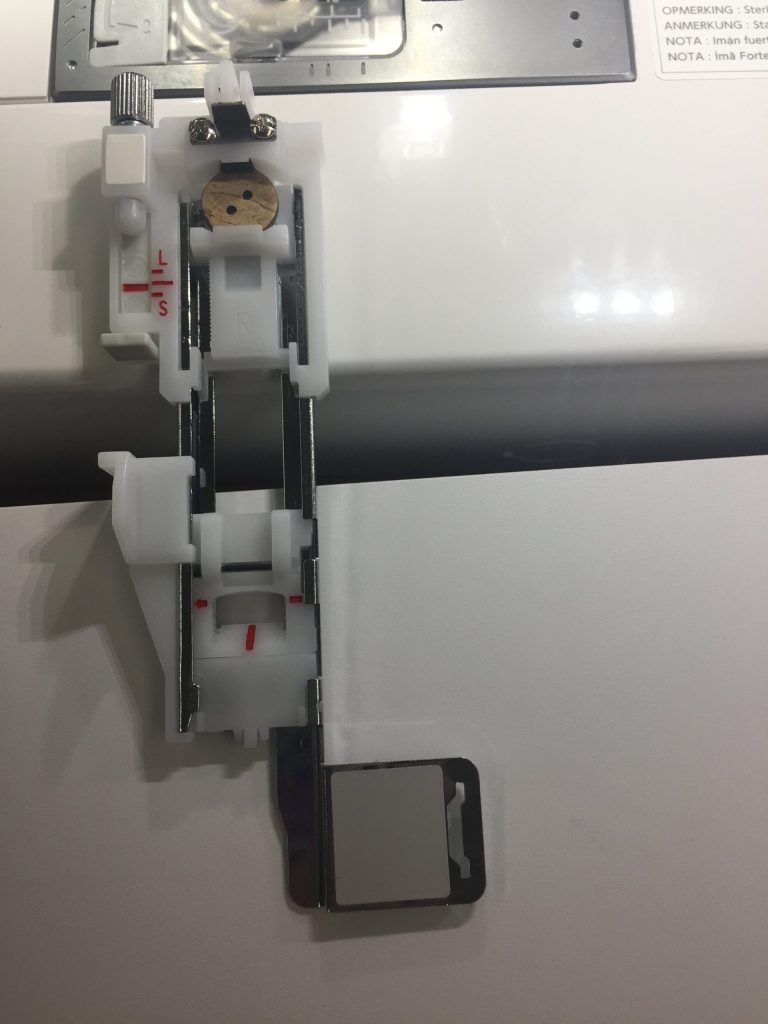
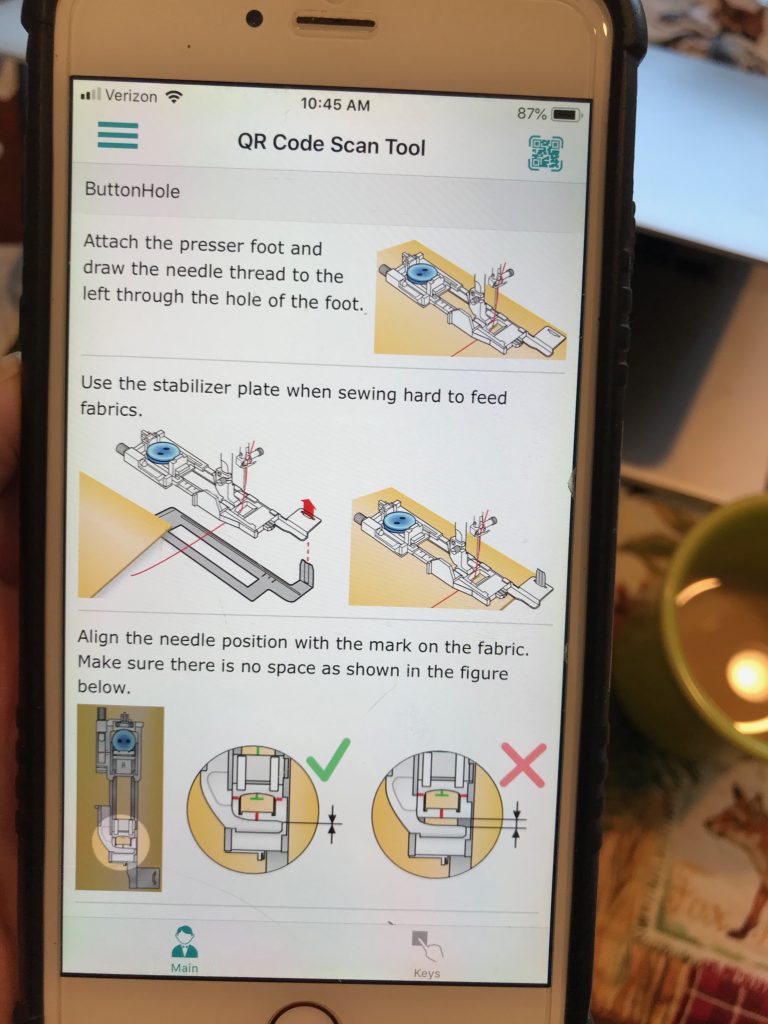
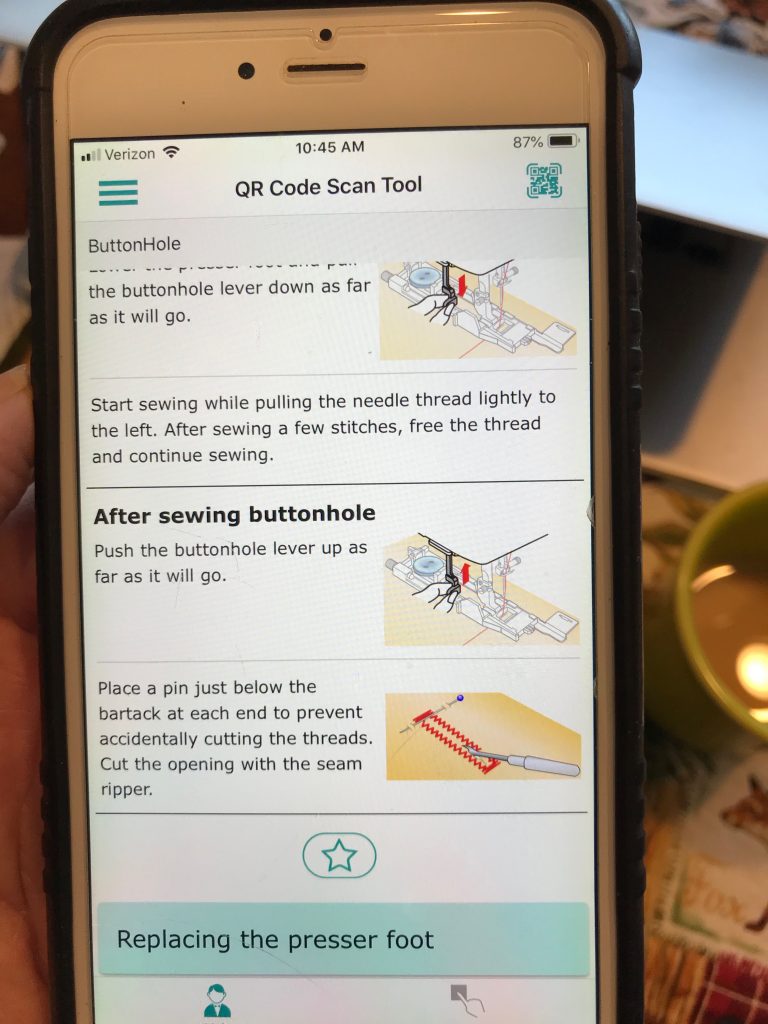
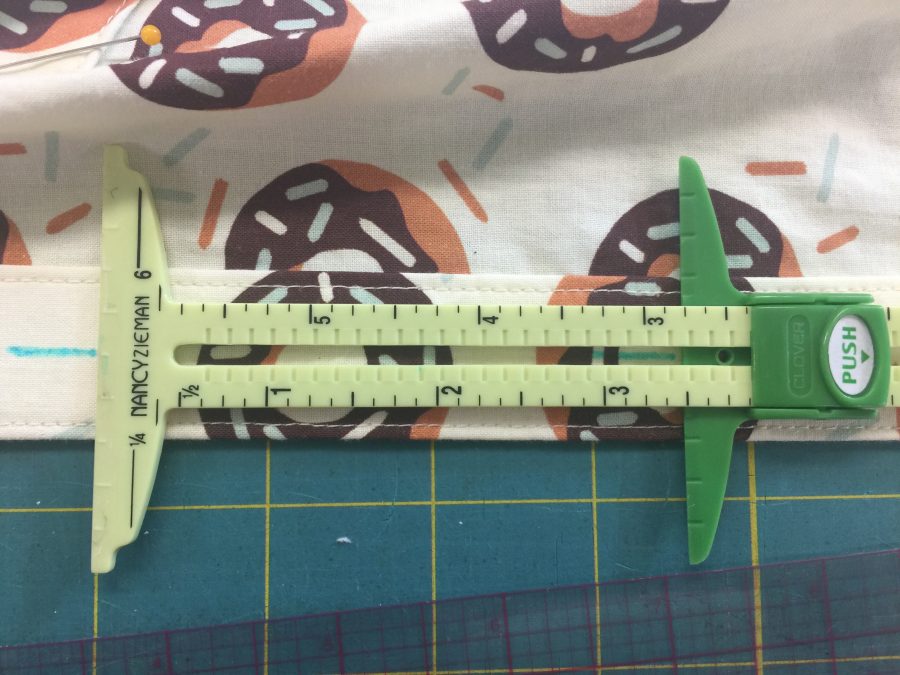
There are a couple screens of buttonhole options, but I used the basic one. Note the QR code in the bottom left corner (more info below).The manual explains the different purposes of the many buttonholes.First, you can select from a wide variety of buttonholes. I went for the standard (after all, I hadn’t sewn a buttonhole in over two decades!). Using the AcuSpark app (free on the App store, works with the M7 and a few other Janome’s), you open the app on your phone/device, scan the QR code in the bottom right of the machine’s screen (photo on left). This takes you to a tutorial within the app.As you can see from the screen shots, the tutorial walks you through the process step by step. Easy peasy…my kind of sewing!Here’s the app telling you how to make a buttonhole!This is what that buttonhole foot looks like in real life. You slide the button into the back, attach the foot to the machine, and it makes the perfect sized hole every time. I kid you not, I make SEVEN buttonholes, perfectly, in seven minutes, and most of that was repositioning to the next spot!More instructions on attaching and using the special buttonholer foot.And how to finish the buttonhole.This Nancy Zieman (oh how I miss her!) tool from Clover is an improvement over the old-school metal one. Although I have a fondness for the metal one, this version allows you to center the ruler exactly on the button band and mark your buttonholes. The darker green slider notches into the grooves so it doesn’t slide up and down the center as you work. I wondered when I bought it why I thought I needed a newer (plastic, yuck) version. Now I know. Once again, smarter sewing.
(Alert: even geekier pattern and garment sewing paragraph!) From the pattern, I also learned a new process for sequence of sewing and attaching the collar and collar stand. Instead of sewing the stand to the neckline, inserting the collar, and closing it up where the collar meets the neck band, the pattern has you sew collar and stand together, then sew the inside of the stand to the inside of the shirt and topstitch the collar to the shirt body. Ended up with absolute precision and perfection!!!!!!
LOOKIT how perfect that turned out! The only thing I would change on the next one (and yes there will be more for both sons) is to use a slightly less crisp interfacing so the collar stand holds up but isn’t quite so stiff.
So, with 50 years of sewing experience (albeit minimal garment making in the past three decades), an excellent pattern that taught this greying sew-ist a couple new things, and the incredible precision of the Janome M7 Continental machine, I am a seriously happy camper. Even better, Joshua loves his shirt!
Part of every new year should be learning new things…and I’m starting with the Accuquilt GO!
As part of the Michael Miller 2020 Brand Ambassador program, we received the Ready. Set. GO! Ultimate Fabric Cutting System from Accuquilt. It includes an AccuquiltGO! plus the 8″ Qube (a set of dies to cut shapes often used in piecing 8″ blocks) and a ginormous die to cut my own 2 1/2″ strips. I’ve never seen one of these used in person, let alone done it myself. They are supposed to be lots faster than traditional rotary cutting and more accurate to boot. That makes two things where I need improvement–grin!
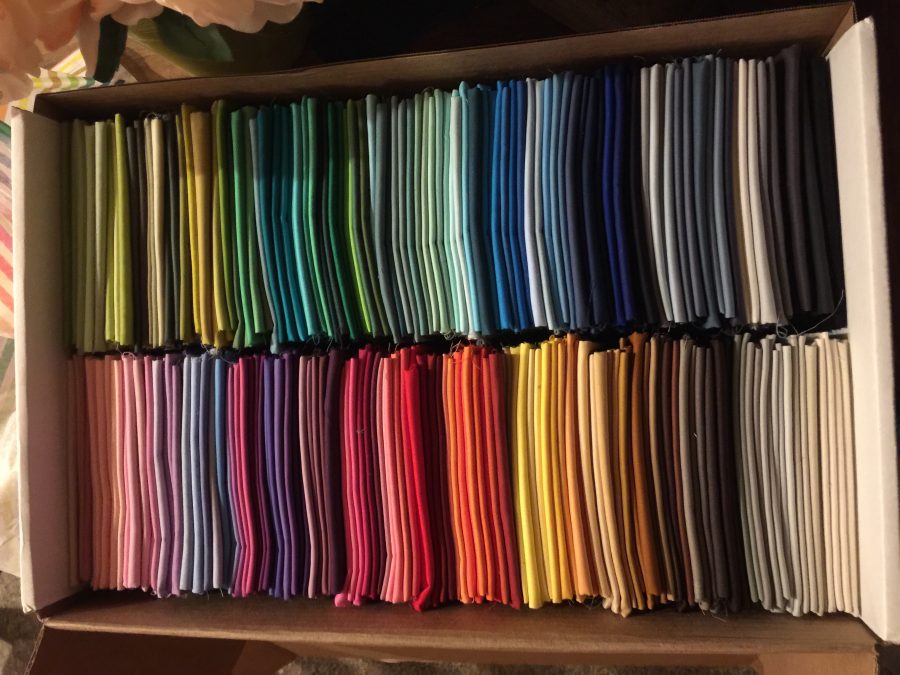
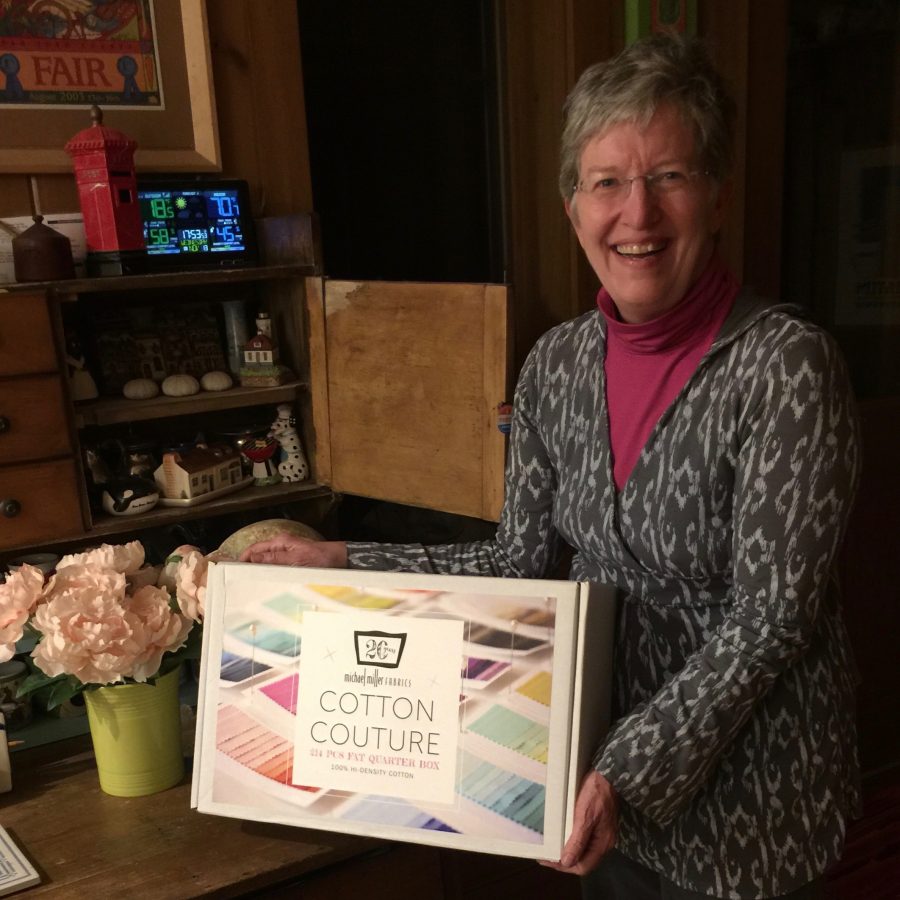
Lookit those amazing colors…don’t you want to dive in face first?
A while back, I was deliriously delighted to learn I had WON all 214 colors (above and below) of Michel Miller’s Cotton Couture (this was before I even applied for the Brand Ambassador program). I’ve been wanting to make a quilt I shall call “214.” As I’ve been waiting to upload this post, I realized that I can use the AccuquiltGO! to do the majority of the cutting, even the sashing! If I use the die for 2 1/2″ strips, I can then manually cut those in half vertically to get the 3/4″ finished strips I want to use for sashing. And then (!!!) I can use the die to cut 4 1/2″ squares (4″ finished) — if I am careful — to subcut the strips into 4 1/2″ lengths to match the size of squares I’m going to use in the quilt! Stay tuned…guess what I’m going to do today!
So, with that I am going to sign off and go play with my new fabric and toys!
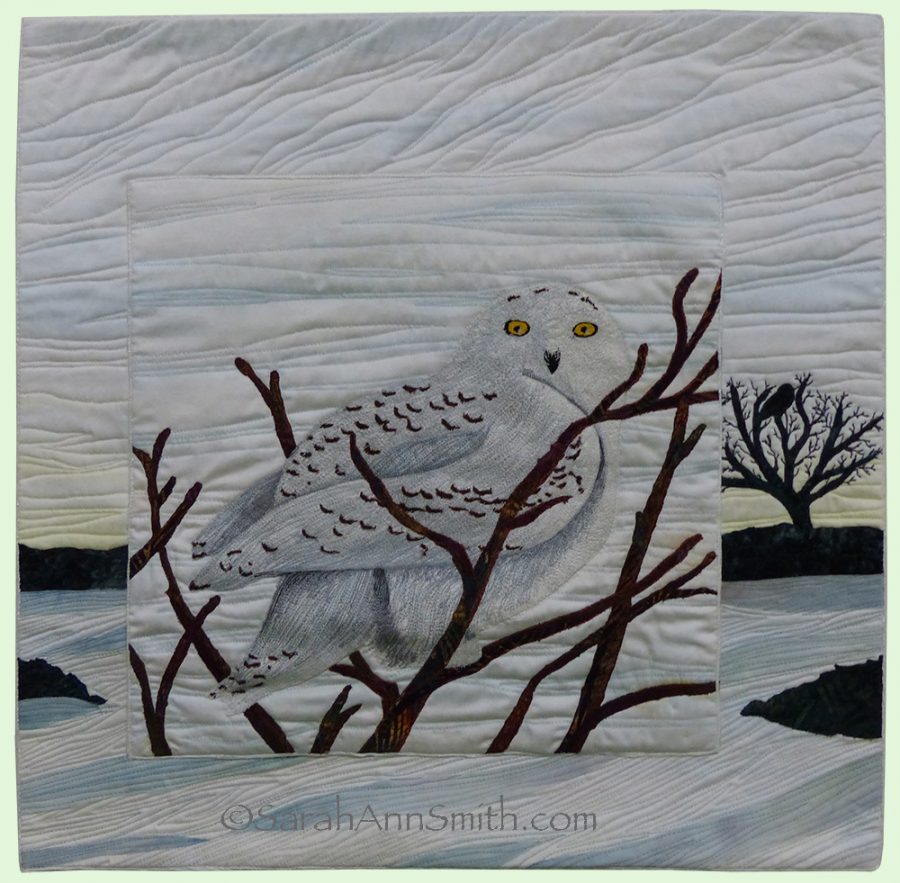
Well today sure started off well…. got an email from curator and exhibit organizer extraordinaire Donne DeSoto that my Snowy Owl, from Acadia National Park, will be on display at the Library of Congress soon! Here’s the LoC’s information on the exhibit–I SO wish I lived close enough to go see it!
Here’s my owl, based on photographs I took at nearby Clarry Hill Ridge. Of course I had to pick something from Acadia National Park, here in Maine. The fabrics are my hand dyes, include a little bit of paint, and lots of threadwork!
This quilt is part of the Inspired by the National Parks exhibit which debuted in the National Parks Centennial Year. The exhibit will finish its phenomenal run in February at the Mancuso Brother’s Mid-Atlantic show. Donna told me the exhibit has been to THIRTY ONE venues in the three years it has traveled! That is astounding! So many thanks to Schiffer Publishing for putting out the tome with all our quilts and to the other participants. But most of all, special thanks to Donna. I can’t even begin to imagine how much work it is to keep tabs on so many quilts and get them traveling so many places for multiple years. THANK YOU DONNA!
(1).png)
.png)
.png)