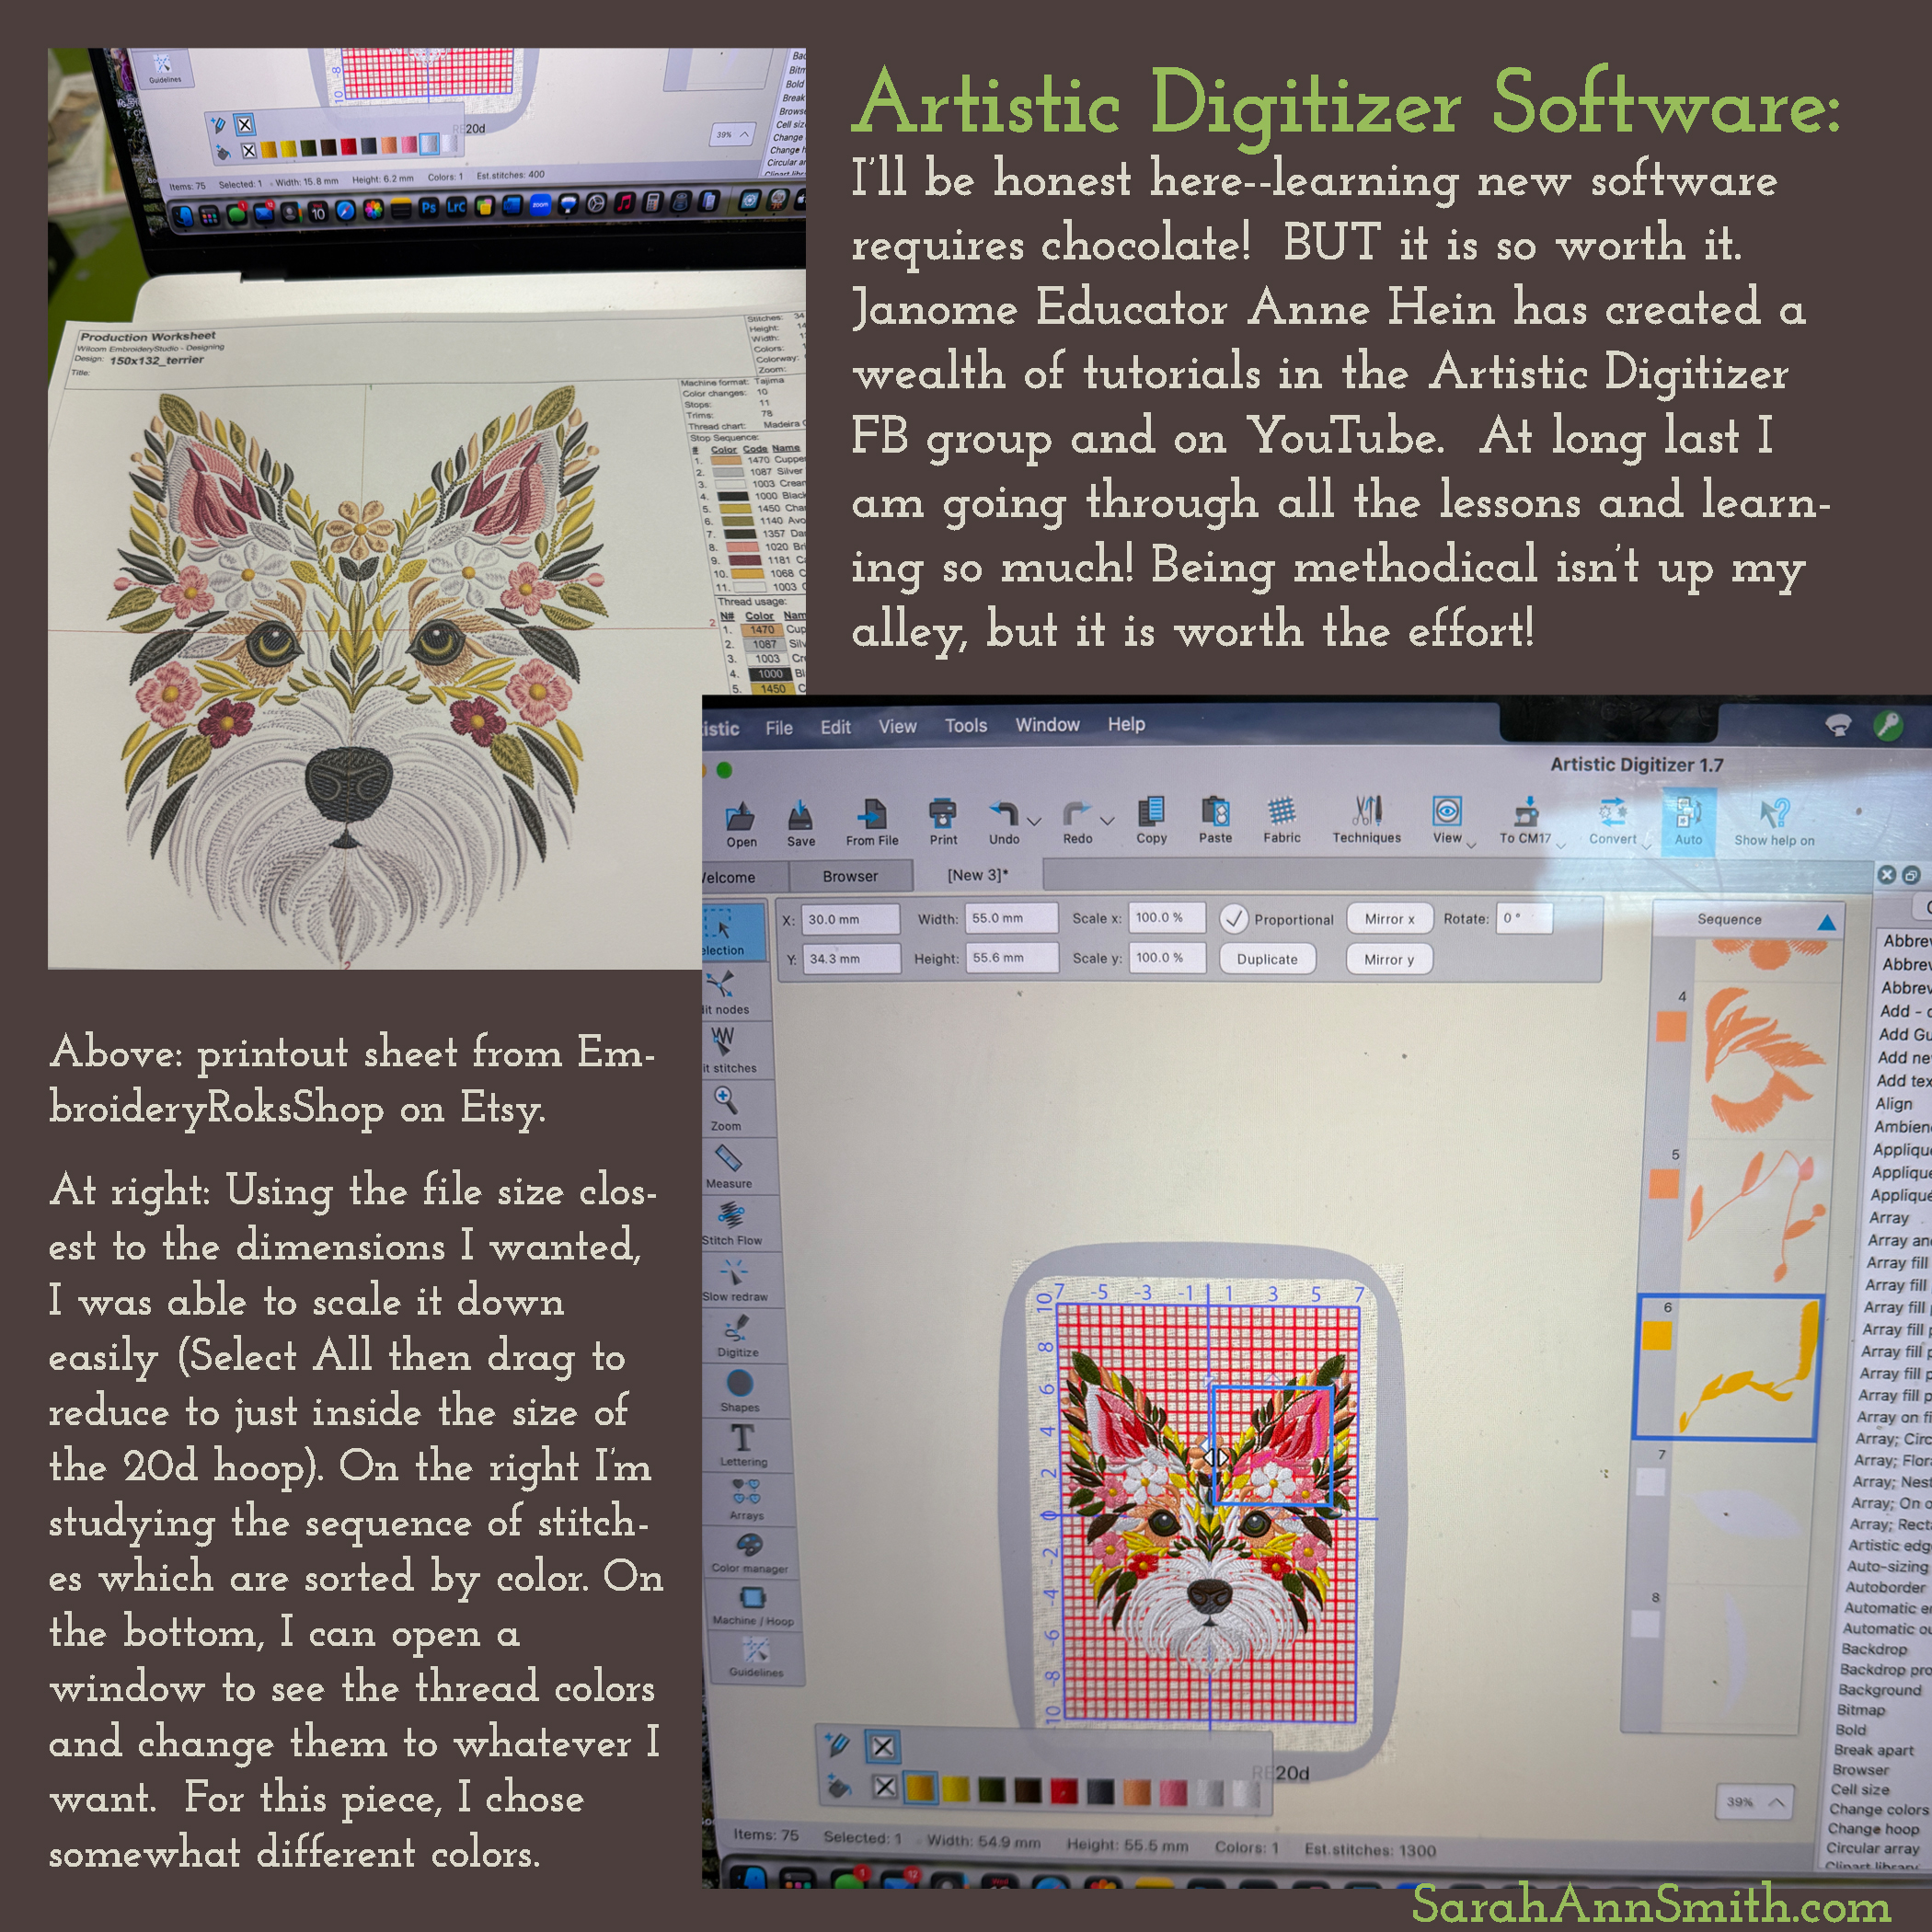
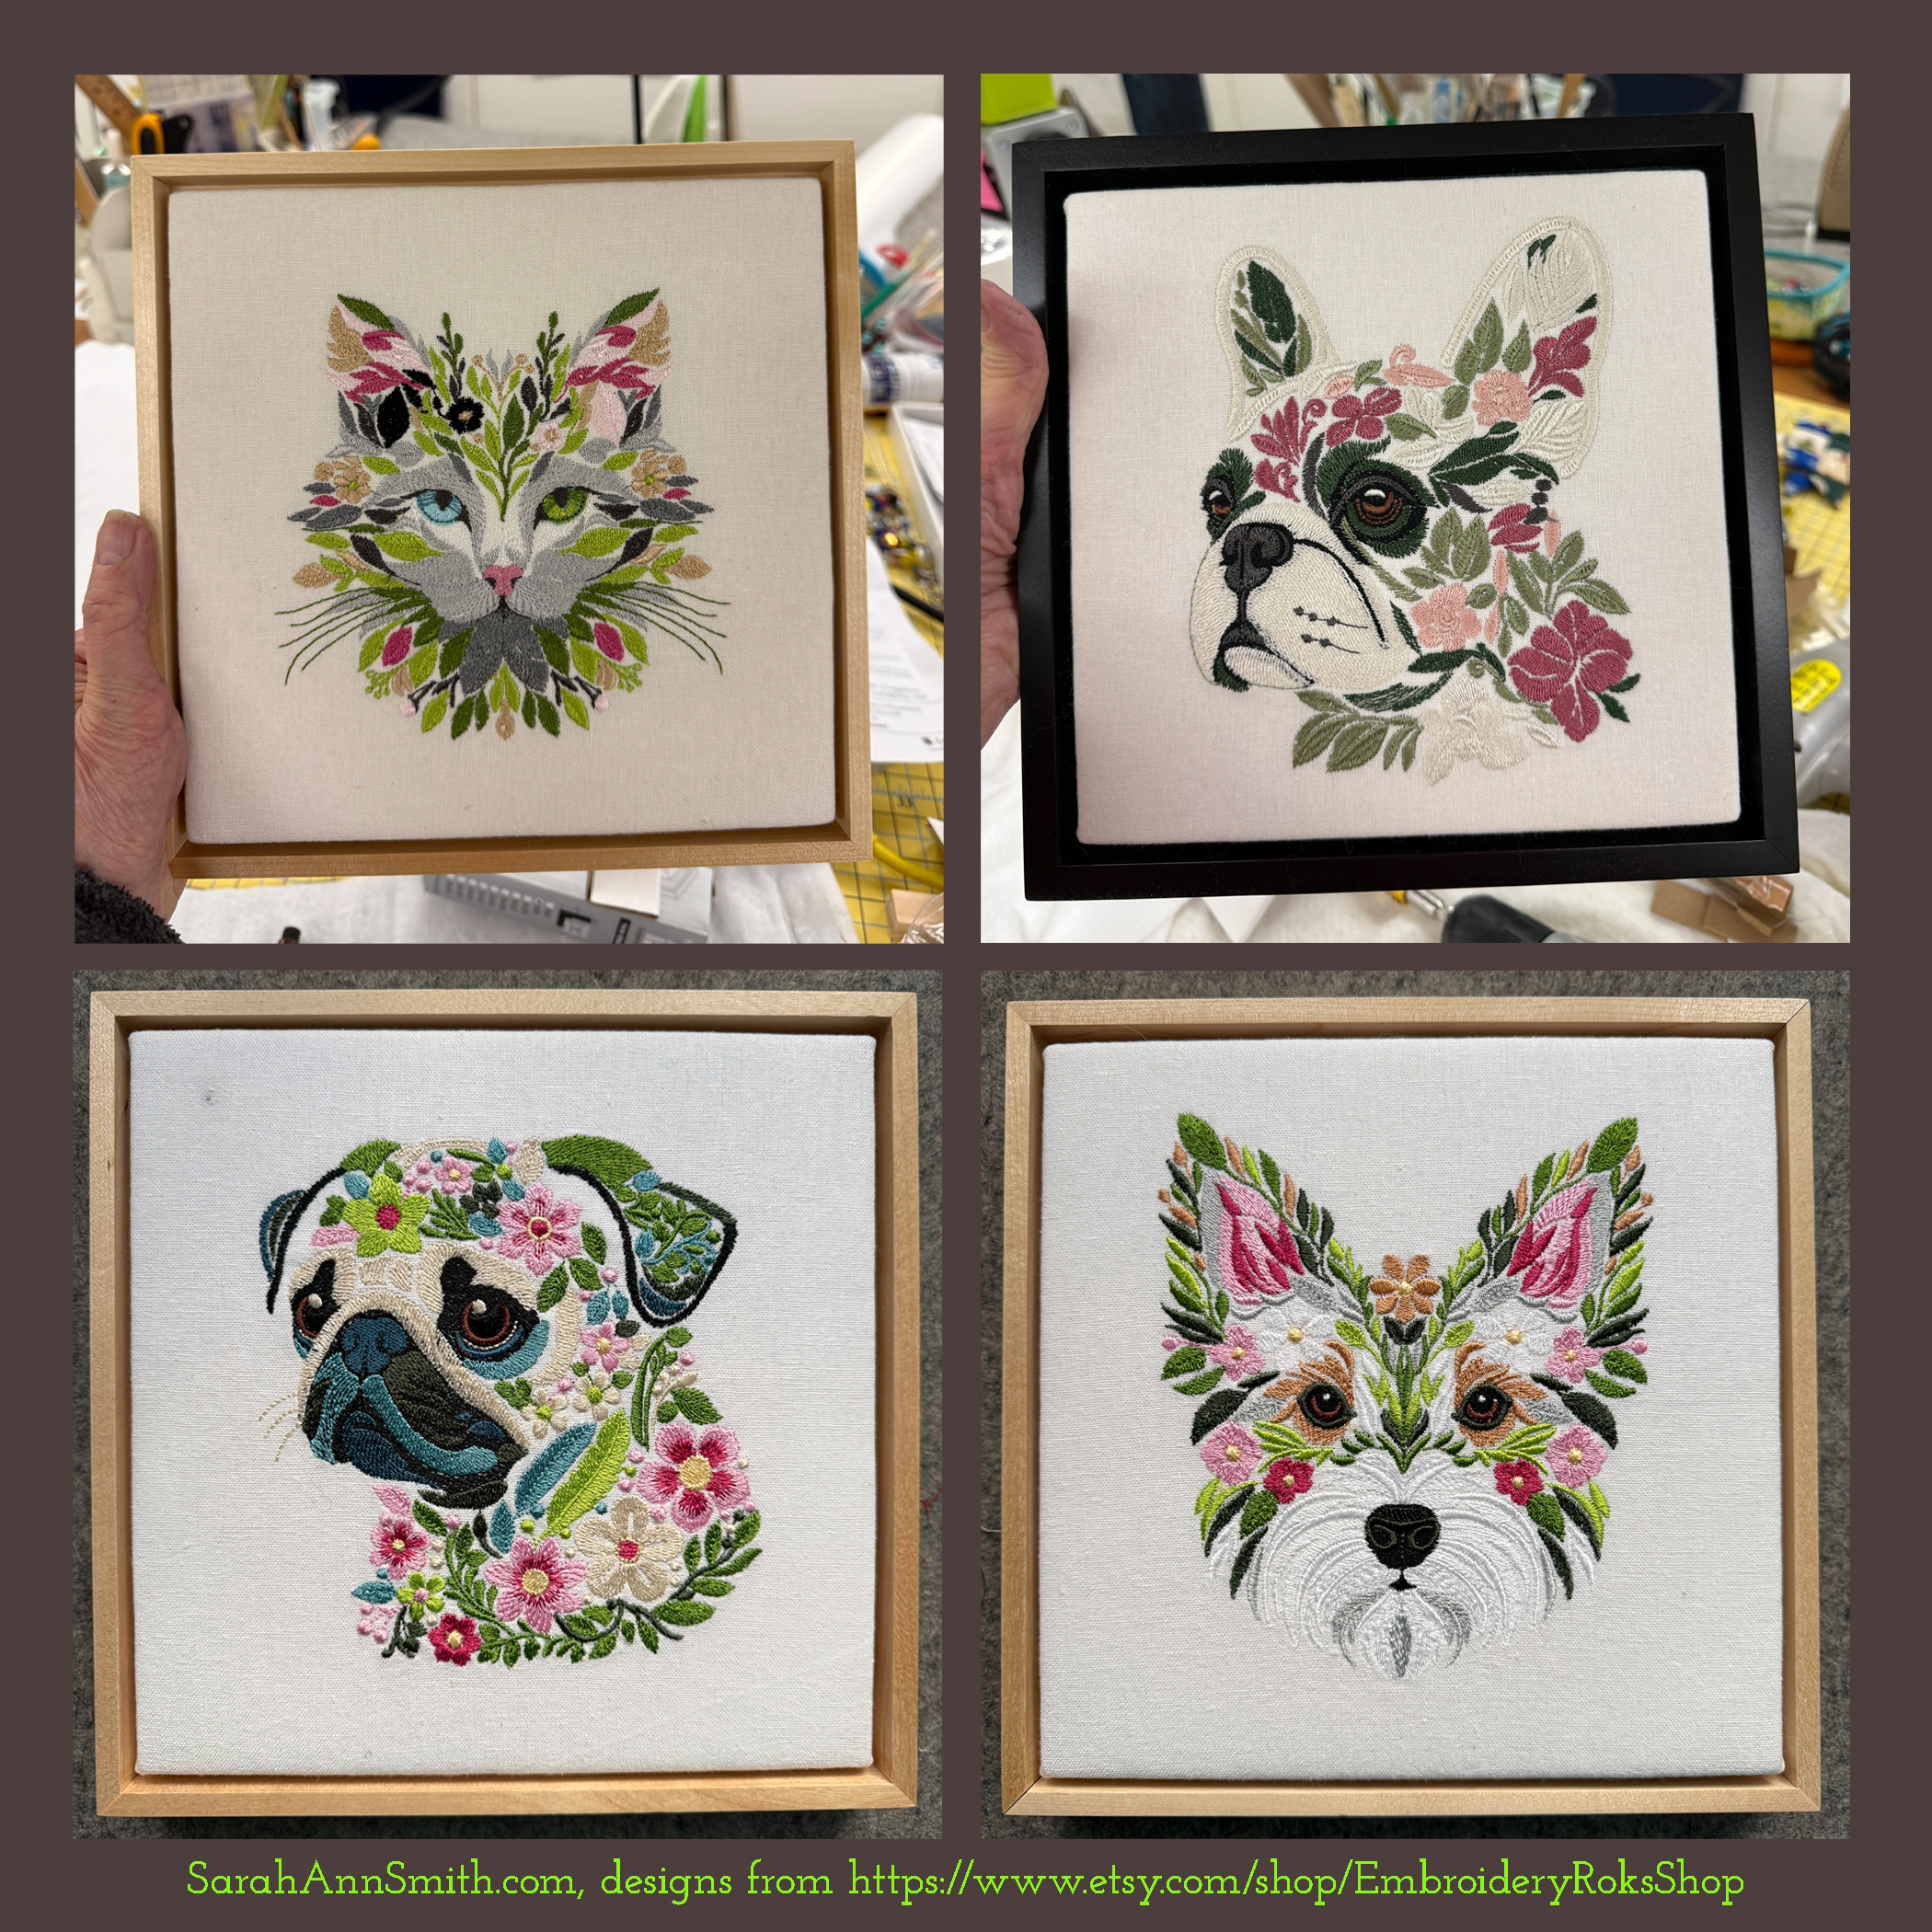
For my January 2026 Artisan project, I’m sharing a few of the gifts I made in the past two months since they are now given and public! At long last I have conquered my greatest hurdle with the *enormous* Janome M17 combination sewing and embroidery machine: learning how to use the Artistic Digitizer software (remember, I’m a completely new to machine embroidery, just learning what the correct words and phrases are to ask how-to questions). The M17 is brilliant and easy to use, but I tend to learn by clicking here, clicking there, and not following a linear progression. However, going through — step-by-step and in order — the MANY tutorials Janome has made available has been amazingly helpful. A huge thanks to Janome Educator Anne Hein who has made so many of these tutorials; they are available on the Janome YouTube Channel . There’s also another valuable resource in the Janome Artistic Digitizer FB group (AD is the Janome software–there is a second group called Artistic Digitizer, but it is a private group, not-affiliated with Janome, and questions don’t get answered as frequently). I am quite the beginner with machine embroidery, but thanks to these resources and help from Anne and the participants in the FB group, I have learned SO MUCH in the past 8 weeks! It is a testament to the machine and tutorials as well as Roksolana’s brilliant design and digitizing (more on that in a minute) that I have been able to do so well.
You can purchase this design and her other gorgeous artwork at https://www.etsy.com/shop/EmbroideryRoksShop . I’m not affiliated in any way other than being a Very Happy Customer. There are all sorts of animals–I bet you’ll find your favorite.
Here’s a short video on the process. There is a longer video below, from near the end of the embroidery process.
And here’s that longer video (also on my YouTube channel):
I also made three other designs by Roksolana. By the way, it was a bonus (for me anyway) to be able to purchase from a young artist living in Kyiv, Ukraine, and I learned that for at least a time Etsy isn’t charging their usual fees to folks living in Ukraine and trying to survive the war. She is a mom, and the war affects them daily (like having electricity long enough to do the laundry!). I had a delightful chat (with help for her using a translate app so we could converse) with her when I wrote to ask permission to use her designs for this Janome project. DO go check out her Etsy shop here. I was so excited when I found it–at last some designs that were not cutesy, or hearts and bows, or juvenile. REALLY COOL designs! I was at first a little concerned as I wasn’t purchasing from a “known” design company, but that is what makes these so fresh and appealing to me. I needn’t have worried. Just seeing how the designs stitch out I could see she really understands and masters the computer part of the work–getting the stitch flow to enhance the curves and lines and contrast in thread… like what follows!
Roks’ colorways are fantastic and were the reason I first stopped because they are perfect for Ashley. But I was able to select thread colors to use my Superior Threads and Isacord threads stash–I have literally hundreds of colors, so as long as I have enough thread on the spool, I’ll use what I have until I need to replace. Then I think I’ll move to Isacord because of quantity on a mini-king spool and wider range of colors. Must. Buy. A ColorCard!
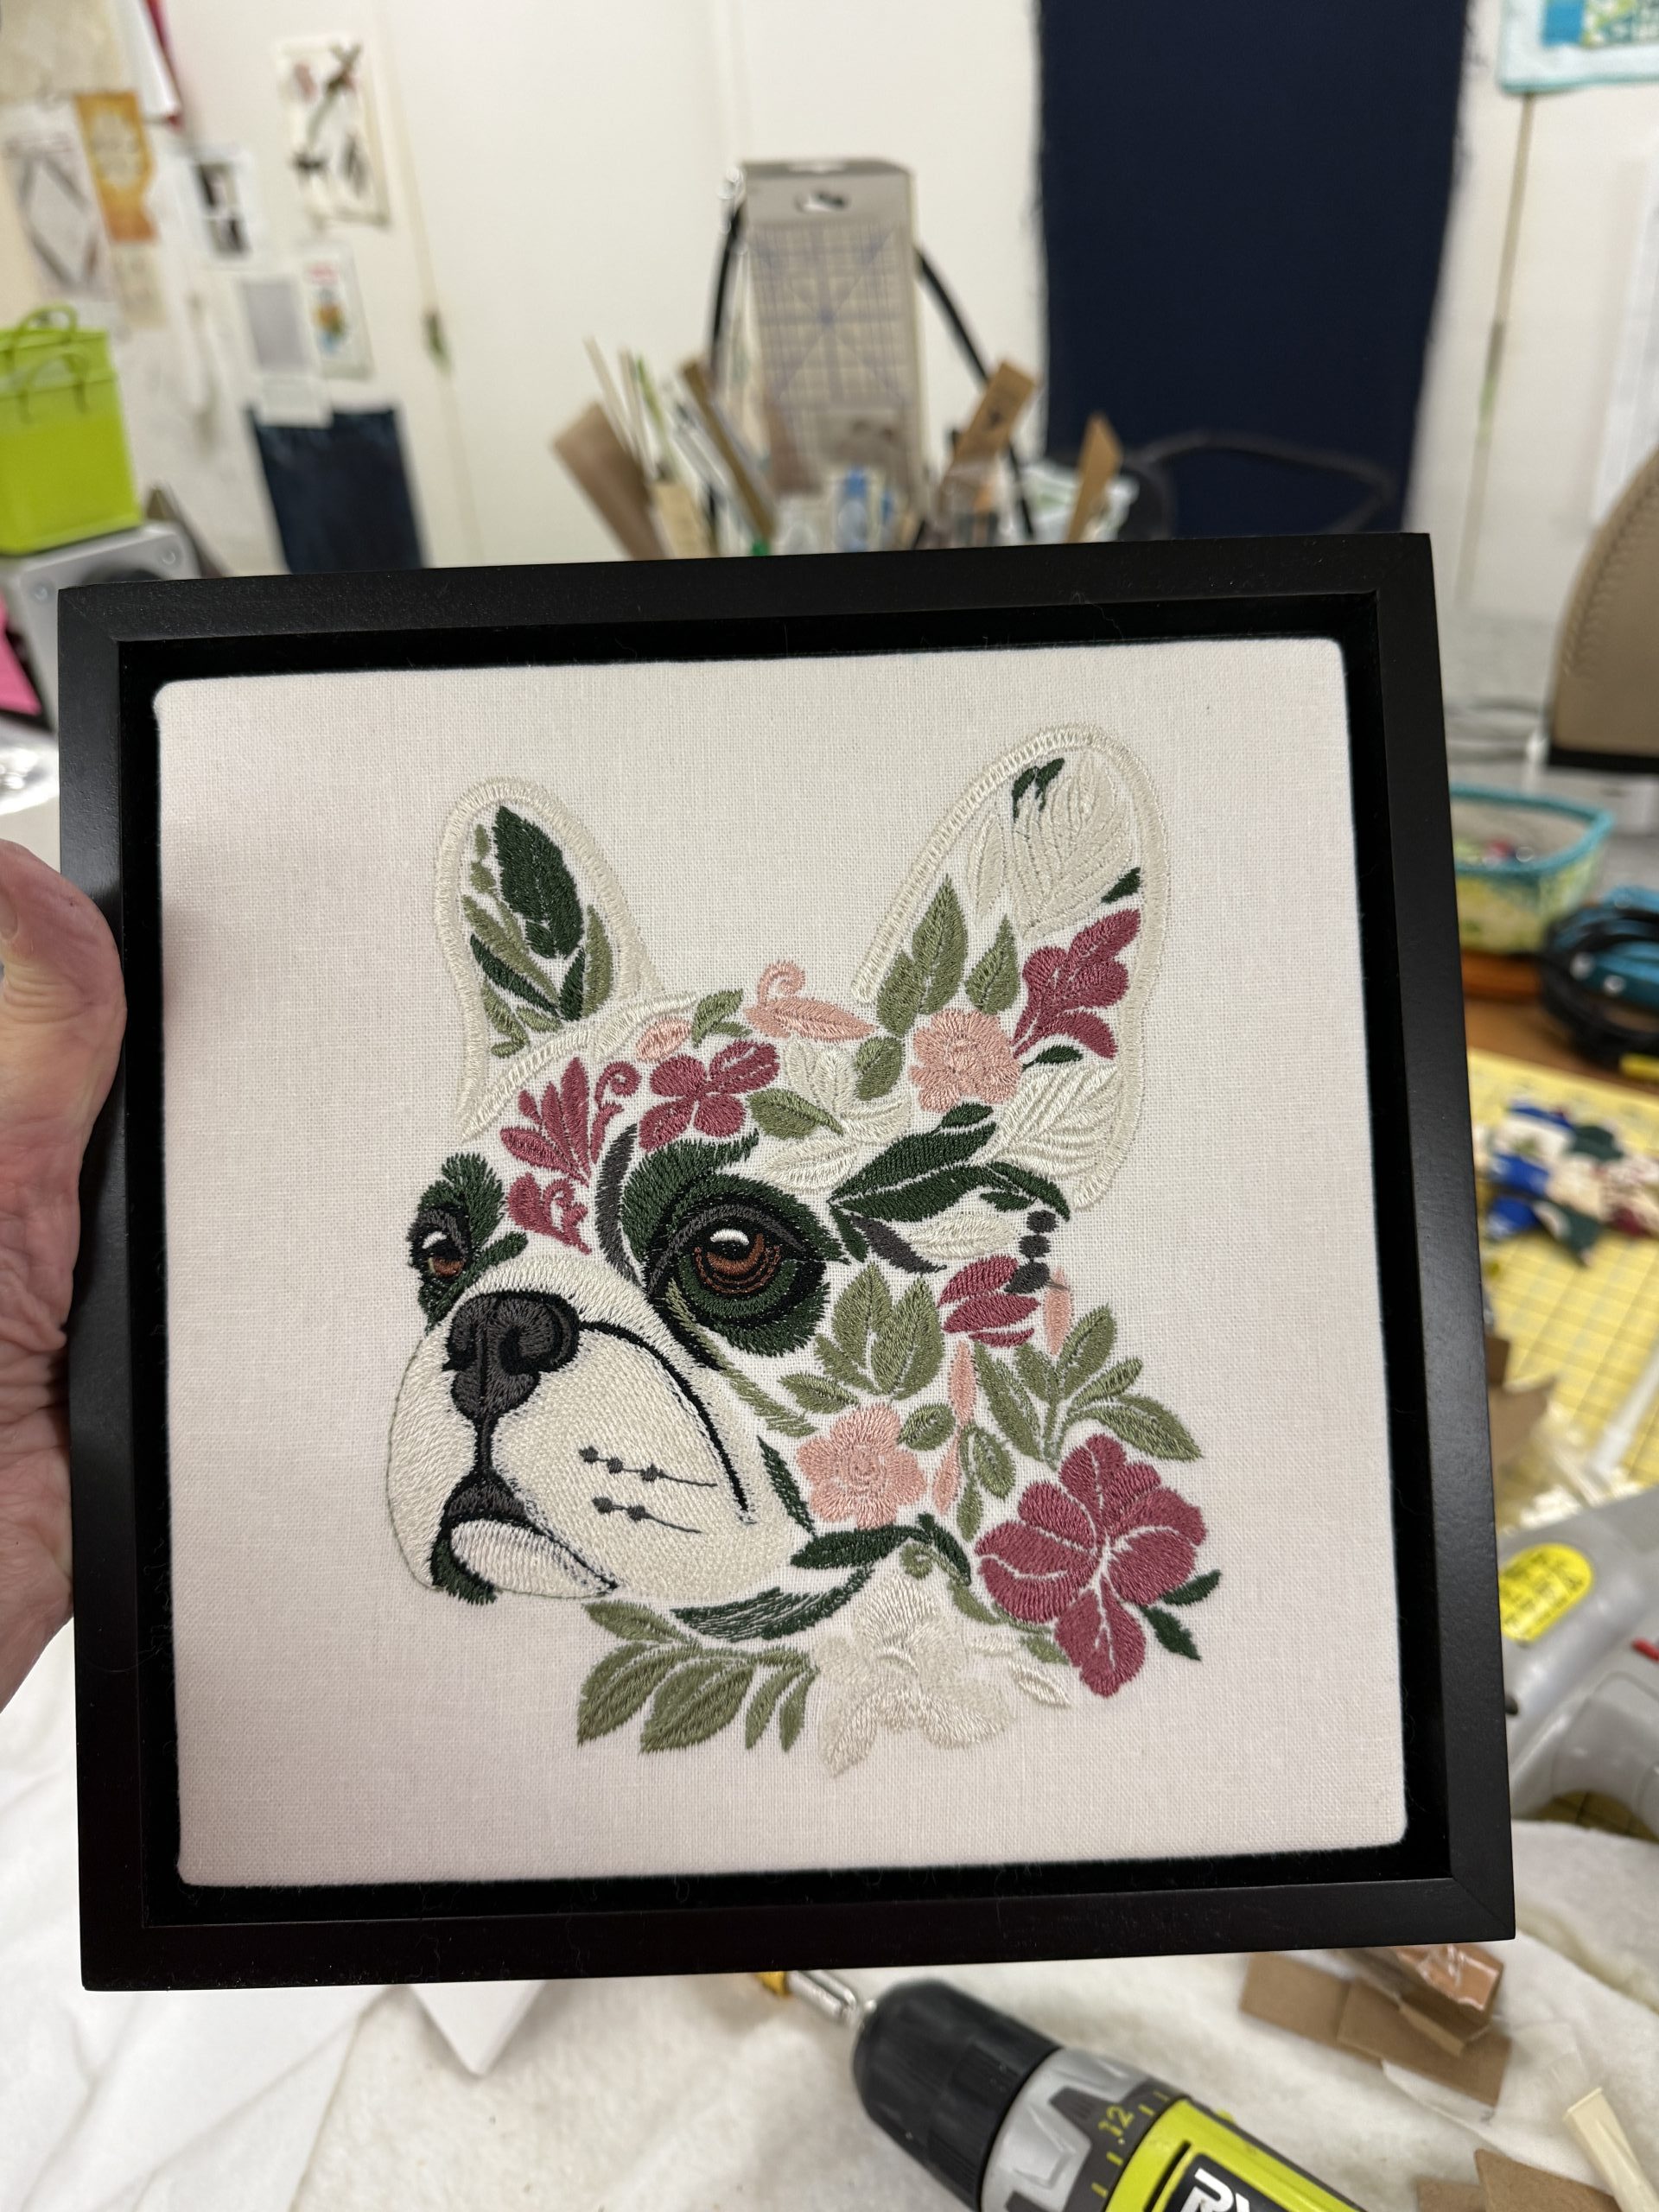
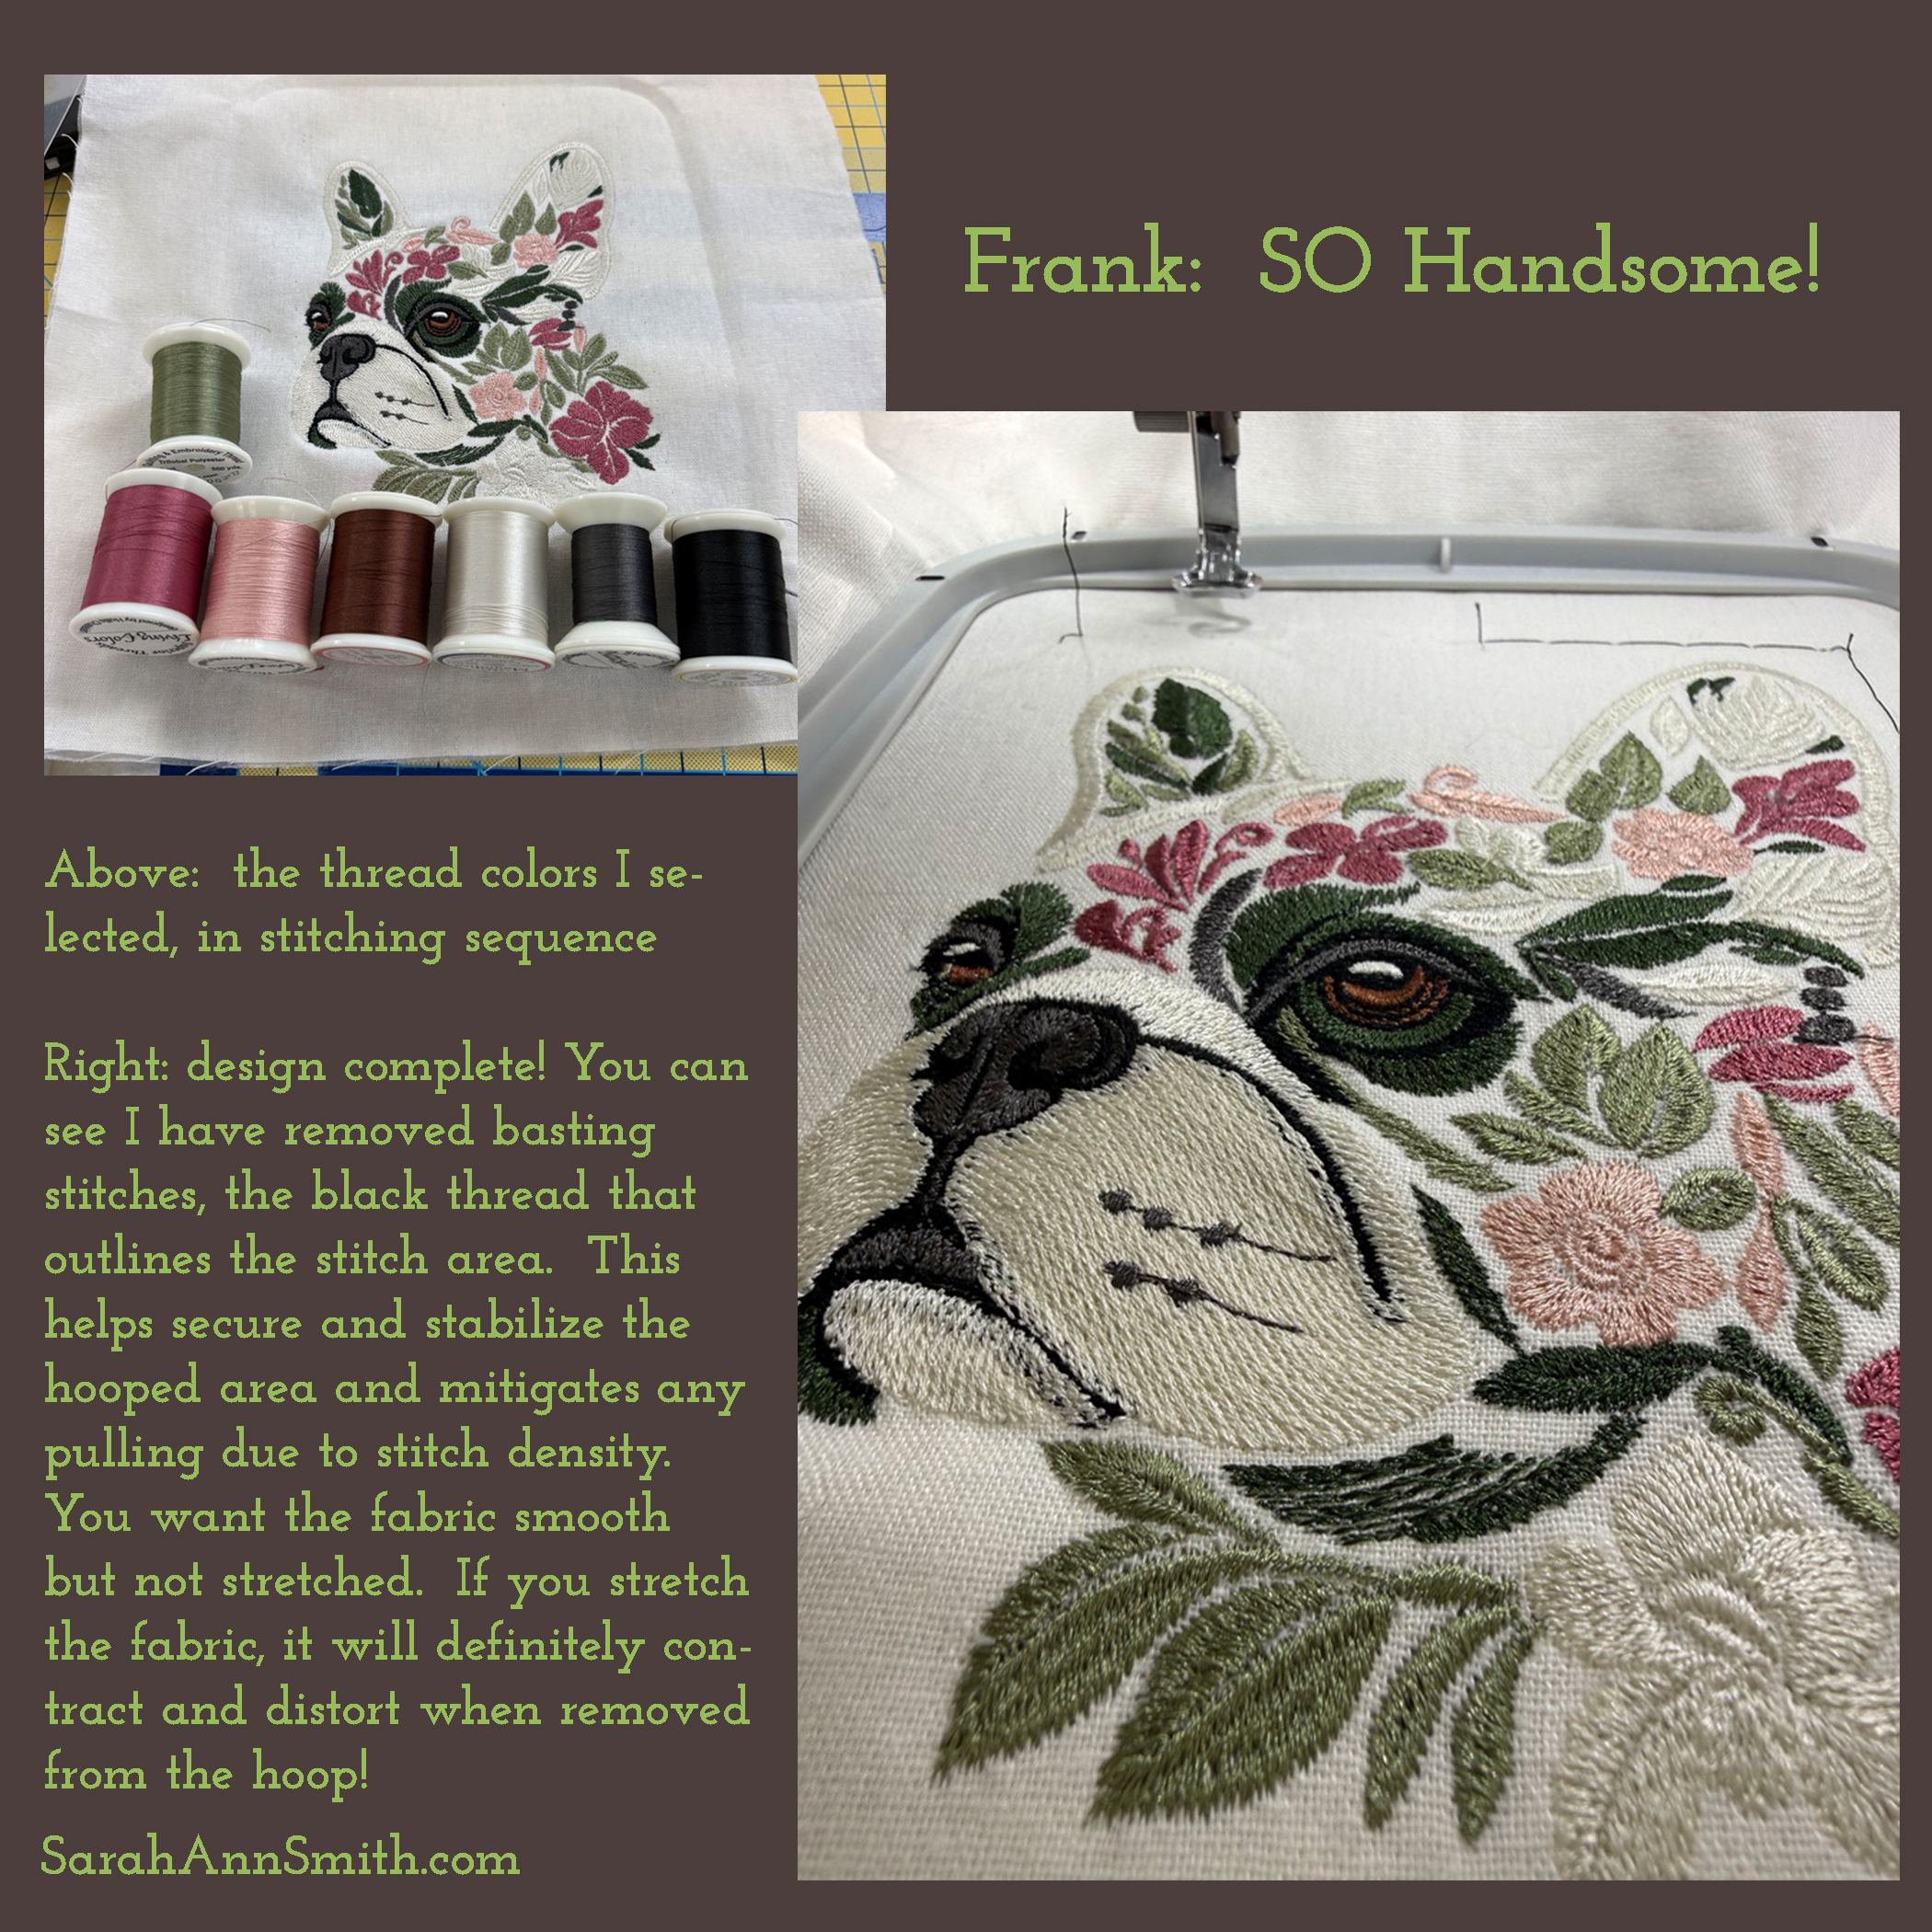
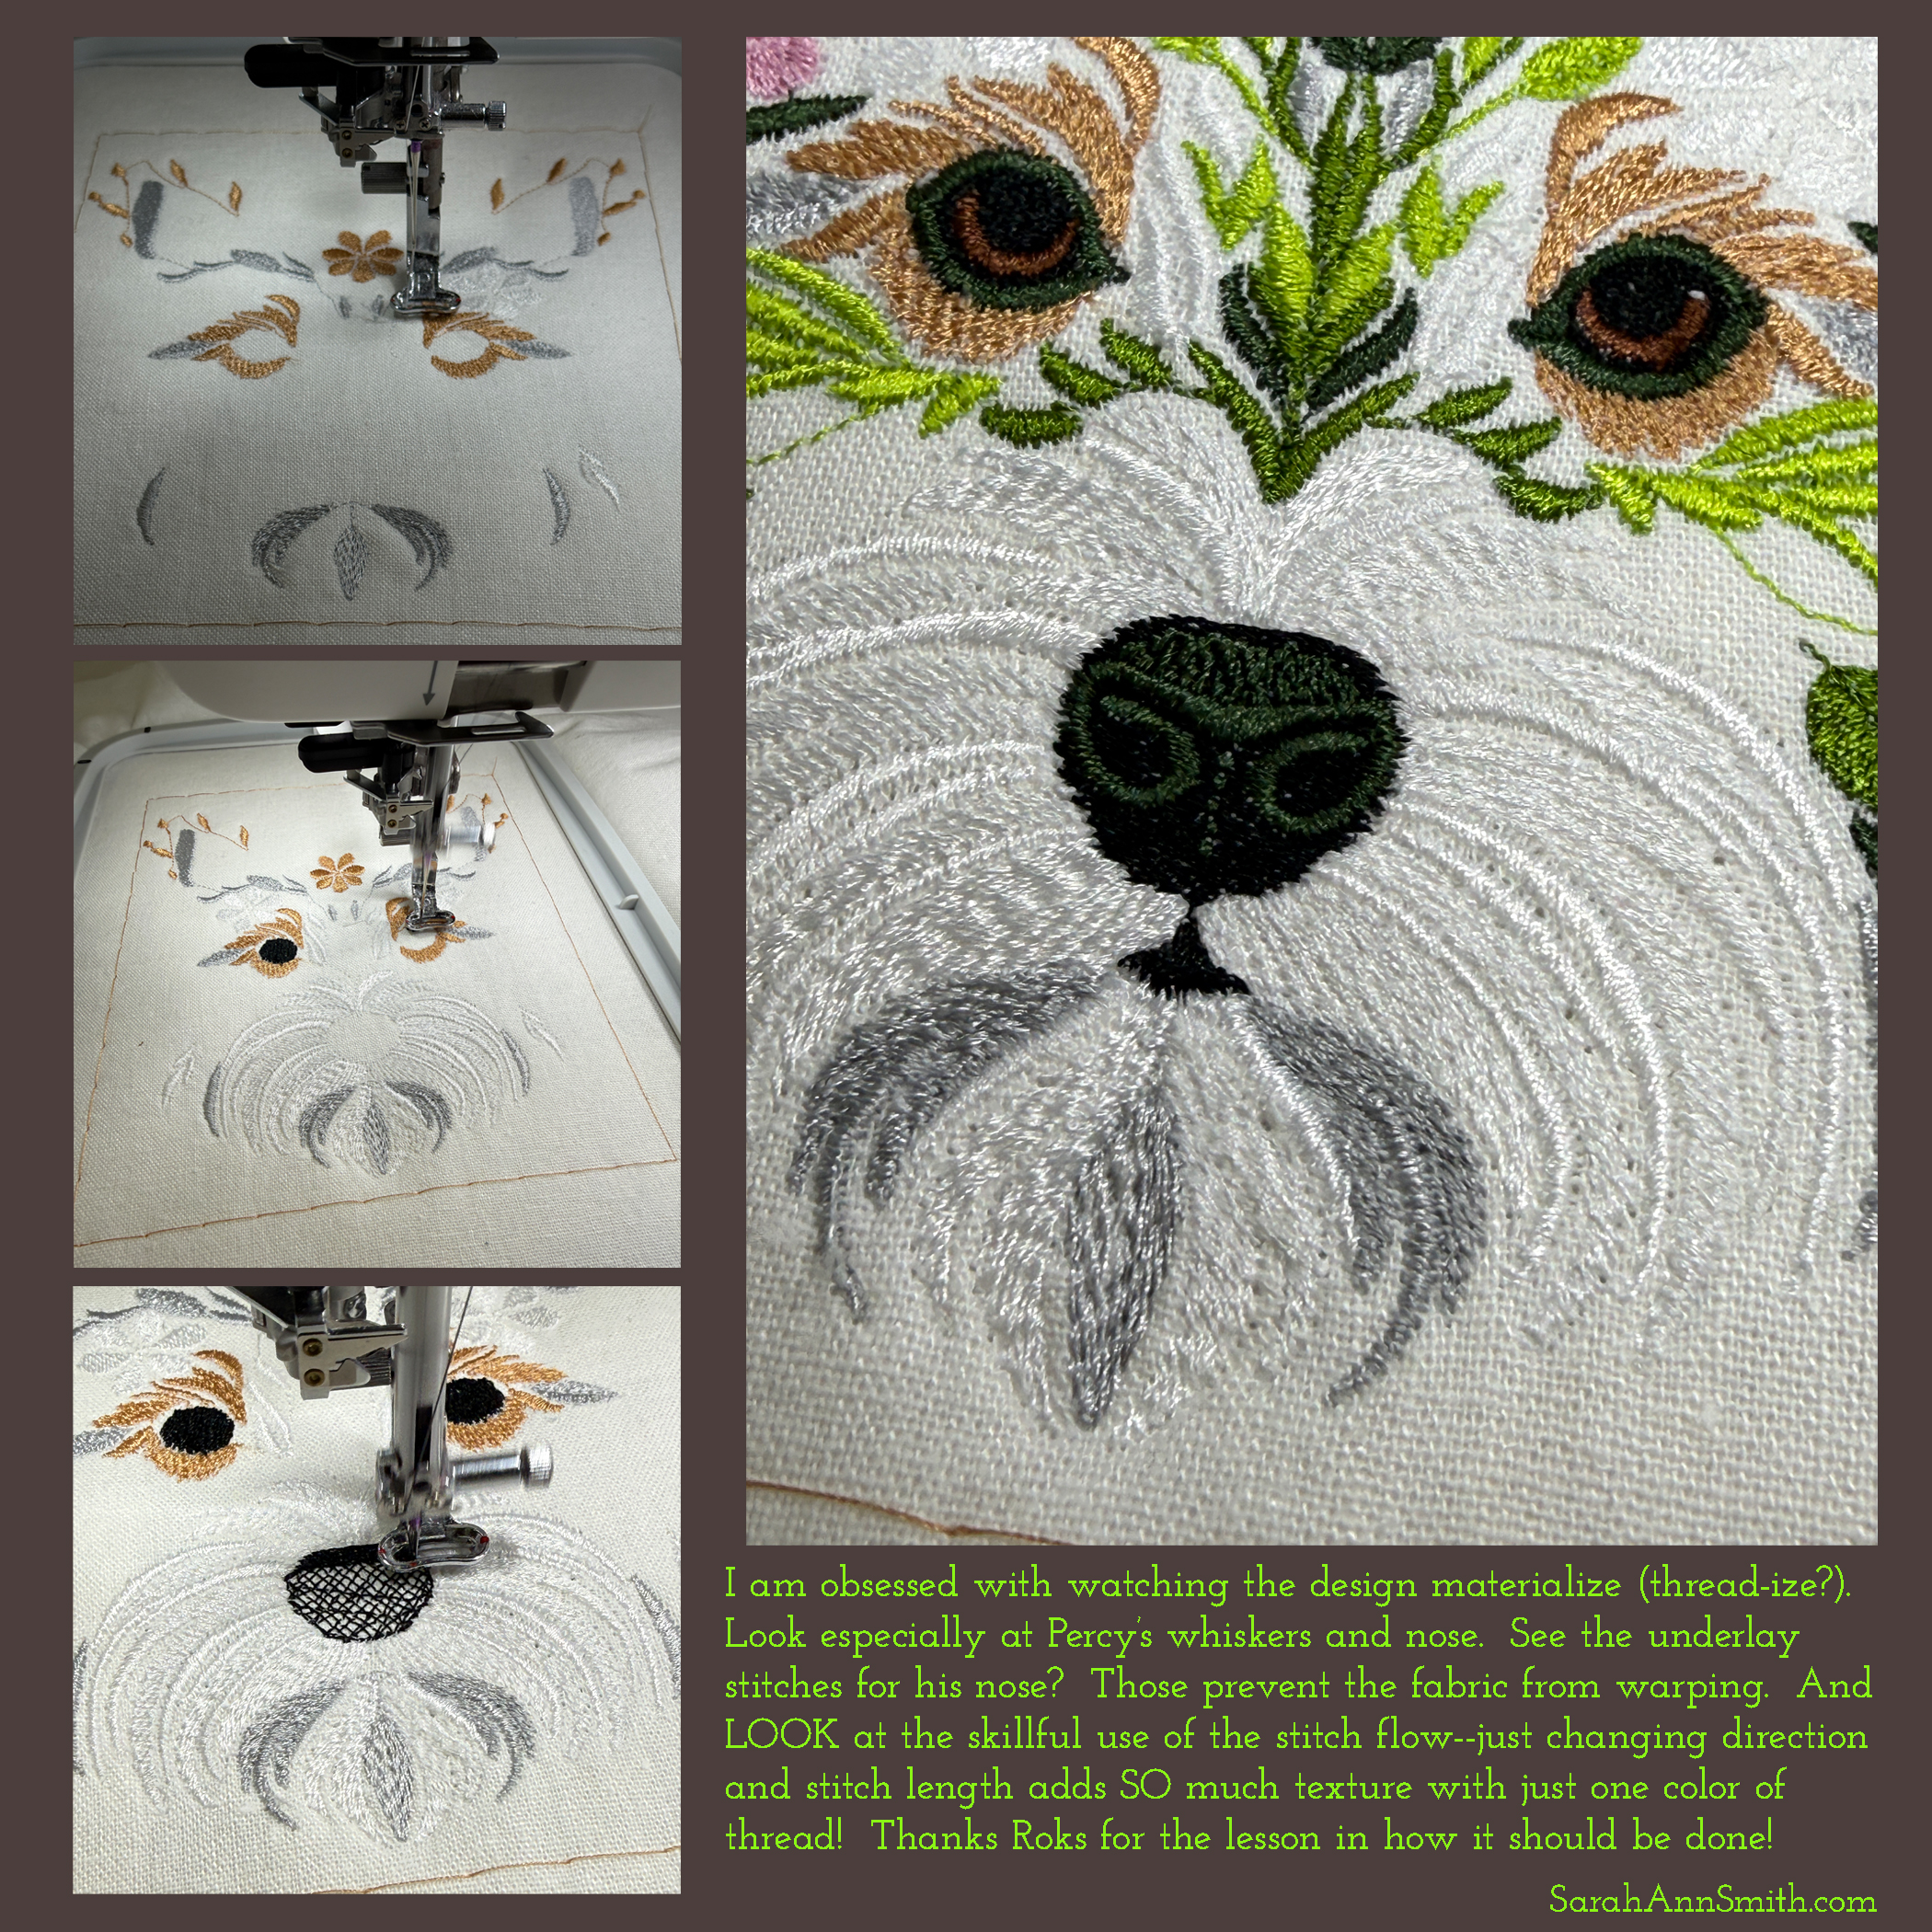
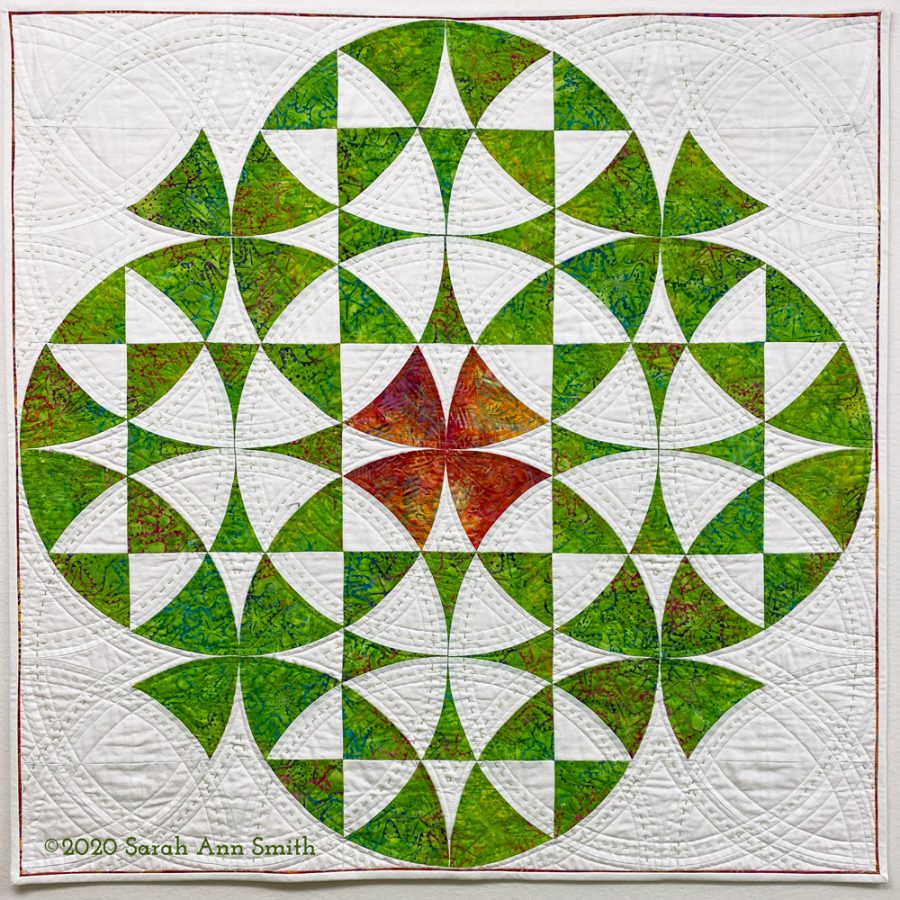
The design in Roksolana’s shop is for an Australian Terrier, but with the white thread and flowers, does this not look Just. Like. Percy?!!!! AND THAT NOSE… I LOVE both noses…the stitched and the real one!
Yes, he sits in the corner of the kitchen cabinets. All. Of. The. Time. That was also the dearly departed Pigwidgeon’s spot, too. So I still have to lean over a dog to cook! This may be the first time in my entire 68 years that I’ve loved a photo of my back side LOL! That face, with the folded down “I Love You” ears!
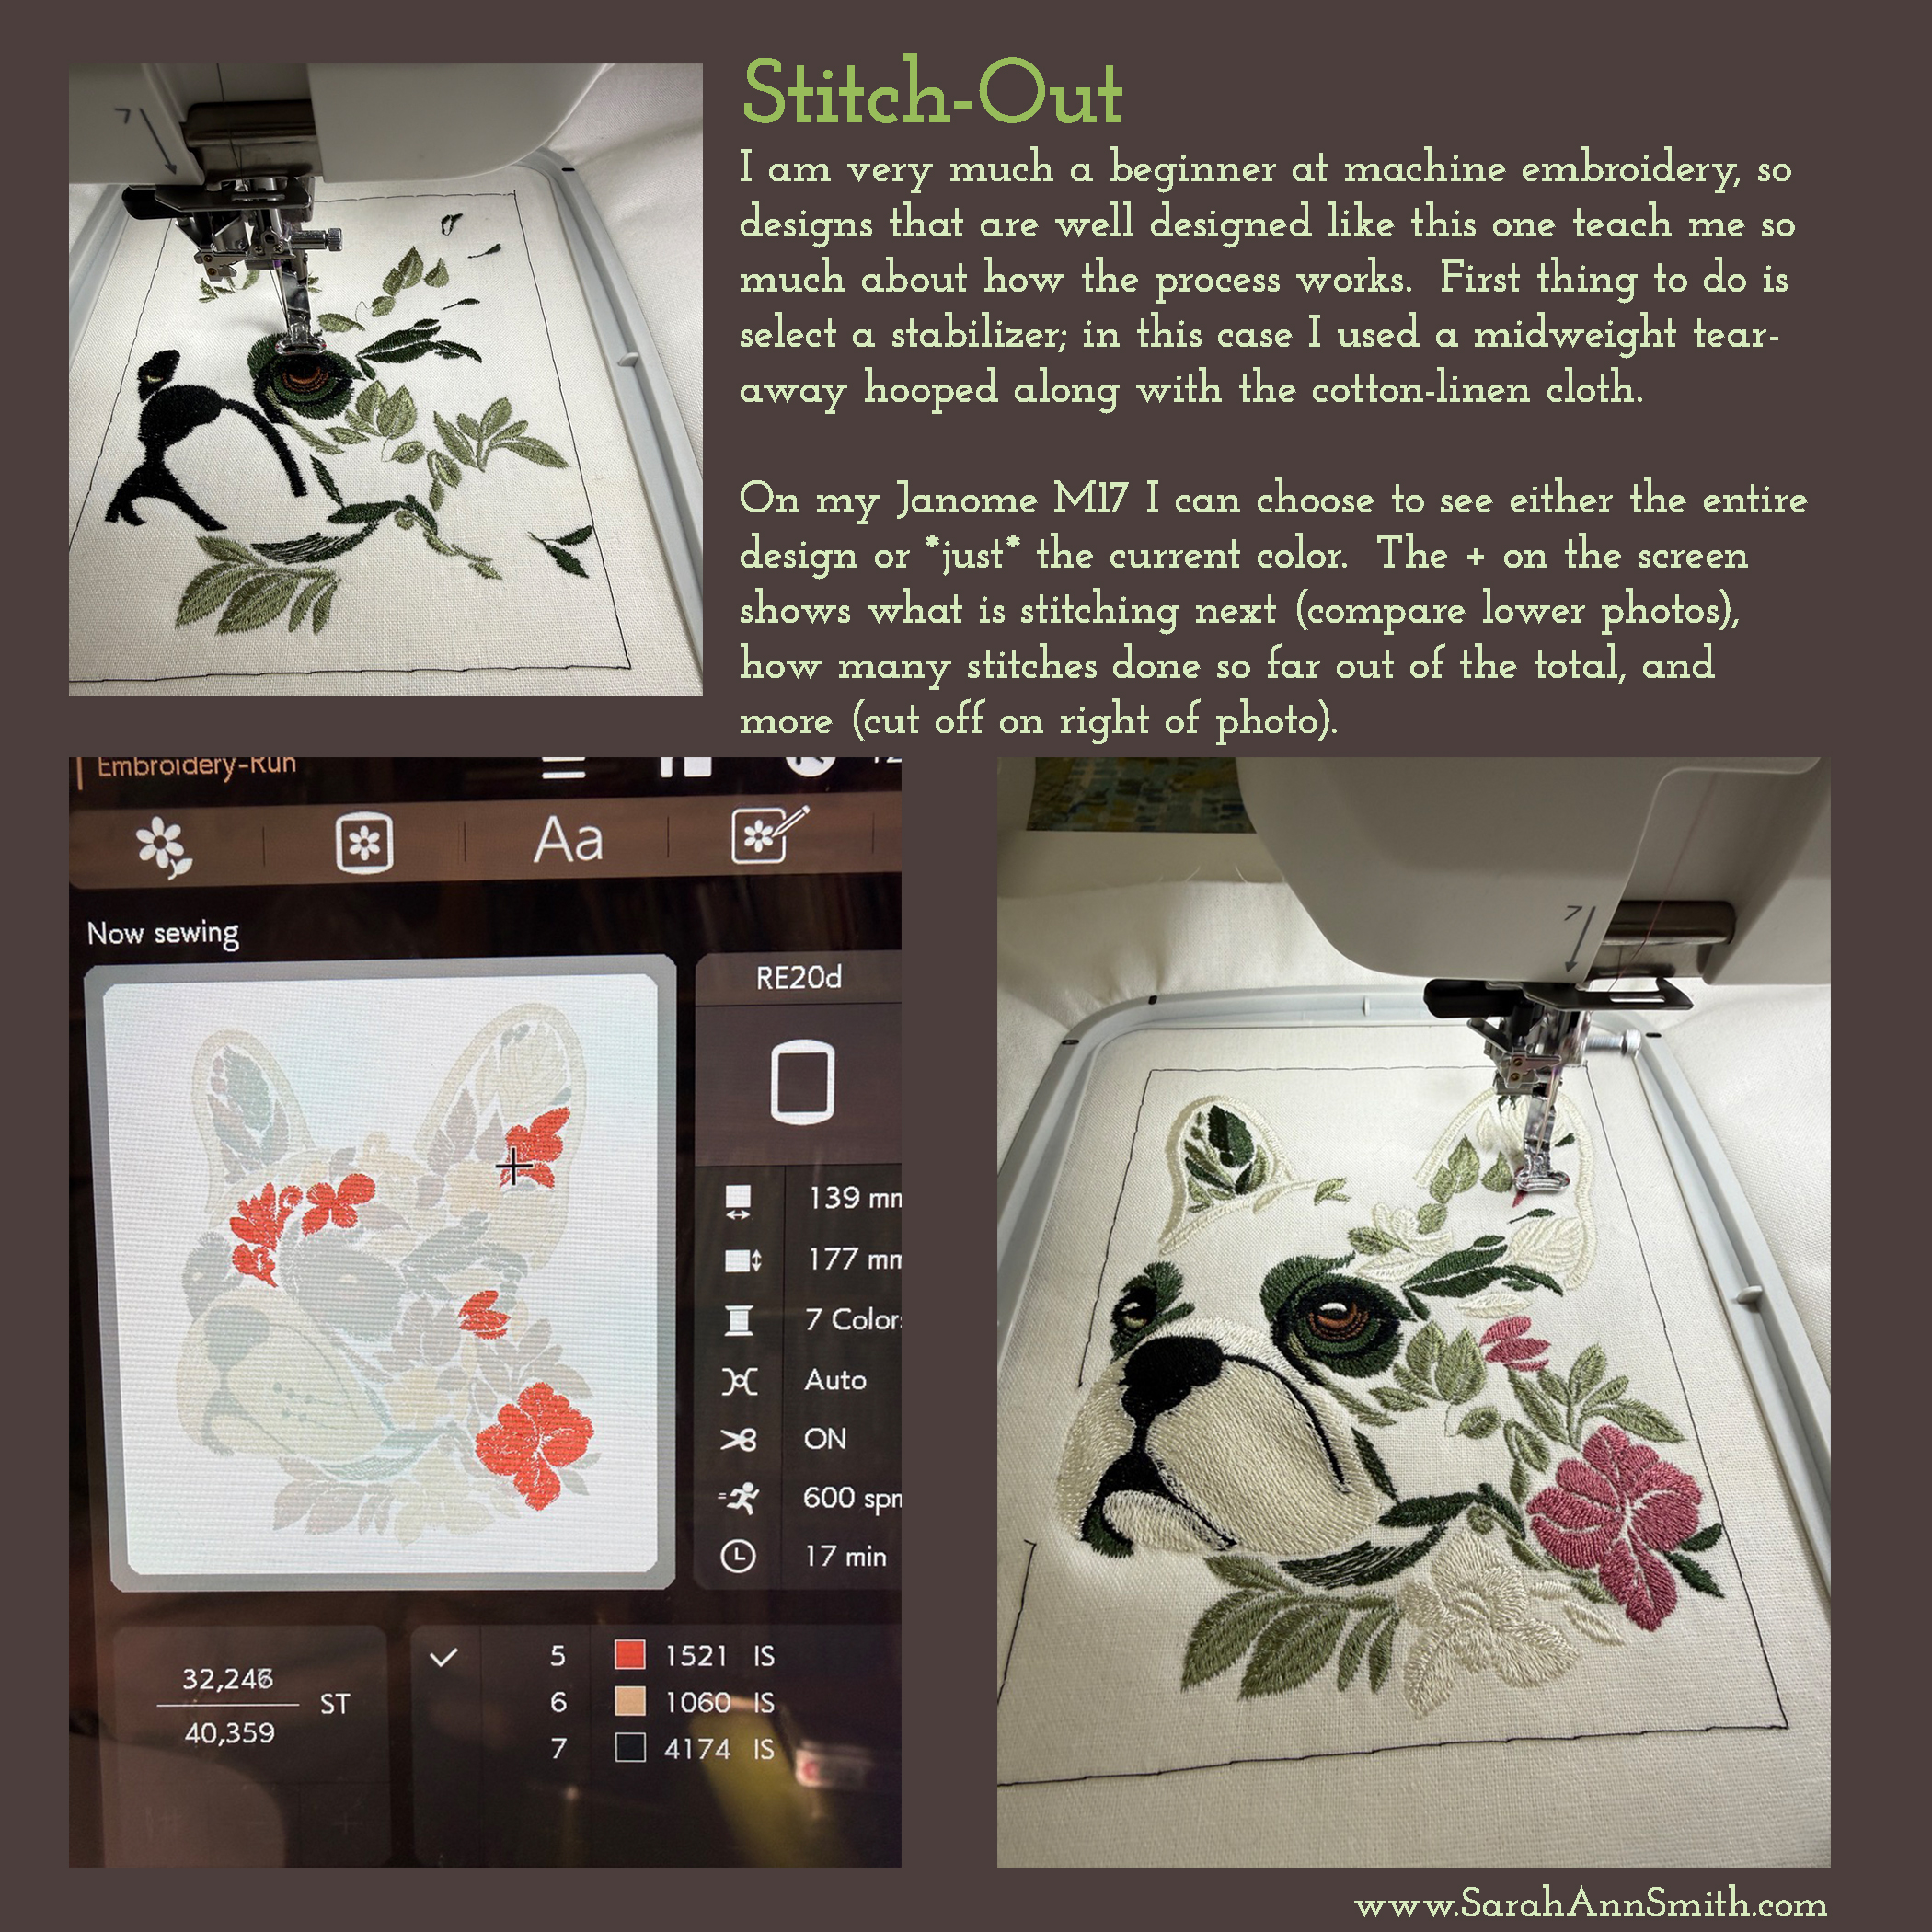
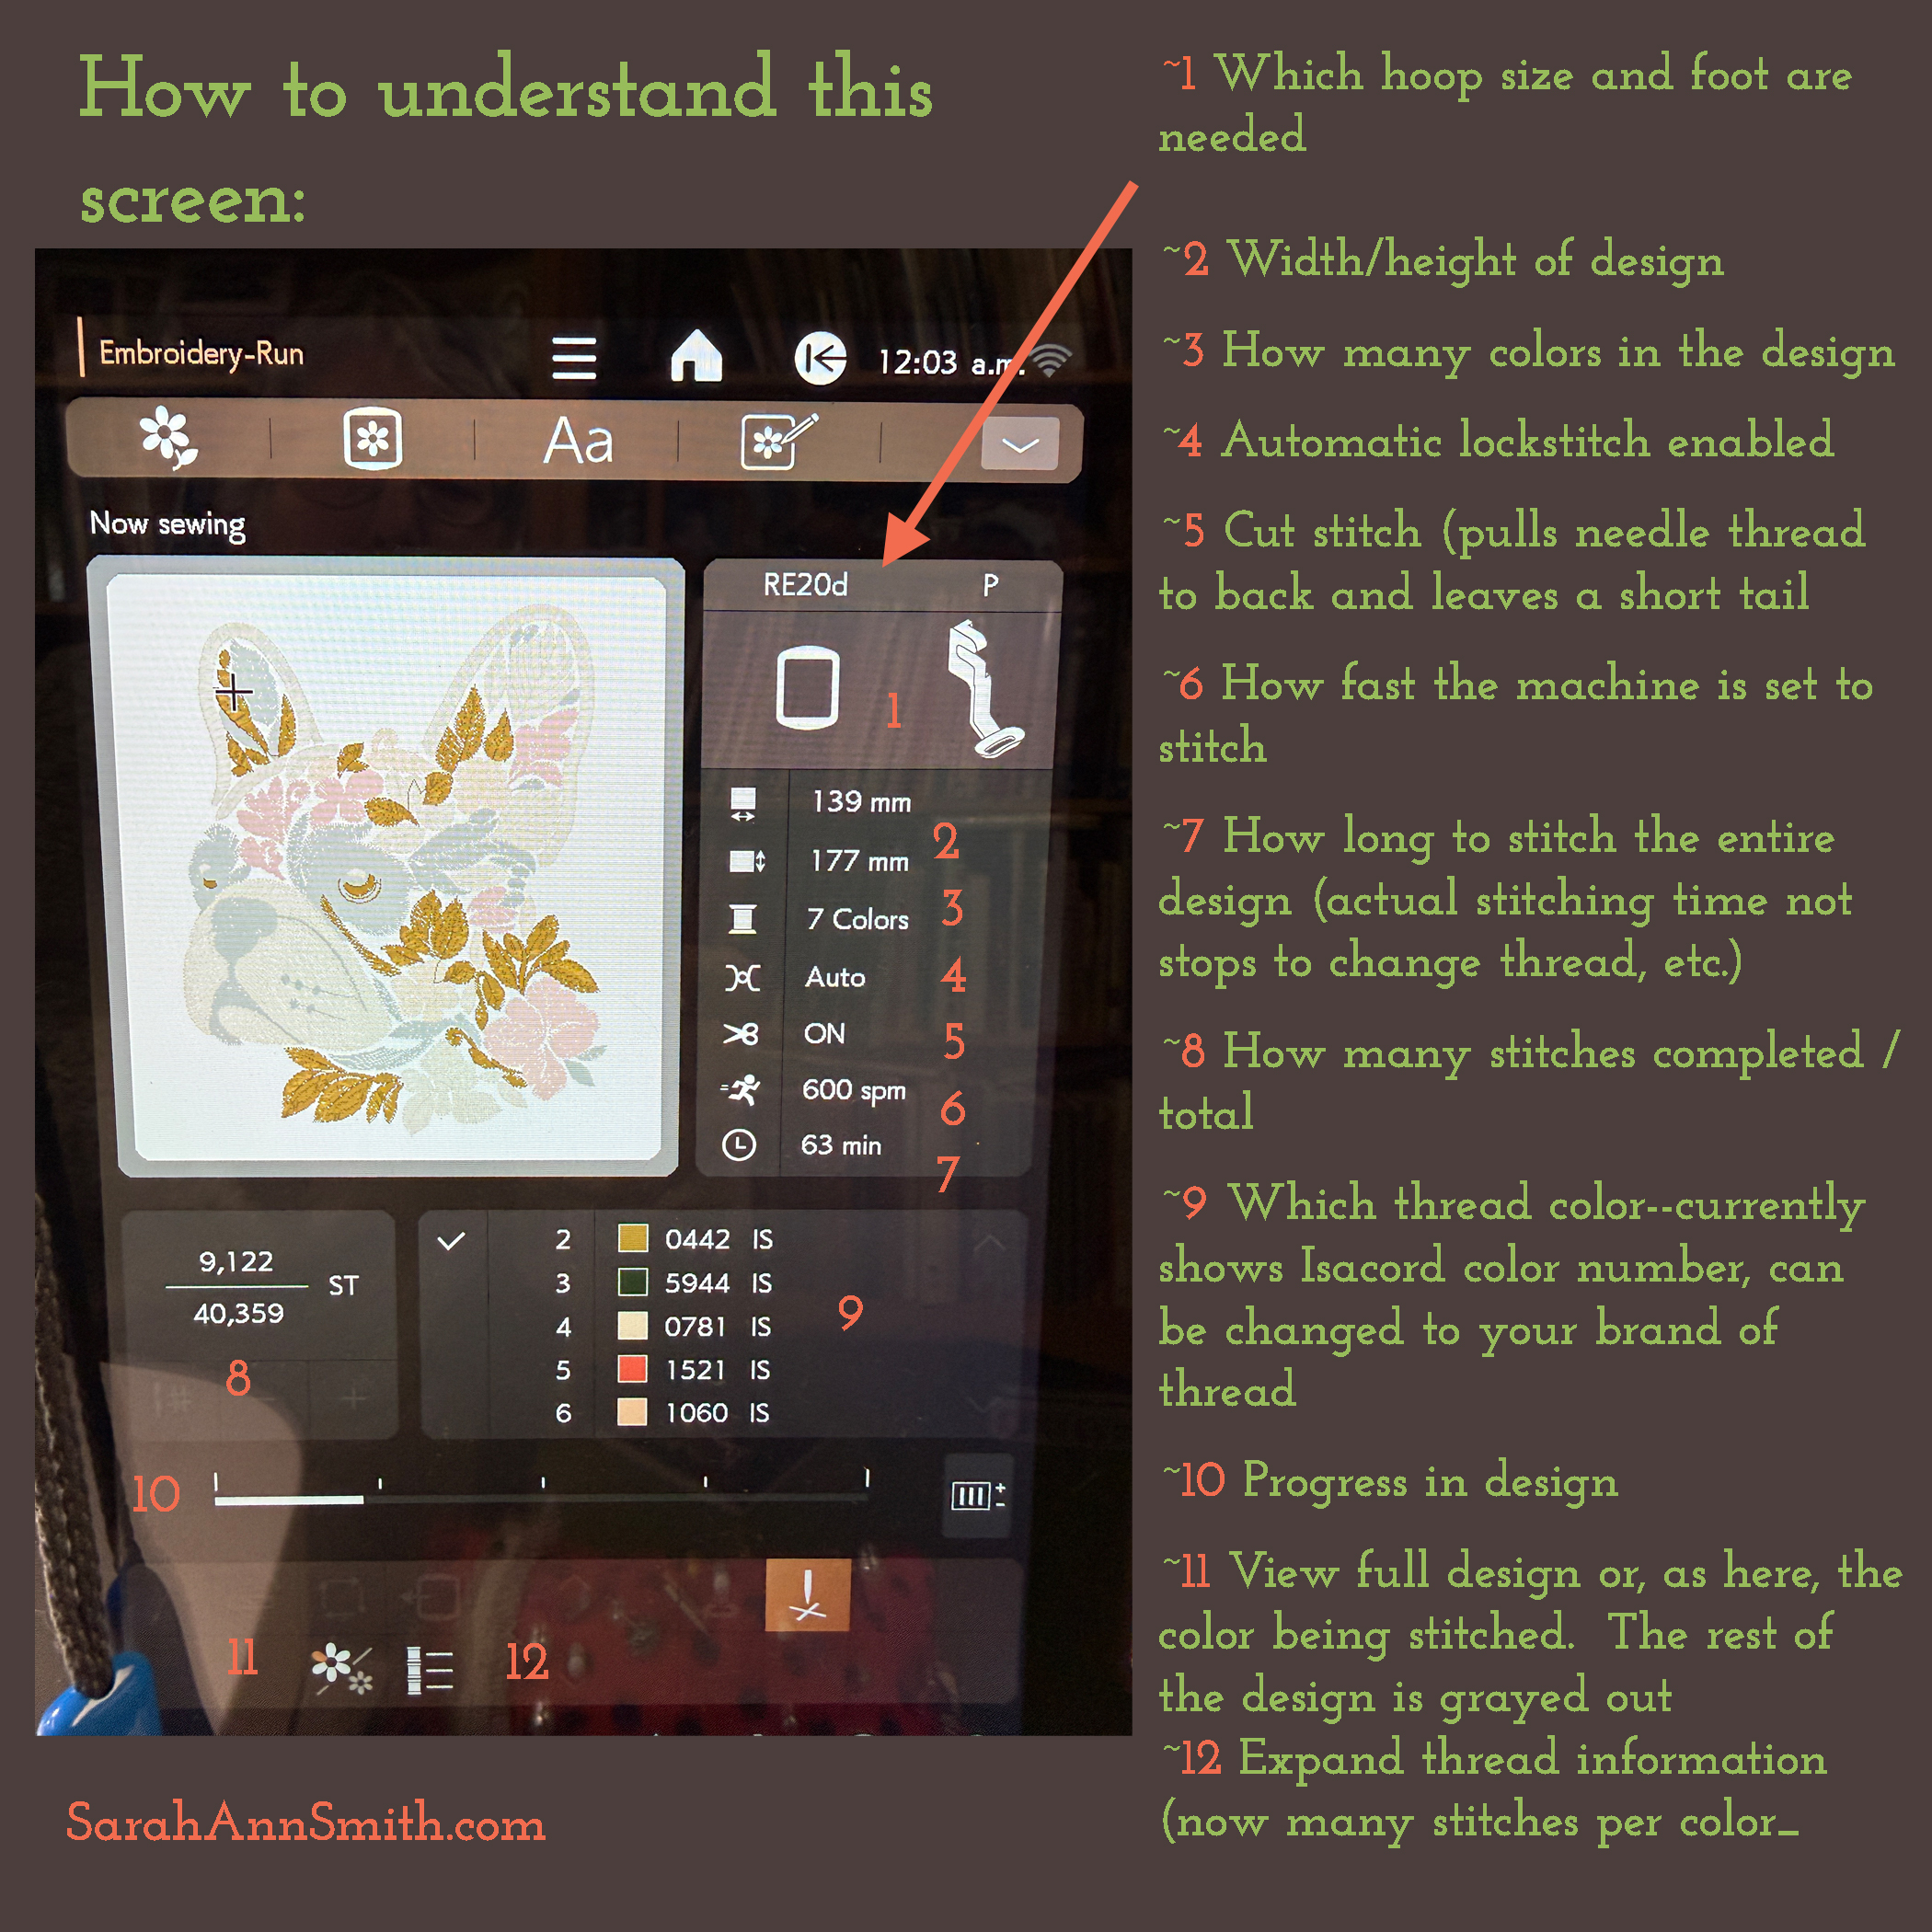
Below are all four of the portraits I did. In the top left is Boo, my husband’s spirit animal who went to the Great Poo Pan in the Sky way too young, at age 5 (he had some sort of tumor or something and went so quickly). He was a Turkish Van: all white except for a dark smudge over his right eye, which I was able to replicate by stopping the machine at the precise moments needed to change thread from greens to black for the location of the smudge. He was also what is known as “odd-eyed:” One blue eye, one yellow green. I am no longer terrified to stop the machine mid-stream to change threads, replace bobbins, back up a stitch or two as needed, and can anticipate pretty well when to hit stop! I’m learning!
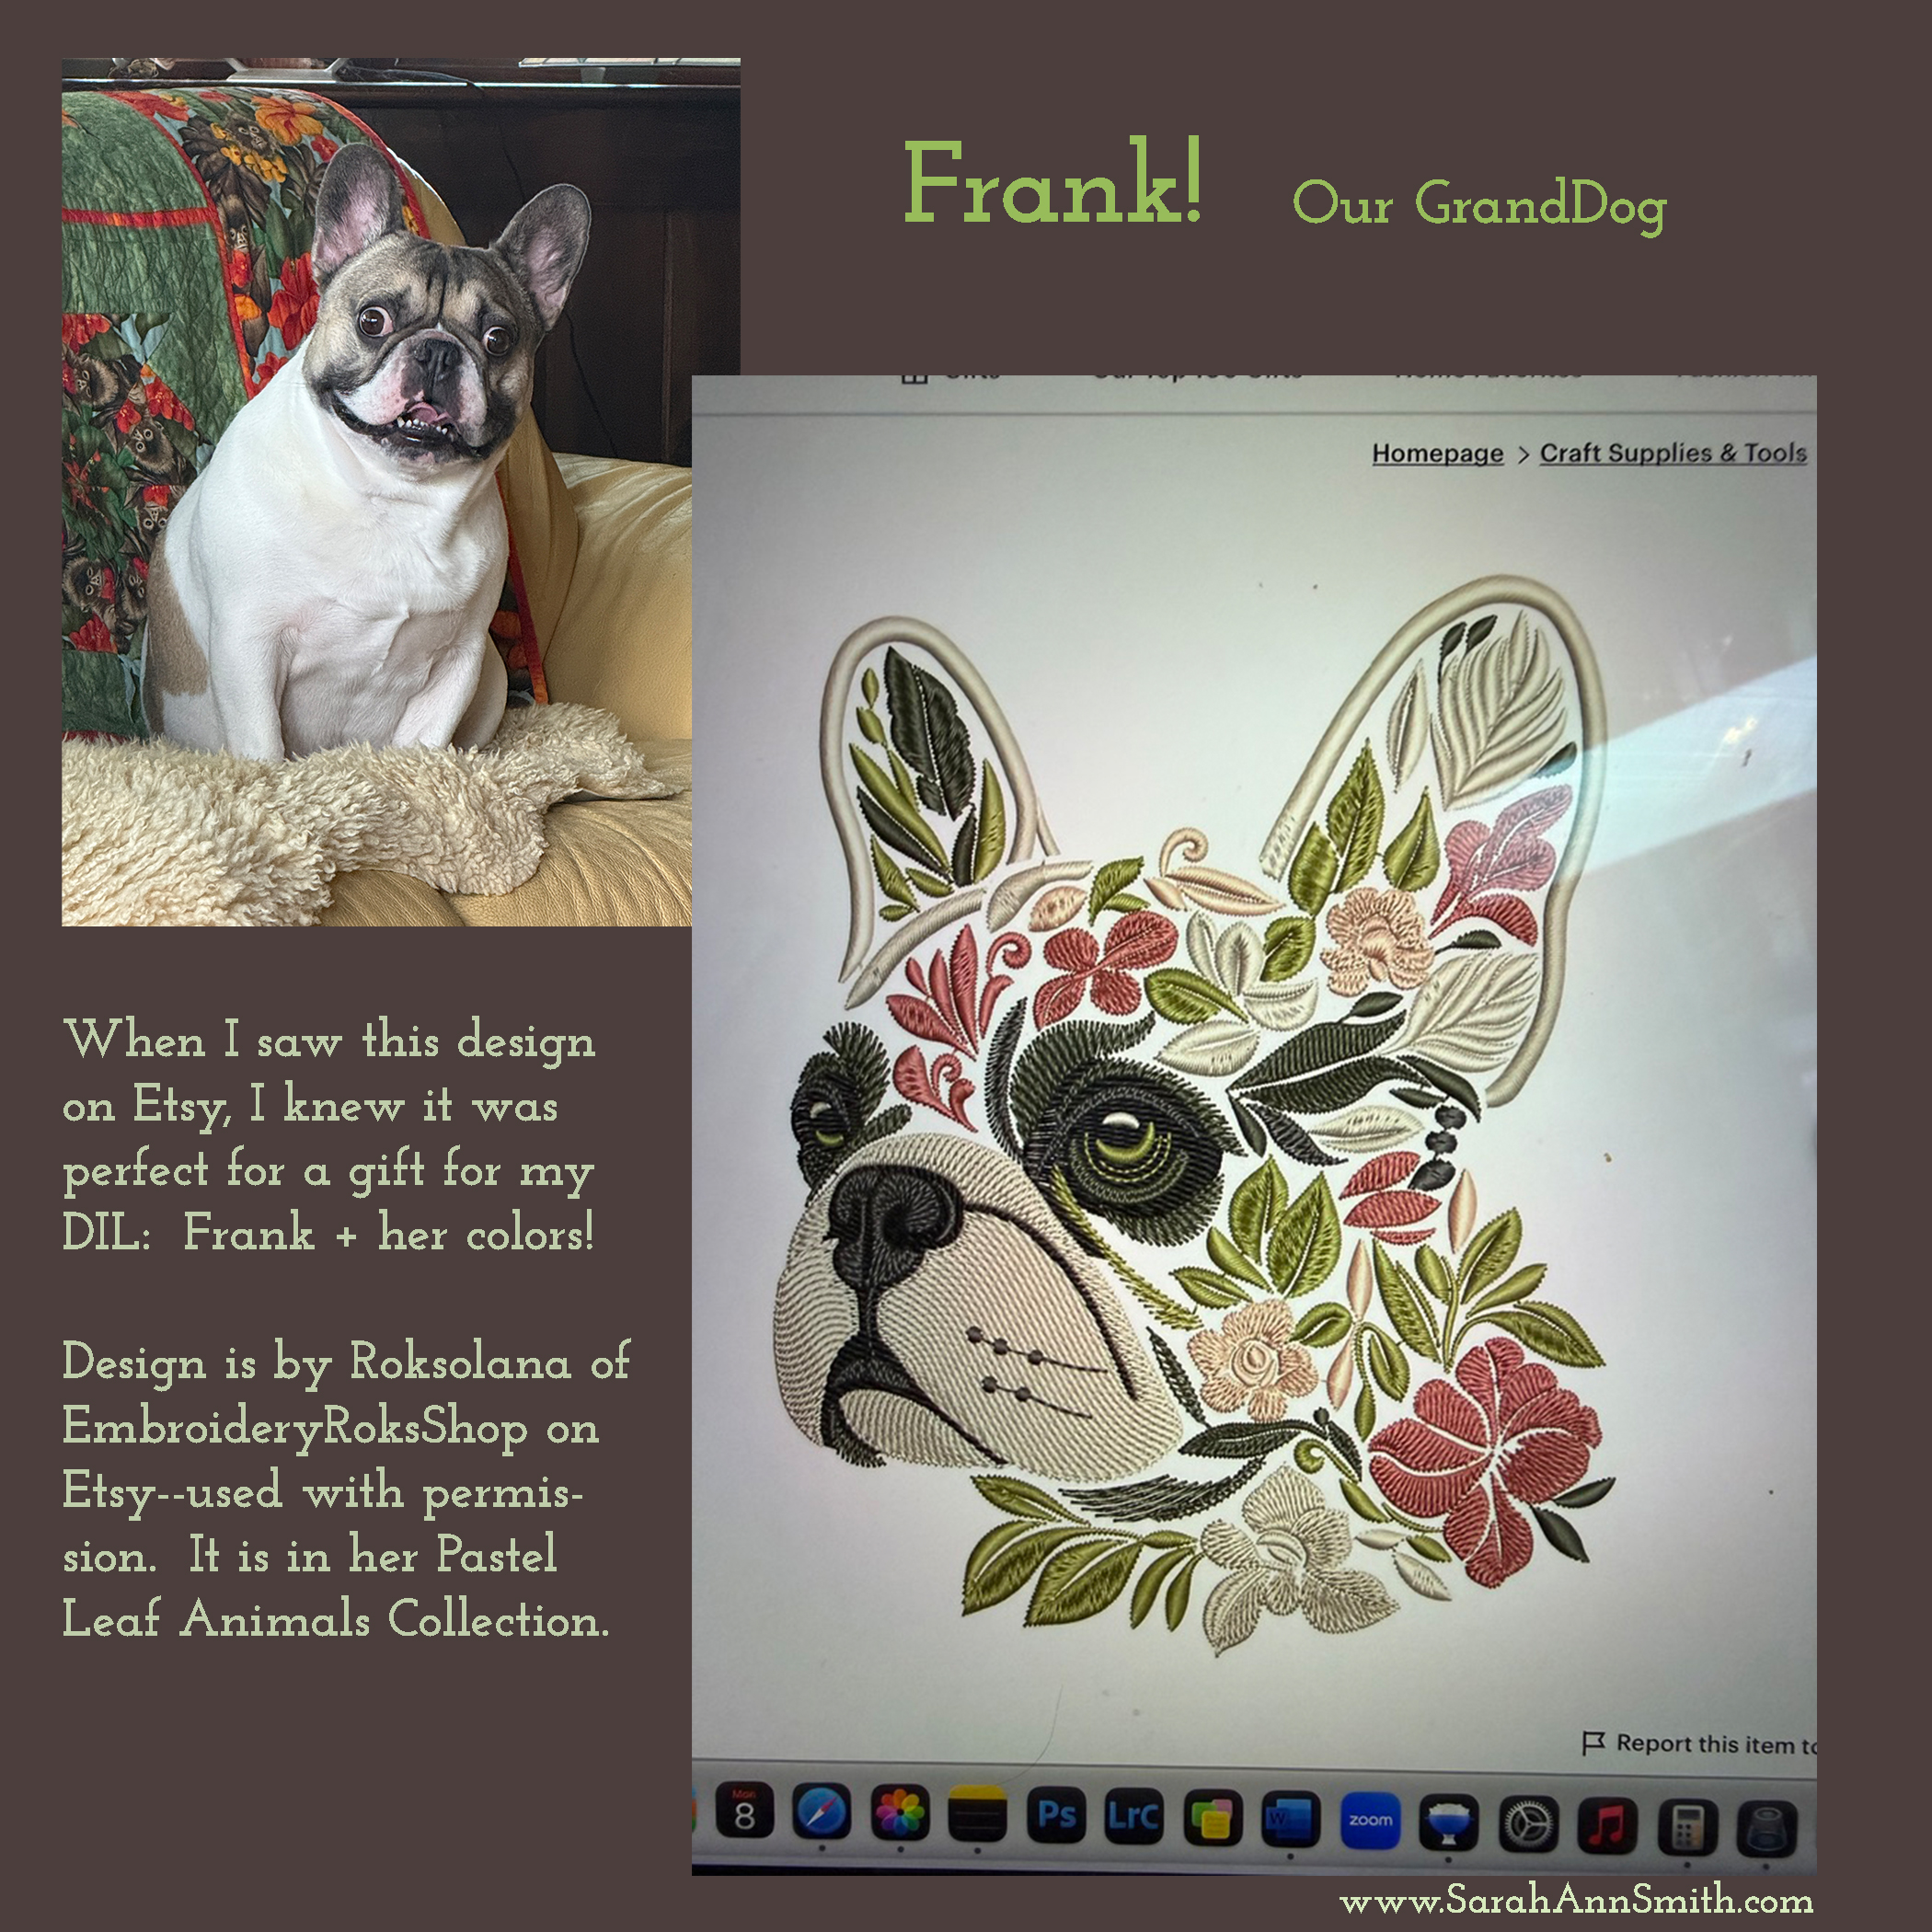
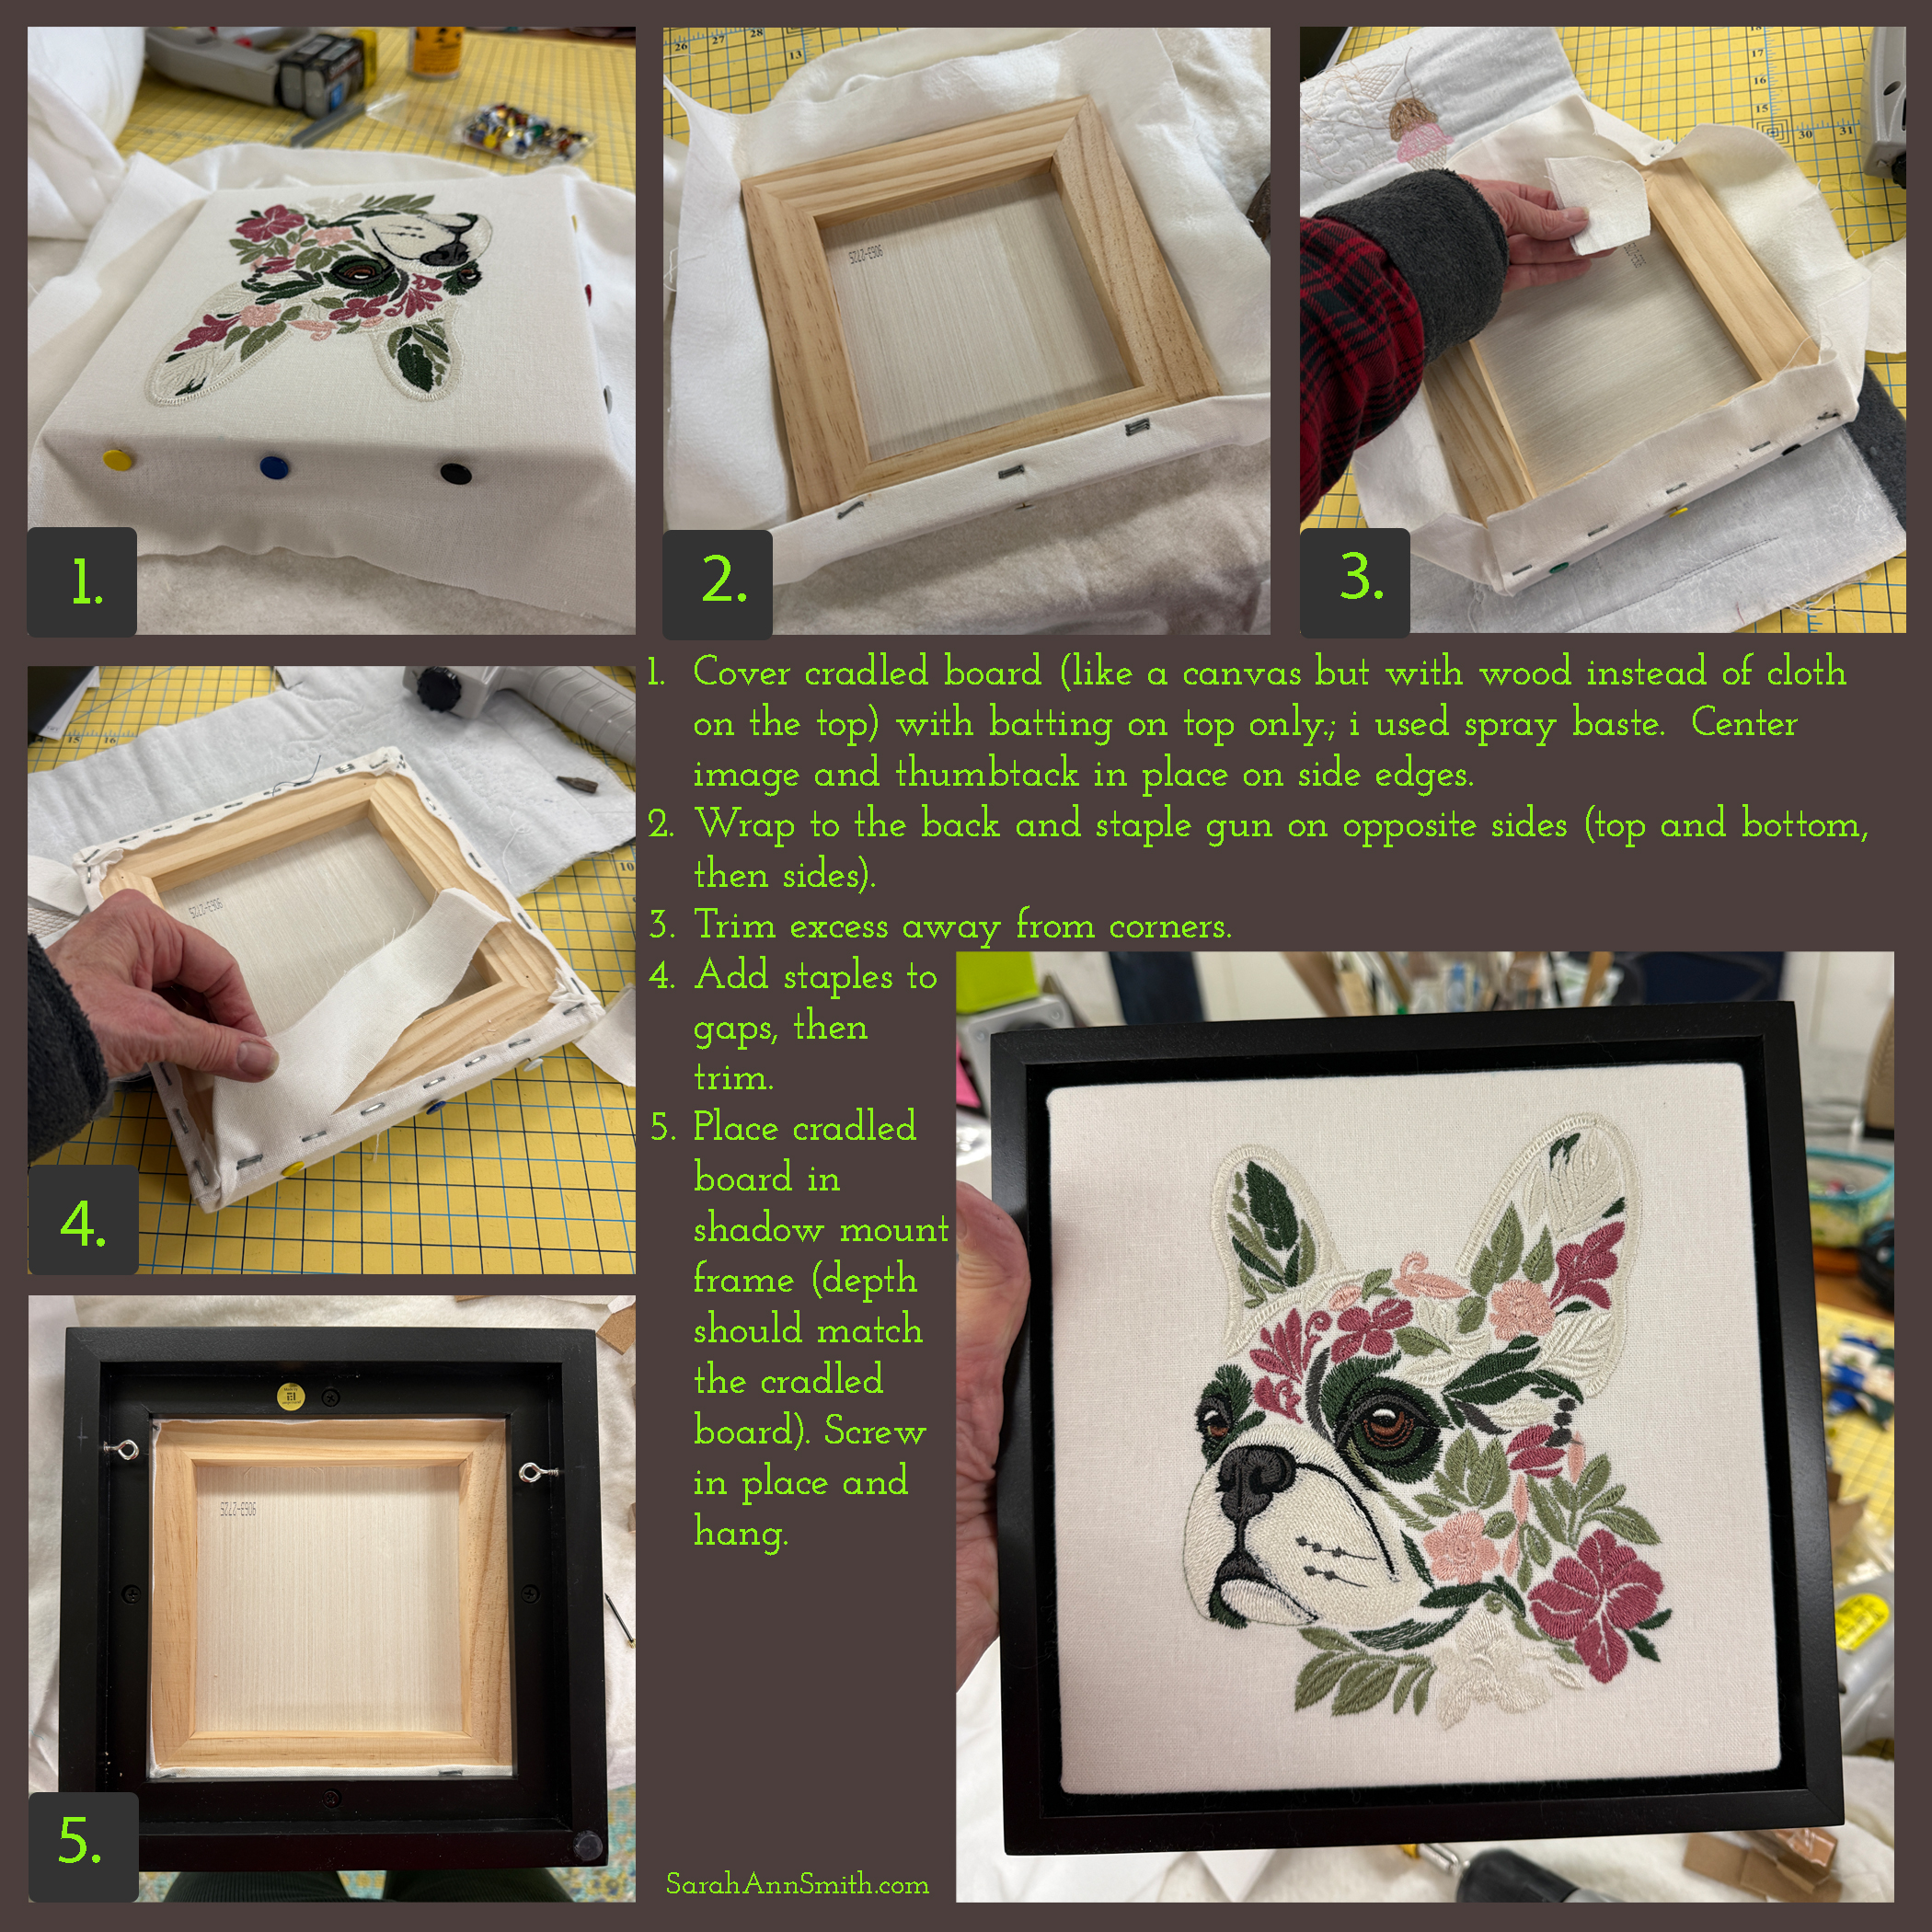
Top right is, of course, Frank, my GrandDog. He is so darn cute and makes the most adorable sounds (and let’s be honest, yeah he kinda farts, too). He and Percy are about the same size so Percy doesn’t have any issues with him (Percy is afraid of the neighbor’s Goldens who resemble Tigger going boing boing boing and tripping all over him), but Frank is a full ten pounds heavier, all dense bone and muscle. Bottom left is a younger pug than the dearly departed Pigwidgeon (one of the true loves of my life), but it’s a pug! So I made him and the terrier for Percy and they will hang in my upstairs studio (son’s old bedroom, my regular studio is in the basement and I have an attitude problem about being underground, so I relish having a WINDOW).
And that’s it for this post! If you aren’t already, follow me on Facebook, YouTube and Instagram, all are @sarahannsmithq . I’m also the same handle on Ravelry if you’re a knitter. THANKS for reading this post!
Back in 2013 I did a post on this subject, and decided it was high time to update it! So here you go. There is a downloadable PDF for you to enjoy; it’s also listed on my Resources page.
Sharing is a good thing, so today I want to share some of my favorite things: products that I use and recommend. If you discover a link is no longer working, please let me know by leaving a comment or using the Contact Me page. Since this list is quite long, here is what you’ll find below, my stuff first (sorry) then alphabetical order:
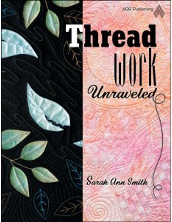
Threadwork Unraveled, my book about all things thread
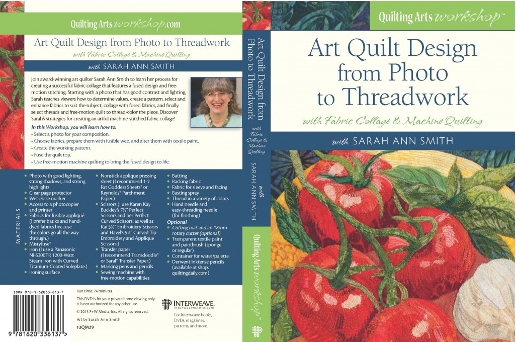
Art Quilt Design from Photo to Threadwork video workshop
The Art of Sarah Ann Smith, so far
Big Design Wall
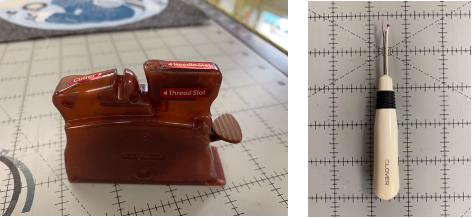
Clover seam ripper
Clover needle threader
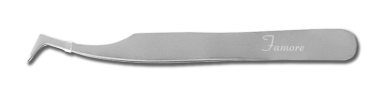
Famore Cutlery Bent-tip tweezers
Heidi Proffetty’s insanely sharp tweezers
Janome M7 Continental Sewing Machine
Karen Kay Buckley’s Scissors
Mistyfuse Adhesive Web
Mistyfuse Goddess Sheets
Mistyfuse Transdoodle / Saral transfer paper
Panasonic Titanium Non-stick Iron
Running with Scissors bag and byAnnie’s patterns
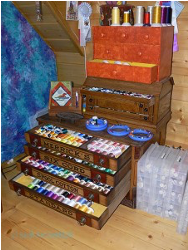
Textile Paints
Val Webb, art teacher extraordinaire
Valerie Hearder—jumbo non-stick press sheeting
Wool Felt ironing pad
Threadwork Unraveled by me, Sarah Ann Smith
My book is about all things thread. You’ll learn everything you need to know about thread, from how it is made to what will make your life easier, and your quilting better! The book is organized in three sections: The Basics, Applique, and Quilting, and is designed to be a reference book you’ll come back to again and again. You’ll learn how needles, tension, your workspace, sewing machine, stabilizers, and other tools all help you in using all those wonderful threads now available. I’ll help you understand how and why certain tools and notions work best and when another option is a better choice. Click here to read more and to order. Now out of print, it is still a valuable reference tool. I have a number of new copies and you may be able to find it online / used elsewhere.
Art Quilt Design from Photo to Threadwork
The complete cover of my video workshop, back when it was a dvd, Art Quilt Design from Photo to Threadwork with Fabric Collage and Machine Quilting. Order the download from Quilting Arts here. https://www.quiltingdaily.com/product/art-quilt-design-from-photo-to-threadwork-video-download-2/
Big Design Wall
There are a ton of different ways to get your own large design wall. When we moved into this house, my studio was a grim, mostly unfinished basement space. I did a series of blogposts in 2011 as I transformed it into my dream studio (well, except for moving it upstairs). Here is the first of the posts… just pop “state of the studio” into the search box. I designed my space and had my carpenter make a storage area by installing “closet doors” made of two hollow-core doors framed with 1x lumber. We nested 1” rigid foam insulation into each of the 48” wide doors. Due to low ceilings, they are a bit under 7 feet tall. If you don’t have space for a permanent design wall, just a 48” wide piece of rigid insulation—perhaps trimmed to 72” tall—works. You can stash it behind a door or under a bed. Trust me, you’ll LOVE having it.
By Annie’s Stiletto
I’d never really liked stilettos until I met this one. The grippy texture on the metal point is what clinched it, but the “ironing” flat end and the comfortable grip help, and the two flat sides to the grip area prevent it from rolling off the table—what a concept! Recently I thought I’d somehow lost mine in the studio and almost ordered another. For once, I found it before I hit Place Order!
Clover Seam Ripper and Clover Needle Threader
Seam Ripper: Sharp. Narrow tip. Comfortable handle. Little rubbery bit to grip. What more can you ask?
Needle Threader: I received this as a gift when I lectured for a local area guild. I didn’t use it for years. WHY NOT? It really works. Has a place to hold the needle that somehow magically turns the needle so the eye is in the correct direction. Has a thread cutter. Drape the thread as indicated, push down on the lever and presto, threaded needle!
Famore Cutlery Bent-Tip Tweezers
I received these as a gift in a teacher goodie bag at International Quilt Festival Houston. They are AMAZING! They GRIP. The have this bent tip that allows you to use them to slide under a stitch like a seam ripper and pop a stitch. When you have little pesky bits of thread, they grab and pull them out…they are so sharp they just pinch down tight and WORK.
For years, I used the tip of my scissors, fingers, a skewer or a pin to coax and nudge itty bitty bits of fabric into place on my collaged art quilts. Then my friend and colleague Heidi Proffetty came up with a better mousetrap: some ridiculously fine, SHARP, POINTY tweezers to place those little bitty bits into place (she does mosaic quilts and does a lot of fiddly work). I don’t know how I managed without them!
Janome M7 Continental Sewing Machine
Look at that harp space! That quilt is 104″ square!
Astonishingly, I have been affiliated with Janome since 2003. I am a Janome Artisan, and proud to be associated with them. Even with that, I’d say all the wonderful things I say about Janome machines if I weren’t. There is a reason why I have chosen Janomes for my sewing. Since the 6500 in 2003, with each new machine they send me, I keep thinking they couldn’t get better. But they do. The 6600 all those years ago was a giant leap forward, and the M7 is perhaps even more of a qualitative leap into excellence. The machine is huge, sturdy, easy to use, and performs flawlessly. And the harp space—that is a 104” x 104” quilt in there!
It started in 2003 when I was frustrated with my then-machine’s balkiness using assorted fun threads. I wanted to decide what threads to use, not have my machine dictate what I could use because the machine would otherwise crab at me (for example, on that other-brand-machine, it didn’t like it when I used Superior Threads 40-wt poly in the needle and 60-wt Bottom Line in the Bobbin; ALL the Janomes I have used handle that with ease). A huge, Huge, HUGE Thank You to JanomeAmerica for their long-term support of me! I think I’ll go hug my Janome right now!
I have started making a few videos of me using my beloved machine to help you learn and posted them to my YouTube channel, here. Hope you enjoy! https://www.youtube.com/user/SmithQuilts/videos
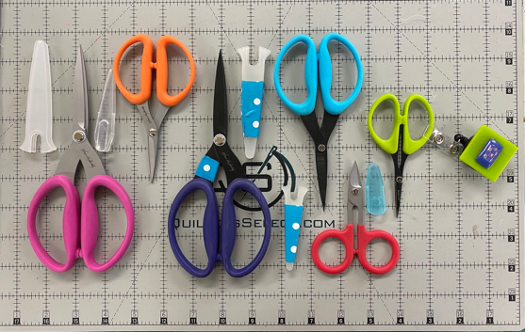
Karen Kay Buckley’s scissors
Honestly, I love and use all of them! They are well worth the not- expensive price, and will likely soon become YOUR favorites, too. You can find these on Karen Kay Buckley’s website as well as at many shops and online. The two on the left are “regular” scissors. The four on the right are the micro-serrated scissors with a non-stick coating (the black ones). The precision in cutting with the micro-serrated scissors allows amazing control and is key to creating my work. The Purple handles are the first ones and still the first scissors I reach for. The curved tip on the little red ones is nifty, and I also use the plain (pink and orange) fairly often.
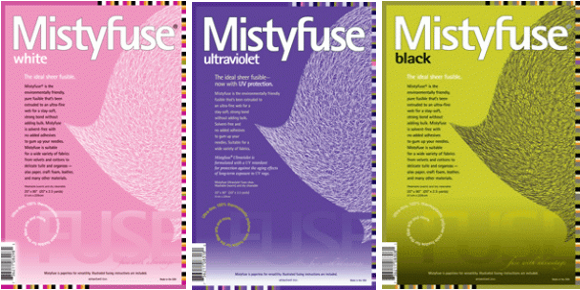
Mistyfuse Adhesive Web
I am a complete fan of Mistyfuse products. I LOVE this fusible web! It leaves such a light, soft hand, never “expires”, doesn’t gunk up the needle EVER, and works really well. I also like that it does NOT come packaged with release paper (which in other brands either comes loose too easily, or sticks, or whatever); you use baking parchment or a non-stick press sheet (next item) which is less wasteful than all that release paper, and once you see how to use Mistyfuse, it is infinitely easier! For most projects you would want either the white or the Ultraviolet; the latter is best for light colored fabrics. The black has lots of fun uses.
Mistyfuse Goddess Sheets
Goddess Sheets are non-stick press sheets. You could use Reynolds Baking Parchment, but these sheets won’t wrinkle and wear out or tear like Baking Parchment. I’ve been using my press sheets for YEARS–the only wear and tear is where I accidentally sliced off a sliver with my rotary cutter! I prefer the largest sheets; the Fat Goddess is so named because it allows you to fuse up an entire Fat Quarter (18×22 inches) of fabric without having to move the sheet. The Holy Cow sheet is 36 x 48 inches!
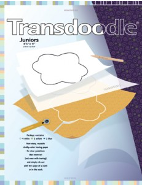
Mistyfuse Transdoodle Transfer sheets and
Saral Transfer Paper in a roll
To transfer designs, I use Transdoodle or trace; but you could use a light box. If the fabric is light enough , I can trace by placing the fabric over the design, OR I layer things up with the fabric on the bottom, Transdoodle Transfer paper in the middle, and the pattern on top. These sheets last a LONG time, can be used over and over and over again. Available in white, it has a heavier chalk load and last longer than Saral. Saral is a transfer paper available in art supply stores and online and is available in sheets like Transdoodle and in rolls. Sometimes you just want a long roll of white for a large design or motif. You can find Saral here at Dick Blick among other places.. I will note one caution: if like me you forget to test for removability, whenever you use ANYTHING yellow, TEST! It doesn’t like to let go of some fabrics! I stick to just white or blue.
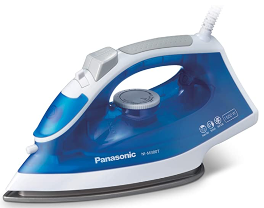
Panasonic Non-Stick Titanium Coated Iron
I have had several of these over the years—one fell to the cement floor one time too many (I filed off the broken tip and kept using it tho!). The other I used so much I wore off (after multiple years) the finish on the sole plate! Oh how I LOVE LOVE LOVE this iron! I think iron manufacturers think non-stick means doesn’t stick to clean fabric. These you can melt fusible onto them directly and wipe it clean with a paper towel! No more iron cleaner fumes!
The key word appears to be Titanium–-other non-stick irons don’t work the same way! There are several models available at the moment on Amazon, and in various wattages…I’m going to order the 1800 as the one I have now is 1200. In 2020 I tested various other irons including one that is “titanium” but none worked nearly as well as the Panasonics have over the years. For the price of four or five tubes of iron cleaner, you get an iron you can wipe clean! Mo’ bettah! Put “Panasonic Titanium Non-stick Iron” into the Amazon search box for a current listing.
Running with Scissors bag and byAnnie’s patterns
Initially I made this as a “travel” case for teaching on the road. In March 2020. When the world screeched into a parallel universe with the arrival of the COVID pandemic. As I type, it has never been on the road. It has also never been put away. I LOVE this bag: it stays open on my worktable and is so easy to use! I enlarged the size about 1” in both directions so I could fit a 9×12” cutting mat inside the outside pockets (or corrugated plastic) so that I can stand it up without having to make and use the companion bag. This is not a fast project, but the instructions, as I have learned from other byAnnie patterns, are brilliant. Take it one step at a time, use the top-quality products from byAnnie (not affiliated, just a fan-girl), and you’ll LOVE it. https://www.byannie.com/running-with-scissors
Superior Threads
There are many brilliant threads out there now, that is one of the things that prompted me to write my book: so that folks could understand how to use them. Since I teach, I try to be fair, honest, and give all companies an equal chance. There are a number of companies that make threads I use, respect and like: Superior Threads, Aurifil, Madeira, Isacord and others. But Superior is far and away the best at striving to educate the public. I highly recommend the Education section of the Superior Threads website. As well, they make brilliant quality threads, stand behind their products, and have great customer service. When I switched from quilting with only cottons to using a wide range of threads (thanks to my Janome’s ability to do so without a grump), I decided to build my stash to “one of each please”–the thread equivalent of the BIG box of crayons! I did so 10 or 12 spools at a time, and having a wide range makes it so much easier for me to do my thread-coloring.
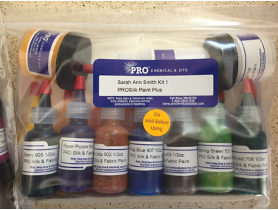
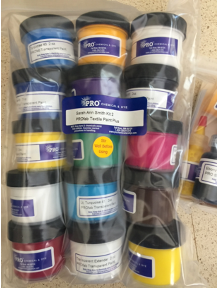
Textile Paint
You could spend years having fun with surface design, textile paints, drawing materials and dyes. My DVD just mentions the use of transparent Textile Paints.
There are many, Many, MANY types of textile paints including opaque, transparent, metallic and so on. You’ll find different ways to use them, too. All of the major brands work but have different properties. Some are creamier, more like sour cream that is well stirred, but others are more like a dense yogurt, almost spreadable Which to pick depends on your personal preferences and what you intend to do with the paint: direct paint, stencil, screen print. Yeah, I know. Helpful as mud LOL!
My favorites now and which I sell on my website are ProChemical & Dye’s ProFAB and ProSilk paints. The ProFAB are sour cream consistency and great for stamping, screen printing (my fave) and direct painting. The ProSilk can, despite their name, be used well on cotton. They are an ink-like consistency and you can almost use them in a watercolor-y way. My kits are now sold, so please check the trial packages at ProChemical and Dye, here. Click on the links there for ProFAB Textile paints, both transparent and opaque, and the ProSilk paint (ink-like consistency).
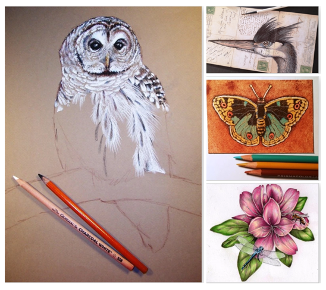
Val Webb, art teacher extraordinaire
In late 2012 I took Val’s first online class. I have no idea how I learned about her, but I am so glad I did. I have learned SO MUCH from her. I have taken other online classes, but the most important thing in any representational art form is learning to see, and that I what she has taught me. My first workshop, I could tell something was maybe a bit amiss, but not what. Over various workshops over the years (several pictured at right, that’s Val’s art), I’ve grown to where I can study and compare, using tips and tricks and techniques. For example, I am not a fan of the waxiness of colored pencils, but learning the slow, repetitive nature of shading with them has taught me how to layer dyes and textile paints to create what I want in my artwork. If you’d like to see some of the blogposts I’ve done over the years about my work in her classes—the vulture is one of my favorites–click here. The skills of seeing and thinking translate directly for me. After a couple-year break for busy life, I am now signed up for my 8th class with her. So I encourage you to check out Val’s site and consider her classes. https://valwebb.wordpress.com She is on FB and IG as The Illustrated Garden.
Some years back, after a good teaching year, I finally indulged: not one but TWO VAST non-stick pressing sheets, which I ordered from art quilter Valerie Hearder, who lives in the Canadian Maritimes. Val says “I sell the wide teflon by the yard and can sell any length. Check out www.valeriehearder.com. I have 18” wide and I also have 37” by any length. Note that my prices are in Canadian $ which is a big saving for Americans. In the pre-COVID days I had no trouble ordering my two 36/7 x 72” sheets. One lives on my Big Board (a 22×60” ironing surface) and the other on my design wall. When I do Really Big quilts, I can pin both up on my design wall (see above!). Expensive, but if you do a ton of fusing and tend to work big, worth it.
Wool Felt Ironing Pad
When I was a kid, ironing boards came with a real wool felt pad under the cloth. Things ironed beautifully. Then things went to polyester and synthetic foam and, well, yuck. The quilting world recently rediscovered the joy of a nice wool press surface. As usual, if you stick the word quilt on the product, the price doubles, triples or more. So I did a little sleuthing. I knew of a felt manufacturer so I went to see if they had the wool pads. THEY DO. And they will sell to the public. It helps if you get a bunch of friends together and do a group order. Their ½” wool felt is 72” wide and is sold by the yard. Some friends from my local guild and I got together and did a group order for 2 yards. Rather than me try to cut the thick felt with a linoleum knife (and end up hospitalized), I paid the modest fee to have them cut the pads. One woman and I each wanted a 72” x 22” wide piece each. The rest we had cut into pieces 14 x 18”. Each yard cut that way yielded one large and three smaller pieces. You can have it cut into whatever size works. We ordered the F-7 Gray ½” thick felt. Shipping added to the cost, but I think the 14×18” pieces ran about $33 including cutting and shipping. 2021 prices for about the same size are a bit lower than two years previously, and are roughly $40, and for the large ones, my 22×72 cost me about $98, while the current prices for 20×60 are around $112 on Amazon. https://www.sutherlandfelt.com/felt/pressed-wool-felt/
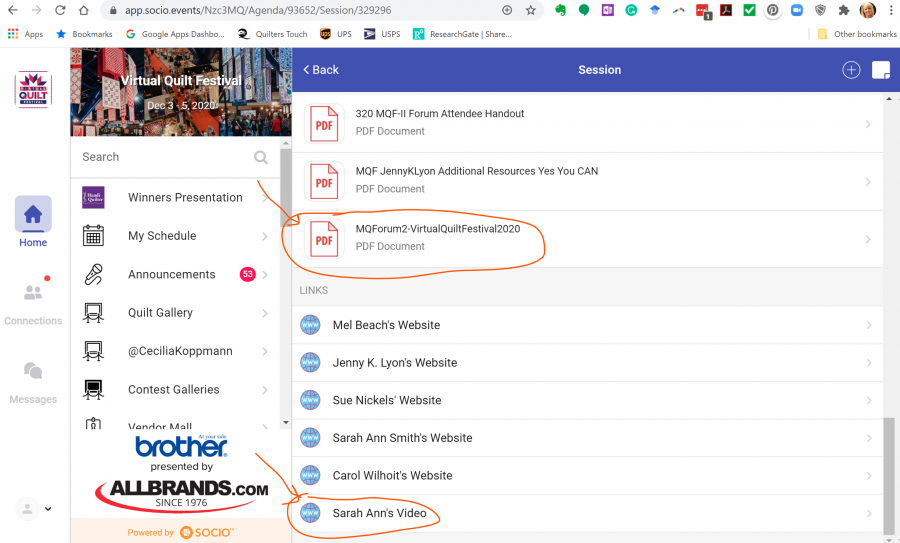
Now Registered participants ONLY can SEE it … CLEARLY!
If you were enrolled in the Virtual Quilt Festival’s second Machine Quilting Forum on Saturday, you know there were serious transmission issues with my presentation that made the video just yucky. TOTAL BUMMERS, but now TOTAL JOY! Thanks to the hard working folks in the Education Department (who should have been taking today off) you can SEE the video through December 12th. After that, like Cinderella’s pumpkin, it disappears. To access it, follow the following steps:
Registered participants ONLY can follow these instructions –
—Go to My Schedule (be sure to select the Saturday, Dec 5 schedule)
—Click on the class – 320 Machine Quilting Forum II
—A new page will open with the description of the class, recording link, faculty links, and attachments
—Scroll down to the bottom of the page to find the PDF attachment and the link to “Sarah Ann’s Video” to watch the YouTube video
Here are some screen shots. They drew attention to the video by adding a text message in RED font in the class description.
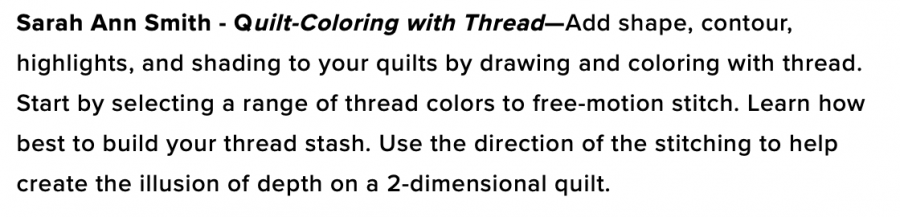
Then this will open up on the next page. My friend Jenny K. Lyon prepared a PDF with links to her stuff, I prepared one for my stuff and the questions I received, and I was able to upload my presentation as an “Unlisted” video on my YouTube channel. The only way to access it is through your “My Schedule” portal. I promise, the video quality is VASTLY better!
Special thanks to Suzanne Hyland, head of the Education Department, who checked email on Sunday when she should have been taking a nap to recover from the frenetic pace she kept up for weeks to direct and pull off this debut event. MASSIVE THANKS to everyone at Quilts Inc. and, for me particularly, in the Education Department. I took three classes, attended three lectures, and would do it again–both present and attend–in a nano-second! Please let Quilts, Inc., the people who bring you International Quilt Festival Houston (and more) that you want MORE!
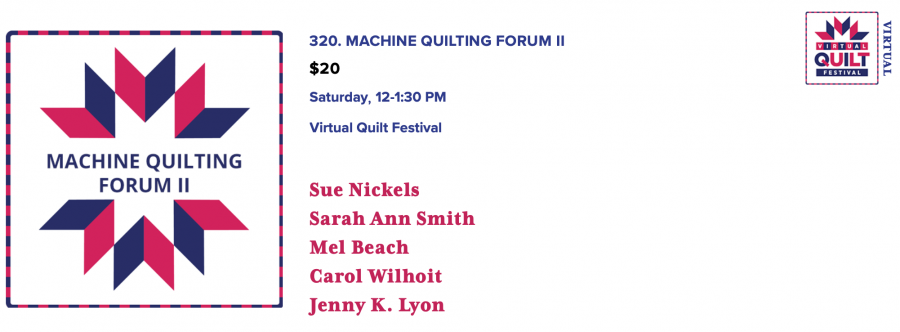
I’ll be one of the five panelists in the Machine Quilting Forum on Saturday, December 5. You can still sign up! Here’s a link to the “Saturday” page. If we weren’t able to go to Houston this year, this is a spiffy alternative! There is a link at the top of the page to enroll. The price for forums, lectures and classes is astonishingly reasonable…. I’ve signed up to be a student too!
I do believe Quilts Inc, the folks that bring you the International Quilt Festival every year (except this one due to COVID) have come up with a better version of the online quilt festival: forums, lectures and Master Classes. The longest are 2 hours, a length of time that gives you TONS of content at a reasonable price in a time length that is manageable online.
I’m actually taking FIVE things: three lectures and two classes. Even better, TWO of them are at the same time … but it’s not a conflict! You don’t even need Hermione Granger’s Time Turner (Harry Potter geek reference), because most of the events are recorded and available for one week! So I can take a class and a lecture that overlap, yet be able to watch BOTH! I’m so stoked… things I’ve never been able to do because in Houston there are classes to teach all day and exhibits and people to see during each and every break.
Anyway, I’d love for you to join me for the Machine Quilting Forum–I’m also excited because for the first time I’ll be able to hear the OTHER teachers just like all the participants! See you in “Virtual Houston”!
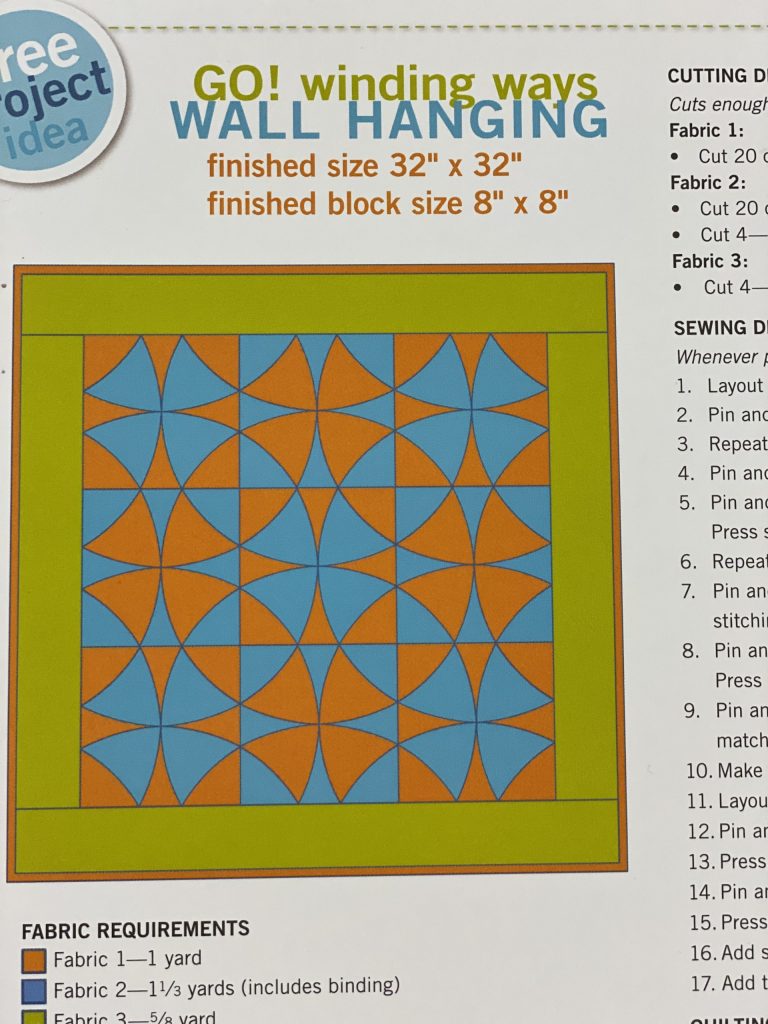
Good tools (AccuQuiltGO!), good fabric (Michael Miller Fabrics), good thread (Aurifil), good machine (Janome Continental M7), and some experience, and you can do a lot! This return to my quilty roots just makes me happy!
Over the course of the year I’ve shared progress on this quilt:
First, there was learning to use the AccuQuiltGO! which I blogged about here. It was a different block, but the easy applies.
Then there is the PIECING of CURVES: see the blogpost here or go directly to the video on my YouTube Channel here.
Now there is the quilting video (that covers a couple other things), embedded below and share-able on my YouTube Channel here.
Full disclosure: I have proudly been a Janome Artisan since 2003, and this year am a Michael Miller Fabrics Brand Ambassador for 2020. MMF provided the fabric and we were given, as part of being a brand ambassador, an AccuQuiltGo and several dies. To my surprise I enjoyed the process so much I have purchased both the Winding Ways and Crossed Canoe dies. Stay tuned for more!
This is the die that I purchased to make the Winding Ways, which has always been one of my favorite traditional blocks. Click this link to see a blogpost of using the AccuQuiltGO (for another block, but it’s the exact same process) including a video.I found this design somewhere on the internet and printed it out to mess around with a design for a future quilt! Stay tuned for a WANDERING Winding Ways! Using a grid like this can help you plan out fun color fades and settings.
Next came machine quilting. I worked on that a while back–I did end up teaching for the Mancuso Online Quiltfest in August and will do a Threadcoloring the Garden workshop in October! More info on that soon! In this video I’m practicing making a video, demonstrating at the machine, and it just happens to be walking foot quilting (fast! easy!) on my beloved Janome M7. Even if I had paid full price instead of being a Janome Artisan I’d rave about this machine’s wonderfulness! Their new slogan, Reliability by Design, is really true!
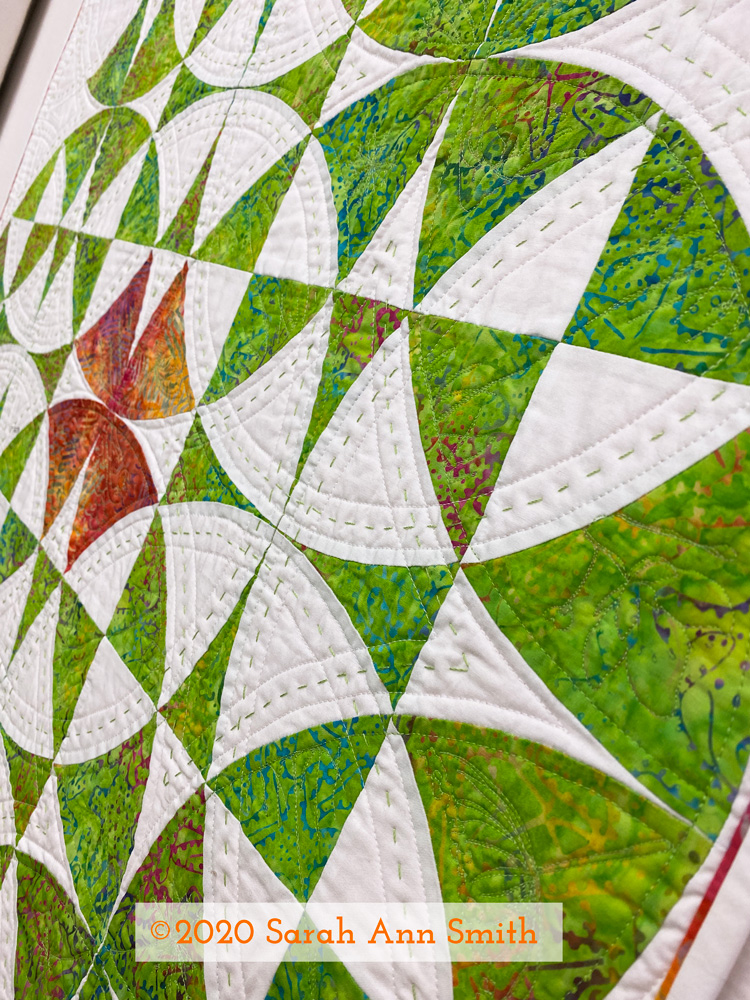
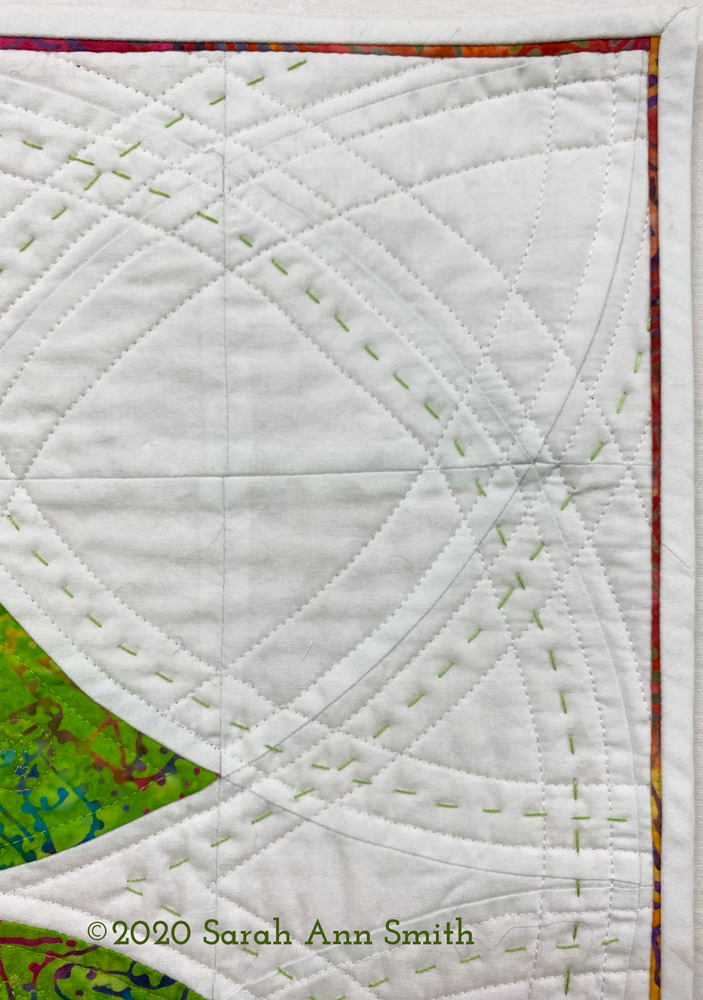
Then, the hand quilting and the finishing!
I haven’t done any hand stitching in a thousand years, but nearly two years ago I bought matching green thread from aurifil in piecing/light quilting weight and a heavier 12-wt that is about the size of a light perle cotton or 6-strands of floss. I LOVE IT…and it went so fast! I can remember clearly sitting on the porch in early summer, something to watch on the iPad, stitching away.
I just love how an angled shot shows the texture and dimension. I was surprised at how quickly the hand stitching went. I used the same green color of thread on the green parts for machine quilting as the green in the heavyweight Aurifil thread.
I wanted to repeat the orange batik in the center on the edges, but using it as the binding was too much. I instead inserted a tiny stitched down “reveal” that is a scant 1/8″ just inside the white binding. Can I also put in a plug for Michael Miller’s Cotton Couture solids? The quality of the base cloth is SO GOOD! And the consistency in color / dye lots over the years is really amazing. I dye fabric and know how hard it is to get perfect matches from batch to batch and it does.
Last but not least, those skinny inserts and perfect corners.
I taught the half day version of my bindings workshop at the Mancuso Online Quiltfest in June and may do so again in the new year. I am scheduled to teach and have an exhibit of my work at the Mid-Atlantic Quiltfest in Virginia in February, but at this point who knows if it will be in person or online! I promise I will teach the bindings (full or half day) again in the new year online, just need to figure out when. My students in June had GREAT results online so it works online too!
Anyway, I hope you’ve enjoyed my 2020 detour back to my quilty roots. Coming soon, a new art quilt!