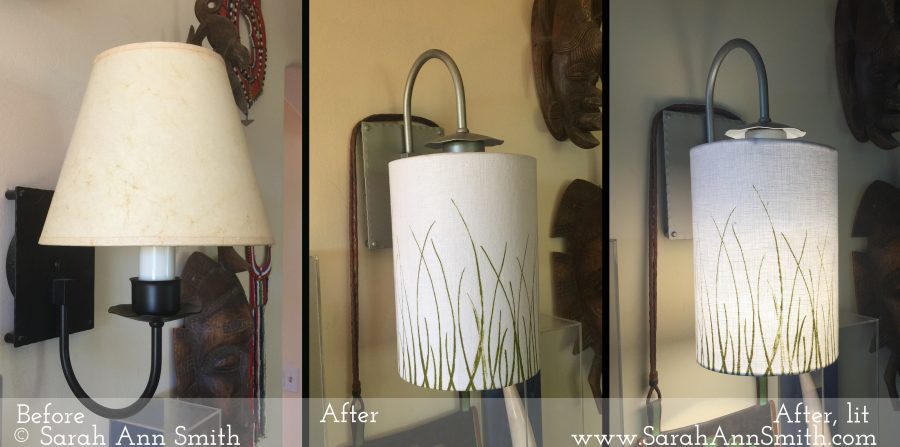
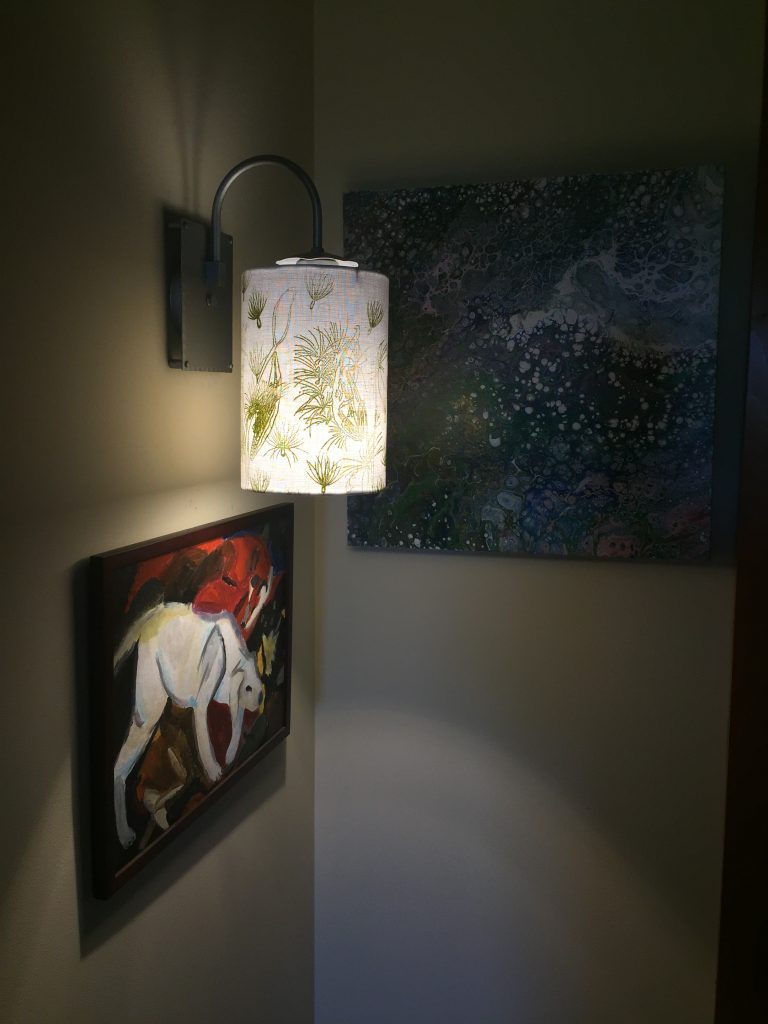
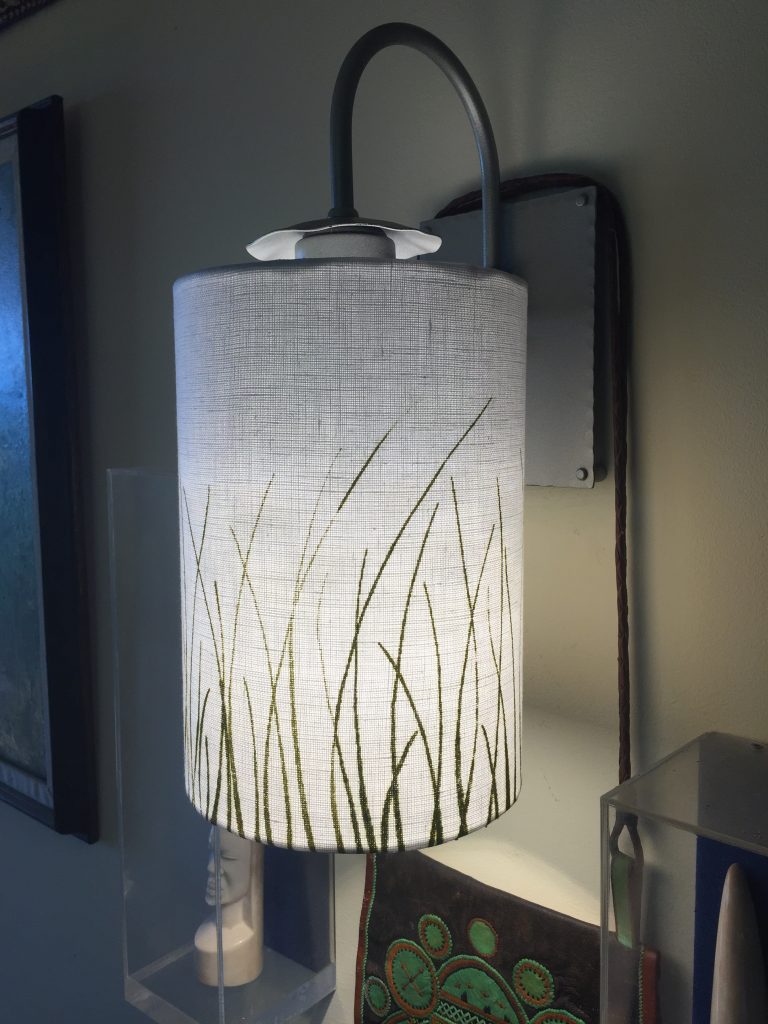
From old to fabulous! Look what a little spray paint, thermofax screens and textile paint, linen and ingenuity can do! Yes, those are the SAME fixtures!
The sconces in our house have made me crazy for years. The shades were made to fit on the old rounded incandescent bulbs…the ones you can’t find any more. The wires didn’t fit well on any of the smaller bulbs that suited the size of the shades and the fixtures–they were always tilting and crooked. And the “old West” look was SO not me! It was Candy Glendenning of Candied Fabrics who got me on the right track. Last year, Candy posted some lamps and shades she made using her wonderful indigo shibori fabric and blogged about them here and here. So I plotted and thought about it. I knew I wanted white, green paint mixed to my favorite shade, my own thermofax screens, and NOT black.
Here are the final shades, then I’ll share the process:
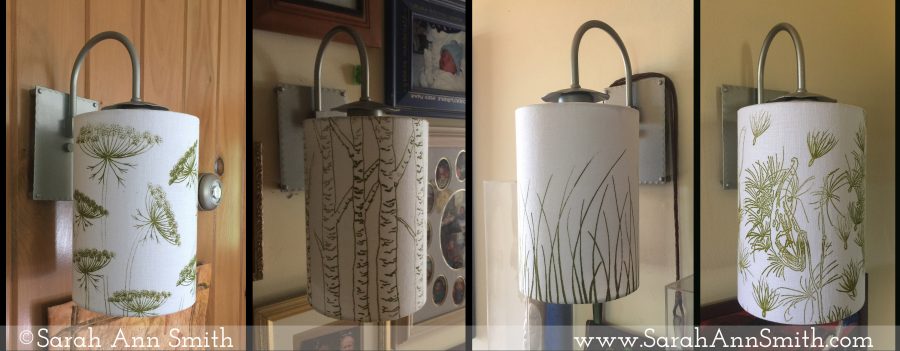
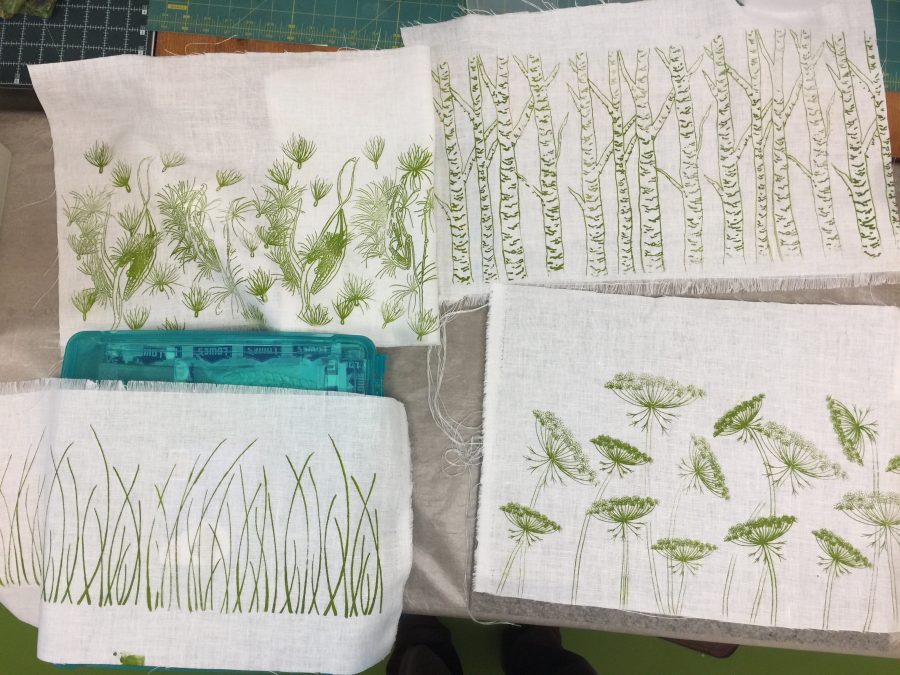
Left to right: Queen Anne’s Lace, Birches, Grasses, and Milkweed
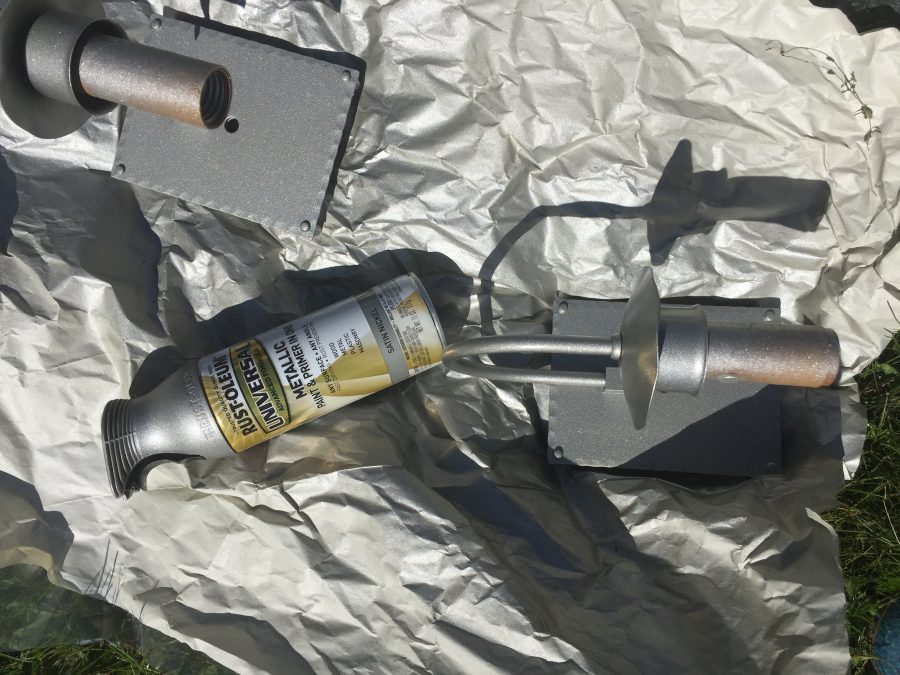
First thing I needed to do was see if I could spray paint the fixtures. Before we moved into the house, one had been damaged and removed (but kept in the basement). I bought some Rustoleum in Satin Nickel and it worked! I didn’t even have to sand!
I was delighted at how good the fixtures looked as Not Black. Once they were on the ground, I also realized I could turn the fixtures upside down and that fluted frill on the bottom looked sort of like a Japanese temple roof line. Sort of. But at least better than as a candle holder!
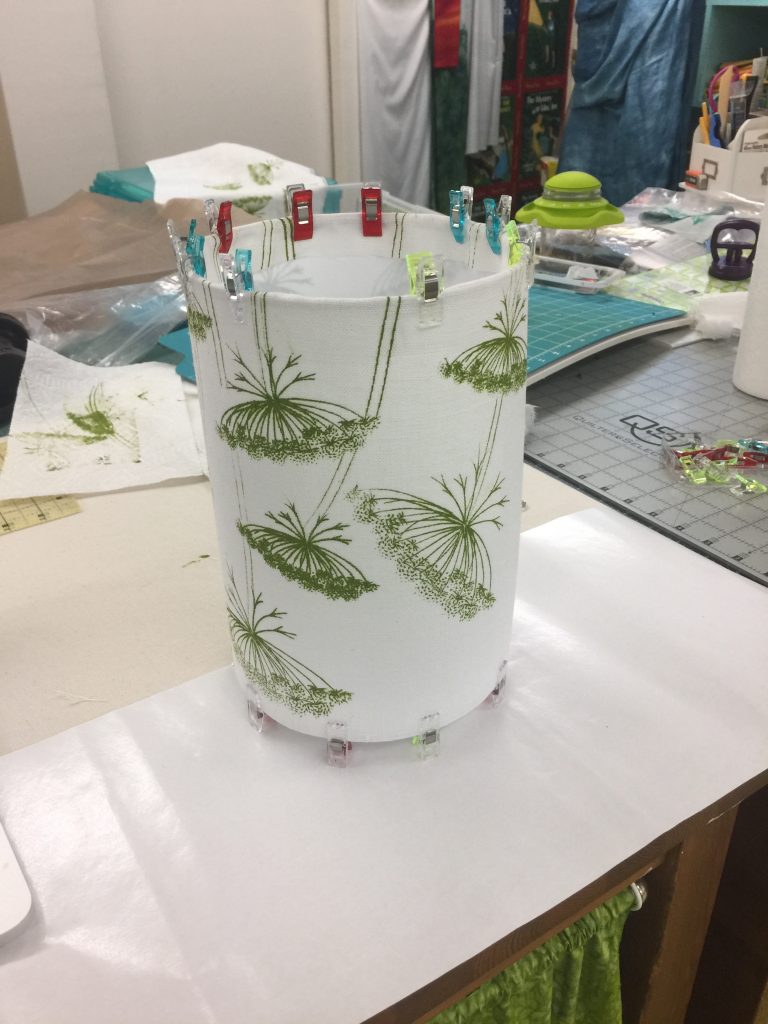
I had planned on using a cotton-linen blend for the shades, but when I went to Fiddlehead Artisan Supply (quilt and art shop to die for and only a half hour away!) they were temporarily out of the blend, so I bought some coarser weave pure linen to try. Then I started searching out stuff to make new shades, starting with Candy’s source, I Like That Lamp website. I ordered the styrene–the rigid stuff to which you adhere the fabric–and glue from that site, but her rings only go down to 8″, and I wanted a 6″ for my sconces in the hallways. I found some 6″ size here, on Etsy.
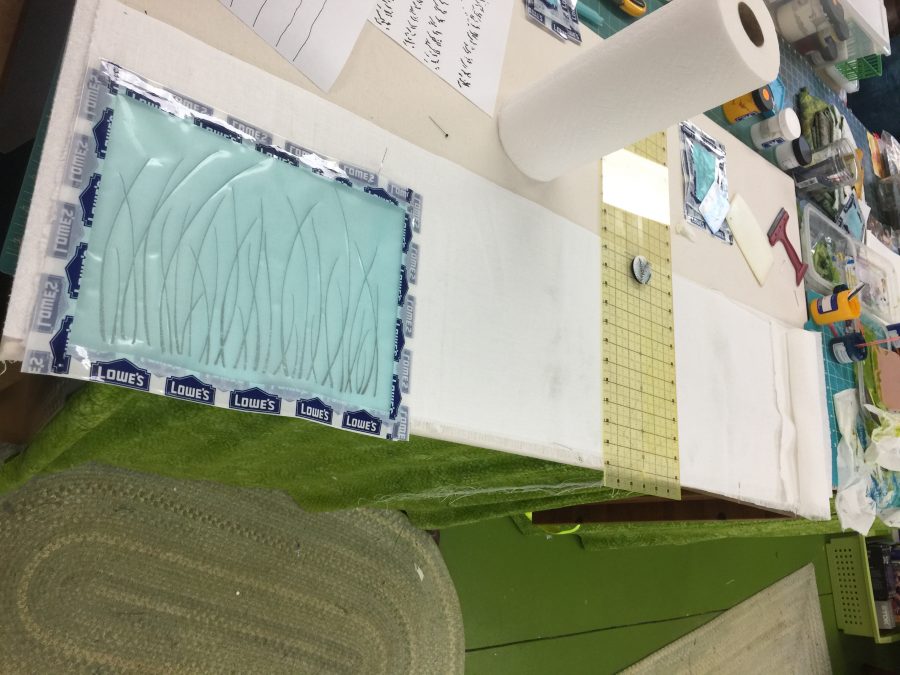
Next, I needed to see how the linen would print. Using my existing printing board, the prints were blobby–the surface had too much squish in it for the somewhat more open weave of the linen (as compared to quilting cottons). So I made a new printing board with less padding, and learned that using paper towels under the linen did not affect the quality of the print and prevented less of the ink from soaking in to my new board.
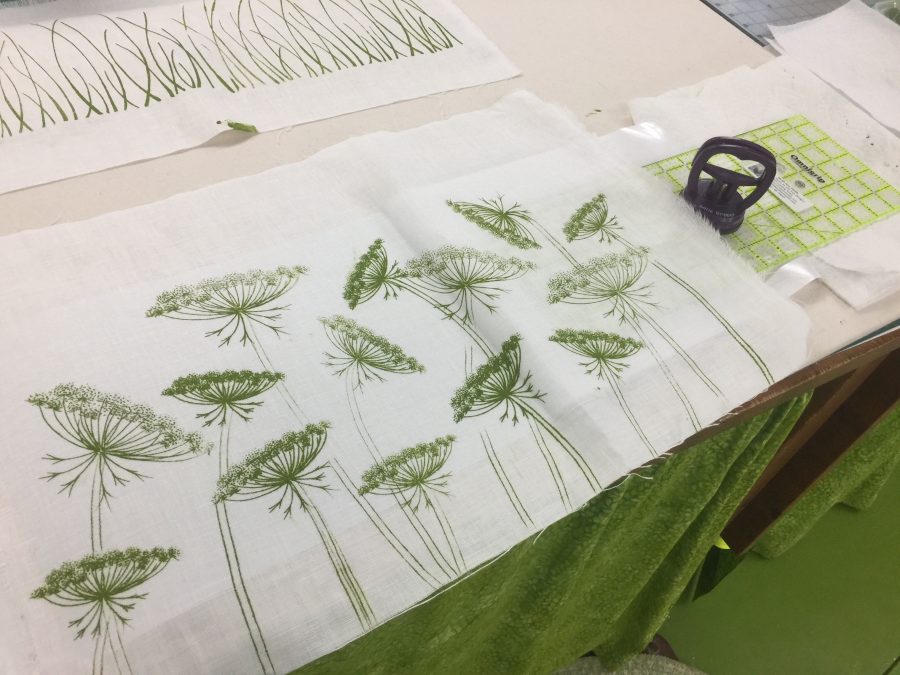
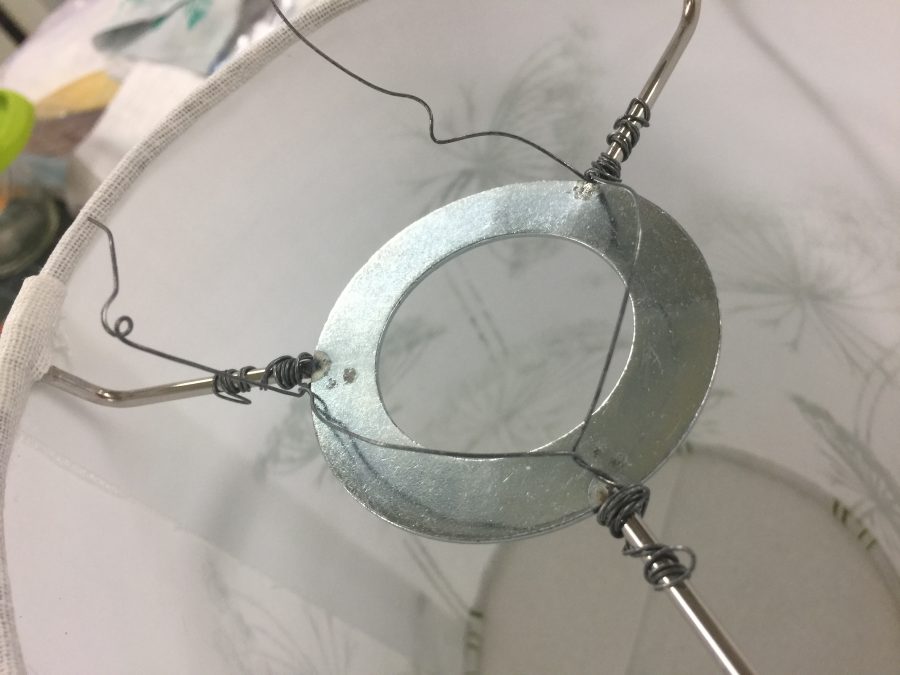
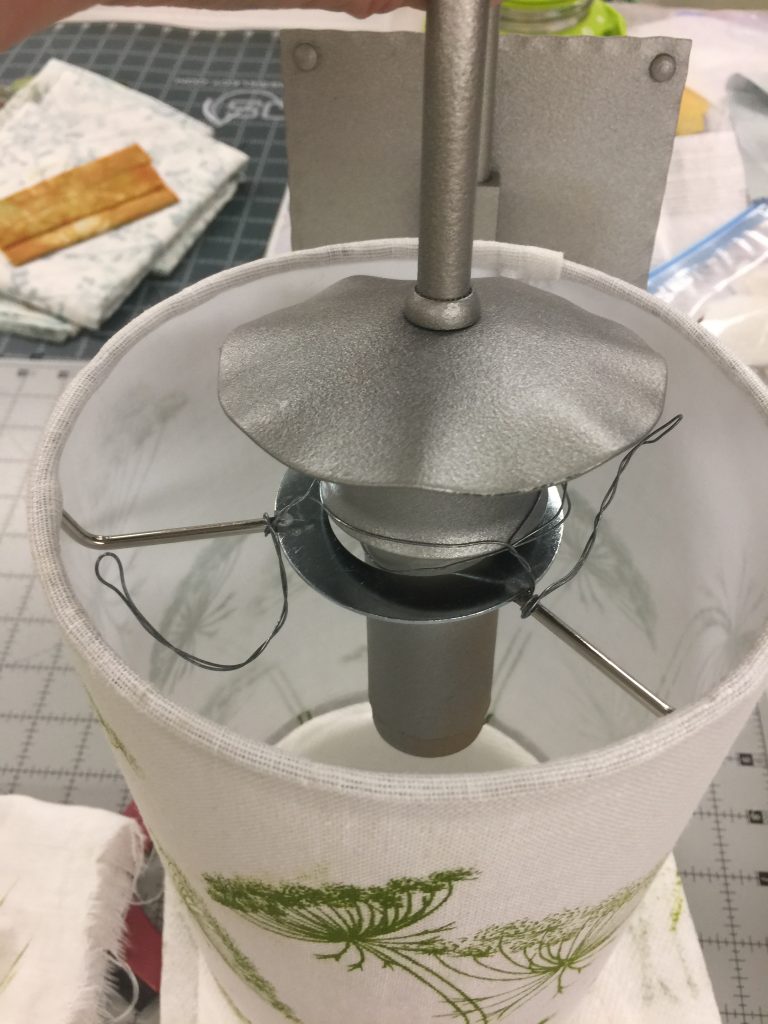
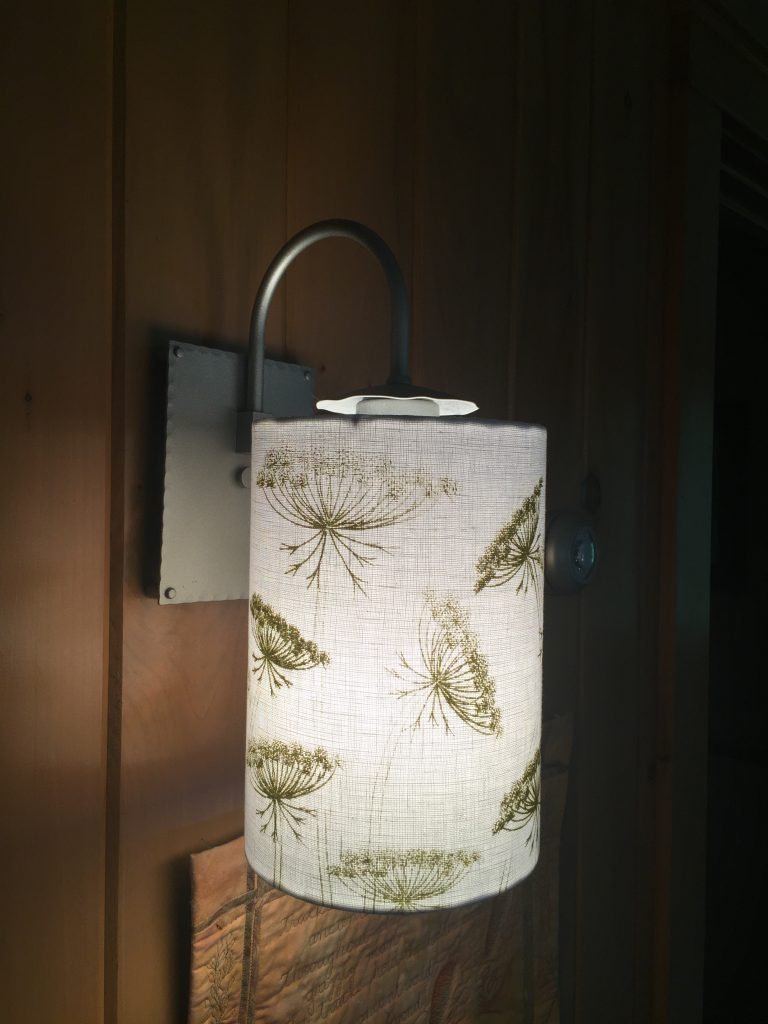
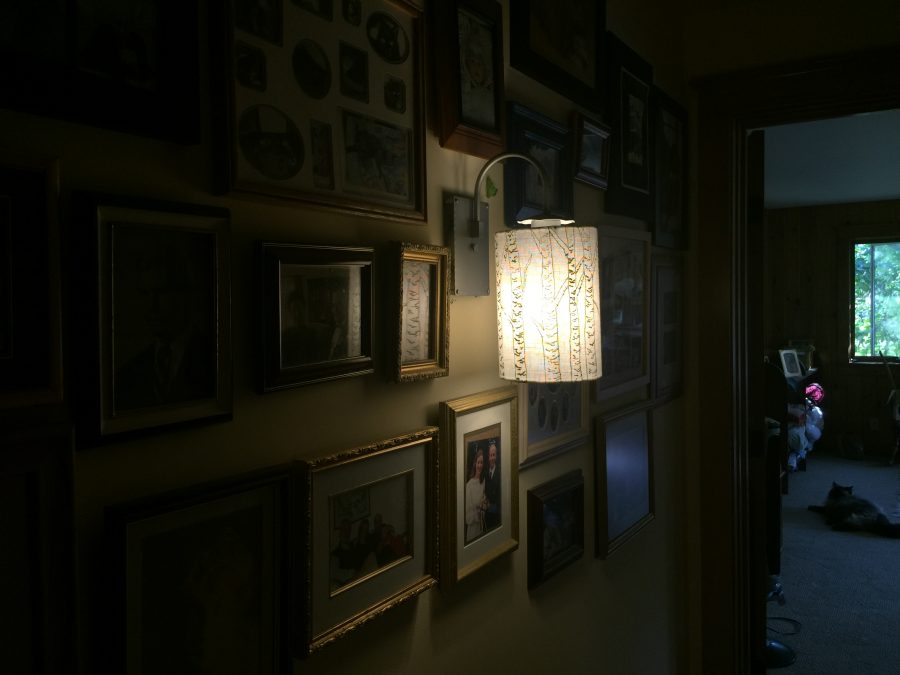
Mess-making in process. I used ProChemical and Dye Opaque and Transparent textile paints. I sell some sets in my store (just scroll down) plus you can buy larger quantities and more colors directly from ProChem. The screen/design for grasses is new and I can tell I will use it often. I cut my linen into lengths from selvage to selvage, then marked how long I needed with a pin. If I goofed, I could keep printing and avoid an oops spot. The Milkweed thermofax screens used in the upper left piece I had already made, but the others are new. All are drawn, not a manipulated photo (which is another process I use). So far I am only selling the milkweed screens (here), but if anyone is interested in the others let me know.At least in my universe, printing always involves an oops and some “letting it go”, but I did end up re-doing the grasses because I had printed them too high on the strip–the bottom of the blades of grass needed to be at the bottom edge of the lamp. I also made some real mistakes on the Queen Anne’s lace, so re-did them, too. But I will use the not-bad parts of those for something else!I Like That Lamp website has some excellent tutorials. Instead of using binder clips, I used Wonder Clips the same way and they worked beautifully. I did have some fuss and bother getting the glue to hold as I wrapped the edges around the wire rings, probably because the glue oozed out between the weave. However, once set, you’d never know. They look well done if I do say so myself.Because my fixtures are OLD, and I didn’t want to have them as candles with the ring sliding down around the tube to rest on the metal, I needed to get creative with how I would suspend the shades. Wire!It’s not the prettiest solution, but it works. And it doesn’t show, best of all. Because the wire fitter is recessed down below the top of the shade, the wires that hold the shade to the fixture are hidden (unless you are really, really tall). Those tails were wrapped around the spider-legs of the ring. The Queen Anne’s Lace is in our bedroom.The birch trees are in the back part of the hallway, in the “Rogue’s Gallery” (aka family photo wall) The milkweed is in the front portion of the hallway, with Eli’s middle school art project underneath and a pour painting by my friend Deidre Murphy on the right.The simplest is perhaps my favorite and is the sconce we see from the living room, the waving grasses. When we first moved into the house there were shrubs that grew up and blocked the view out the windows at the far end–not great. But in the afternoon light they cast lovely shadows on that wall, which inspired me to make this shade.
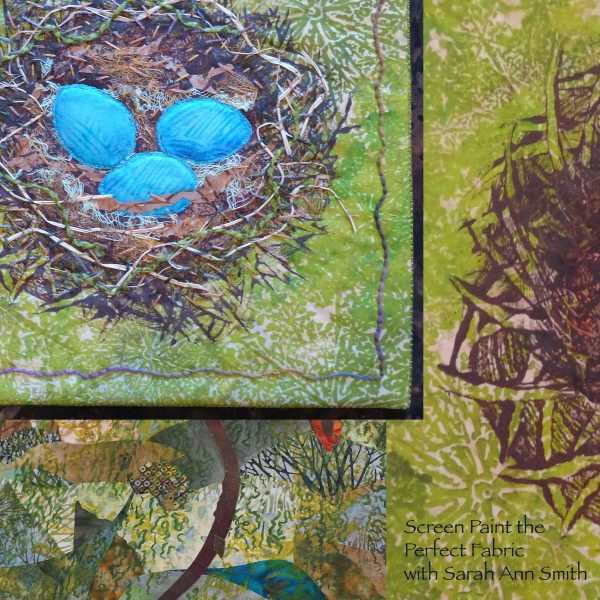
Some good news: in August 2020 I will be teaching a 3-day surface design workshop at ProChemical and Dye in Fall River, Mass. (about an hour or 90 minutes south of Boston, minutes from Rhode Island) and we will cover the thermofax and paint technique.
The whole thing worked SO WELL that I am thinking I would like to make a set of seasonal shades for the floor lamp in the living room…one for Christmas/Winter, another for Spring, Summer and Autumn. I need to do some patterning as this lamp looks best with an angled shade, not a drum shade, and they are harder to make. I need to learn if I can do it with standard 44″ wide fabric given the flare on the shade. Stay tuned for more house fix-ups! Hope you’ve enjoyed this detour from the usual art quilts and family life.
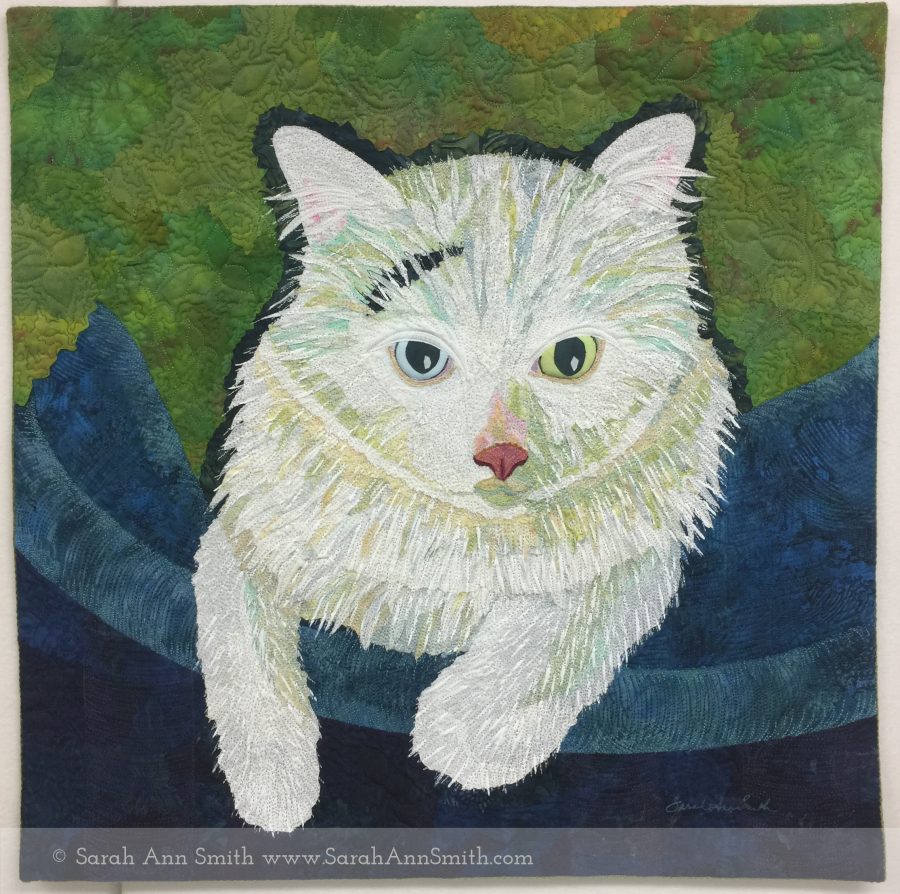
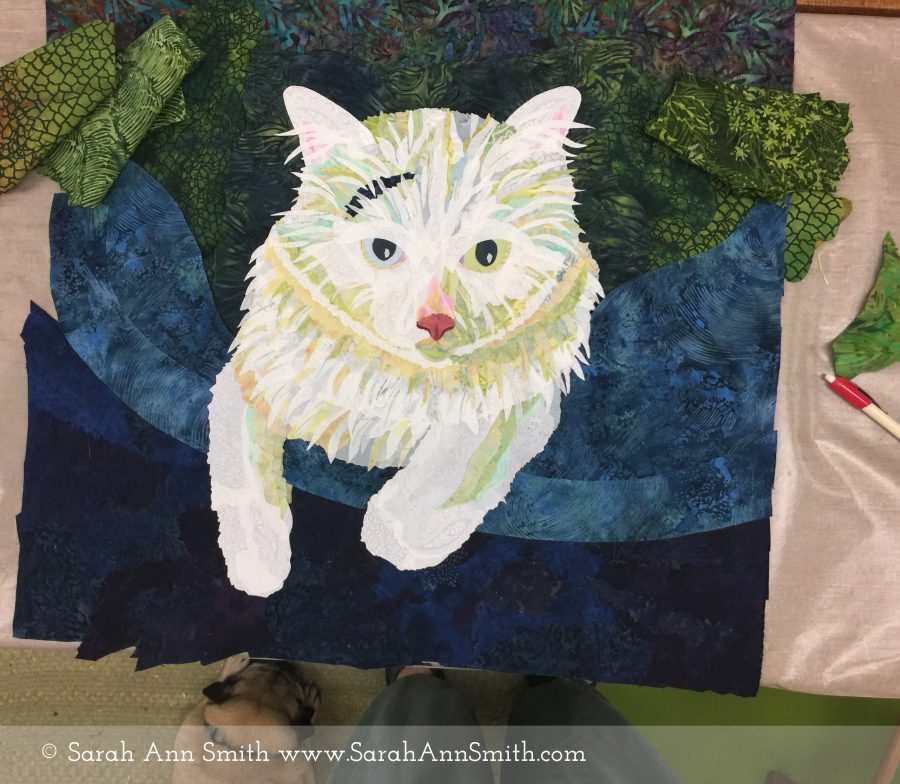
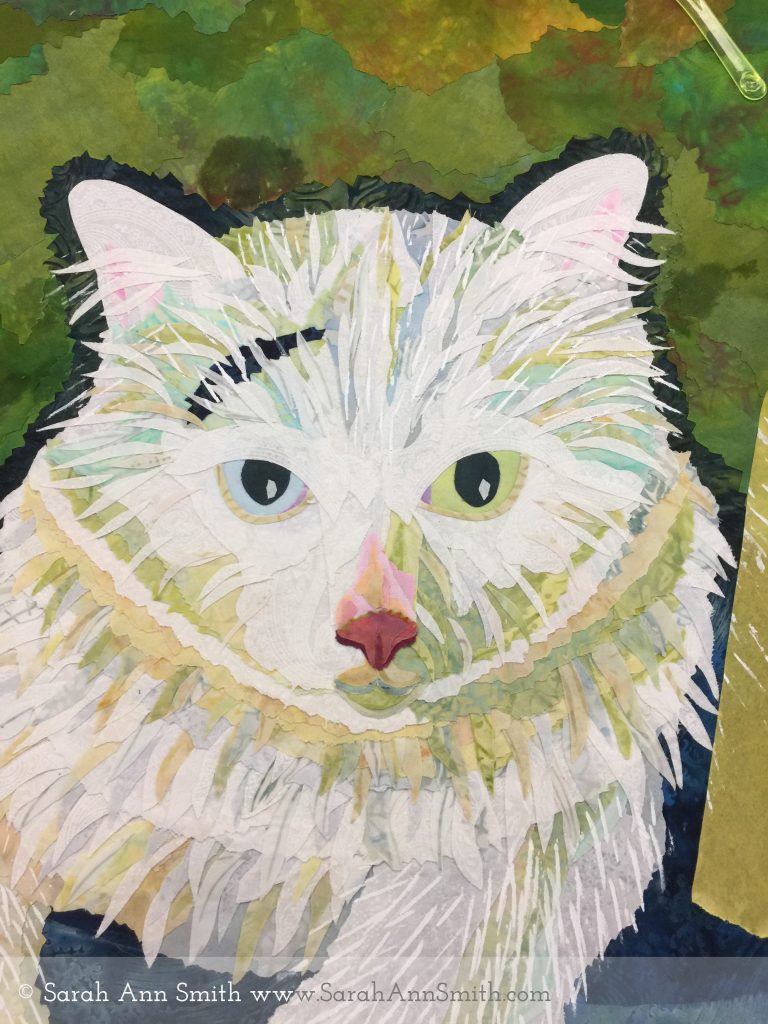
Boo’s portrait is the third part of this trio of quilts. I had considered doing a self portrait, Sarah and her muses, with the selfie for my local Coastal Quilters challenge due next May. But then hubby, who has never ever asked me to make an art quilt, said when he saw the ones of Yoda and Widgeon, “you should make one of Boo, too.” Boo, you see, is his Very Special Cat. So I did that instead. Much nicer than a selfie! And it turns out the portrait challenge doesn’t have to be a selfie, and can be a critter–way better!
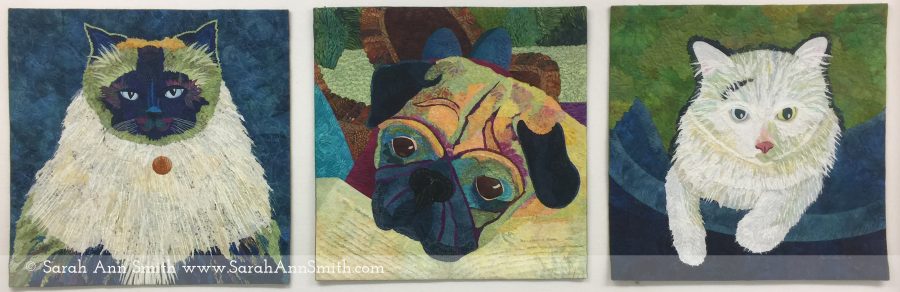
Just to remind you, here are the three portraits in this series on La Familia Smith (furry edition). Each is a 20″ square and they are debuting at the Janome Institute this week! I made them in thanks for over 15 years as part of their Janome Artisan program. I love their machines and would say all the good things I do even if I weren’t affiliated and paid full MSRP!
I prepared blurbs for Janome to use for each of the quilts, in the “voice” of each of the critters. Here is Boo’s:
Boo, J. D.
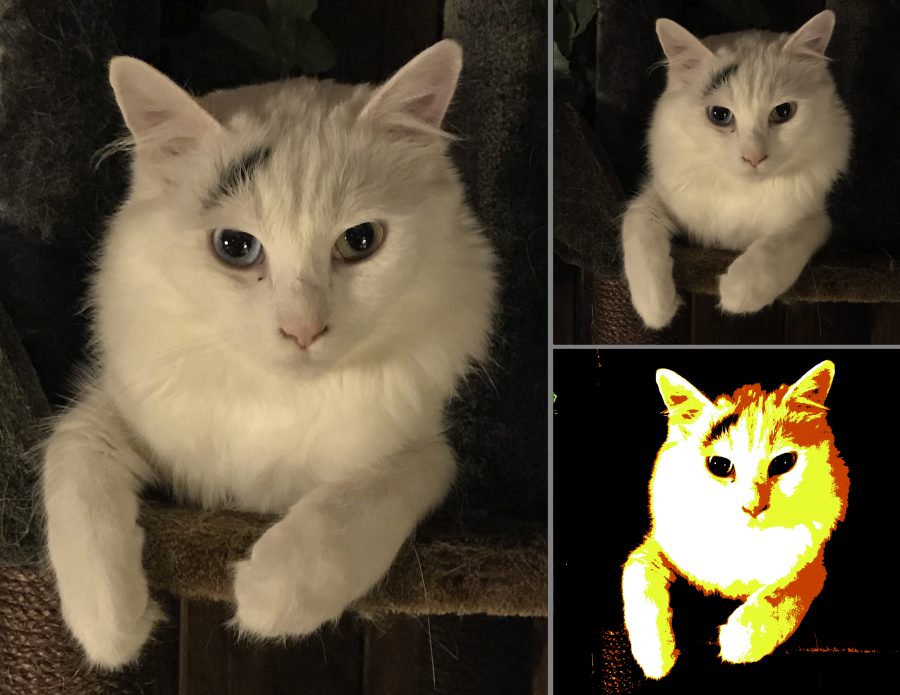
“Emperor Yoda! Hah! What does he know? And why do they call me the Juvenile Delinquent? Can’t they see that I am going to be KING of this realm? I am young, I am strong, I speak, I jump, I am growing into being the largest and strongest in the realm, not like that tub of lard who is rightfully dubbed His Immensitude. Stay away from my kibble, tubbo. The humans love my chirpy voice and sleek, silky fur! Now I will deign to let my human pet me and feed me my favorite wet food and pet me more. All others, including the ostensible Chief Minion, be forwarned: you are subject to attack!” (Boo is a 10-month old Turkish Van. I am the ostensible Chief Minion.)
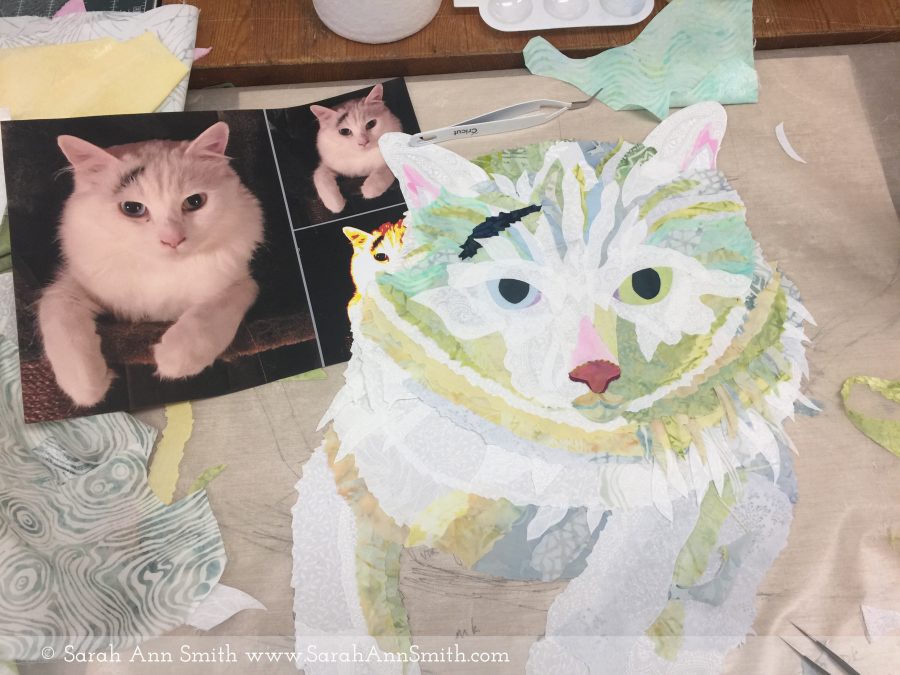
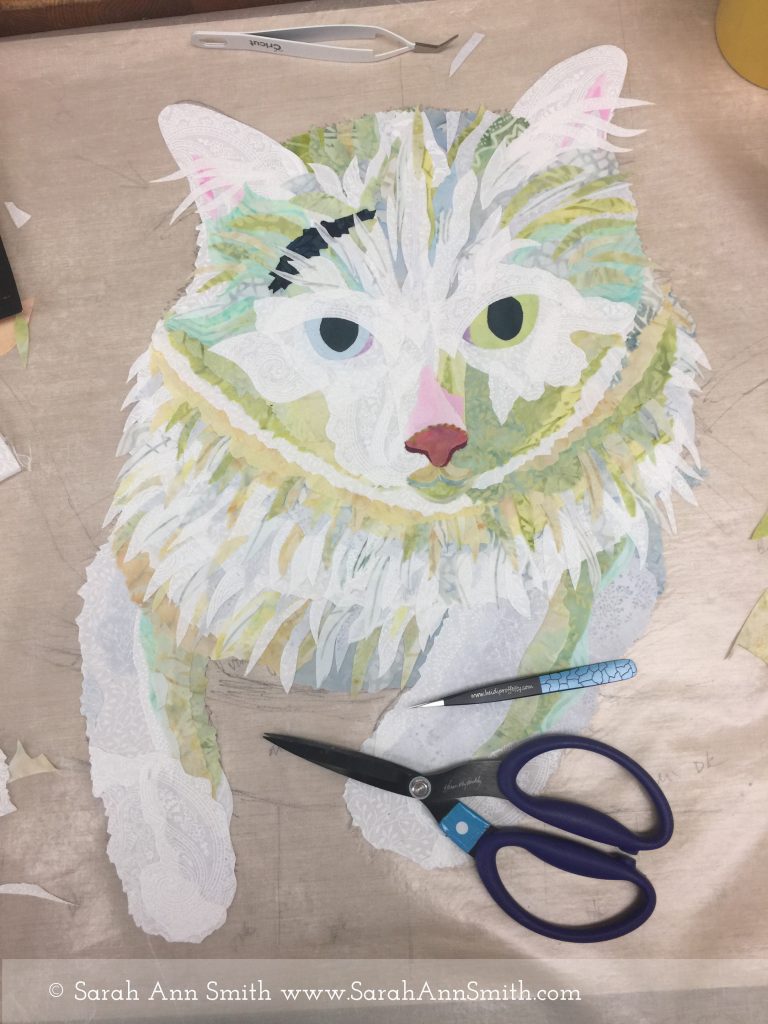
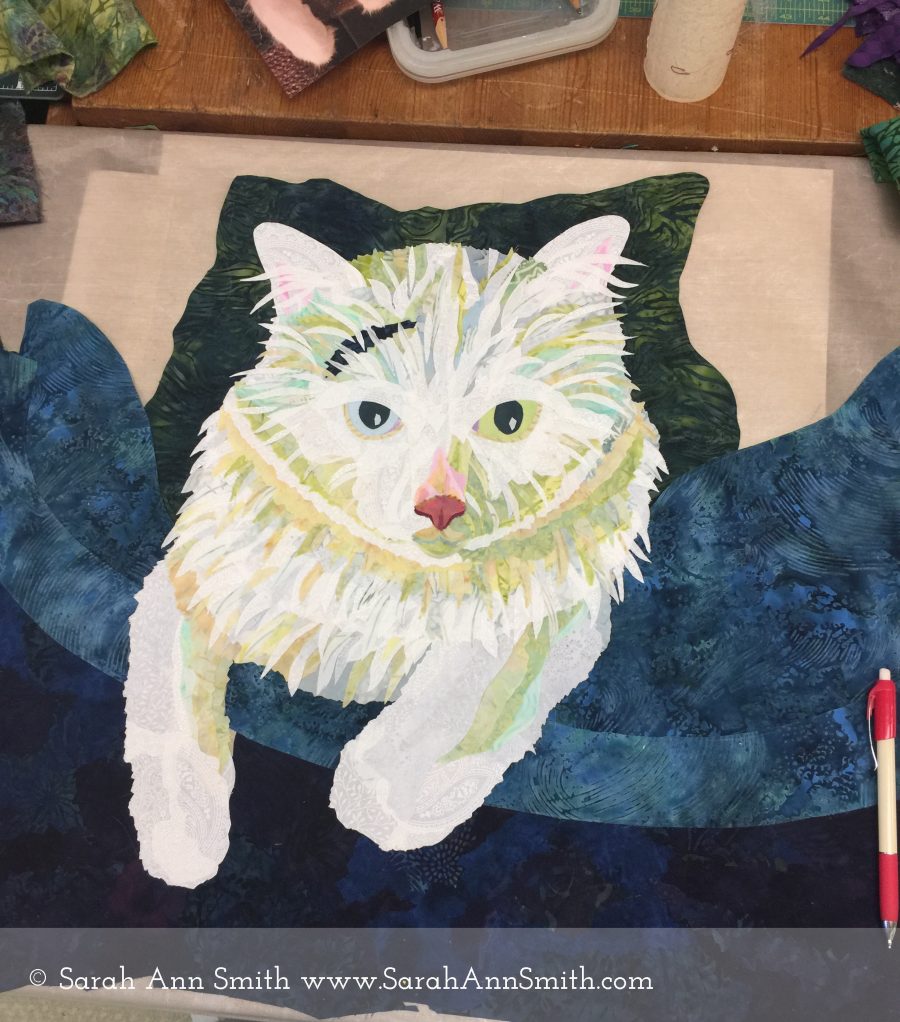
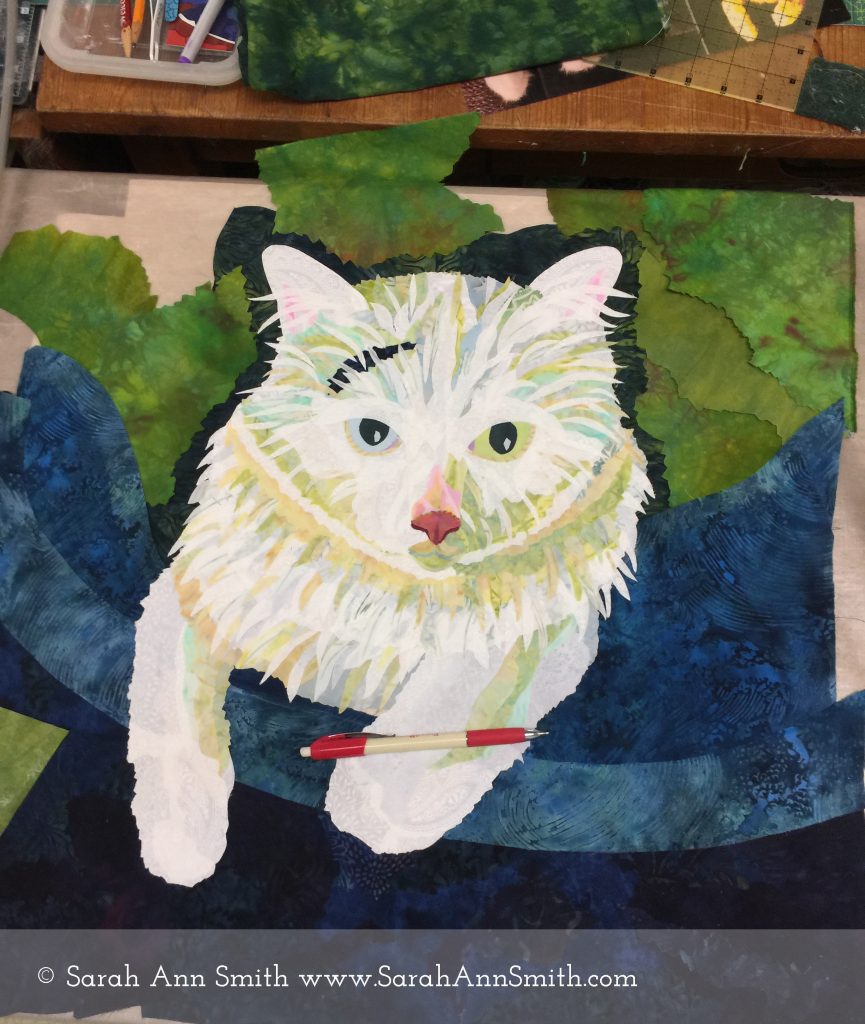
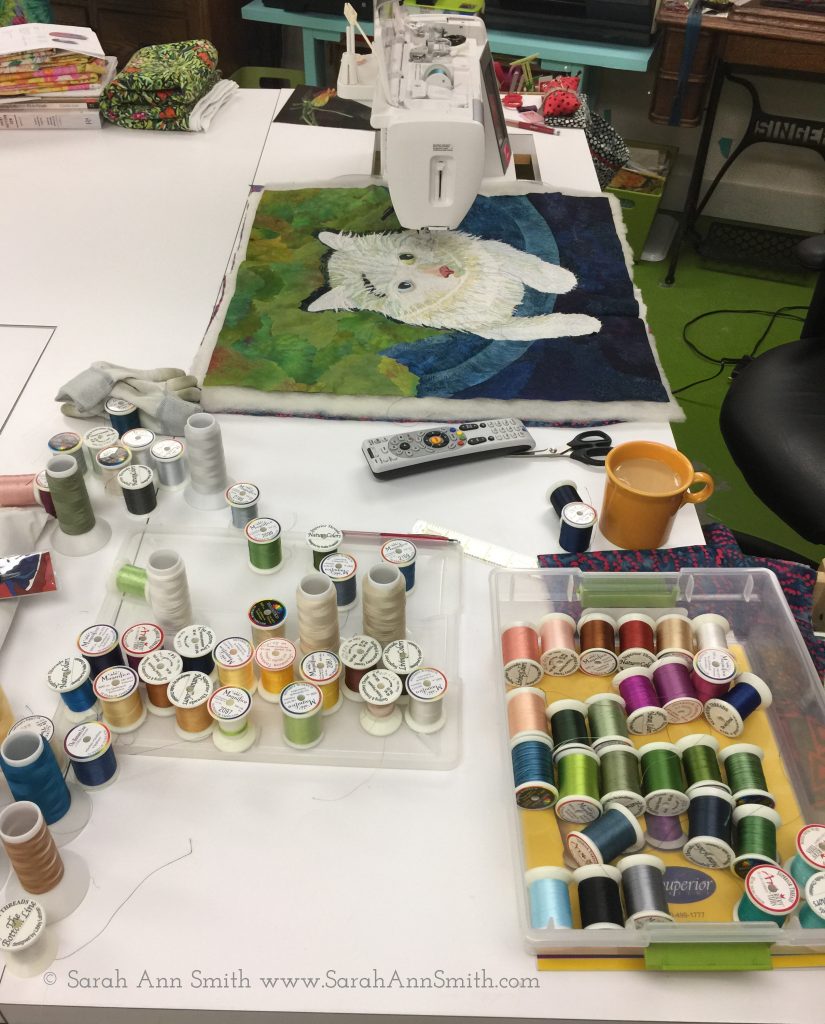
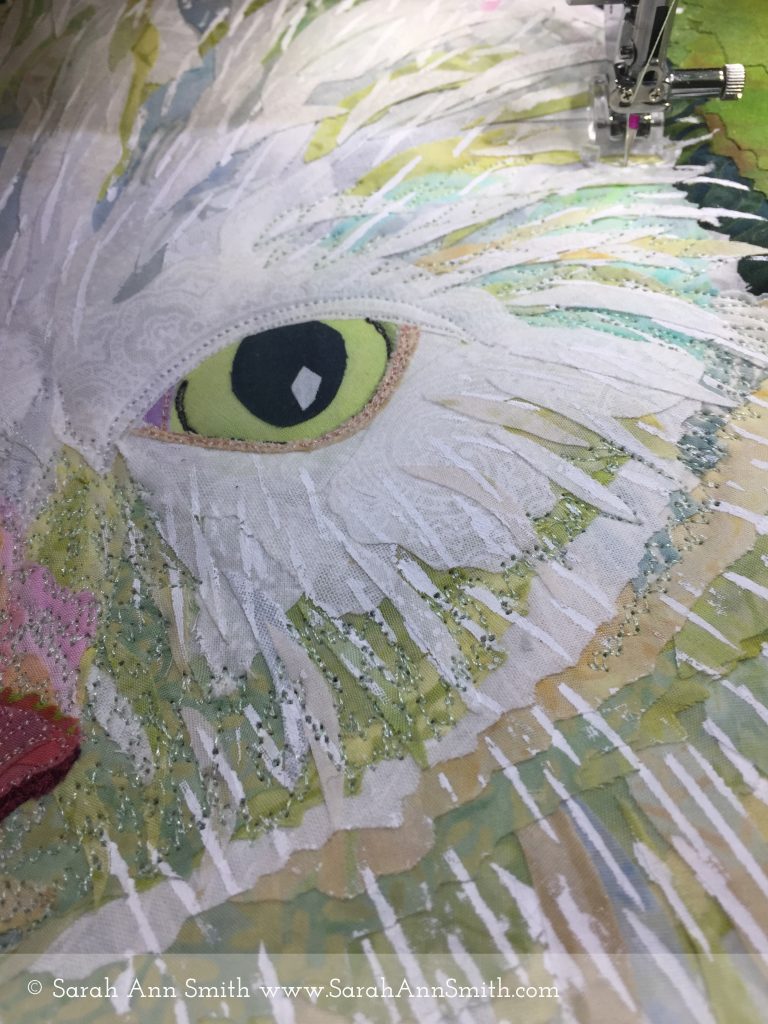
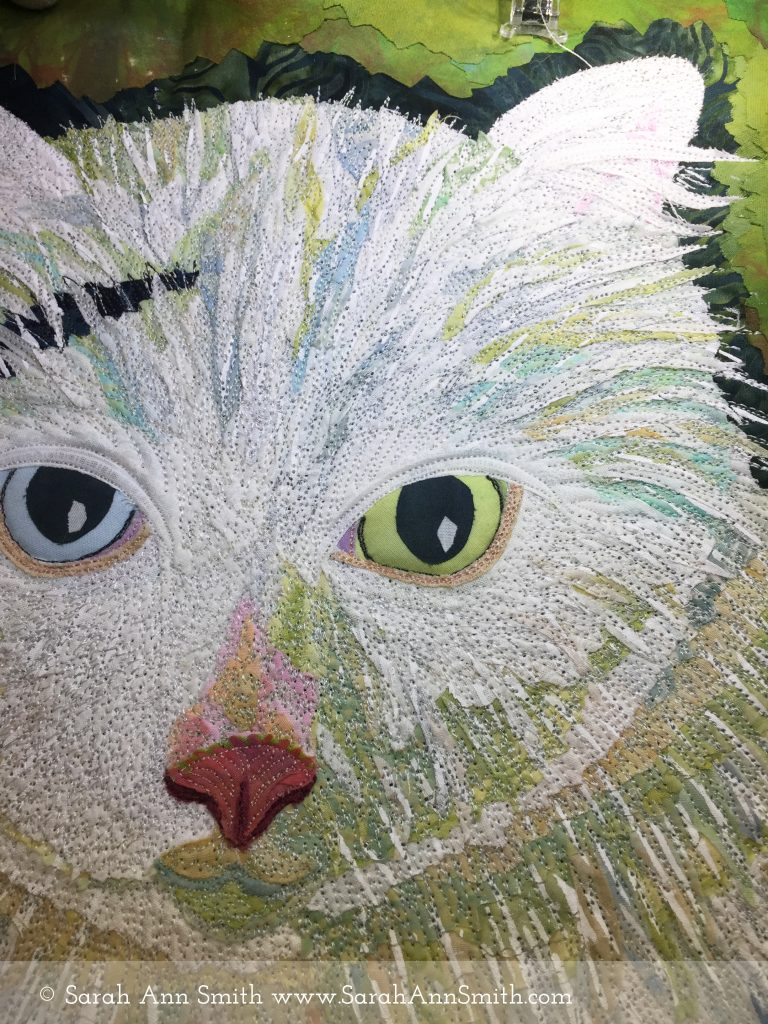
When I start a new project, I look usually at photos I have taken as “reference” photos. This time, hubby Paul’s photo was a better shape to fit into a square than what I had, plus Boo loves to sit with his paws hanging over the edge of stuff. I rarely use Photoshop any more to identify areas of light and dark, but I was curious to see what it would do. Meh. I like making the decisions as they are more nuanced than someone else’s software.Step 1 is working on the collage with my reference images close by. I use Mistyfuse (my preferred fusible by far) and prefuse all my fabric, then cut the shapes I need, usually freehand but sometimes with other techniques that I share in my workshops. At this point the base layers just looks blotchy and blobby. It gets better.Once the base layer is down, I start adding slivers of fur. Notice two of my favorite tools (and I’m not affiliated, just a fan-girl): Karen Kay Buckley’s purple-handled micro-serrated scissors (here) and Heidi Profetty’s awesomely pointy tweezers (here). The tweezers are new to my process and SO much easier than my old way of fingers, pins, skewer etc. Much easier and more accurate to place than to nudge! I like them so much I sell them in my workshops.To tie the three quilts together, I took out all the fabric I would use for all three quilts at the start of the first one. The blue ocean-like batik plays a major role in all three: in Widgeon’s face, the background for Yoda, and here as the “bed” in Boo’s cat tree in the living room, and the other fabrics repeat. I liked the dark green in the background to pop Boo’s silhouette, but it was too much and boring as the entire top of the quilt, so I trimmed to have a “halo” of dark (no, that is not a commentary on the cat’s personality LOL!).I selected assorted greens from my stash of prefused fabrics. I just didn’t like the way these looked–made the whole piece too heavy and dark for a rambunctious kitten.So the dark greens, other than the “halo,” went away and my much-loved yellow greens (mostly my hand dyes in this set) came in. The next step, as with Yoda, was adding paint via thermofax screens to refine the fur. Did I mention (another gratuitous self promotion here) that I’ll be teaching a 3-day workshop August 5-7, 2020, at ProChemical and Dye in Fall River, Massachusetts, on using paint on cloth? Sign ups open on October 2nd and I’d love to have you join me. Here’s the link to the Workshops at ProChem–details on the 2020 workshops will post on or about September 3rd. Anyway…. you can see the difference between the right where I have screened to the left where I haven’t, also up on the upper vs. lower parts of his face. I used a temporary mask of painter’s tape to avoid getting paint on parts of the background.Final phase: quilt it to death! This is the Janome 9450–I began on the 6500 when the Horizon series debuted back in 2003 and every time I think they couldn’t possibly make the machine better, yet they do. This is pretty much my PERFECT MACHINE! I pick more threads than I think I will need for a project. Since I was doing three quilts at once, that was a lot of thread. Luckily, the most labor intensive one was Widgeon because of so many different colors. The quilting on Yoda (a beige cat with some dark) and on Boo (a white cat with just a tiny bit of black on him) was easier in some ways, though finding six shades varying from white to cream was interesting….ended up using a very very pale green for example, which reads as a mostly white/gray for the under layer. Then the stitching begins! Here I’m putting in the first of three layers of thread used in each area. I teach a workshop on this, too (Thread-Coloring the Garden, but the process is the same for flowers, pets, people, landscapes, etc.). I really love this new open-toe free-motion quilting foot. It was designed for free-motion zigzagging, but it is awesome visibility. I’m not sure but I may possibly like it as well (or even better? is that possible?) than my all-time favorite thin metal open circle foot. In this photo, I’m up to about the third layer of threads. Compare how it looks to the previous photo. Also, I do minimal stitching on eyes!An angled shot always shows up the quilting best. I used the same leaf/vine motif on this that I used in the background of Yoda’s quilt to tie things together.
So that’s my process and all three of the quilts. To read the blogpost about Yoda’s quilt: His Immensitude Yoda, Emperor of Minions and all He Surveys, click here for Yoda . To read the blogpost about Widgeon’s quilt: I Love, Therefore I Am, click here for Widgeon. Thanks for coming along on my summer quilting extravaganza!
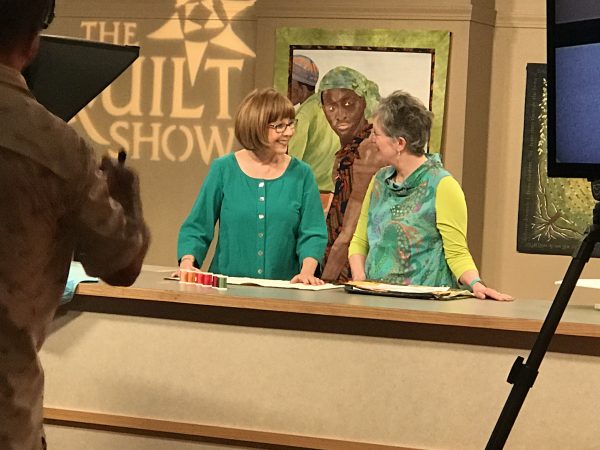
What a delight it was to be invited to tape a show for the Ricky Tims and Alex Anderson online “tv” show, The Quilt Show (TQS)! In the past I have taped for two seasons of Quilting Arts TV (on PBS) and did a video workshop for Interweave (Art Quilt Design from Photo to Threadwork, available as a download), but TQS is on a whole other level of professionalism. It was filmed in the Comcast center near Denver…as you walked by the main office there was an entire cabinet of awards including a few Golden Globes! And to get it up front: THANK YOU ADELE Merrell for all these great photos and Gayle Schliemann from Bernina for a bunch more!
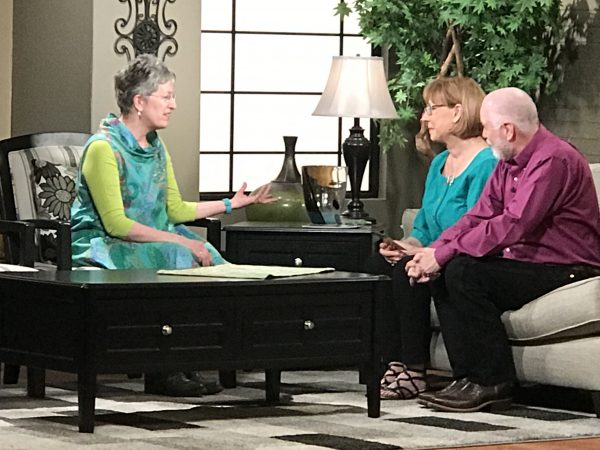
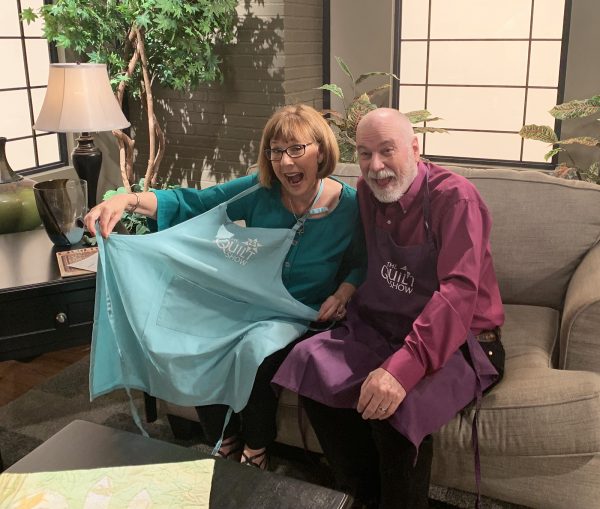
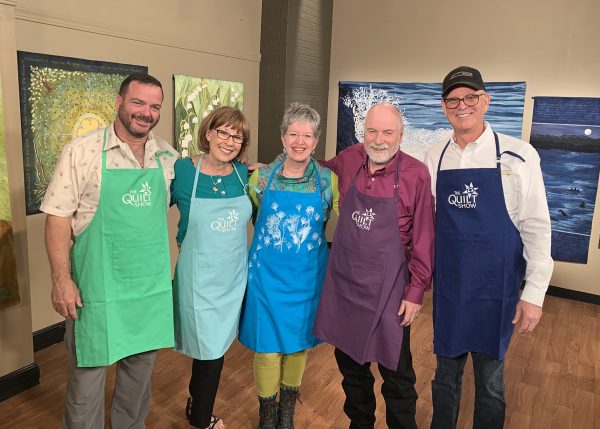
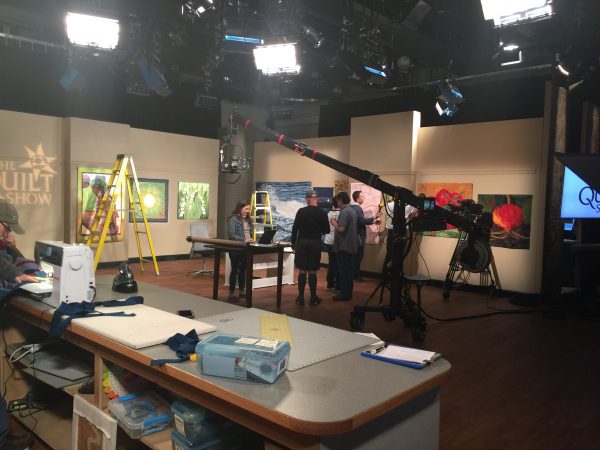
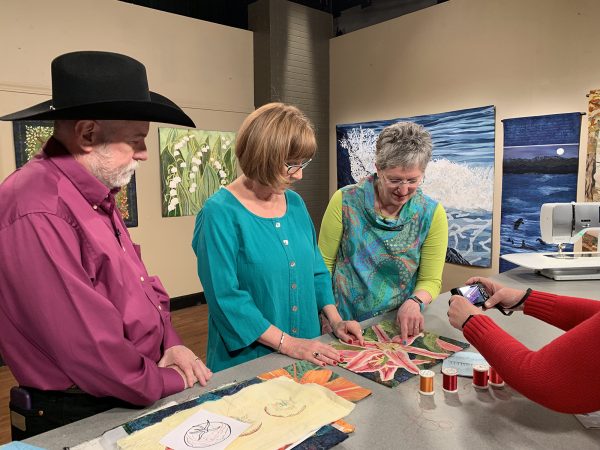
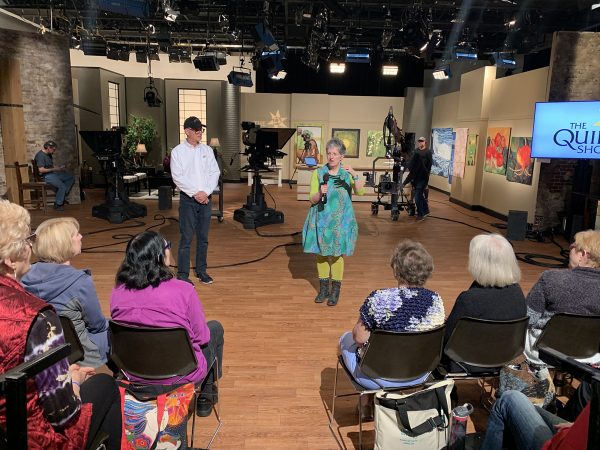
Intro segment with Alex Anderson and Ricky Tims…yes, they color coordinate their tops with the guest’s outfit! My dress is a Marcy Tilton pattern, Vogue 9112 I was so excited that I was able to pull off my surprise gifts for Alex, Ricky, John and Justin: custom TQS aprons made with a thermofax screen I made for them (with behind the scenes help from Producer Shelly to help with a graphic and favorite colors for them). After the intro we got together and everyone modeled their custom TQS aprons. Sorry folks, there are only four of these that exist, but I’m delighted they are already using them with other guests. I bought all cotton colored aprons on Amazon (where else?). If you like the milkweed design on mine, I am selling my custom screens on my website for a limited time (maybe six to 12 months) so you could make your own! There are two guests taped each day–I had Saturday morning. They hang the quilts first as all the other prep begins, and well before the audience comes in. The lighting is SUPERB…both of the guests and the quilts. There are light colored walls behind the seat walls with bounce diffuser lights that reflect off the exterior studio walls to create a smooth even light, then each quilt has a spot…there wasn’t a single “hot spot” or deep dark area (unless it was intentional)
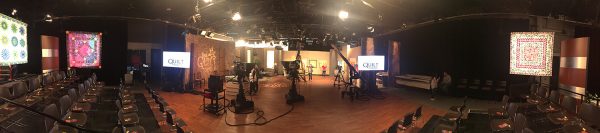
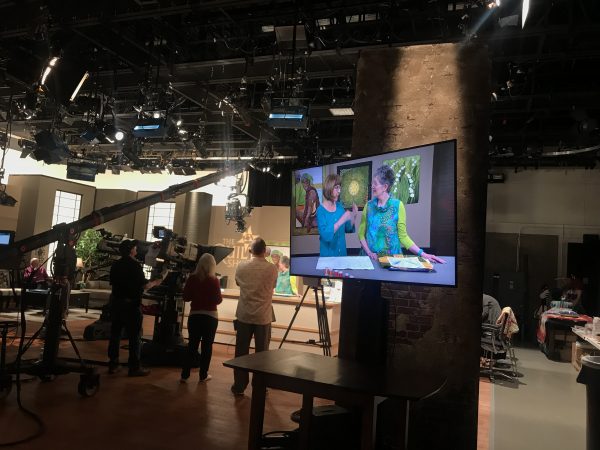
And a panorama shot…the detail isn’t great because of the re-sizing I had to do for the blog, but I am standing in the center of the audience area. There were four large quilts including this year’s BOM, Sizzle, then the door to the Green Room, a monitor, the areas of the set from the “brick” wall, seating area, gallery space. The big tables are all on rollers as is the longarm and Q20 so everything can be moved easily for each segment. Another monitor on the middle-right, the staff and guest cubbyhole is behind that wall, you can see a long light thing that is the longarm, then Alex’s quilt (which is gorgeous in person) and right bank of the audience seating. There are usually 50-70 guests for each show. Tickets are free but you must reserve in advance…check the TQS website for info.
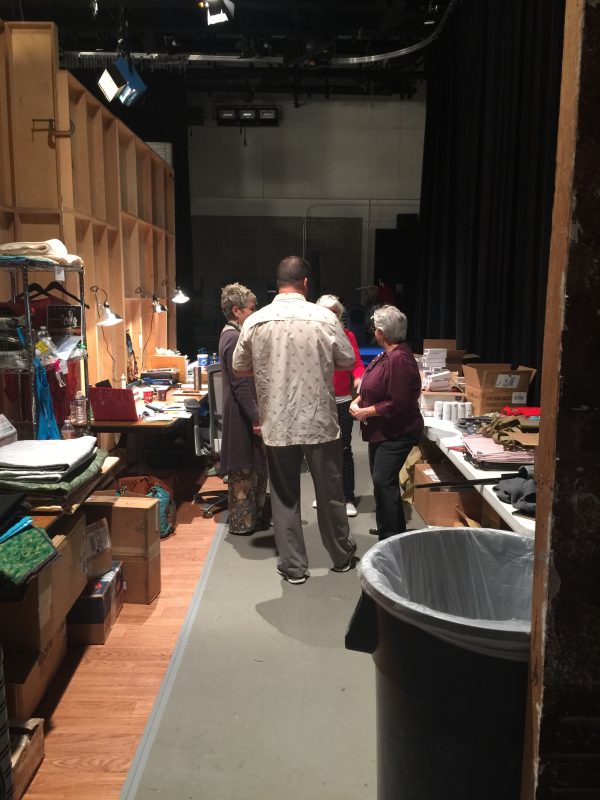
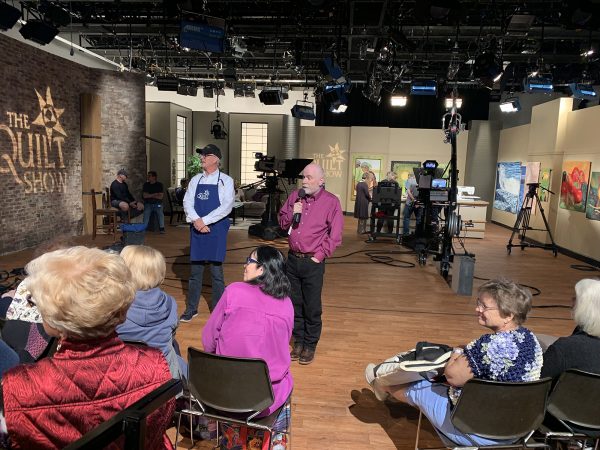
Justin Shults, Ricky’s partner, consults with the team in an area to by one side of the set where they collect the guests’ “stuff” for the episodes and serves as staff work space. I love that they said “welcome to the family.” Everyone staying at the DoubleTree collects in the same zone of the restaurant for breakfast (travel, meals, hotel are on your own dime, but it is so worth it!) and eat together. It is a delightful way to get to know the crew and principals. Left to right: Lilo Bowman, Justin Shults, Mary Kay Davis and Katie. Justin is the guy coordinating things on the set while Shelly Heesacker, the Producer, is in the control room. They communicate by headsets.
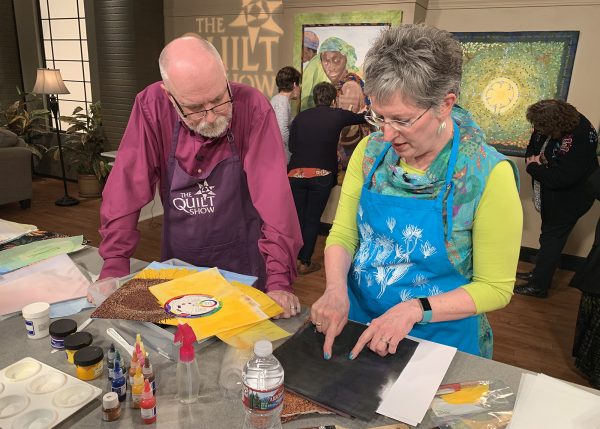
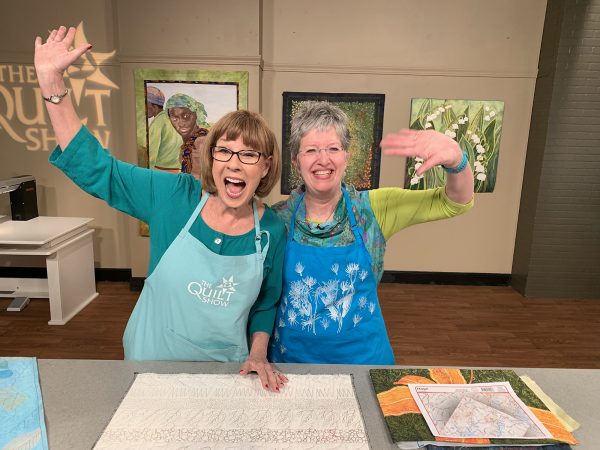
This is pretty close to the image folks will see when the show airs online sometime this autumn.And here’s what that looks like from the sidelinesMy first segment was about using paint on cloth (and I now have custom paint kits available here) and using shrink fabric to make my sunflower quilt (a blogpost to come). Here Ricky and I reviewed what I brought and what we could fit into the 10-14 minute segment. While the guest and hosts review the segments, groups of folks from the audience are allowed to come up and see the quilts up close. In the breaks between segments, John Anderson (Alex’s husband) keeps the audience entertained, shares quilts from upcoming guests and more. This one is at the end of the day when Ricky came to chat with the audience.
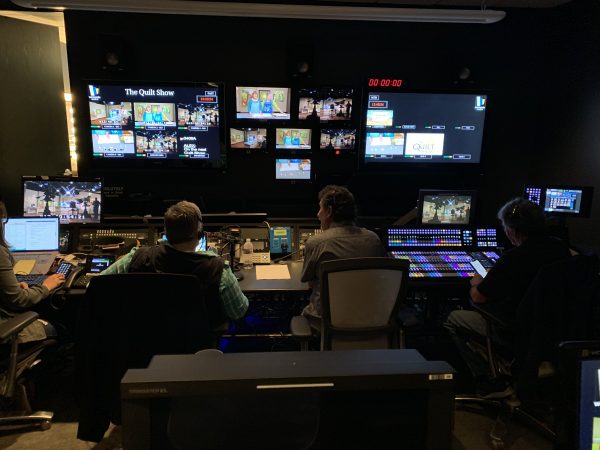
Rehearsing for the thread segment: Ricky, Alex, me and Mary Kay Davis taking a close up photo.Thanks SO MUCH to Adele, who dresses the set, for taking a billion photos for me. I especially wanted this one from inside the control room that shows what a polished and complicated production this is. Producer Shelly Heesacker is in the bottom left and she crafts each episode and runs the show.And a close up of the screens as I am taping my second segment, with Alex, on how I do my Threadwork.
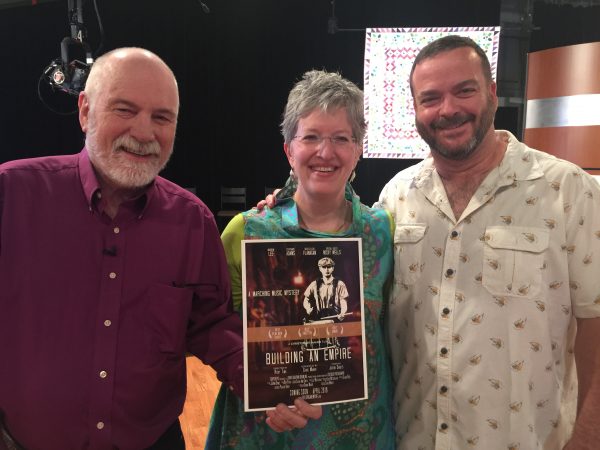
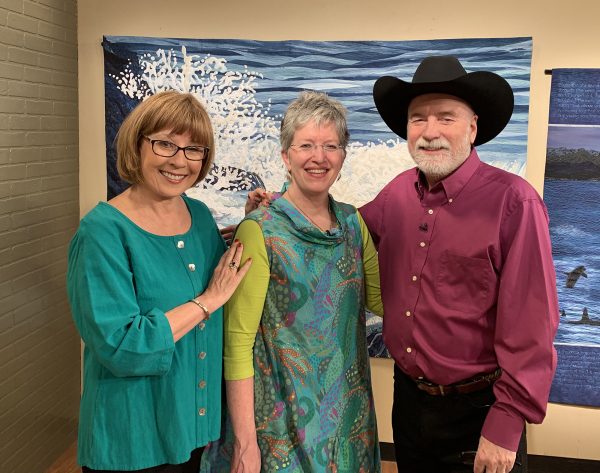
After-taping shots: here, I am holding a photo by Chris Maher from the online Photo Critique Group–it is a mock movie poster, with Ricky, Justin and many of our classmates in the assorted cast and crew roles. Too much fun! I made TQS screen prints on my hand-dyed fabric for the audience as a little gift. MAJOR thanks to Iris Karp of MistyFuse for donating a package of MF (which changed my life and makes what I do possible!!!!! and that is NO exaggeration) so I made up a pattern for the sunflower that I demonstrated on set. Time for some portrait shots with my quilts…this was one of the best!Going to use this one for my FB profile photo for a while…THANK YOU ADELE!Question and Answer session with the audience (and you can see that fun dress!) after taping.
I have to say, I wasn’t all that nervous thanks to being UBER prepared and having done Quilting Arts before, but I was wired for sound LOL..by the time of the Q&A I was relaxed and ready to have even more fun sharing.
At the end of my segment saying “It’s a new day EVERY day,” the TQS motto. Can you tell we were having fun?!!!!
My episode will air sometime in late summer/autumn. Star Members of The Quilt Show will have the first view, then there will be one week where the episode will be free to everyone. I will be sure to post, but gosh there are so many wonderful guests that I am so glad I am a member–and did you know I joined the very first day TQS began: January 1, 2007? And now, here I am as a guest! WOOT! Life is GOOD!
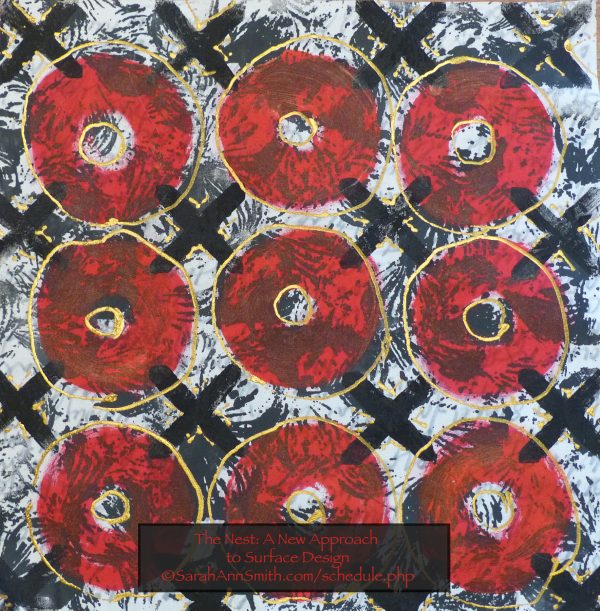
Another SQUEEE–this time ProChem! I am delighted to share that I will be teaching a 3-day Paint on Cloth Workshop from August 5-7, 2020 at Pro Chemical & Dye in Fall River, Massachusetts. Think kindergarten for grown-ups with paint and cloth: silk paint, transparent, opaque and pearlescent textile paints, as both the Movie Star and the Supporting Cast. I’ll be developing course materials over the next 15 months, so if you’ve got something you want to learn, TELL ME! And if you’ve got a brilliant title, I’m sure I’m gonna need suggestions on that, too!
Modify the fabrics that you already have to create your art
I’m not usually an abstracts person, but I love the layers I was able to get from handwriting, screen printing, and stamping…come play with me!
Please let me know what YOU would love to do in a paint-on-cloth workshop. Personally, I want to go to dinner at the fabulous seafood restaurant out on the shore in Rhode Island after class, too! I’ll be back later in the year with more details, but in the meantime, tell me what you’d love to learn from me!
Sometimes you need to do something else. You totally love your main “thing” (in my case it is clearly art quilting), but you need a break. And sometimes, that makes your main “thing” even better. I’ve learned over the years that good design is good design, whether it is landscape, interiors, architecture, photography, painting, sculpture, apparel, the principles are the same. So I have taken online classes in drawing and photography and been enriched.
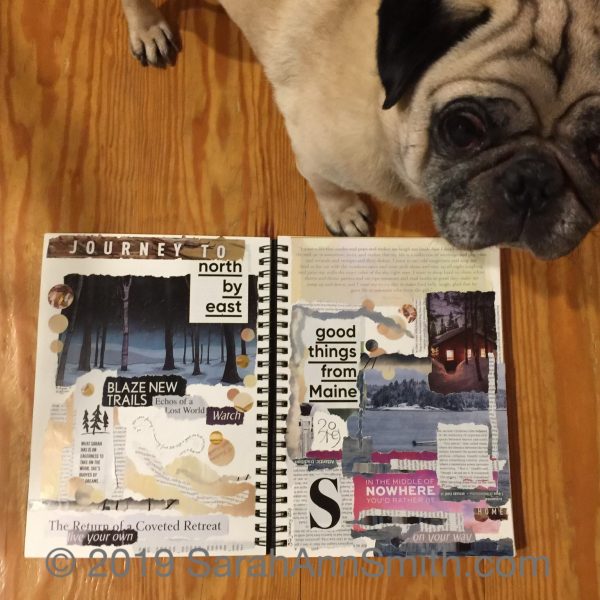
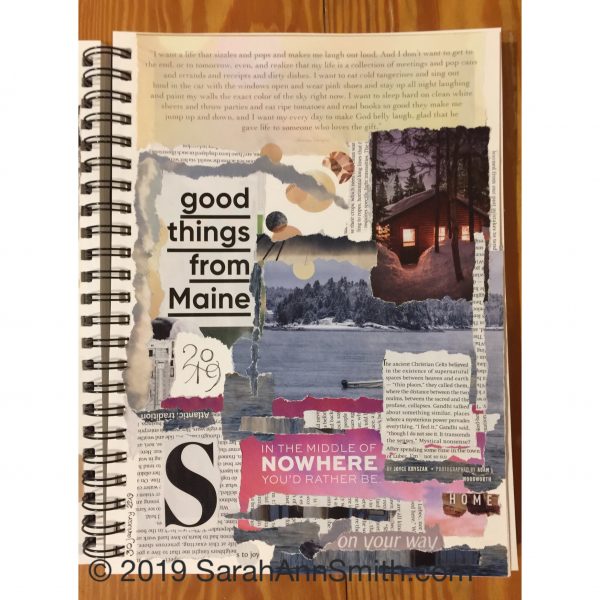
At least ten years ago, I sat down between Christmas and New Year’s desperate to do something creative. The boys were still pretty young so time was scarce. I grabbed a pile of magazines and started tearing out words and pictures and glued them into my sketchbook. That has become an annual tradition…at least most years. This year Widgeon decided he needed to see if the collage passed inspection. Happily, it merited a wag.
I don’t know if I’ve done it every single year, and some years — like this one — it was done in (late) January instead. But I like reading what words have called me to use them and seeing where my head was in a given moment.
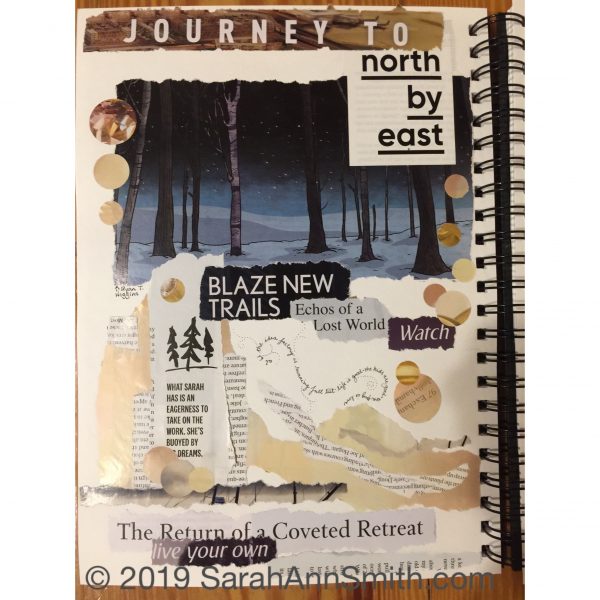
This year, I made sure to add information about whose artwork or photo. As with most years, a lot of my fodder comes from Down East magazine. North by East is a monthly column, and in December they featured work by Ryan T Higgins, a Maine Children’s book author. I must now go to the Library and see what they have of his. I was also stunned to see the “Sarah” quote, obviously about another Sarah. I covered up the “big” before dreams, but otherwise I really liked it.
This page got pretty dense…but I liked the quote at the top (from an ad for something). I also liked the bit on the pink, but it was too much pink, so I covered it up. Using blocks of text upside down or sideways works. And I LOVE torn edges…LOVE LOVE LOVE…that exposed white framing the image or words. I also dug out my circle punches. Have some circles and a few squares.
I’ve also taken a number of outstanding art classes from Val Webb over the years, ranging from birds to children to faeries to animals, using pencil, ink, watercolor, colored pencil…I learn so much, both about materials and tools but more importantly about SEEING. Observing. I’ll never want to be a colored pencil artist, but taking birds in colored pencil with Val taught me about patience and layering. I found I now do that with dyes, with paints on cloth, with thread, in my art quilts. And this year I also took a brilliant course at Sketchbook Skool, Watercolor. I always want more watercolor!
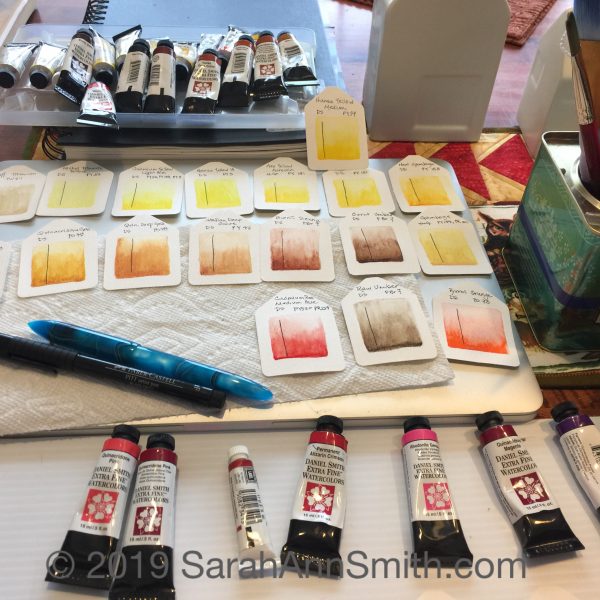
Over the past 8 years or so I have learned about the difference between student grade and artist pigments, that using quality paper makes all the difference in the world, and using pure pigments and mixing your own (just like dyeing fabric!). I decided I needed to get a bit organized and SEE the actual colors painted out from each tube. I had bought some icky (Bienfang) cheap watercolor paper that I will never use for a finished anything, not even a class practice piece. So got out my “tag” punch and did a paint out of every tube I have. Then ordered two more tubes! In search of the perfect pink…..and replacing one teeny tiny tube that is almost done. Each tag has the name, code for the manufacturer, and the universal pigment code (PV 42 for example is Permanent Violet 42). Yes, you can go wwwwwaaaaayyyyyy down the rabbit hole with this stuff!
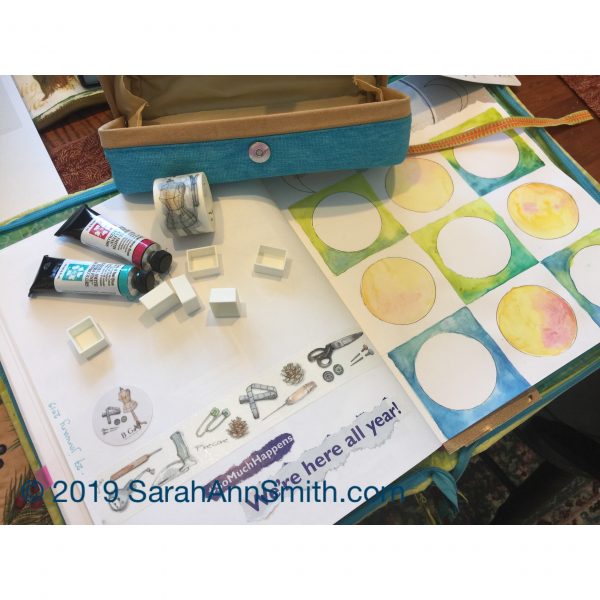
A good mail and watercolor day. Turns out quilting templates and rulers have lots of uses, of course we all know that! I saw the clamshell cases at Jetpens.com and couldn’t resist. When I went to order, I discovered I had left that awesome washi tape in my cart, so it had to come to me also. And then there are those two tubes of watercolor and some empty half pans. That’s another thing I learned: make your OWN palettes with your favorite colors, use magnetic tape that sticks to the bottom of the pan, put inside a palette or metal tin. And then I used my quilting rulers and circles to mark a grid in my notebook/sketchbook.
I used to have both my to-do-etc notebook and a sketchbook. I never had the one I wanted handy. So I said to heck with the cost, and bought a GOOD sketchbook and use that as my “everything” journal. I write lists, take notes at SAQA (Studio Art Quilt Associates) meetings, suss out ideas for quilts, and sometimes even sketch or paint in it! Now I will start filling in the circles with words, quotes, ideas, images/sketches, may fill the white backgrounds with ink textures…we shall see!
So that’s what I’ve been doing…along with quilting. What about you? And here’s an end of the day/blogpost dog walks photo from yesterday: