email Youtube

Home
Galleries
Blog
Workshops & Calendar
Store
Resources
About
Contact

Blog Archives

Plaid Top Tutorial: Lesson 3–Matching Plaids, cutting out your garment pieces

Friday, February 24th, 2023

While visiting a favorite local shop in nearby Rockland, Maine, Clementine, I happened to fondle this amazing thick, soft flannel and thought it would made a perfect winter top.  The plaid adds a bit of complexity and opportunity to teach a few more advanced skills along with a fairly simple pattern for this series.

Please note:  I am affiliated with Janome as a Janome Artisan and am compensated.  However, my reviews are honest and I would say what I say whether affiliated or not.  I’ve also chosen to be affiliated with Janome since 2003 (!!!) because their machines are so good and they are so responsive to the interests and needs of their customers.

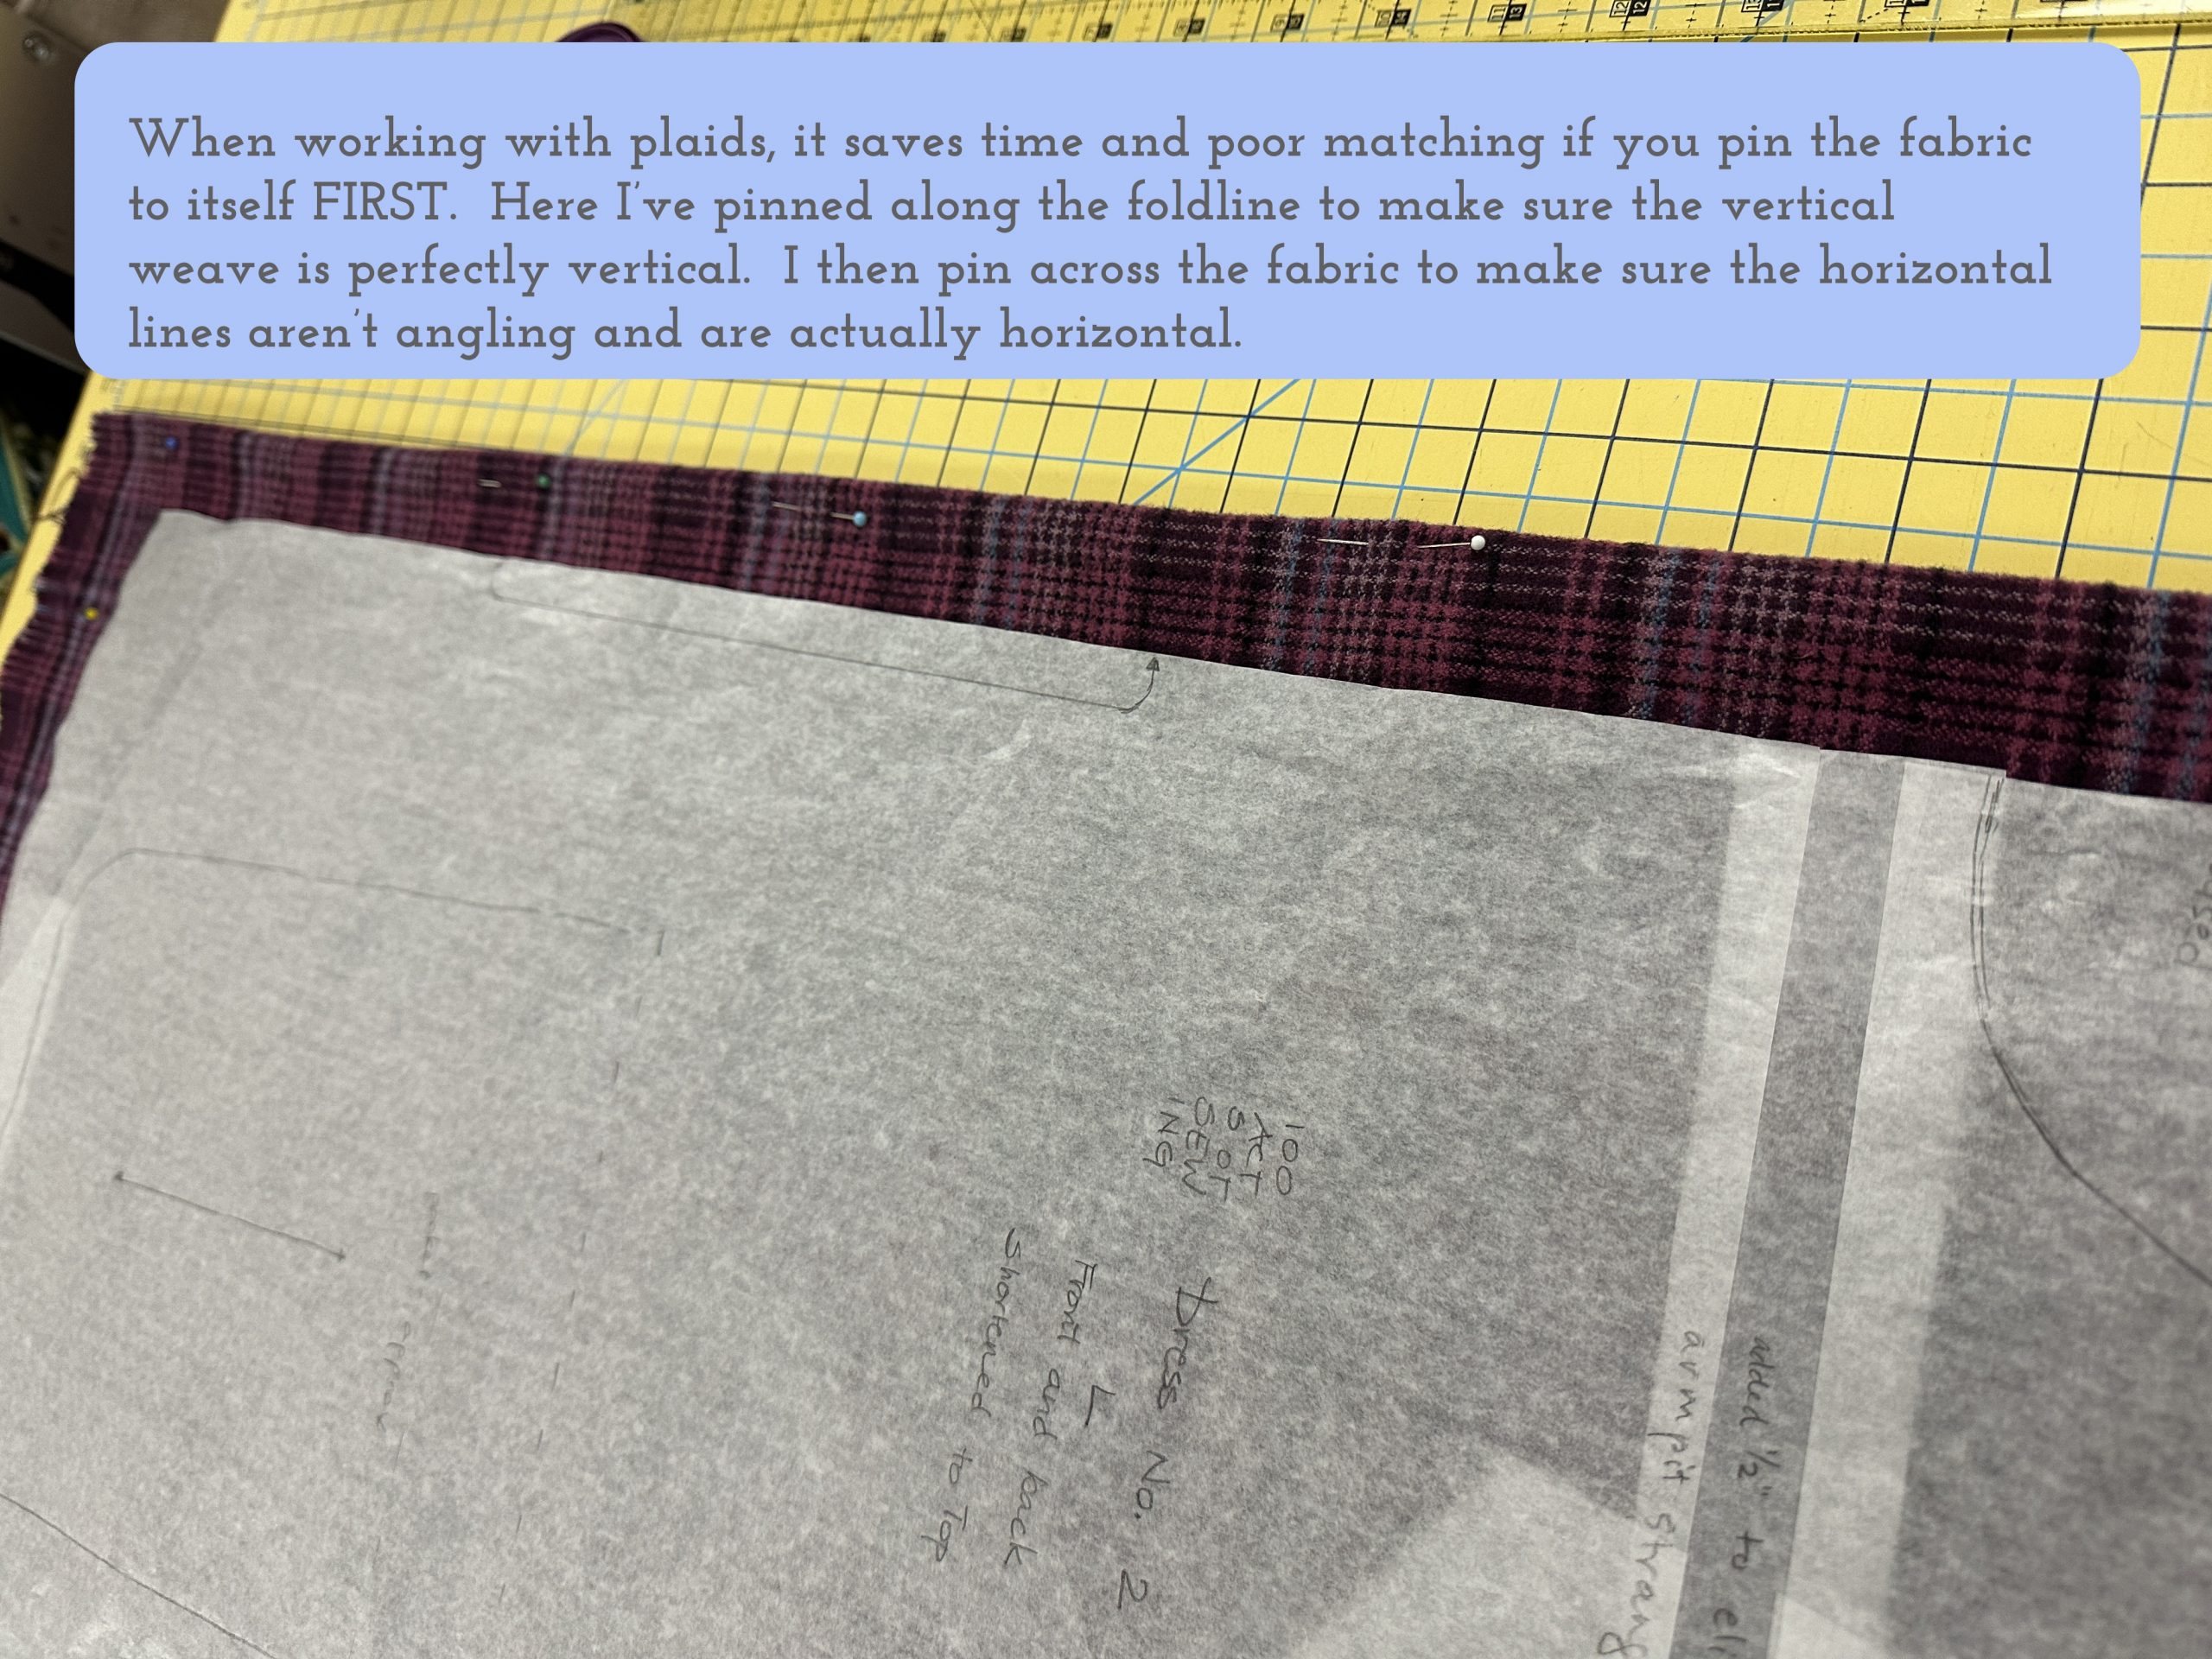
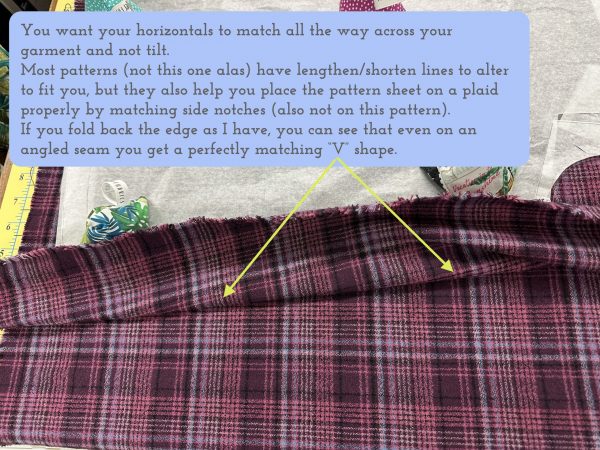
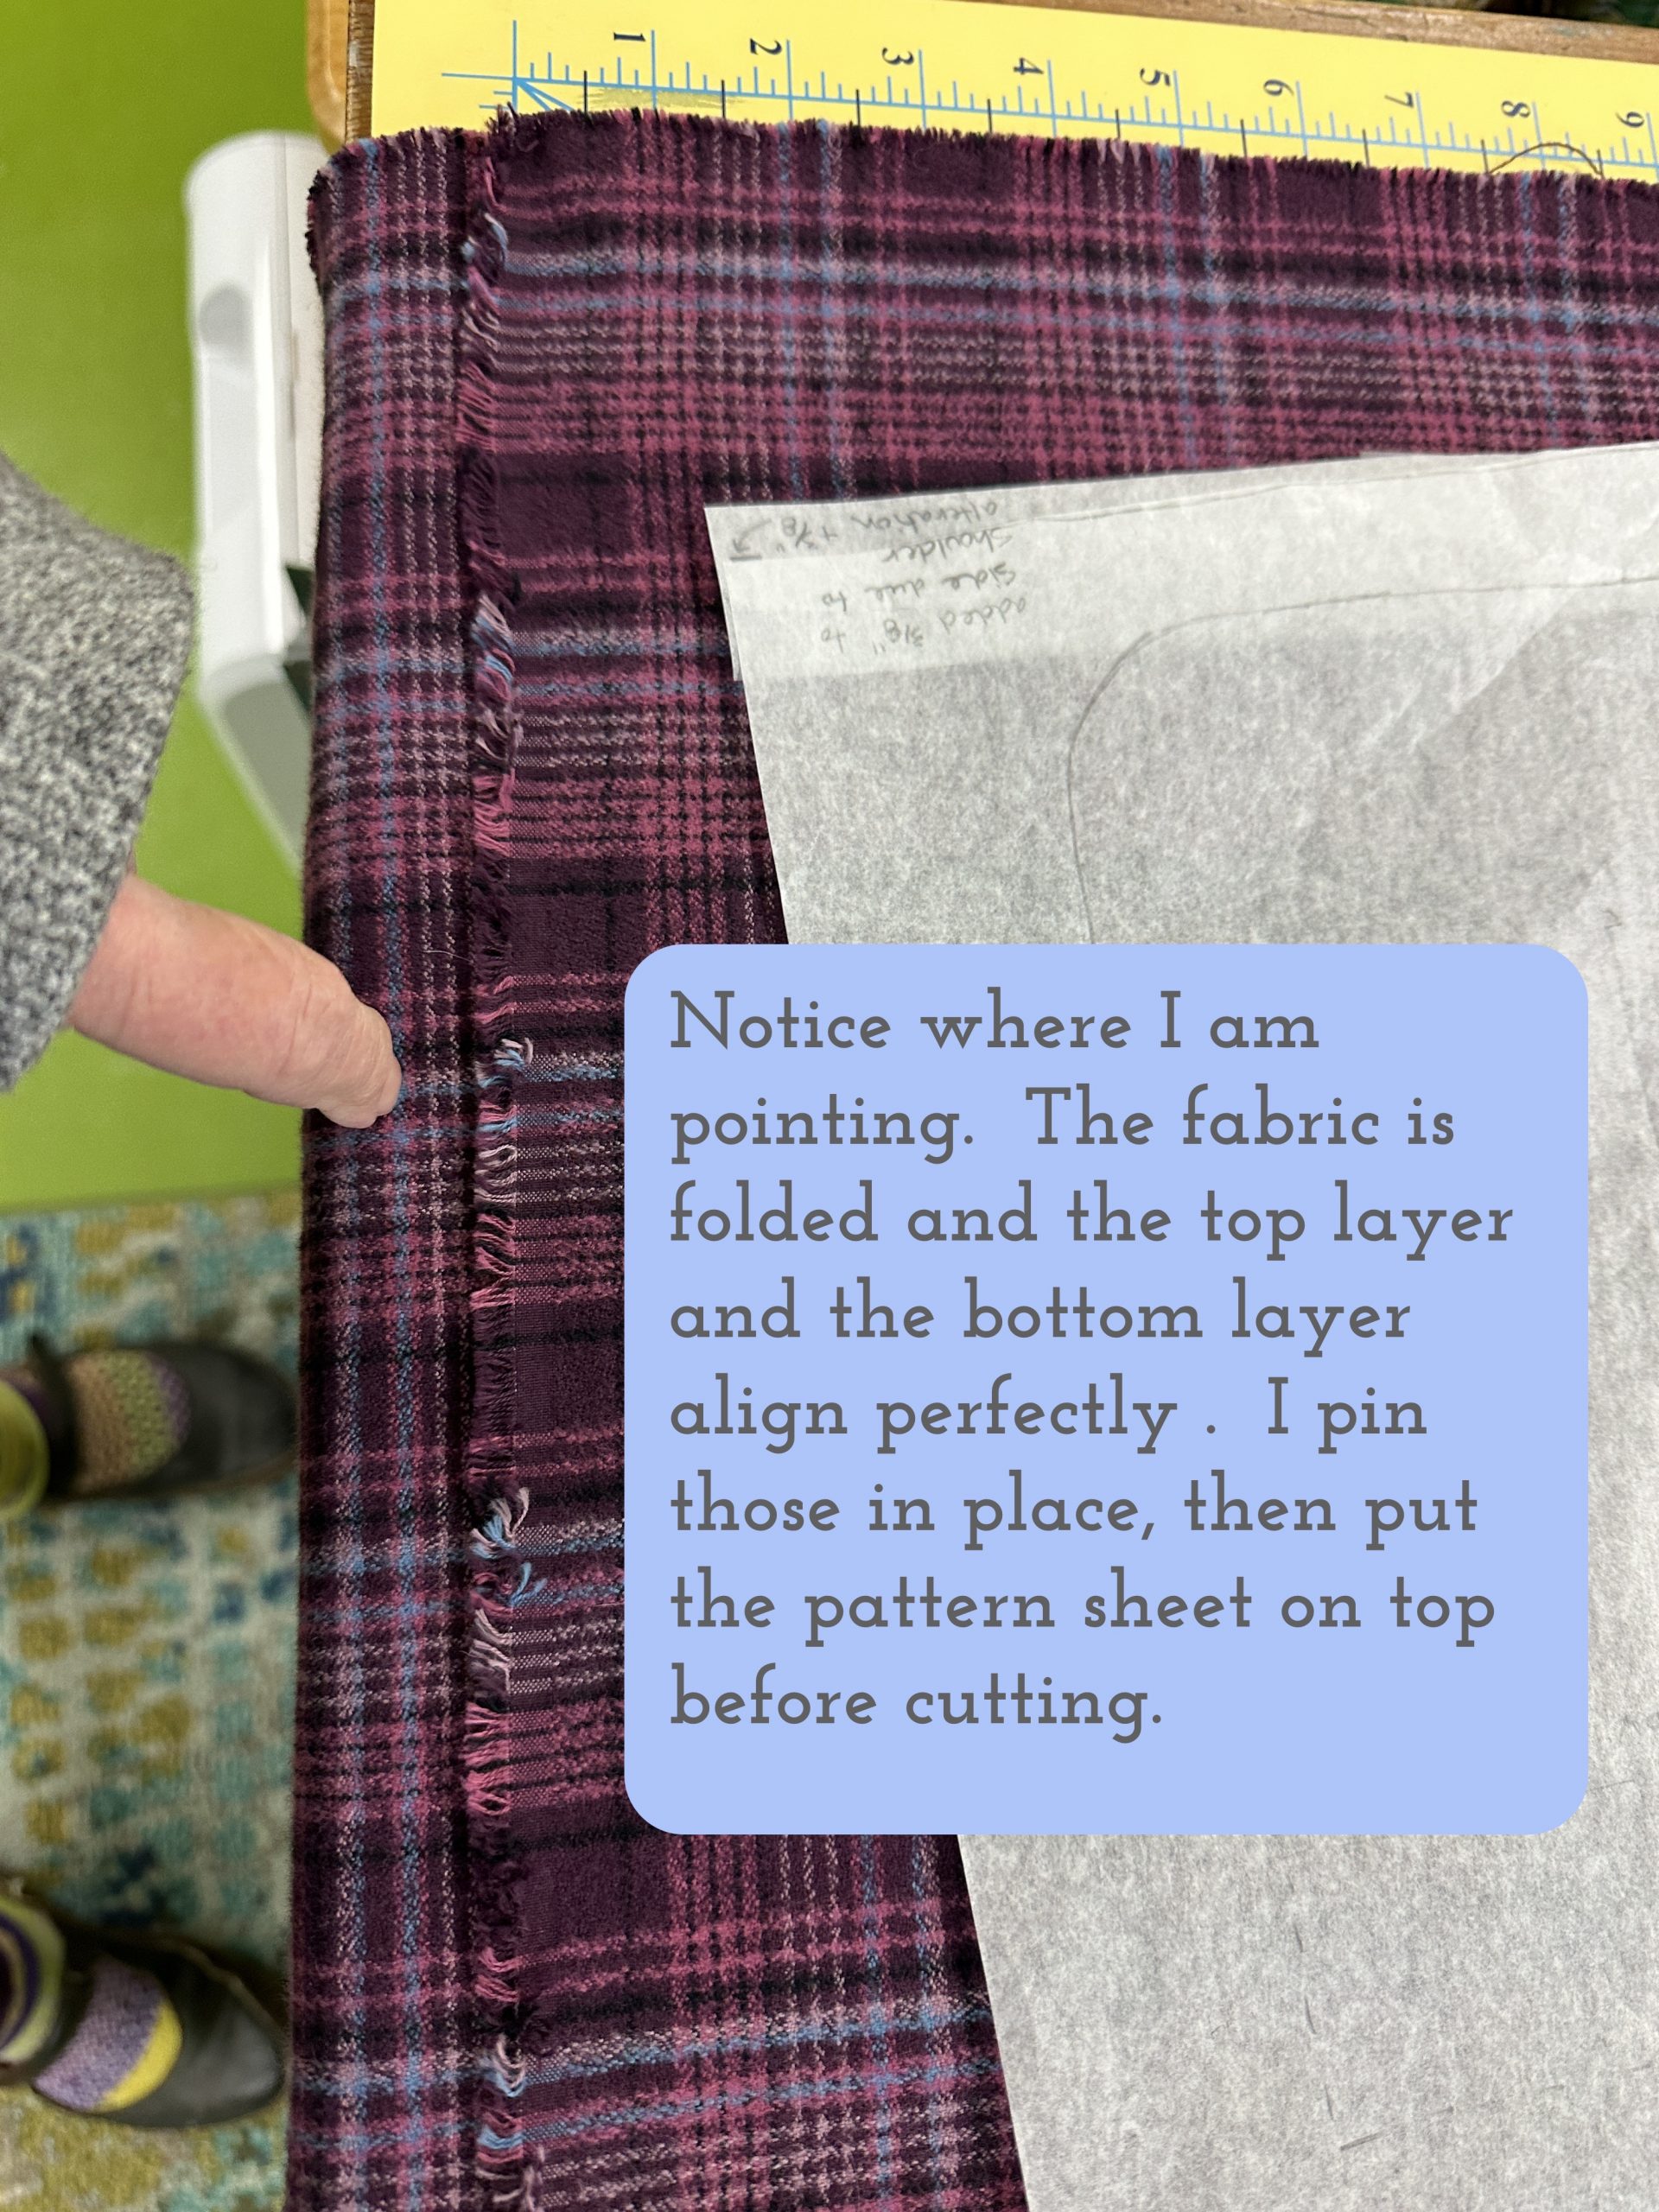
You use the lengthen shorten line to make sure the pattern piece is places squarely on the plaid–the line on the pattern runs on top of the same horizontal band all the way across. The notches (when you have them on a pattern…still grumpy about that!) give you additional “checkpoints” to make sure the horizontals on the front will align with the horizontals on the back.


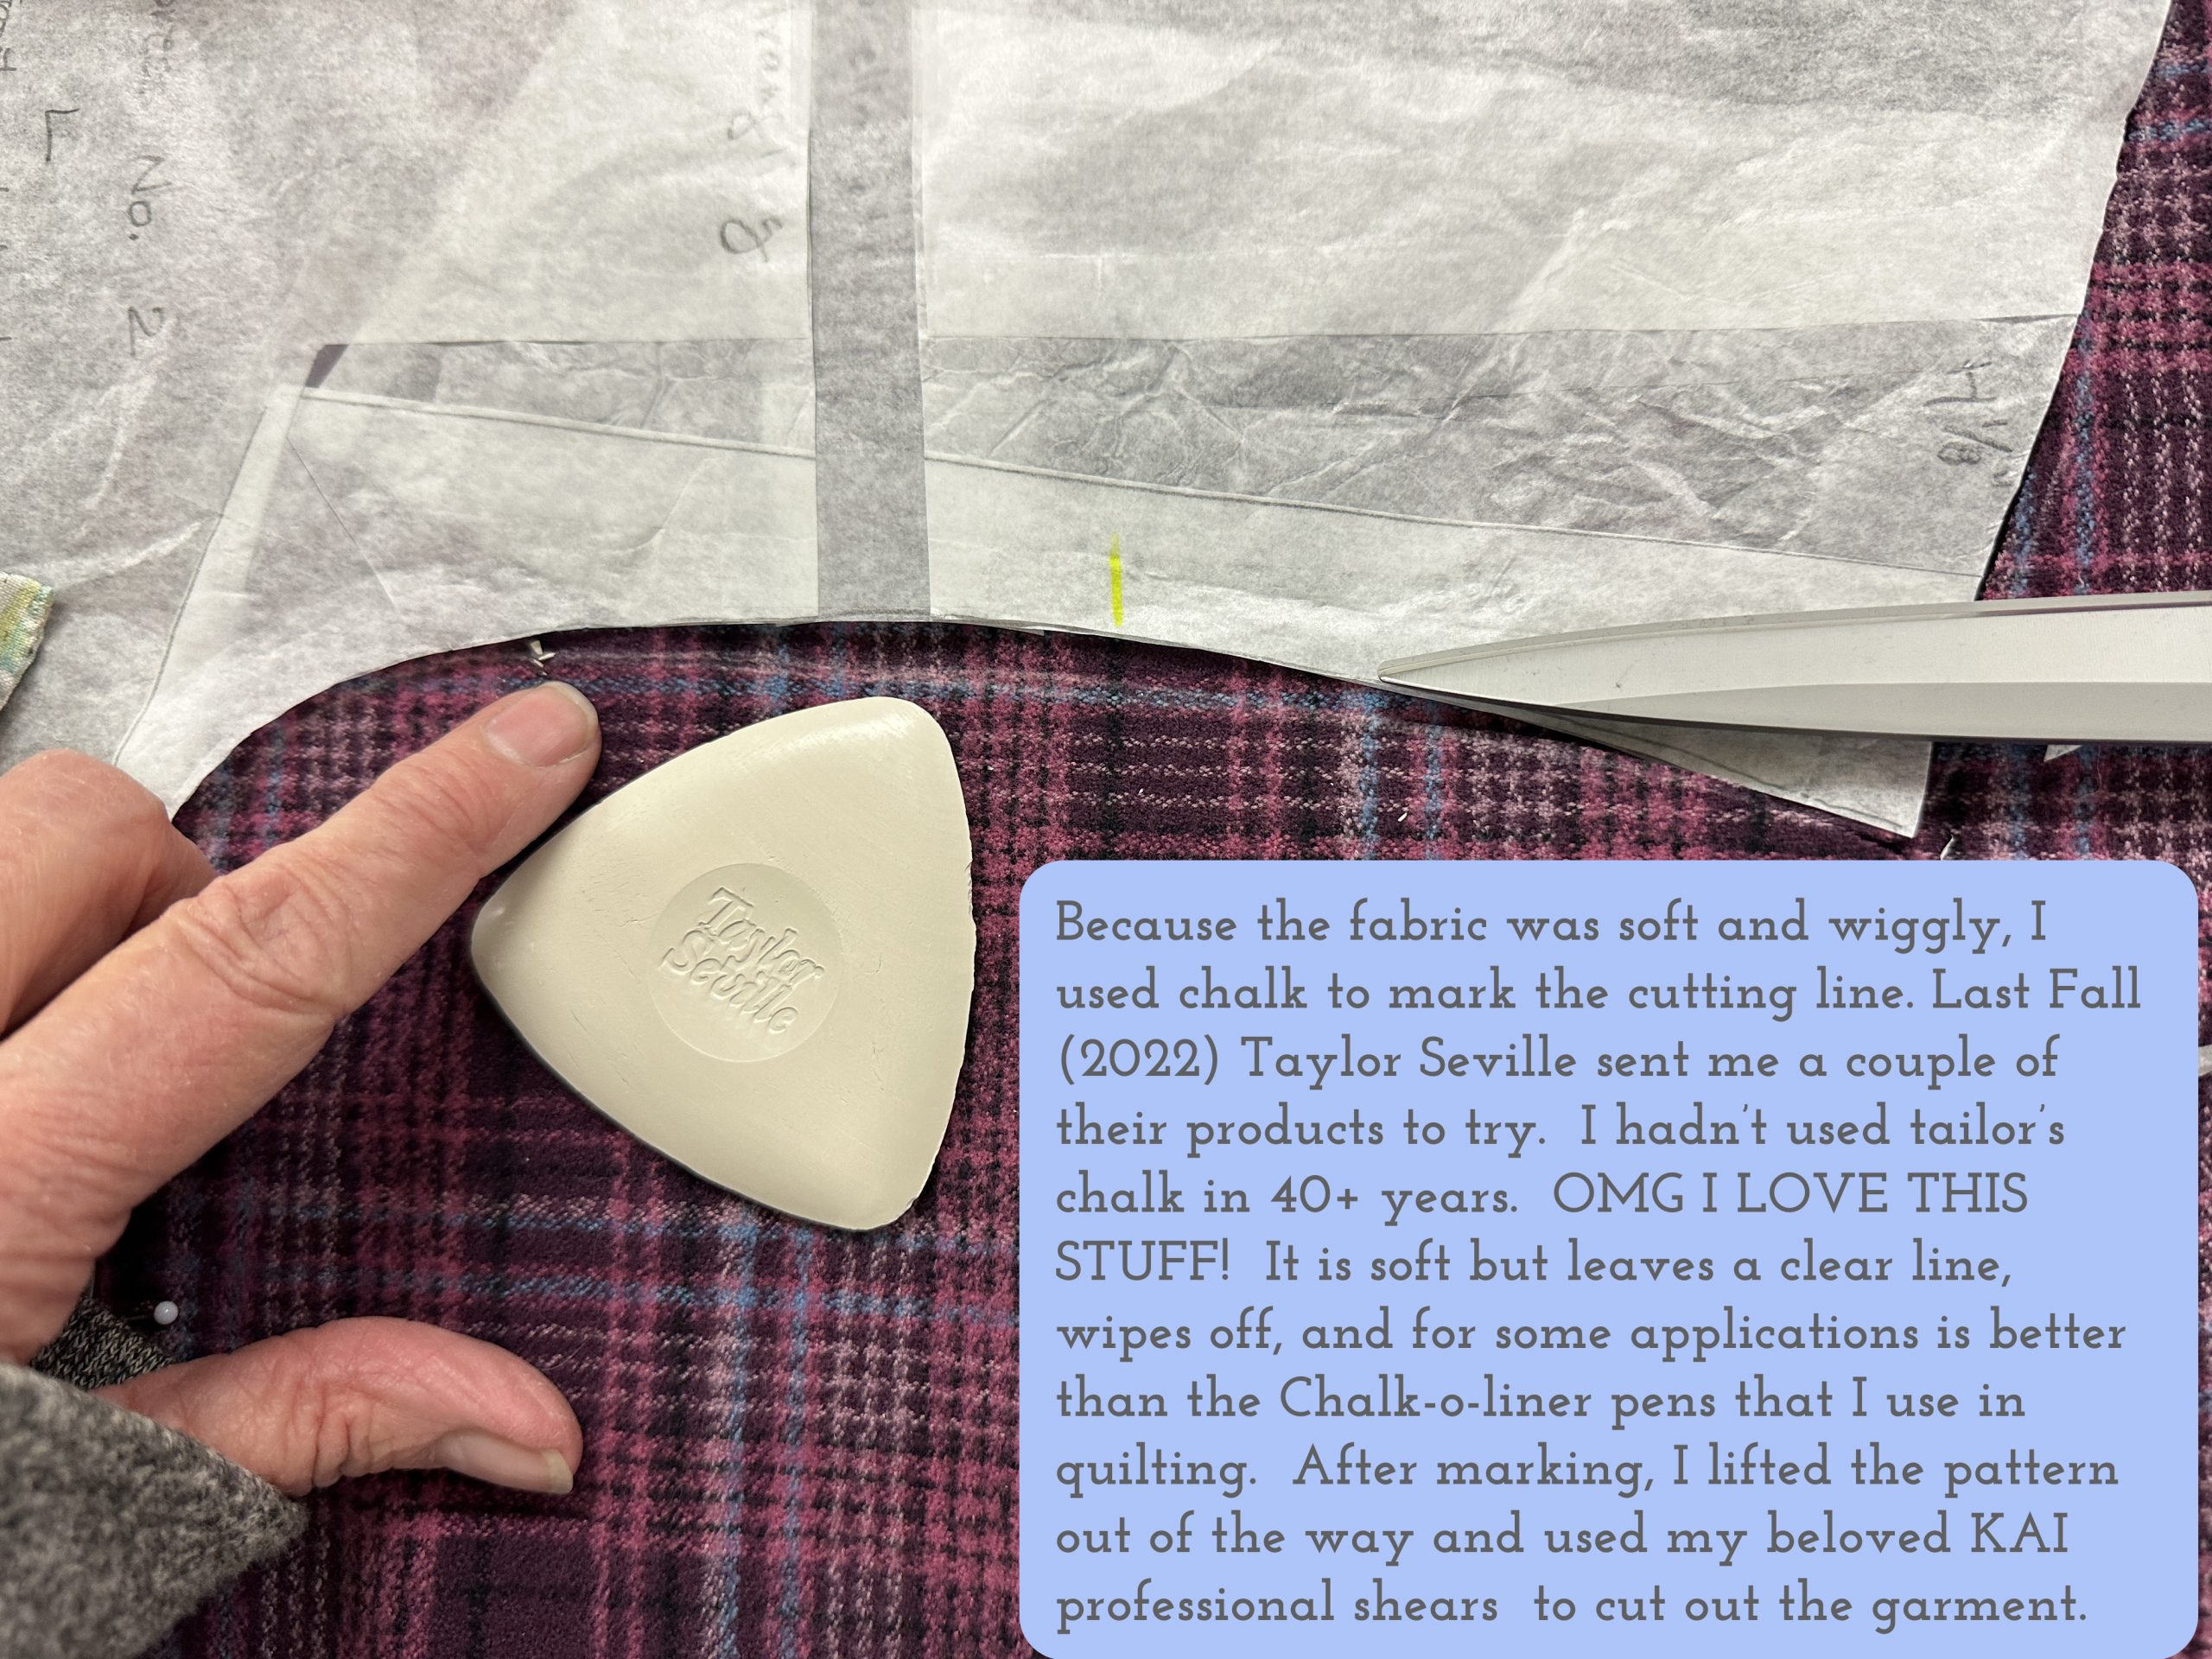
The Taylor Seville chalk is much nicer than the tailor’s chalk I remember from the 70s and 80s. It comes in a nice plastic case that prevents the edges from getting chipped, too.  The KAI shears are these.  They are the first fine shears I’ve bought in nearly 30-35 years.  WHY did I wait so long????? To be blunt, these make my Ginger shears look like lead clunkers!  They weigh less and are SO much easier on my arthritic hands.  They cut like a hot knife through butter!

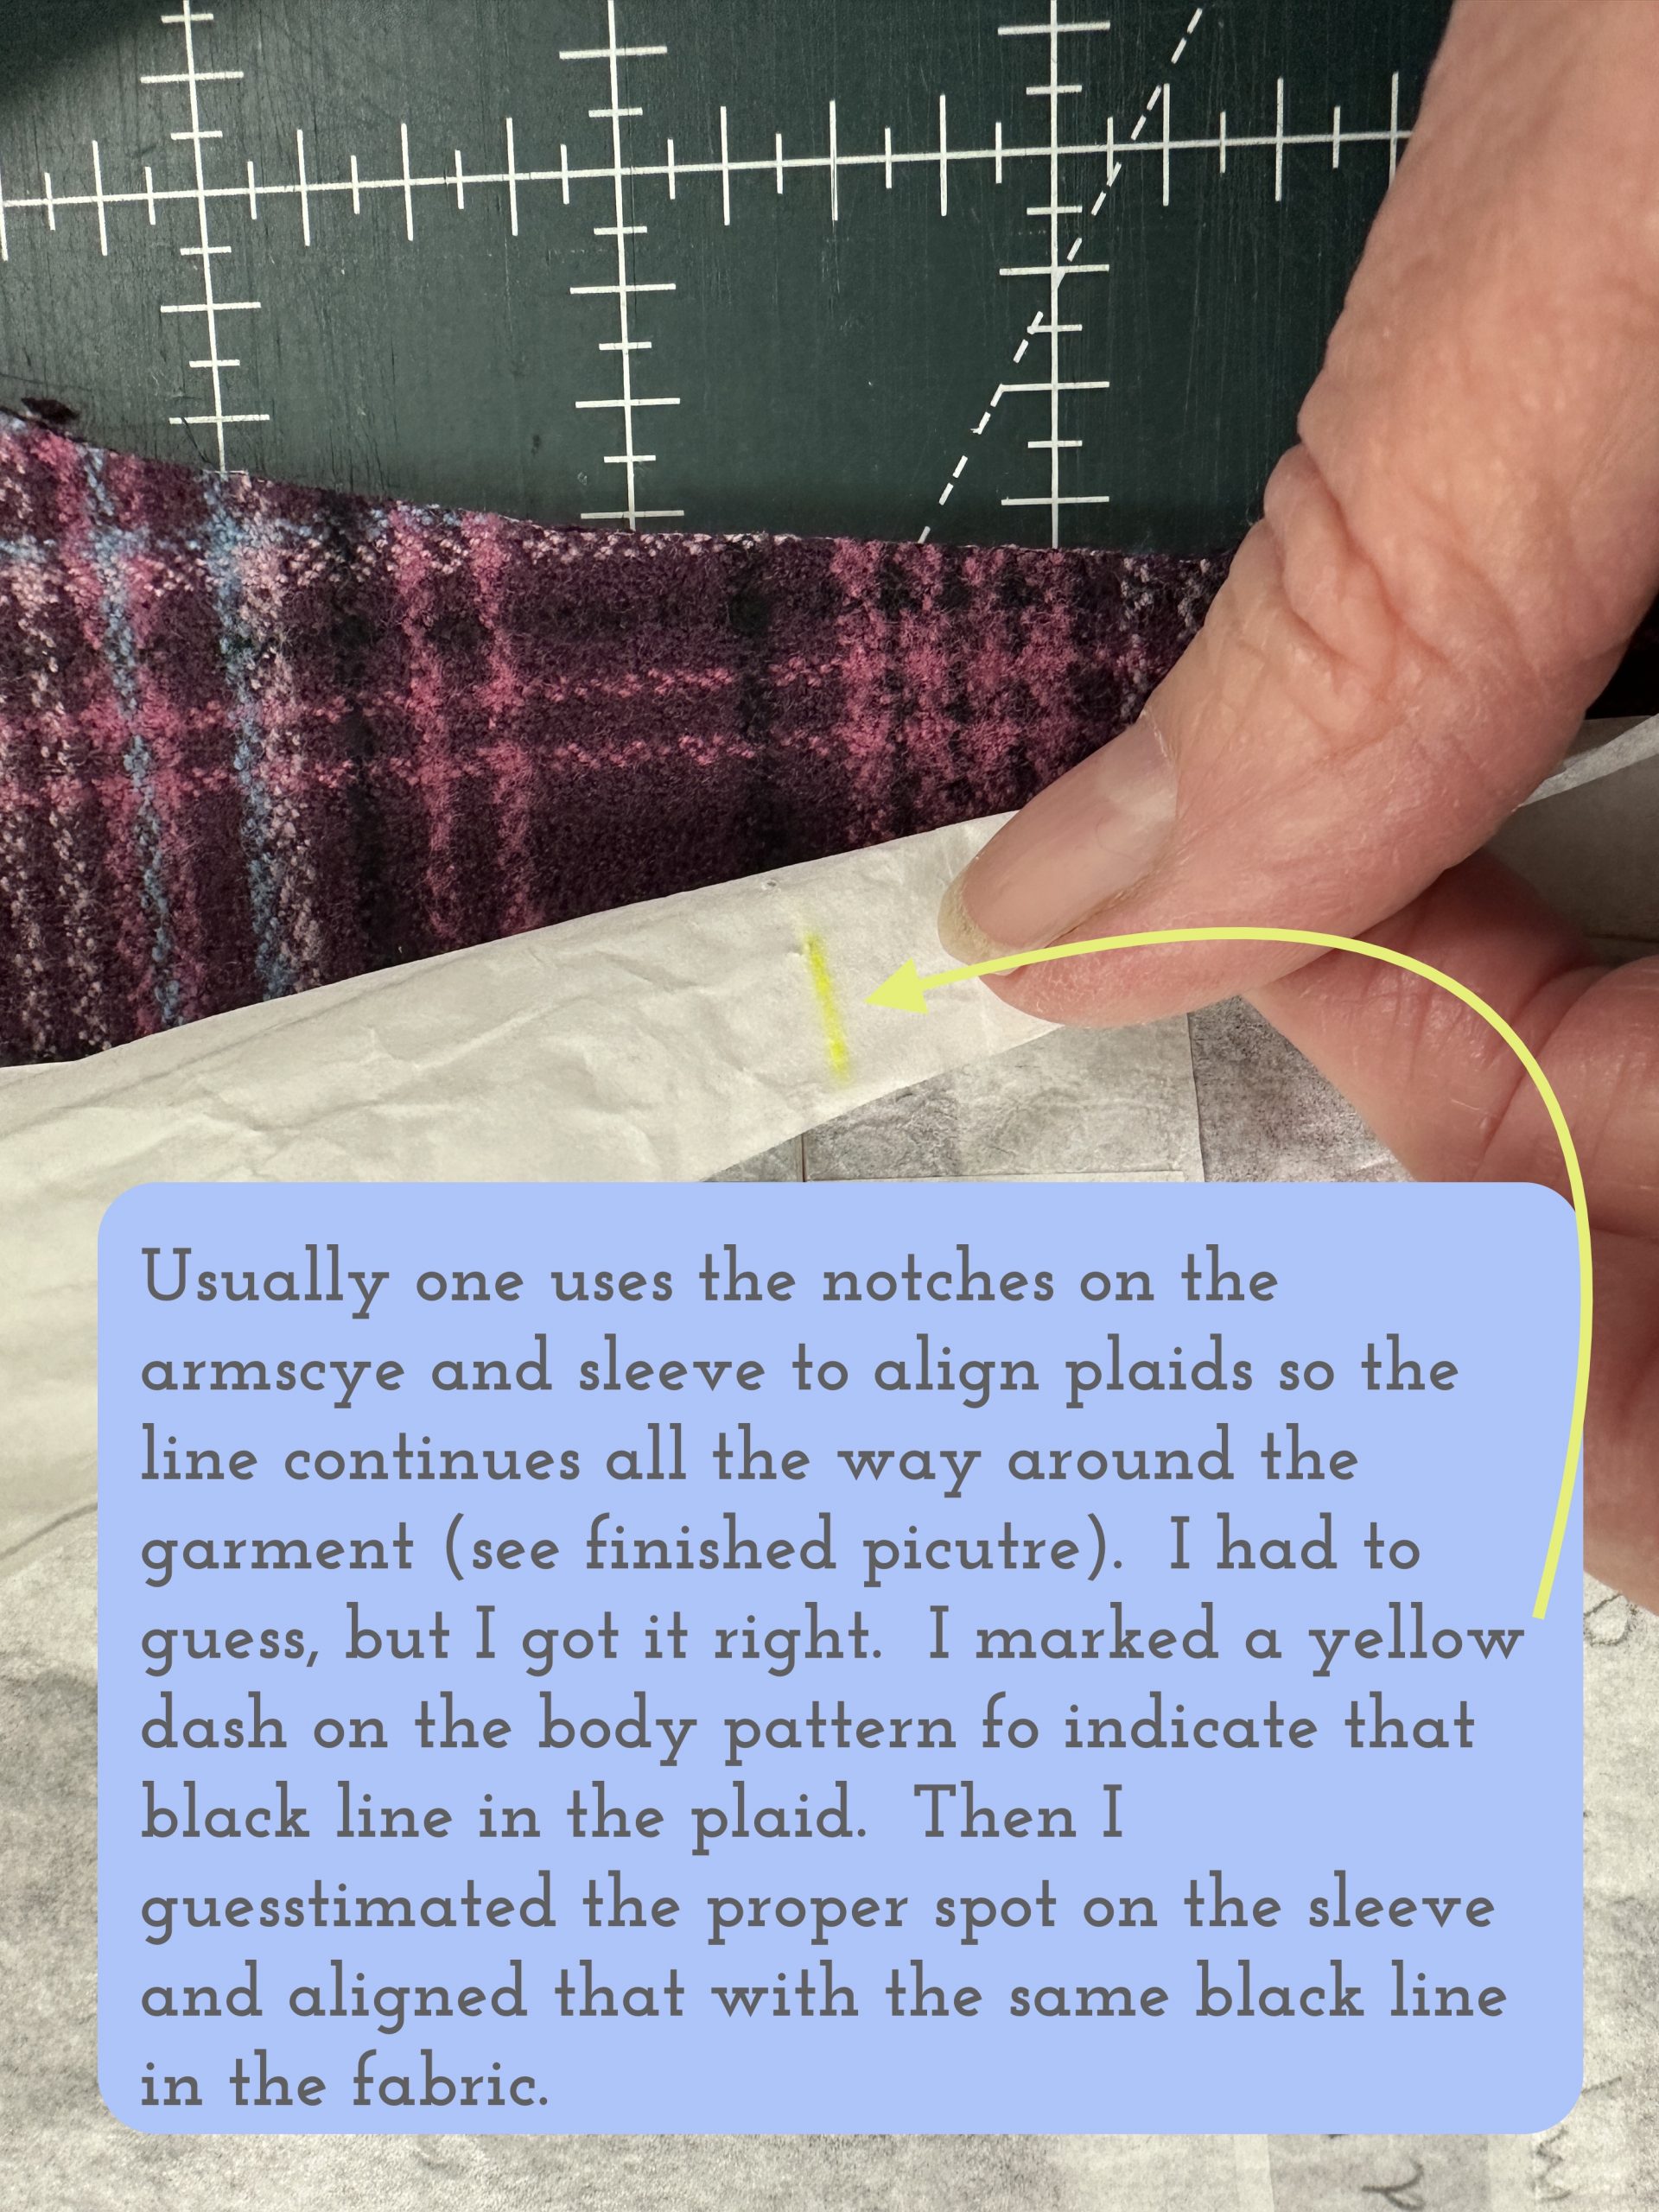
By matching the plaid at the (made by me) “notches” the horizontal lines of the plaid will match up all the way around the garment, continuing from the front to the sleeve to the back to the other sleeve and back to the front. The next photo shows how nicely the line matches up across the garment.

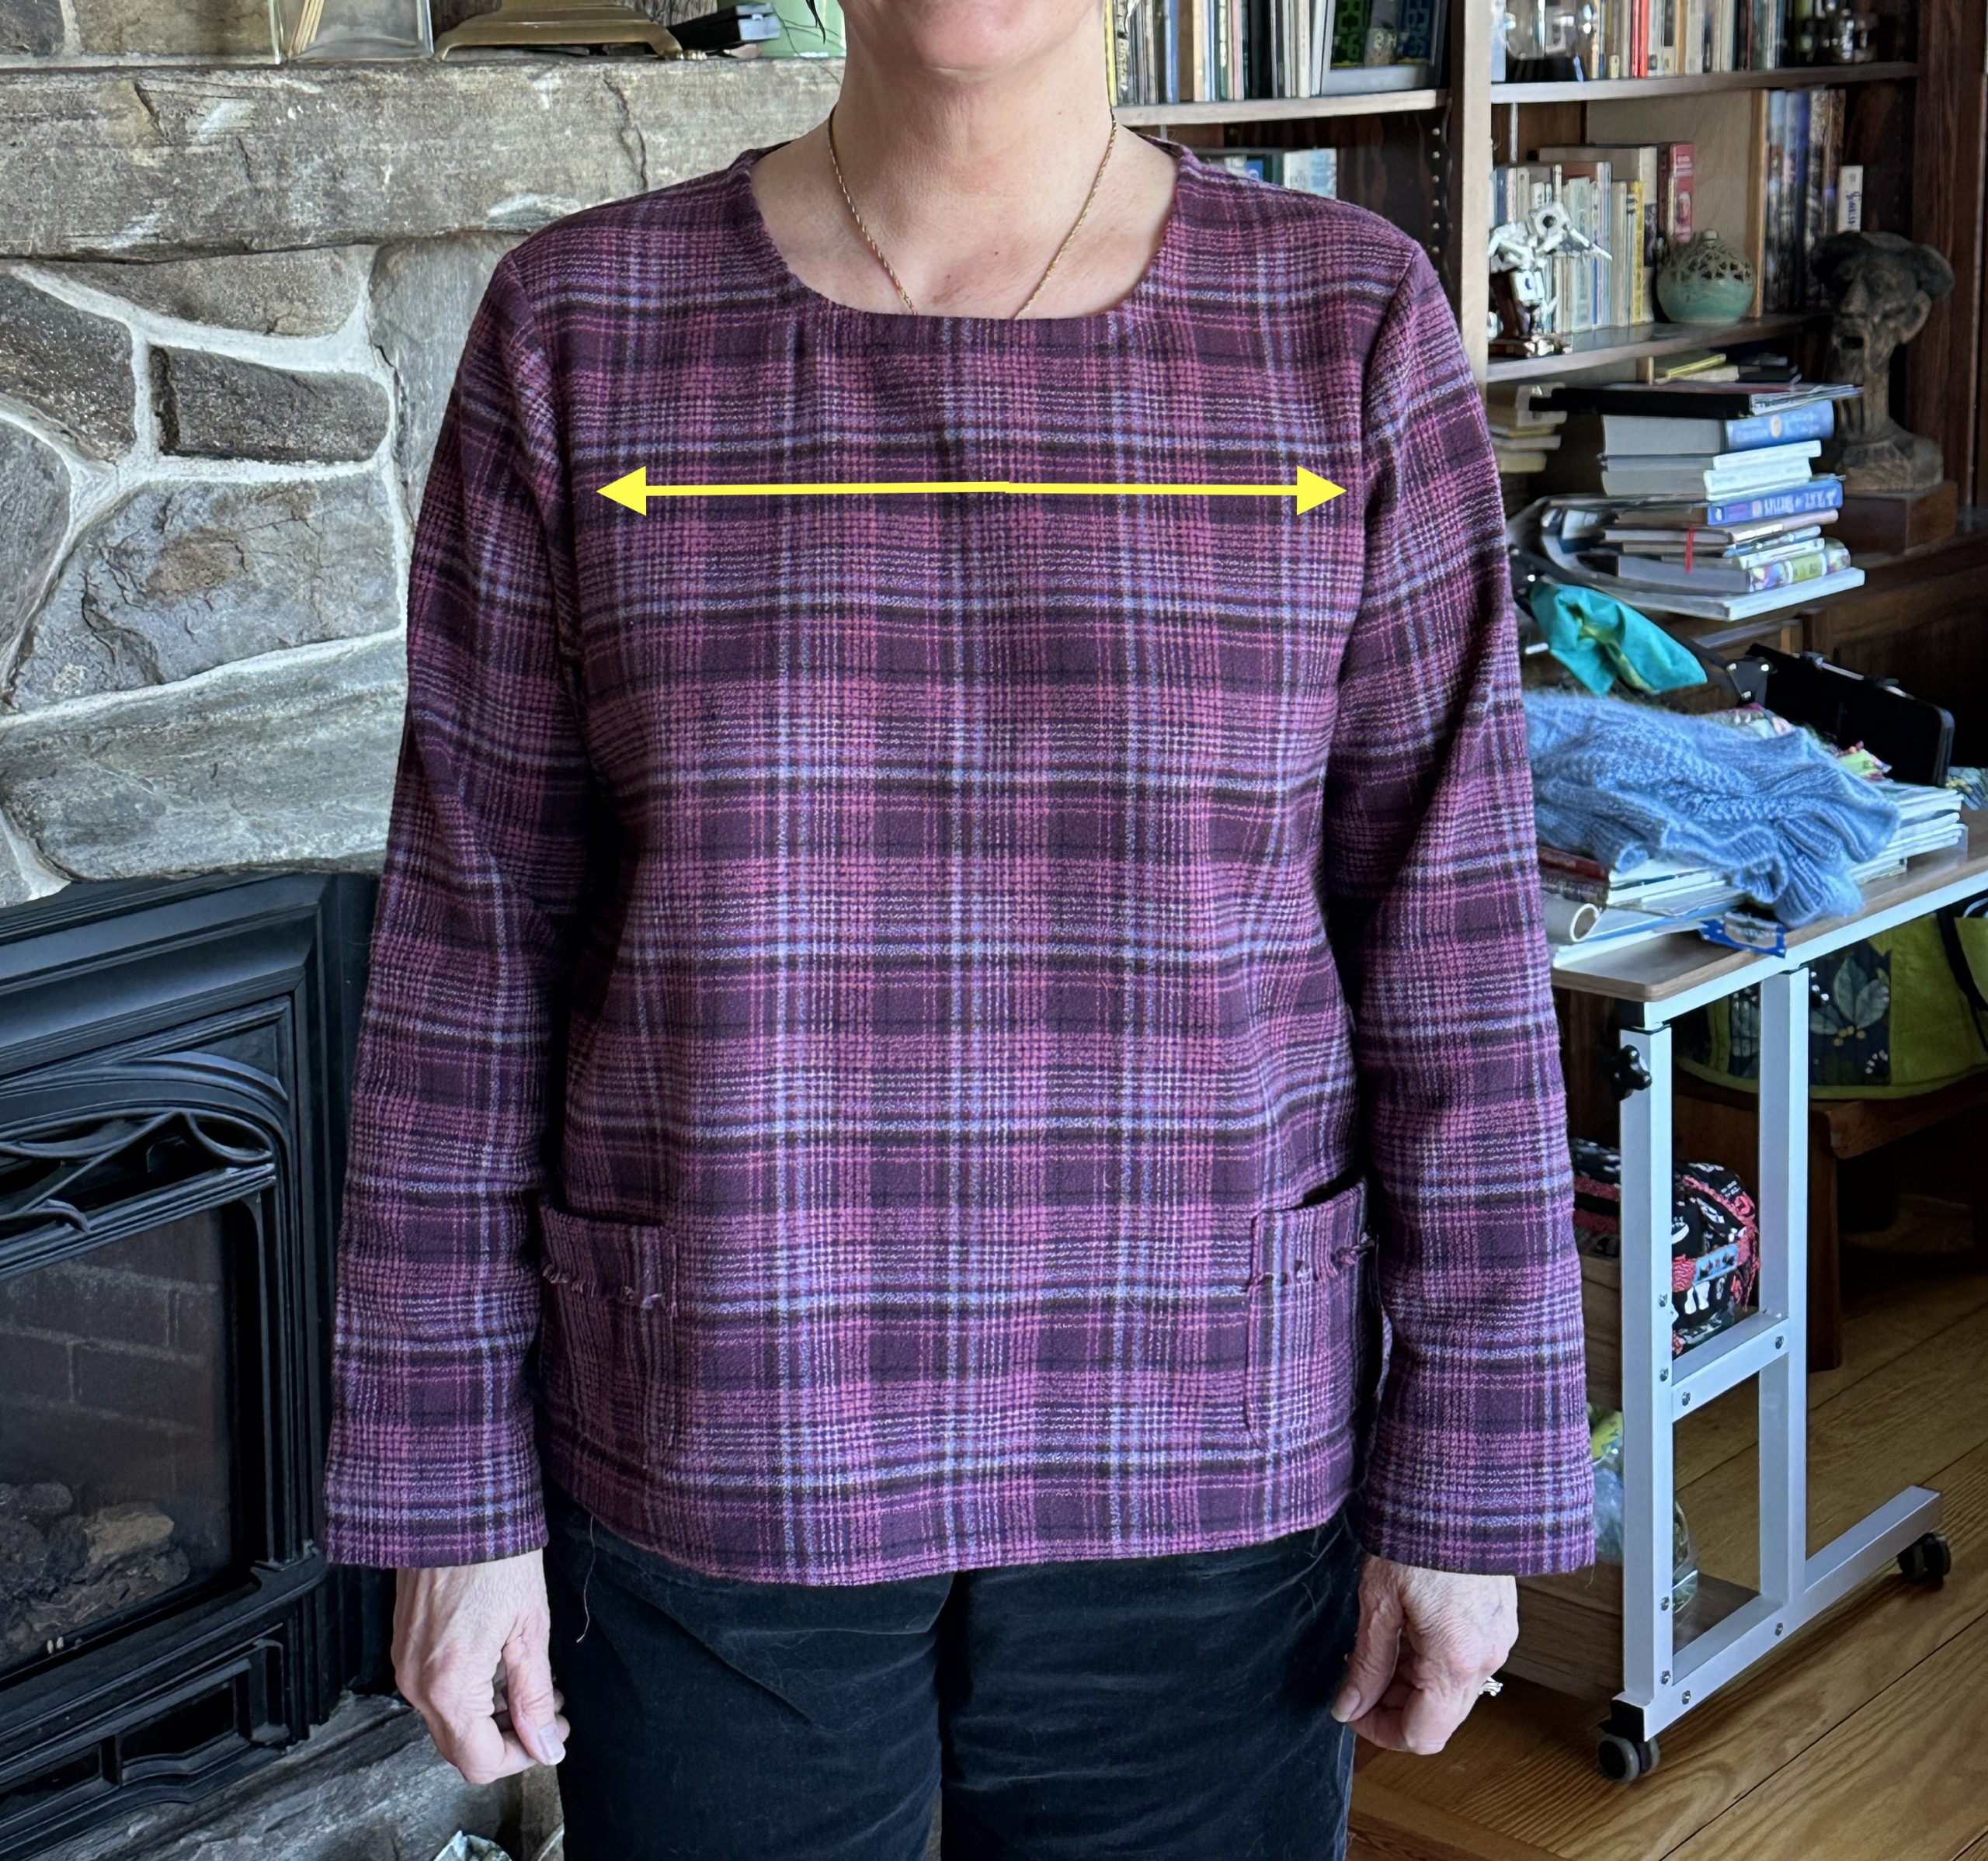
The arrow shows how the black line carries across the garment. Because you need to ease in extra at the sleeve cap, the matching goes off a bit at the top of the sleeve.  That’s why it is so helpful to have notches marked on the pattern–that’s where you match up a plaid or stripe as well as easing the sleeve cap to fit properly!

Now that the top is cut out, it is time to start sewing.  My next post will be the first one on seam finishes.  See you then–but one more side-view to show what a beautiful seam you get when the plaids are properly aligned!
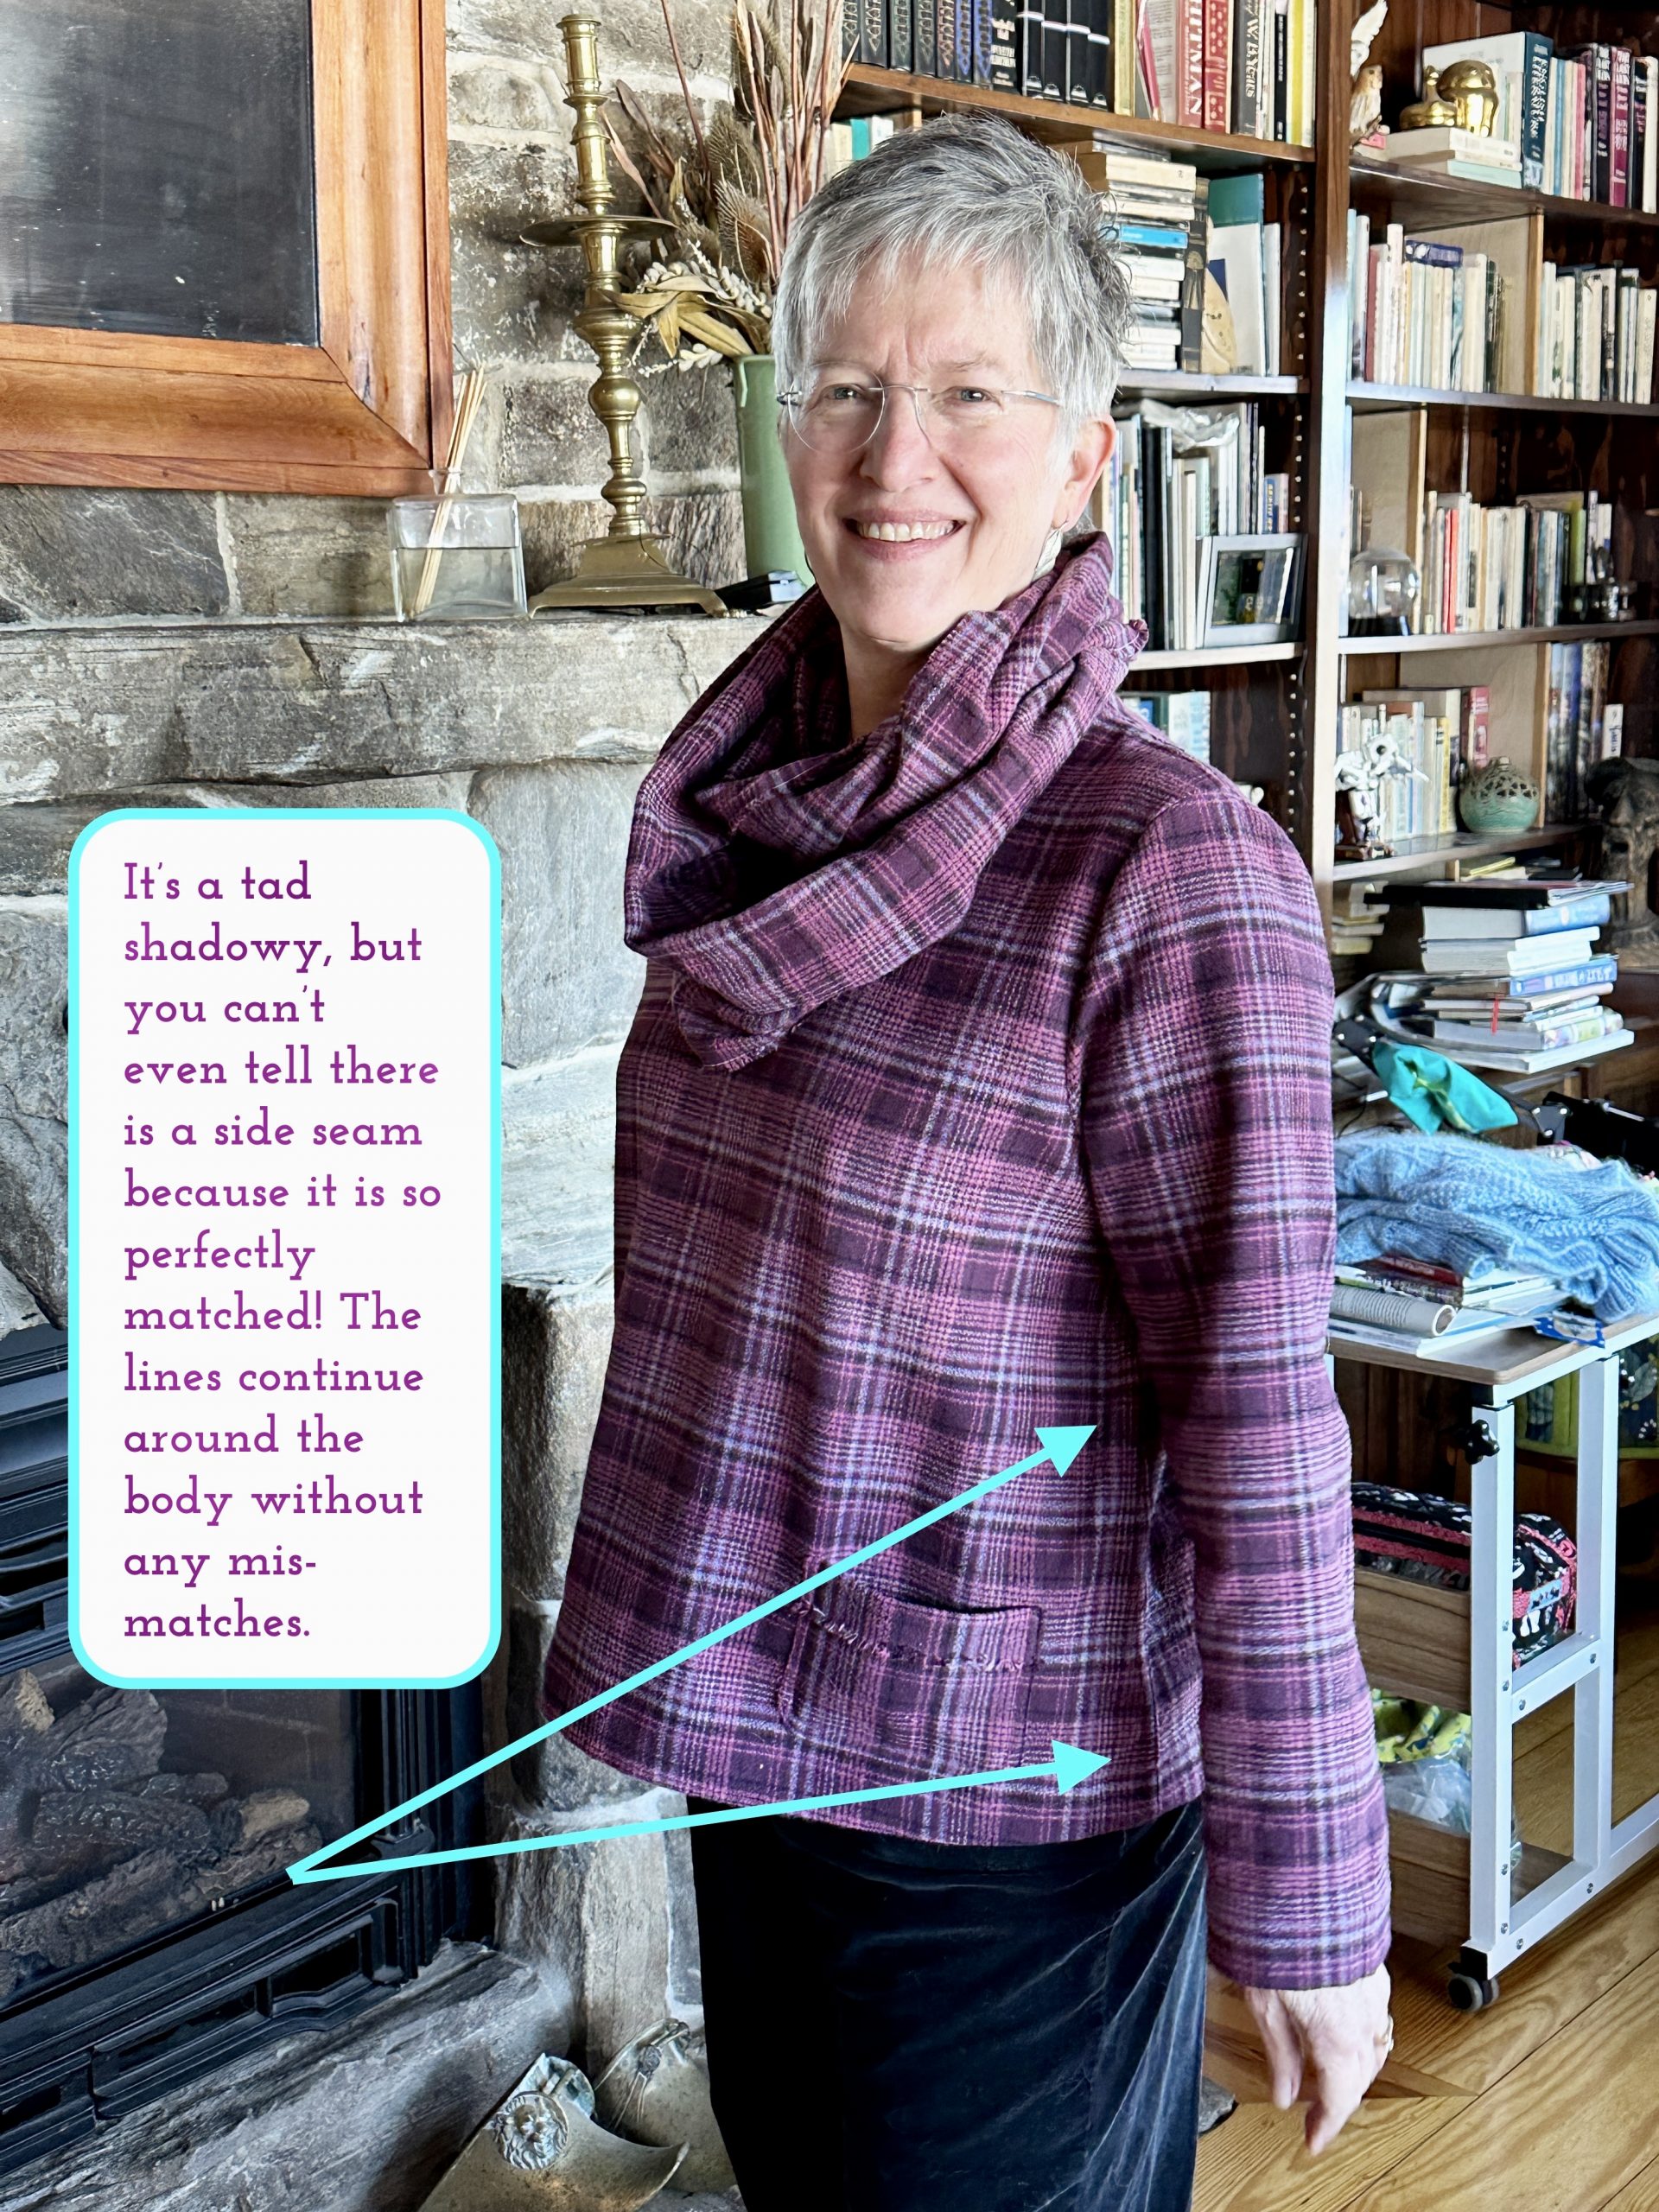
Here are the links to all the posts in this series of lessons, techniques that can be applied to virtually any garment and many home dec projects.   Let me know what you’d like to learn and see here on the blog.  Cheers and thanks, Sarah

Lesson 1:   Choosing a Pattern and Starting Tips

Lesson 2:   Making a Muslin, Fitting and Sleeves

Lesson 3:   Matching Plaids, Cutting out Your Garment Pieces

Lesson 4:  Overcast Seams, just like Serged Seams

Lesson 5:   French Seams

Lesson 6:  Lapped and Flat-felled Seams

Lesson 7:  Hong Kong Finish for Seams

Lesson 8:  Lined Patch Pocket Tutorial

Lesson 9:  Hems and Scarf

Teaching Online this August! Join me!

Monday, June 21st, 2021

Guess what I’m teaching online again! in August at the Mancuso World Quilt Fest!  Enjoy the video below– and then go sign up for my workshops here:  https://www.quiltfest.com/register/world-quilt-show-online/workshops-by-instructor/sarah-ann-smith-bindings-facings/    For more info, you can also visit my workshop page here

Here’s the hotlink to sign up again: https://www.quiltfest.com/register/world-quilt-show-online/workshops-by-instructor/sarah-ann-smith-bindings-facings/

These are three of my favorite workshops, and in consideration of SUMMER and being able to get back out into the world (WOOOOOT!), I chose half-day workshops so you can learn then go play and actually smile at people–all of their faces–in person!

This is the LAST TIME I’ll be teaching online win a public venue (there are two guild jobs I’m doing online) this year, and I don’t know if I will be teaching online next year or not. For sure, I am cutting back on my teaching schedule, so get these while you can! Hope you’ll join me!

PLEASE feel free to comment and ask questions!

Ready to travel? Come to Japan with me!

Thursday, April 1st, 2021

I am beyond elated to share that I will be your US host on a 10-day trip to Japan March 2-11, 2022! Here’s a link to the complete PDF Brochure which you can download or print, but I’ll post each page here in the photos. Originally, this trip was to have been in January 2021 but was cancelled due to COVID. It was rescheduled to January 2022 to coincide with the Tokyo Quilt Festival, but that looks like it won’t happen either so we are now in March 2022. BUT, I think the March itinerary is EVEN BETTER–so many cool things, including quilts, shibori workshop, my bucket-list-dream-item visit to the Itchiku Kubota museum (see my Kubota Pinterest board here), and so much more (and not as cold as January)! AND here’s some more eye candy, my Japan pinterest board.

A friend asked about food restrictions, and the company replied: “Regarding diets.  We have a place on the registration form for them to include dietary restrictions.  They were really good about it in Japan.  The meals that are included will be notified ahead of time regarding any restrictions and they do make substitutions.  Both years I have gone we have had guests that were vegetarian and gluten free.  They were prepared separate meals.  Also for when she eats on her own she should give the Japanese guide an index card and ask her to write in Japanese what she is allergic to and dietary restrictions then she can show it to waitresses when she eats on her own.  This worked well.” Fantastic! So don’t worry if you are vegetarian or gluten free or whatever you can travel on this trip!

I am so excited about this trip…. while many go on these trips just to go to the Tokyo Quilt Festival, comparing the two itineraries and activities, I actually think this is a better trip! AND the weather won’t be as cold in March! I hope you’ll join me–I’m already thinking of little on-tour goodies for you should you join me! Please do write and ask any questions!

Never underestimate the inspiration caused by a group project

Sunday, December 20th, 2020

Art should be like a holiday: something to give a man the opportunity to see things differently and to change his point of view. -Paul Klee, painter (18 Dec 1879-1940) 

So I’m part of Mt. Battie Modern Quilt Guild, one of two local groups. This chapter, part of the MQG (Modern Quilt Guild) is the smaller of the two and is almost completely comprised of members of Coastal Quilters (the other group) which is part of the statewide Pine Tree Quilt Guild (Maine is the Pine Tree state). For once, I decided to participate in a round robin sort of thing. This year, the group opted to have each person do a block for ONE member of the group, doing it every other month or so.

Let me tell you I was stumped. I started by pulling fabrics.

Other than the sky fabric which I purchased because I didn’t have the right color or the time to dye something to order, I used only my own hand-dyes, above.

This past month was Becca’s turn. At first her prompt had me totally baffled: Paul Klee – Swiss/German Artist 1879-1940, use solids/read as solids, and she quoted several bits about his style and inspiration:

  • Klee … greatly admired the art of children who seemed free to create free of models or previous examples. In his own work, Klee often strove to achieve a similar untutored simplicity, using the intense colors inspired by an early trip to North Africa and by line drawing in the unstudied manner of everyday craftsman.
  • Klee suggests that color, shape and the faintest suggestion of a subject are enough to powerfully recreate in the eye of the viewer the actual feeling of repose the artist experienced in the original landscape.

Once I started pulling fabrics, though, I got excited. I googled Paul Klee…well first I googled Klimt and it didn’t seem to jive, then Becca corrected my mental jump from Klee to Klimt and things made more sense. I thought this quilt looked like good imagery for improv piecing:

Paul Klee’s Castle and Sun

I started with the pointy roofed houses and made two sets, then did some strips. I made my castle wall darker and shorter than his, but opted to have two towers reminiscent of the ones here. I used a few pops of the brighter yellow and ochre and the light green and the bright blue scattered hither and yon as in the original. I really liked the odd jigs at the top so left it up to Becca to leave them or trim.

At about 24 x 27 inches, it is a rather large “block,” but only took me a couple days to put together. There may be something to this improv stuff! Anyway, I had a ton of fun and am energized to dive into dyeing fabric and new work in January once the holidays are done. Hope you’ve enjoyed!

Winding Ways: quilt and done!

Saturday, August 29th, 2020
Good tools (AccuQuiltGO!), good fabric (Michael Miller Fabrics), good thread (Aurifil), good machine (Janome Continental M7), and some experience, and you can do a lot! This return to my quilty roots just makes me happy!

Over the course of the year I’ve shared progress on this quilt:

  • First, there was learning to use the AccuQuiltGO! which I blogged about here. It was a different block, but the easy applies.
  • Then there is the PIECING of CURVES: see the blogpost here or go directly to the video on my YouTube Channel here.
  • Now there is the quilting video (that covers a couple other things), embedded below and share-able on my YouTube Channel here.

Full disclosure: I have proudly been a Janome Artisan since 2003, and this year am a Michael Miller Fabrics Brand Ambassador for 2020. MMF provided the fabric and we were given, as part of being a brand ambassador, an AccuQuiltGo and several dies. To my surprise I enjoyed the process so much I have purchased both the Winding Ways and Crossed Canoe dies. Stay tuned for more!

This is the die that I purchased to make the Winding Ways, which has always been one of my favorite traditional blocks. Click this link to see a blogpost of using the AccuQuiltGO (for another block, but it’s the exact same process) including a video.
I found this design somewhere on the internet and printed it out to mess around with a design for a future quilt! Stay tuned for a WANDERING Winding Ways! Using a grid like this can help you plan out fun color fades and settings.

Next came machine quilting. I worked on that a while back–I did end up teaching for the Mancuso Online Quiltfest in August and will do a Threadcoloring the Garden workshop in October! More info on that soon! In this video I’m practicing making a video, demonstrating at the machine, and it just happens to be walking foot quilting (fast! easy!) on my beloved Janome M7. Even if I had paid full price instead of being a Janome Artisan I’d rave about this machine’s wonderfulness! Their new slogan, Reliability by Design, is really true!

Then, the hand quilting and the finishing!

I haven’t done any hand stitching in a thousand years, but nearly two years ago I bought matching green thread from aurifil in piecing/light quilting weight and a heavier 12-wt that is about the size of a light perle cotton or 6-strands of floss. I LOVE IT…and it went so fast! I can remember clearly sitting on the porch in early summer, something to watch on the iPad, stitching away.

I just love how an angled shot shows the texture and dimension. I was surprised at how quickly the hand stitching went. I used the same green color of thread on the green parts for machine quilting as the green in the heavyweight Aurifil thread.

I wanted to repeat the orange batik in the center on the edges, but using it as the binding was too much. I instead inserted a tiny stitched down “reveal” that is a scant 1/8″ just inside the white binding. Can I also put in a plug for Michael Miller’s Cotton Couture solids? The quality of the base cloth is SO GOOD! And the consistency in color / dye lots over the years is really amazing. I dye fabric and know how hard it is to get perfect matches from batch to batch and it does.

Last but not least, those skinny inserts and perfect corners.

I taught the half day version of my bindings workshop at the Mancuso Online Quiltfest in June and may do so again in the new year. I am scheduled to teach and have an exhibit of my work at the Mid-Atlantic Quiltfest in Virginia in February, but at this point who knows if it will be in person or online! I promise I will teach the bindings (full or half day) again in the new year online, just need to figure out when. My students in June had GREAT results online so it works online too!

Anyway, I hope you’ve enjoyed my 2020 detour back to my quilty roots. Coming soon, a new art quilt!